


一、cheerio是什么可以做什么 👇 👇 👇
Cheerio是一个快速、灵活且精益的jQuery核心实现,用于在Node.js环境中解析HTML文档。它可以帮助您在服务器端轻松地从HTML文档中提取数据,比如从网页中提取文章标题、内容、图片等信息。
二、为什么选择cheerio 👇 👇 👇
使用Cheerio的好处是它非常轻量级,因此可以很快地加载和解析HTML文档。此外,Cheerio的API与jQuery非常相似,因此如果您熟悉jQuery,那么学习和使用Cheerio也会非常容易。
三、安装依赖 👇 👇 👇
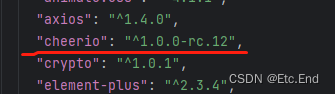
yarn add cheerio我安装的版本
四、爬虫的资源以及资源分析 👇 👇 👇
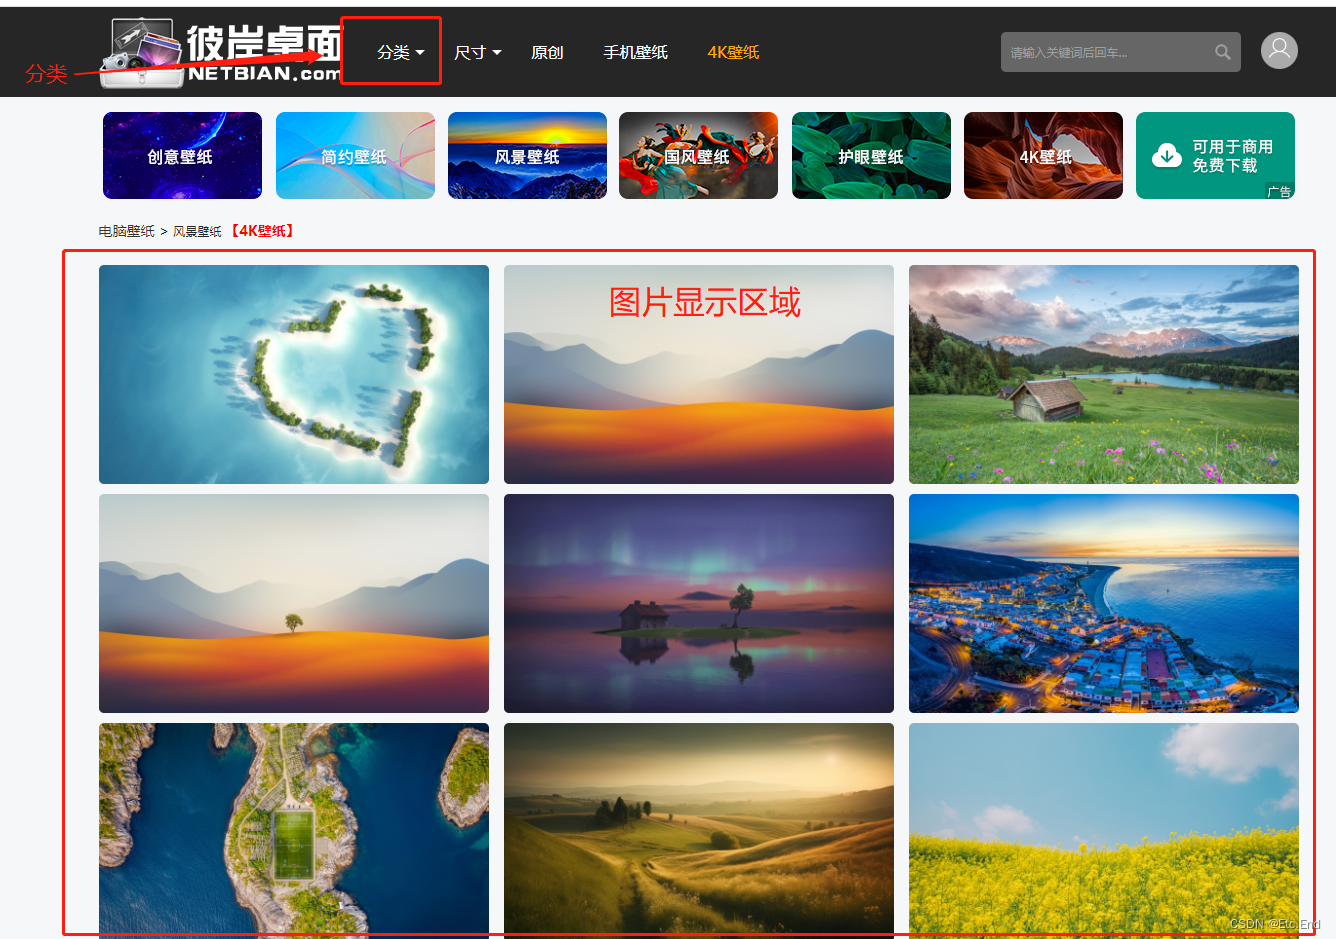
这里以电脑壁纸 高清电脑壁纸大全 高清手机壁纸 彼岸桌面壁纸为例。本文只为学习,请不要对网站进行恶意攻击。
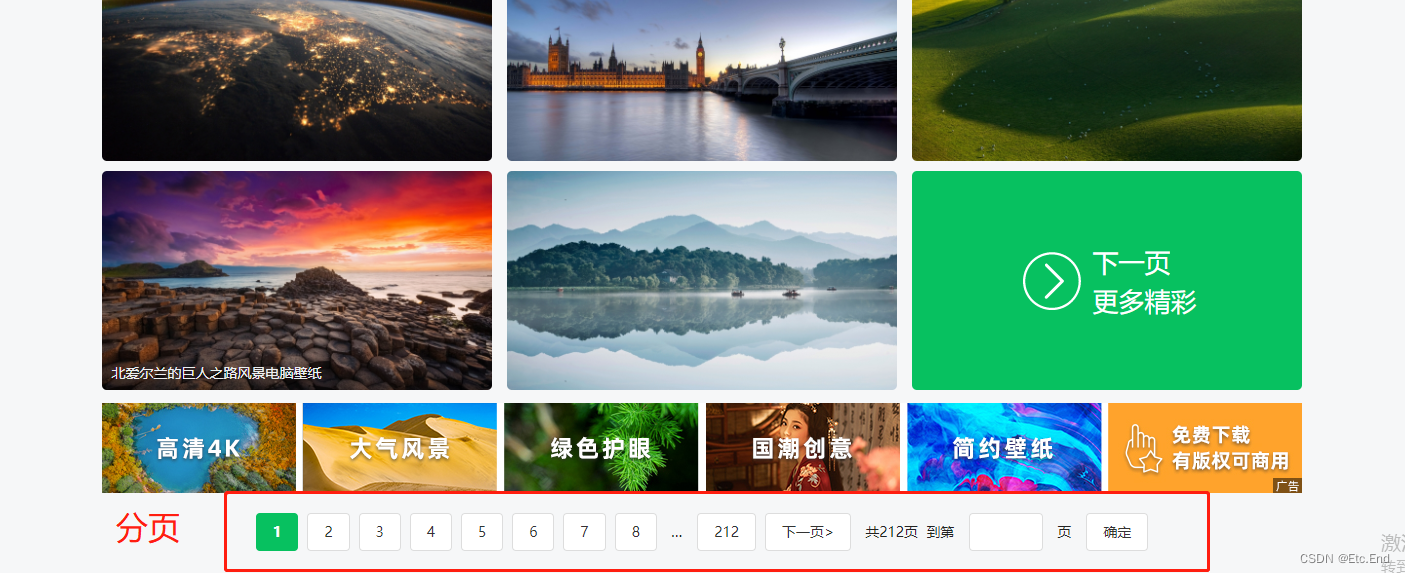
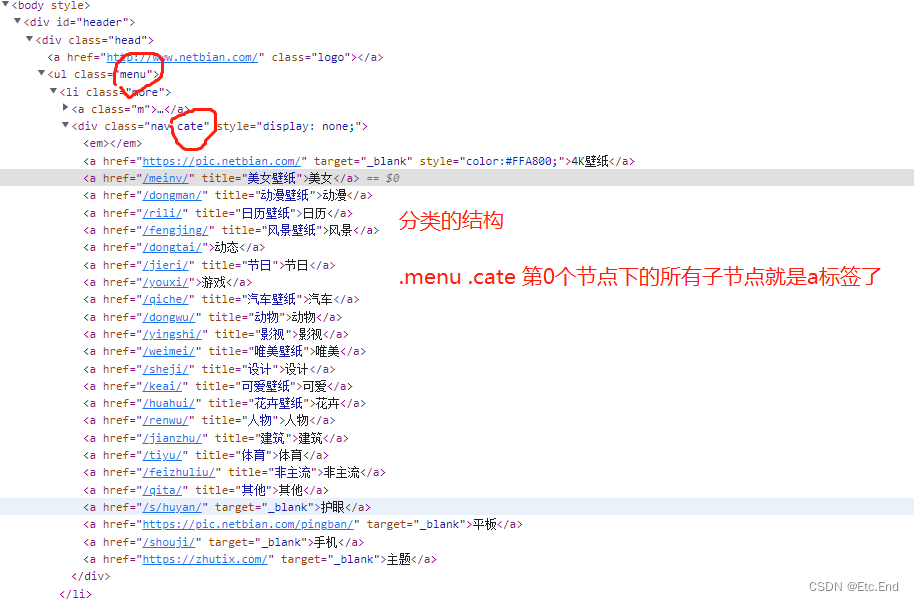
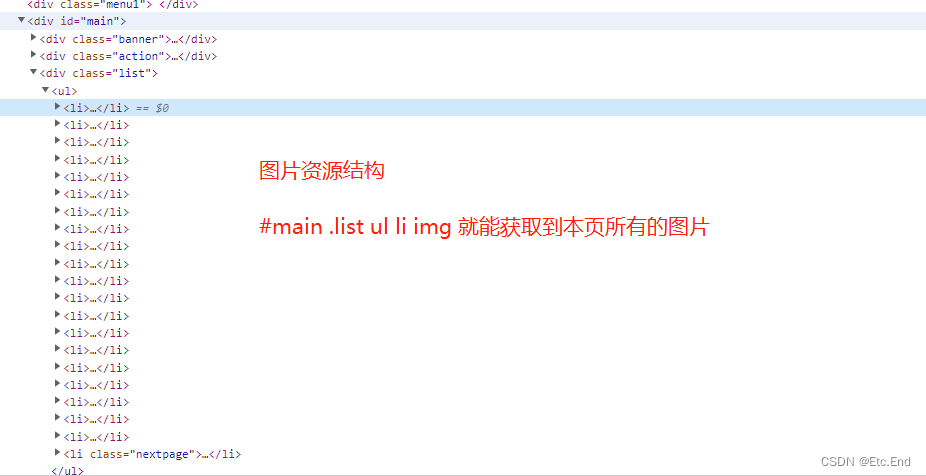
打开网站以后分析页面,页面结构我们只需要三个部分。一是分类,而是图片显示区域以及分页。
1、获取分类 👇 👇 👇
打开浏览器控制台
使用cheerio对应的代码如下,这里面的话有个核心的就是中文乱码的处理啊。
getPageInfo() {
    // {responseType: 'arraybuffer', responseEncoding: 'utf-8'} 这里是配置返回结果中文乱码的解决方案
    axios.get(this.source, {responseType: 'arraybuffer', responseEncoding: 'utf-8'}).then((res: any) => {
        // 中文乱码的解决方案
        let utf8decoder = new TextDecoder("GBK")
        const $: any = cheerio.load(utf8decoder.decode(res.data))
        // 分类
        const classify = $('.menu .cate')[0]['children']
        if (classify?.length) {
            const data = classify.filter((item: Element) => item.tagName === 'a')
            this.classifyList = data.map((item: Element) => {
                return !item.attributes[0].value.includes('http') && {
                    name: (item.children[0] as unknown as Text).data,
                    path: item.attributes[0].value
                }
            })
        }
    })
},
2、获取资源 👇 👇 👇
具体实现的代码如下。分页的逻辑也是一样的。自行分析,分页的获取代码也写在了一起。
getClassifyInfo(item: ClassifyType) {
    this.currentClassify = item
    this.currentIndex = 1
    this.currentResult = []
    axios.get(`${this.source}${item.path}`, {responseType: 'arraybuffer', responseEncoding: 'utf-8'}).then((res: any) => {
        // 中文乱码的解决方案
        let utf8decoder = new TextDecoder("GBK")
        const $: any = cheerio.load(utf8decoder.decode(res.data))
        this.splicing($)
    })
},
splicing($: any) {
    // 获取页面上的图片
    const list = $('#main .list ul li img')
    for (let i = 0; i < list.length; i++) {
        if ((list[i] as Element).attributes[0] && (list[i] as Element).attributes[1]) {
            this.currentResult.push({
                name: (list[i] as Element).attributes[1].name,
                path: (list[i] as Element).attributes[0].value
            })
        }
    }
    // 获取分页
    const page = $('#main .page').children()
    if (page[page.length - 1]) {
        let val: Text = page[page.length - 2].children[0]
        this.pageTotal = (val.data as any) - 0 || 0
    }
},
我使用的是pinia状态管理器,整个爬虫的代码如下:
完整代码
import { defineStore } from 'pinia';
import axios from "axios";
// @ts-ignore
const cheerio = require('cheerio')

export interface ClassifyType {
    name: string
    path: string
}

/**
 * @Description: 壁纸
 * @CreationDate 2023-05-31 17:04:13
 */
interface WallpaperModule {
    source: string // 源
    classifyList: ClassifyType[] // 分类
    currentClassify?: ClassifyType // 当前分类
    pageTotal: number // 总页数
    currentIndex: number // 当前分页
    currentResult: ClassifyType[] // 当前搜索出来的结果
}

/**
 * @Description: 壁纸爬取
 * @Author: Etc.End(710962805@qq.com)
 * @Copyright: TigerSong
 * @CreationDate 2023-05-31 17:01:36
 */
export const wallpaperModule = defineStore({
    id: 'wallpaper',
    state(): WallpaperModule {
        return {
            source: 'http://www.netbian.com',
            classifyList: [],
            pageTotal:0,
            currentIndex: 1,
            currentResult: []
        }
    },
    actions: {
        getPageInfo() {
            // {responseType: 'arraybuffer', responseEncoding: 'utf-8'} 这里是配置返回结果中文乱码的解决方案
            axios.get(this.source, {responseType: 'arraybuffer', responseEncoding: 'utf-8'}).then((res: any) => {
                // 中文乱码的解决方案
                let utf8decoder = new TextDecoder("GBK")
                const $: any = cheerio.load(utf8decoder.decode(res.data))
                // 分类
                const classify = $('.menu .cate')[0]['children']
                if (classify?.length) {
                    const data = classify.filter((item: Element) => item.tagName === 'a')
                    this.classifyList = data.map((item: Element) => {
                        return !item.attributes[0].value.includes('http') && {
                            name: (item.children[0] as unknown as Text).data,
                            path: item.attributes[0].value
                        }
                    })
                }
            })
        },
        getClassifyInfo(item: ClassifyType) {
            this.currentClassify = item
            this.currentIndex = 1
            this.currentResult = []
            axios.get(`${this.source}${item.path}`, {responseType: 'arraybuffer', responseEncoding: 'utf-8'}).then((res: any) => {
                // 中文乱码的解决方案
                let utf8decoder = new TextDecoder("GBK")
                const $: any = cheerio.load(utf8decoder.decode(res.data))
                this.splicing($)
            })
        },
        splicing($: any) {
            // 获取页面上的图片
            const list = $('#main .list ul li img')
            for (let i = 0; i < list.length; i++) {
                if ((list[i] as Element).attributes[0] && (list[i] as Element).attributes[1]) {
                    this.currentResult.push({
                        name: (list[i] as Element).attributes[1].name,
                        path: (list[i] as Element).attributes[0].value
                    })
                }
            }
            // 获取分页
            const page = $('#main .page').children()
            if (page[page.length - 1]) {
                let val: Text = page[page.length - 2].children[0]
                this.pageTotal = (val.data as any) - 0 || 0
            }
        },
        next(type: string) {
            if (this.currentClassify) {
                this.currentResult = []
                this.currentIndex = type === 'left' ? this.currentIndex - 1 : this.currentIndex + 1
                axios.get(`${this.source}${this.currentClassify.path}index_${this.currentIndex}.htm`, {responseType: 'arraybuffer', responseEncoding: 'utf-8'}).then((res: any) => {
                    // 中文乱码的解决方案
                    let utf8decoder = new TextDecoder("GBK")
                    const $: any = cheerio.load(utf8decoder.decode(res.data))
                    this.splicing($)
                })
            }
        }
    },
    getters: {},
});
五、编写渲染页面 👇 👇 👇
这里的话有个小问题,就是直接访问我们爬取的图片会返回401,只需要再index.html里面头部加入一个配置
<meta name="referrer" content="no-referrer" /><template>
<div>
<div class="wallpaper-classify">
<template v-for="(item, index) in classifyList">
<div class="wallpaper-classify-item" v-if="item.name" :key="index" @click="getClassifyInfo(item)">{{item.name}}</div>
</template>
</div>
<div style="display: flex;flex-direction: row;flex-wrap: wrap;justify-content: center;align-items: center;">
<template v-for="(item, index) in currentResult">
<el-image :preview-src-list="[item.path]" style="width: 300px;height: 169px;margin: 0 26px 20px 0;" :src="item.path" :alt="item.name"></el-image>
</template>
</div>
<div v-if="pageTotal > 0" style="display: flex;justify-content: center;align-items: center;">
<div style="margin-left: 20px;">当前在第 <span style="color: #009169">{{currentIndex}}</span> 页</div>
<el-button size="small" style="margin-left: 20px;" v-if="currentIndex > 1" @click="goPage('left')">
<template #icon>
<i-noto-backhand-index-pointing-left/>
</template>
上一页
</el-button>
<el-button size="small" style="margin-left: 20px;" v-if="currentIndex < pageTotal" @click="goPage('right')">
<template #icon>
<i-noto-backhand-index-pointing-right/>
</template>
下一页
</el-button>
<div style="margin-left: 20px;">共 <span style="color: #009169">{{pageTotal}}</span> 页</div>
</div>
</div>
</template>
<script lang="ts">
import {defineComponent, onMounted, reactive} from "vue";
import appStore from "@/pinia";
import {storeToRefs} from "pinia";
import {ClassifyType} from "@/pinia/modules/wallpaper.modules.ts";
export default defineComponent({
setup() {
const { classifyList, currentResult, pageTotal, currentIndex } = storeToRefs(appStore.wallpaperModule)
const getClassifyInfo = (item: ClassifyType) => {
appStore.wallpaperModule.getClassifyInfo(item)
}
const goPage = (type: string) => {
appStore.wallpaperModule.next(type)
}
onMounted(() => {
appStore.wallpaperModule.getPageInfo()
})
return {
classifyList,
getClassifyInfo,
currentResult,
pageTotal,
currentIndex,
goPage,
}
}
})
</script>
<style scoped lang="scss">
.wallpaper-classify {
display: flex;
padding: 20px 10px;
justify-content: center;
align-items: center;
}
.wallpaper-classify-item {
cursor: pointer;
& + & {
margin-left: 12px;
}
&:hover {
color: #03a9a9;
border-bottom: 1px solid #03a9a9;
}
}
</style>
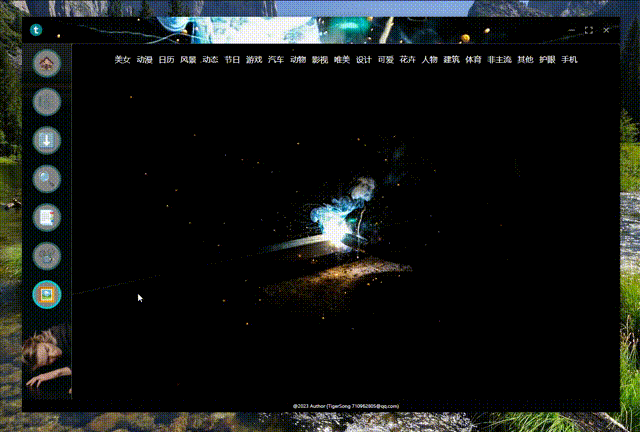
到这这一步就完成所有的代码了。你还可以接着扩展,比如下载图片等等

我是Etc.End。如果文章对你有所帮助,能否帮我点个免费的赞和收藏😍。

👇 👇 👇 👇 👇 👇 👇 👇 👇 👇 👇 👇


 675
675


 被折叠的 条评论
为什么被折叠?
被折叠的 条评论
为什么被折叠?
 到【灌水乐园】发言


