


概念
1、用来解释说明
2、注解必须作用在类的某一个部分
3、注解的作用域范围(java,class,jvm)
4、注解解析器
Spring中的注解
<!--
把person和student放入到spring容器中
-->
<bean id="person" class="com.itheima09.spring.di.annotation.Person"></bean>
<bean id="student" class="com.itheima09.spring.di.annotation.Student"></bean>
<!--
启动依赖注入的注解解析器
-->
<context:annotation-config></context:annotation-config>
public class Person {
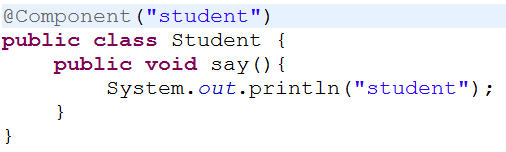
@Resource(name="student")
private Student student;
public void say(){
this.student.say();
}
}
1、启动spring容器
2、spring容器内部创建了两个对象person和student
3、当spring容器解析到
<context:annotation-config></context:annotation-config>
启动依赖注入的注解解析器:
4、spring容器在容器中查找所有的bean(prerson,student)
5、看哪些bean的属性上面是否有Resource注解
6、如果属性上面有该注解,再次检查是否有name属性
7、如果没有name属性,则会把该注解标注的属性的名称获取到和spring容器中的id做匹配,如果匹配成功,则赋值,如果匹配不成功,则按照类型进行匹配,如果匹配成功,则赋值,如果匹配不成功,则报错。
8、如果有name属性,则把name属性的值解析出来和spring容器中的id做匹配,如果匹配成功,则赋值,如果匹配不成功,则报错。
9、从上述的步骤可以看出注解的效率比较低,xml的效率比较高,注解书写比较简单,xml书写比较复杂。
Spring容器的关于di的注解
//按照id进行匹配
    @Autowired//按照类型进行匹配
    @Qualifier("student")//按照id进行匹配
    private Student student;

//按照类型进行匹配
    @Autowired//按照类型进行匹配
    private Student student;

注解只能应用与引用类型
类扫描的注解
//说明:在指定的包及子包中扫描
    <!--
        把一个类放入到spring容器中,该类就是一个component
          在base-package指定的包及子包中扫描所有的类
     -->
    <context:component-scan base-package="com.itheima09.spring.scan.annotation">
    </context:component-scan>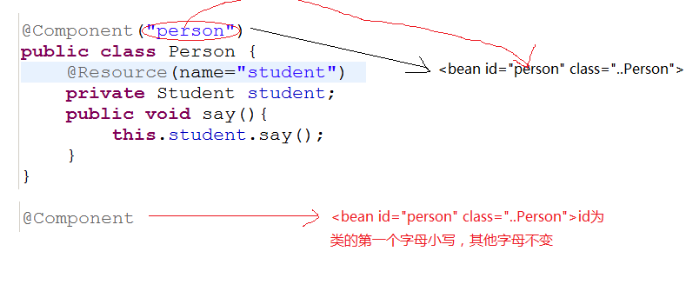
流程分析
1、启动spring容器
2、Spring容器解析类扫描的注解解析器,在base-package指定的包及子包中查找所有的类
3、查看哪些类上面是否含有@Component注解
4、如果该注解的value的属性的值为空,则把类名的第一个字母变成小写,作为id值,放入到spring容器中
5、如果该注解的value的属性的值不为空,则用value的属性的值作为id值,放入到spring容器中
6、再次查找在spring容器中的类的所有的属性,按照@Resource的规则给属性赋值

说明
    使用了类扫描机制的做法,配置文件中的配置很简单了,但是效率越来越低。
Xml的继承
    <bean id="person" class="com.itheima09.extend.Person">
        <property name="name" value="aaa"></property>
    </bean>

    <bean id="student" class="com.itheima09.extend.Student"
        parent="person"></bean>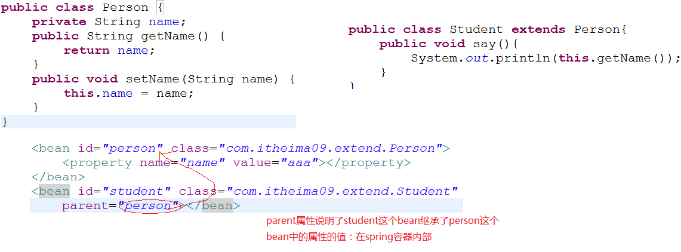
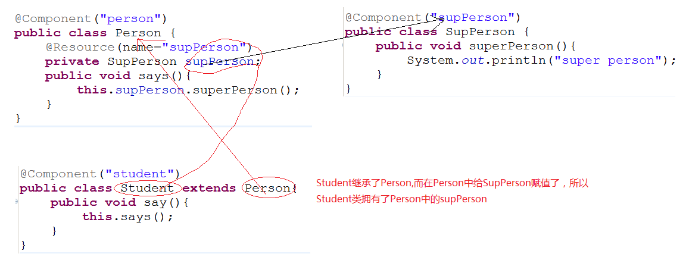
注解的继承


 被折叠的 条评论
为什么被折叠?
被折叠的 条评论
为什么被折叠?
 到【灌水乐园】发言


