


 本文详细介绍了SpringBoot的基础知识,包括它的优势、项目创建、属性配置的各种方式,如@Value、@ConfigurationProperties,以及数据类型的处理。此外,还涉及了配置文件的引入、多环境配置和随机值引用。文章深入讲解了@SpringBootApplication注解的组成部分和自动配置的工作原理。同时,讨论了SpringBoot的Tomcat原理,JDBC和Mybatis的整合,以及Web开发相关的内容,如静态资源处理和模板引擎。在运维方面,提到了测试、部署策略以及监控功能。最后,文章探讨了SpringBoot的扩展性,如自定义starter和使用外置Tomcat,以及启动时执行的多种方式,并简要概述了SpringBoot2的新特性。
一、基础
官方文档地址:Spring Boot
注:以下部分例子 有些用到 .properties 方式,有些用 .yml方式,两者可自行学习,这里部分是为了省空间而写 .properties 方式。
1、泛谈
(1)优势
- 快速构建,去除传统 spring xml配置
- 内嵌web容器,并提供监控/健康检查
- starters 自动依赖包,大量自动配置(“习惯大于配置”)
(2)springboot项目创建
- 创建 maven项目
- 引入 相应的 starters(继承parent & 引入web),并加入 maven 插件
- 创建 启动类(@SpringBootApplication & SpringApplication.run())
注:如果不想继承 parent,也可以
2、属性配置
(1)获取方式
- @Value 方式 或者 Environment:
// @Value("${name:default}") 双引号后面可以加 默认值
@Value("${name}")
private String name;


等同于下面,不过下面这种如果配置文件中不存在值的时候,启动不会报错,而上面启动都不行
@Autowired
private Environment env;
env.getProperty("name");- @ConfigurationProperties 方式:
// 其实基于 @EnableConfigurationProperties 来完成
@Component
@ConfigurationProperties(prefix = "lin")
@Data
public class LinProperties {
    private String name;
    private Integer age;
    private String email;
    private Boolean boss;
    private Date birth;
    private Map<String, String> system;
//    private UserSystem system;
    private List<String> work;
}
(2)数据类型
- 简单类型:
lin:
  name: 小林
  boss: false
  birth: 1995/02/17
email: 928232596@qq.com- 对象 & Map类型:
lin:
  system:
    username: linzhuzai
    password: 123456
  #也可以写成 system: {username: linzhuzai, password: 123456}
  #如果是 properties文件,还能写成 lin.system[username]=linzhuzai 或者 lin.system.username=linzhuzai


# 如果获取方式是 @Value("#{${lin.system}}")
lin:
  system: '{"MY0003": "MY0001"}'
- List & Set类型:
lin:
  work:
    - 佛山
    - 广州
  #也可以写成 work: [佛山,广州]
  #如果是 properties文件,还能写成 lin.work[0]=佛山
(3)引入文件
- 导入xml 文件:
@ImportResource(locations = {"classpath:beans.xml"})
@SpringBootApplication
public class SpringbootApplication {
    public static void main(String[] args){
        SpringApplication.run(SpringbootApplication.class, args);
    }
}- 导入 properties 文件:
@PropertySource(value = {"classpath:lin.properties"})
@Component
@ConfigurationProperties(prefix = "lin")
public class LinProperties {
}
(4)多环境配置
如有多个 yml文件配置:application.yml & application-dev.yml & application-prod.yml
- yml 文件:spring.profiles.active=dev
- 启动命令行:--spring.profiles.active=dev
- 虚拟机参数:-Dspring.profiles.active=dev
(5)随机值 & 引用值
- 随机值:利用 random,如 age: ${random.int}
- 引用值:可引用已配置的值,如 name: ${lin.name}
(6)配置目录优先级:
- –file: ./config/
- –file: ./
- –classpath: /config/
- –classpath: /
(7)配置优先级:
- 命令行参数配置
- 系统环境变量
- bootstrap.properties/bootstrap.yml(优先级高于 application,它是 spring-cloud的)
- jar包外,内的 application-{profile}.properties / application-{profile}.yml
- jar包外,内的 application.properties / application.yml
注:① 命令行>系统环境>bootstrap>application-{profile}>application;② properties>yaml>yml;③ jar包外 优先于 包内
二、@SpringBootApplication
1、@SpringBootConfiguration:等同于 @Configuration
2、@EnableAutoConfiguration:
- (1)
3、@ComponentScan:
三、原理
1、@Import 原理:
(1)@Import:可用来导入 普通类或者配置类,这样类本身和类中配置的 Bean都可被 spring托管
ImportSelector & ImportBeanDefinitionRegistrar
2、自动装配:
(1)工作流程:在 classpath下搜索所有 META-INF/spring.factories文件,将里面 org.springframework.boot.autoconfigure.EnableAutoConfiguration 配置的项都加载到 spring容器
(2)源码:
SpringApplication.run() => prepareContext() => load() => createBeanDefinitionLoader()
AbstractApplicationContext.refresh() => invokeBeanFactoryPostProcessors() => invokeBeanDefinitionRegistryPostProcessors() => ConfigurationClassPostProcessor.postProcessBeanDefinitionRegistry() => ConfigurationClassParser.parse() => processConfigurationClass() => doProcessConfigurationClass()


@EnableAutoConfiguration => @Import({AutoConfigurationImportSelector.class}) =>  AutoConfigurationImportSelector => selectImports() => getAutoConfigurationEntry() =>
getCandidateConfigurations() => SpringFactoriesLoader.loadFactoryNames() => "META-INF/spring.factories" => org.springframework.boot.autoconfigure.EnableAutoConfiguration=XXXX
(3)实现关键:
- ImportSelector
- Conditional:可限制加载条件(如某些类存在或不存在才实例化,若用户自己实现则不加载 springboot自动配置的等等)
- @EnableAutoConfiguration(exclude = ) 可进行排除
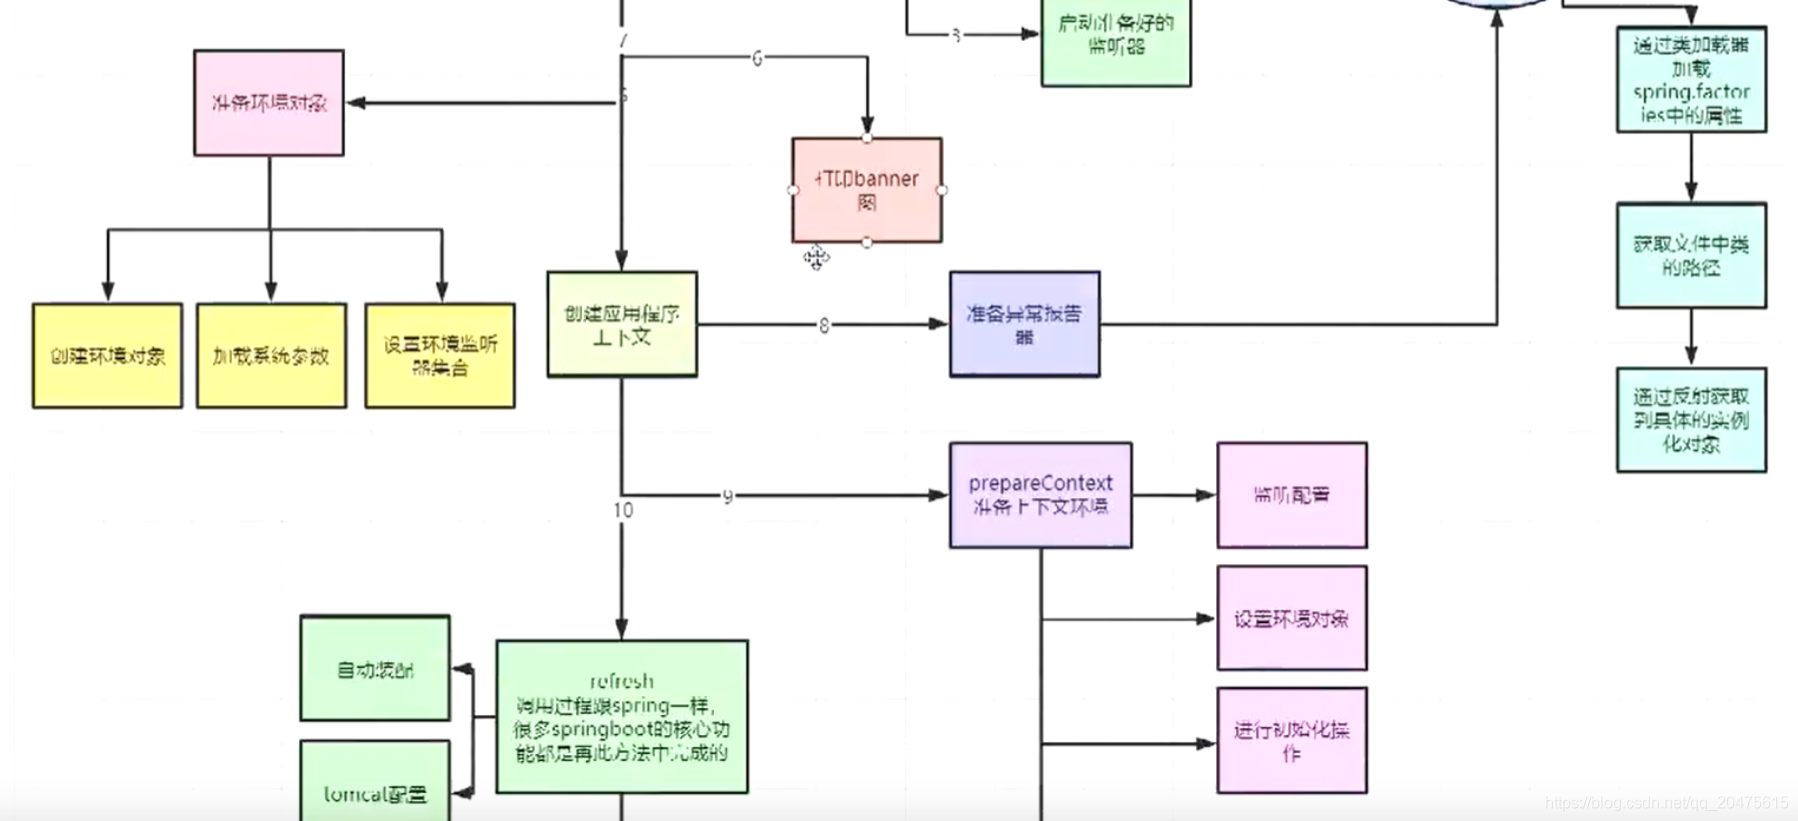
3、启动原理:
(1)源码:
// 启动流程:在启动类 SpringApplication => run() 到 AbstractApplicationContext => refresh() 之间做了很多准备工作,用 listener监听器来实现,比如自动装配、内嵌tomcat等等

// 创建 ApplicationContext实例、注册 CommandLinePropertySource参数命令行解析器、刷新 applicationContext并加载单例对象、触发 CommandLineRunner的bean


// EventPublishingRunListener 执行 ApplicationStartingEvent、ApplicationEnvironmentPreparedEvent、ApplicationStartedEvent、ApplicationReadyEvent
// 启动流程
SpringApplication.run() => new SpringApplication() => getSpringFactoriesInstances() => SpringFactoriesLoader.loadFactoryNames() => loadSpringFactories() => 加载 spring-boot/spring-boot-autoconfigure下的META-INF/spring.factories => SpringApplication.createSpringFactoriesInstances()
 => SpringApplication.run() => getRunListeners() => new DefaultApplicationArguments() => SpringApplication.prepareEnvironment()/configureEnvironment()/configurePropertySources() => SpringApplication.createApplicationContext() => SpringApplication.prepareContext() => postProcessApplicationContext()
=> SpringApplication.refreshContext()

// spring-boot
org.springframework.context.ApplicationContextInitializer=
org.springframework.context.ApplicationListener=
org.springframework.boot.env.PropertySourceLoader=
org.springframework.boot.SpringApplicationRunListener=
org.springframework.boot.env.EnvironmentPostProcessor=

// spring-boot-autoconfigure
org.springframework.context.ApplicationContextInitializer=
org.springframework.context.ApplicationListener=
org.springframework.boot.autoconfigure.AutoConfigurationImportListener=
org.springframework.boot.autoconfigure.AutoConfigurationImportFilter=
org.springframework.boot.autoconfigure.EnableAutoConfiguration=


3、Tomcat 原理:
四、JDBC & Mybatis & DAO
springboot整合数据库和mybatis_真是呆子啊的博客-CSDN博客
五、Web开发
1、静态资源:
(1)路径优先级:优先级高到低
- classpath:/META-INF/resources
- classpath:/resources
- classpath:/static
- classpath:/public
2、模板引擎:
3、视图配置:
3、组件配置:
2、自定义 web配置:springboot集成mvc_spring boot 继承mvc_真是呆子啊的博客-CSDN博客
2、国际化:
6、认证
六、应用
1、日志
springboot 默认是 slf4j + logback,spring 默认是 jcl,mybatis 默认是 slf4j + log4j
(1)日志包:
- 日志抽象:JCL(Jakarta Commons Logging)、slf4j
- 日志实现:logback、log4j、log4j2、jul(java.util.logging)、jboss-logging
- 日志适配:slf4j-log4j12、slf4j-jdk14
(2)日志配置:
(3)日志级别:
2、缓存:
3、异常:springboot 全局异常处理_真是呆子啊的博客-CSDN博客
4、定时任务:springboot集成定时任务_真是呆子啊的博客-CSDN博客
5、事务:springboot 事务与并发及回滚_真是呆子啊的博客-CSDN博客
6、异步:@Async + @EnableAsync
7、消息/事件监听:ApplicationListener + ApplicationEvent
七、运维
1、测试:springboot 单元测试集合_真是呆子啊的博客-CSDN博客
2、部署:
(1)开发热部署:spring-boot-devtools
(2)linux 下部署:springboot 项目在linux下部署_真是呆子啊的博客-CSDN博客
(3)docker 下部署:docker基于Dockerfile将springboot项目构建成镜像,并推送远端仓库_真是呆子啊的博客-CSDN博客
3、监控:
- 添加依赖:spring-boot-starter-actuator
- 访问项目: 项目访问 + /actuator
- 可配置监控参数:
management.server.port=8888
management.server.servlet.context-path=/lin
八、扩展
1、自定义 starter:
2、使用外置 tomcat:
SpringBootServletInitiailzer
3、启动时执行方式:
(1)监听 Bean
使用@PostConstruct注解
实现InitializingBean和 DisposableBean接口(等同于配置 init-method)
(2)监听 spring 容器
接口 ApplicationContextInitializer
实现CommandLineRunner接口
实现ApplicationRunner接口
实现ServletContextAware接口并重写其setServletContext方法
实现ServletContextListener接口
WebApplicationInitializerSpringBootServletInitializer4、springboot2 的变化
- 基于 java8,可以不用模板方法提供默认实现而是直接在接口上默认实现


 1605
1605

 被折叠的 条评论
为什么被折叠?
被折叠的 条评论
为什么被折叠?
 到【灌水乐园】发言


