


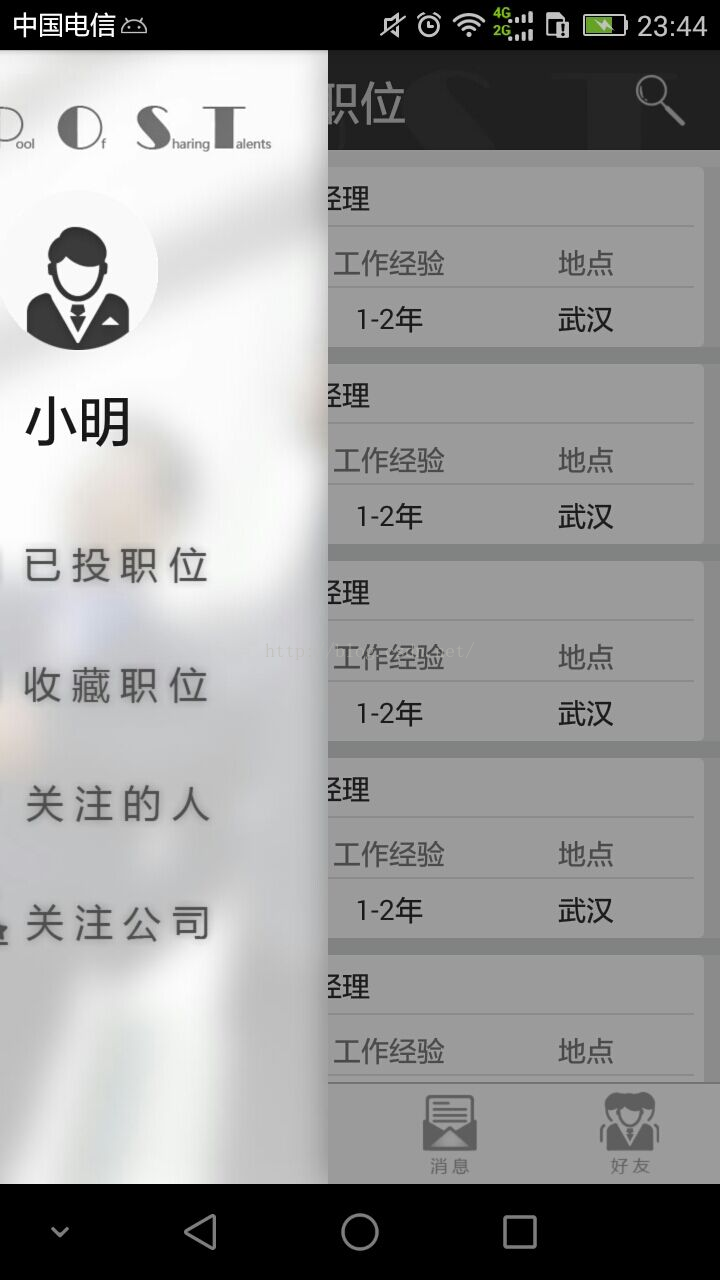
采用DrawerLayout的方法实现抽屉布局的效果,抽屉布局有两个部分,第一个部分为主内容区,如图中的包含底部菜单栏的部分。第二部分为侧边栏部分,左边部分。
对应xml布局如下:
<android.support.v4.widget.DrawerLayout
    android:id="@+id/drawer_main"
    xmlns:android="http://schemas.android.com/apk/res/android"
    android:layout_width="match_parent"
    android:layout_height="match_parent"
    android:background="#FFFFFF"
    >
    <RelativeLayout
        android:layout_width="match_parent"
        android:layout_height="match_parent"
        android:background="#eeeeee"
        >
        <include
            android:id="@+id/include2"
            layout="@layout/top_search_view"
            android:layout_width="match_parent"
            android:layout_height="100px"
            android:layout_alignParentTop="true"
            ></include>

        <FrameLayout
            android:id="@+id/fl_drawerlayout"
            android:layout_width="wrap_content"
            android:layout_height="wrap_content"
            android:layout_below="@+id/include2"
            android:layout_above="@+id/textview"
            />
        <TextView
            android:id="@+id/textview"
            android:layout_width="match_parent"
            android:layout_height="1dp"
            android:background="#bfbfbf"
            android:layout_above="@+id/include"
            android:layout_alignParentStart="true" />
        <include
            android:id="@+id/include"
            layout="@layout/bottom_menu"
            android:layout_width="match_parent"
            android:layout_height="100px"
            android:layout_alignParentBottom="true"
            ></include>
    </RelativeLayout>

    <LinearLayout
        android:id="@+id/ll_left_menus"
        android:layout_height="wrap_content"
        android:layout_gravity="start"
        android:layout_width="250dp"
        android:orientation="vertical">
        <include
            layout="@layout/left_menu"
            android:layout_height="match_parent"
            android:layout_width="wrap_content"
            >
        </include>
    </LinearLayout>


</android.support.v4.widget.DrawerLayout>其中的RelativeLayout布局所包含的内容即为主内容,其中第一个include进的布局为标题栏,类似于actionbar,第二个include进的为底部菜单栏,其中的FrameLayout用来填充fragment,点击对应的底部菜单后添加对应的fragment。
LinearLayout布局则对应的是侧边栏,include进来的是一个自定义布局,包括头像,名字,功能列表等。其中layout_gravity属性的值设为start则表示侧边栏从左往右滑动开启,设置为end则表示从右往左滑动开启。
类文件如下:
package com.xiaoyi.Main;

import android.app.Activity;
import android.app.Fragment;
import android.app.FragmentManager;
import android.graphics.Bitmap;
import android.graphics.Canvas;
import android.graphics.Paint;
import android.graphics.PorterDuff;
import android.graphics.PorterDuffXfermode;
import android.graphics.RectF;
import android.os.Bundle;
import android.support.v4.view.GravityCompat;
import android.support.v4.widget.DrawerLayout;
import android.util.Log;
import android.view.View;
import android.widget.ImageView;
import android.widget.TextView;

import com.xiaoyi.Company.CompanyFragment;
import com.xiaoyi.Friend.FriendFragment;
import com.xiaoyi.Message.MessageFragment;
import com.xiaoyi.position.PositionFragment;


public class MainActivity extends Activity{

    private ImageView iv_head,iv_left_setting; //用户头像和设置按钮
    private ImageView iv_bottom_menu0,iv_bottom_menu1,iv_bottom_menu2,iv_bottom_menu3;//底部菜单
    private ImageView iv_left_menu0,iv_left_menu1,iv_left_menu2,iv_left_menu3; //抽屉中的菜单
    private TextView tv_top_name; //顶部标题栏文字
    private ImageView iv_search; //搜索按钮
    private ImageView iv_drawer; //开启抽屉的点击图标
    private DrawerLayout drawer_main; //抽屉
    @Override
    protected void onCreate(Bundle savedInstanceState) {
        super.onCreate(savedInstanceState);
        setContentView(R.layout.activity_main);
        initView();

    }
    public void initView(){
        iv_head = (ImageView)findViewById(R.id.iv_head);
        iv_left_setting = (ImageView)findViewById(R.id.iv_left_setting);

        iv_bottom_menu0 = (ImageView)findViewById(R.id.iv_bottom_menu0);
        iv_bottom_menu1 = (ImageView)findViewById(R.id.iv_bottom_menu1);
        iv_bottom_menu2 = (ImageView)findViewById(R.id.iv_bottom_menu2);
        iv_bottom_menu3 = (ImageView)findViewById(R.id.iv_bottom_menu3);

        iv_left_menu0 = (ImageView)findViewById(R.id.iv_left_menu0);
        iv_left_menu1 = (ImageView)findViewById(R.id.iv_left_menu1);
        iv_left_menu2 = (ImageView)findViewById(R.id.iv_left_menu2);
        iv_left_menu3 = (ImageView)findViewById(R.id.iv_left_menu3);

        tv_top_name = (TextView)findViewById(R.id.tv_top_name);
        iv_search = (ImageView)findViewById(R.id.iv_search);


        BottomMenuOnclick();//底部菜单的点击事件监听
        LeftMenuOnclick(); //侧边栏菜单的点击事件的监听

        drawer_main = (DrawerLayout) findViewById(R.id.drawer_main);

        iv_drawer = (ImageView)findViewById(R.id.iv_drawer);
        iv_drawer.setOnClickListener(new View.OnClickListener() {
            @Override
            public void onClick(View v) {
                drawer_main.openDrawer(GravityCompat.START); //点击按钮后打开抽屉,START为从左向右打开,END为从右向左打开,跟xml布局中的属性一直
            }
        });

    }

    public void LeftMenuOnclick(){
        iv_left_menu0.setOnClickListener(new View.OnClickListener() {
            @Override
            public void onClick(View v) {
            }
        });
        iv_left_menu1.setOnClickListener(new View.OnClickListener() {
            @Override
            public void onClick(View v) {
            }
        });
        iv_left_menu2.setOnClickListener(new View.OnClickListener() {
            @Override
            public void onClick(View v) {
            }
        });
        iv_left_menu3.setOnClickListener(new View.OnClickListener() {
            @Override
            public void onClick(View v) {
            }
        });
    }

    public void BottomMenuOnclick(){

        //初始时为职位fragment页面
        iv_bottom_menu0.setBackgroundResource(R.drawable.position_select);
        Fragment positionFragment = new PositionFragment();
        FragmentManager fm = getFragmentManager();
        fm.beginTransaction().replace(R.id.fl_drawerlayout,positionFragment).commit();
        tv_top_name.setText("职位");

        iv_bottom_menu0.setOnClickListener(new View.OnClickListener() {
            @Override
            public void onClick(View v) {
                iv_bottom_menu0.setBackgroundResource(R.drawable.position_select);
                iv_bottom_menu1.setBackgroundResource(R.drawable.company_no_select);
                iv_bottom_menu2.setBackgroundResource(R.drawable.message_no_select);
                iv_bottom_menu3.setBackgroundResource(R.drawable.friend_no_select);

                Fragment positionFragment = new PositionFragment();
                FragmentManager fm = getFragmentManager();
                fm.beginTransaction().replace(R.id.fl_drawerlayout, positionFragment).commit();
                tv_top_name.setText("职位");
                iv_search.setVisibility(View.VISIBLE);
            }
        });
        iv_bottom_menu1.setOnClickListener(new View.OnClickListener() {
            @Override
            public void onClick(View v) {
                iv_bottom_menu0.setBackgroundResource(R.drawable.position_no_select);
                iv_bottom_menu1.setBackgroundResource(R.drawable.company_select);
                iv_bottom_menu2.setBackgroundResource(R.drawable.message_no_select);
                iv_bottom_menu3.setBackgroundResource(R.drawable.friend_no_select);

                Fragment companyFragment = new CompanyFragment();
                FragmentManager fm = getFragmentManager();
                fm.beginTransaction().replace(R.id.fl_drawerlayout, companyFragment).commit();
                tv_top_name.setText("企业");
                iv_search.setVisibility(View.VISIBLE);
            }
        });

        iv_bottom_menu2.setOnClickListener(new View.OnClickListener() {
            @Override
            public void onClick(View v) {
                iv_bottom_menu0.setBackgroundResource(R.drawable.position_no_select);
                iv_bottom_menu1.setBackgroundResource(R.drawable.company_no_select);
                iv_bottom_menu2.setBackgroundResource(R.drawable.message_select);
                iv_bottom_menu3.setBackgroundResource(R.drawable.friend_no_select);

                Fragment messageFragment = new MessageFragment();
                FragmentManager fm = getFragmentManager();
                fm.beginTransaction().replace(R.id.fl_drawerlayout, messageFragment).commit();
                tv_top_name.setText("消息");
                iv_search.setVisibility(View.INVISIBLE);
            }
        });

        iv_bottom_menu3.setOnClickListener(new View.OnClickListener() {
            public void onClick(View v) {
                iv_bottom_menu0.setBackgroundResource(R.drawable.position_no_select);
                iv_bottom_menu1.setBackgroundResource(R.drawable.company_no_select);
                iv_bottom_menu2.setBackgroundResource(R.drawable.message_no_select);
                iv_bottom_menu3.setBackgroundResource(R.drawable.friend_select);

                Fragment friendFragment = new FriendFragment();
                FragmentManager fm = getFragmentManager();
                fm.beginTransaction().replace(R.id.fl_drawerlayout, friendFragment).commit();
                tv_top_name.setText("朋友");
                iv_search.setVisibility(View.INVISIBLE);
            }
        });
    }
}
由于不知道什么原因,如果你用activity直接继承OnClickListener()的方式监听点击事件的话并没有效果,因此本人采用直接设置监听器的方式来监听点击事件。


 421
421

 被折叠的 条评论
为什么被折叠?
被折叠的 条评论
为什么被折叠?
 到【灌水乐园】发言


