


引入pom
<?xml version="1.0" encoding="UTF-8"?>
<project xmlns="http://maven.apache.org/POM/4.0.0" xmlns:xsi="http://www.w3.org/2001/XMLSchema-instance"
         xsi:schemaLocation="http://maven.apache.org/POM/4.0.0 https://maven.apache.org/xsd/maven-4.0.0.xsd">
    <modelVersion>4.0.0</modelVersion>
    <groupId>com.example</groupId>
    <artifactId>order</artifactId>
    <version>0.0.1-SNAPSHOT</version>
    <name>order</name>
    <description>order</description>
    <properties>
        <java.version>17</java.version>
        <project.build.sourceEncoding>UTF-8</project.build.sourceEncoding>
        <project.reporting.outputEncoding>UTF-8</project.reporting.outputEncoding>
        <spring-boot.version>3.0.2</spring-boot.version>
        <spring-cloud-alibaba.version>2022.0.0.0-RC2</spring-cloud-alibaba.version>
    </properties>
    <dependencies>
        <dependency>
            <groupId>org.springframework.boot</groupId>
            <artifactId>spring-boot-starter-web</artifactId>
        </dependency>
        <dependency>
            <groupId>com.alibaba.cloud</groupId>
            <artifactId>spring-cloud-starter-alibaba-nacos-discovery</artifactId>
        </dependency>

        <dependency>
            <groupId>org.springframework.boot</groupId>
            <artifactId>spring-boot-starter-test</artifactId>
            <scope>test</scope>
        </dependency>

        <!-- 添加MyBatisPlus的依赖 -->
        <dependency>
            <groupId>com.baomidou</groupId>
            <artifactId>mybatis-plus-boot-starter</artifactId>
            <version>3.5.4.1</version>
        </dependency>
        <!-- MySQL数据 -->
        <dependency>
            <groupId>mysql</groupId>
            <artifactId>mysql-connector-java</artifactId>
            <version>8.0.16</version>
        </dependency>
        <!-- druid  连接池-->
        <dependency>
            <groupId>com.alibaba</groupId>
            <artifactId>druid</artifactId>
            <version>1.1.14</version>
        </dependency>
        <dependency>
            <groupId>org.projectlombok</groupId>
            <artifactId>lombok</artifactId>
            <optional>true</optional>
        </dependency>
        <dependency>
            <groupId>org.mybatis.spring.boot</groupId>
            <artifactId>mybatis-spring-boot-starter</artifactId>
            <version>3.0.0</version>
        </dependency>

        <!--引入aop-->
        <dependency>
            <groupId>org.springframework.boot</groupId>
            <artifactId>spring-boot-starter-aop</artifactId>
        </dependency>

        <dependency>
            <groupId>com.alibaba</groupId>
            <artifactId>fastjson</artifactId>
            <version>1.2.76</version>
        </dependency>

    </dependencies>
    <dependencyManagement>
        <dependencies>
            <dependency>
                <groupId>org.springframework.boot</groupId>
                <artifactId>spring-boot-dependencies</artifactId>
                <version>${spring-boot.version}</version>
                <type>pom</type>
                <scope>import</scope>
            </dependency>
            <dependency>
                <groupId>com.alibaba.cloud</groupId>
                <artifactId>spring-cloud-alibaba-dependencies</artifactId>
                <version>${spring-cloud-alibaba.version}</version>
                <type>pom</type>
                <scope>import</scope>
            </dependency>
        </dependencies>
    </dependencyManagement>

    <build>
        <plugins>
            <plugin>
                <groupId>org.apache.maven.plugins</groupId>
                <artifactId>maven-compiler-plugin</artifactId>
                <version>3.8.1</version>
                <configuration>
                    <source>17</source>
                    <target>17</target>
                    <encoding>UTF-8</encoding>
                </configuration>
            </plugin>
            <plugin>
                <groupId>org.springframework.boot</groupId>
                <artifactId>spring-boot-maven-plugin</artifactId>
                <version>${spring-boot.version}</version>
                <configuration>
                    <mainClass>com.example.order.OrderApplication</mainClass>
                    <skip>true</skip>
                </configuration>
                <executions>
                    <execution>
                        <id>repackage</id>
                        <goals>
                            <goal>repackage</goal>
                        </goals>
                    </execution>
                </executions>
            </plugin>
        </plugins>
    </build>

</project>
yml配置
mybatis-plus:
  configuration:
    log-impl: org.apache.ibatis.logging.stdout.StdOutImpl
  mapper-locations: classpath:mapper/*.xml
server:
  port: 8082
spring:
  application:
    name: order
  cloud:
    nacos:
      discovery:
        namespace: public
        password: nacos
        server-addr: localhost:8848
        username: nacos
  datasource:
    driverClassName: com.mysql.cj.jdbc.Driver
    password: 123456
    type: com.alibaba.druid.pool.DruidDataSource
    url: jdbc:mysql://localhost:3306/dmg1?serverTimezone=Asia/Shanghai&useUnicode=true&characterEncoding=utf-8&useSSL=true
    username: root
设置实体类
package com.example.order.entity;

import com.baomidou.mybatisplus.annotation.IdType;
import com.baomidou.mybatisplus.annotation.TableId;
import com.baomidou.mybatisplus.annotation.TableName;
import lombok.Data;

import java.util.Date;

/**
 * 记录接口超时
 */
@Data
@TableName("timeout_log")
public class TimeOutLog {

    //主键
    @TableId(type = IdType.AUTO)
    private Long id;

    //请求方法
    private String requestMethod;

    //请求参数
    private String requestParams;

    //创建时间
    private Date createTime;

    //超时时间
    private Long time;
}
创建dao
package com.example.order.mapper;

import com.baomidou.mybatisplus.core.mapper.BaseMapper;
import com.example.order.entity.TimeOutLog;


public interface TimeOutLogMapper extends BaseMapper<TimeOutLog> {


}
设置监听类
package com.example.order.config;

import com.alibaba.fastjson.JSONObject;
import com.example.order.entity.TimeOutLog;
import com.example.order.mapper.TimeOutLogMapper;
import lombok.extern.slf4j.Slf4j;
import org.aspectj.lang.ProceedingJoinPoint;
import org.aspectj.lang.annotation.Around;
import org.aspectj.lang.annotation.Aspect;
import org.springframework.beans.factory.annotation.Autowired;
import org.springframework.stereotype.Component;

import java.util.Date;

/**
 * 超时接口监听 记录到数据库
 */
@Slf4j
@Aspect
@Component
public class TimedOutListen {

        @Autowired
        private TimeOutLogMapper timeOutLogMapper;

        /**
         * 环绕通知 监听controller里面的接口超时
         * @param proceedingJoinPoint
         * @return
         * @throws Throwable
         */
        @Around("execution(* com.example.order.controller.*.*(..))")
        public Object around(ProceedingJoinPoint proceedingJoinPoint) throws Throwable {
            //返回结果
            Object result = null;
            //开始时间
            long startTime = System.currentTimeMillis();
            try {
                //执行方法
                result = proceedingJoinPoint.proceed();
                return result;
            } catch (Throwable throwable) {
                throw throwable;
            } finally {
                //结束时间
                long endTime = System.currentTimeMillis();
                //如果大于3000毫秒那么就说明超时了
                if (endTime - startTime > 3000L) {
                    //方法的名字
                    String method=proceedingJoinPoint.getSignature().toShortString();
                    //超时时间 毫秒
                    long time=endTime-startTime;
                    //请求参数
                    String str= JSONObject.toJSONString(proceedingJoinPoint.getArgs());
                    log.info("请求方法:{},超时时间:{},请求参数:{}",method,time,str);
                    //把超时日志 记录到数据库中
                    TimeOutLog bean=new TimeOutLog();
                    bean.setTime(time);
                    bean.setCreateTime(new Date());
                    bean.setRequestMethod(method);
                    bean.setRequestParams(str);
                    timeOutLogMapper.insert(bean);
                    //TODO 这时候 也可以设置发送短信 或者邮件的功能 通知程序员 去解决这个超时的问题

                }
            }
        }


}
创建控制层
package com.example.order.controller;

import lombok.extern.slf4j.Slf4j;
import org.springframework.web.bind.annotation.GetMapping;
import org.springframework.web.bind.annotation.RequestParam;
import org.springframework.web.bind.annotation.RestController;

@Slf4j
@RestController
public class OrderController {


    @GetMapping("/aa")
    public void aa(@RequestParam("name")String name){
      log.info("进入添加方法:{}",name);
        try {
            //阻塞4秒
            Thread.sleep(1000*4);
        } catch (InterruptedException e) {
            throw new RuntimeException(e);
        }

        log.info("添加完毕");
    }
}
启动类
package com.example.order;

import org.mybatis.spring.annotation.MapperScan;
import org.springframework.boot.SpringApplication;
import org.springframework.boot.autoconfigure.SpringBootApplication;
@MapperScan(basePackages = {"com.example.order.mapper"})
@SpringBootApplication
public class OrderApplication {

    public static void main(String[] args) {
        SpringApplication.run(OrderApplication.class, args);
    }

}
创建表
CREATE TABLE `timeout_log` (
  `id` bigint NOT NULL AUTO_INCREMENT COMMENT '主键',
  `request_method` varchar(50) CHARACTER SET utf8mb4 COLLATE utf8mb4_unicode_ci DEFAULT NULL COMMENT '请求方法',
  `request_params` text CHARACTER SET utf8mb4 COLLATE utf8mb4_unicode_ci COMMENT '请求参数',
  `create_time` datetime DEFAULT NULL COMMENT '创建时间',
  `time` bigint DEFAULT NULL COMMENT '超时时间',
  PRIMARY KEY (`id`)
) ENGINE=InnoDB AUTO_INCREMENT=3 DEFAULT CHARSET=utf8mb4 COLLATE=utf8mb4_0900_ai_ci COMMENT='接口超时日志表';
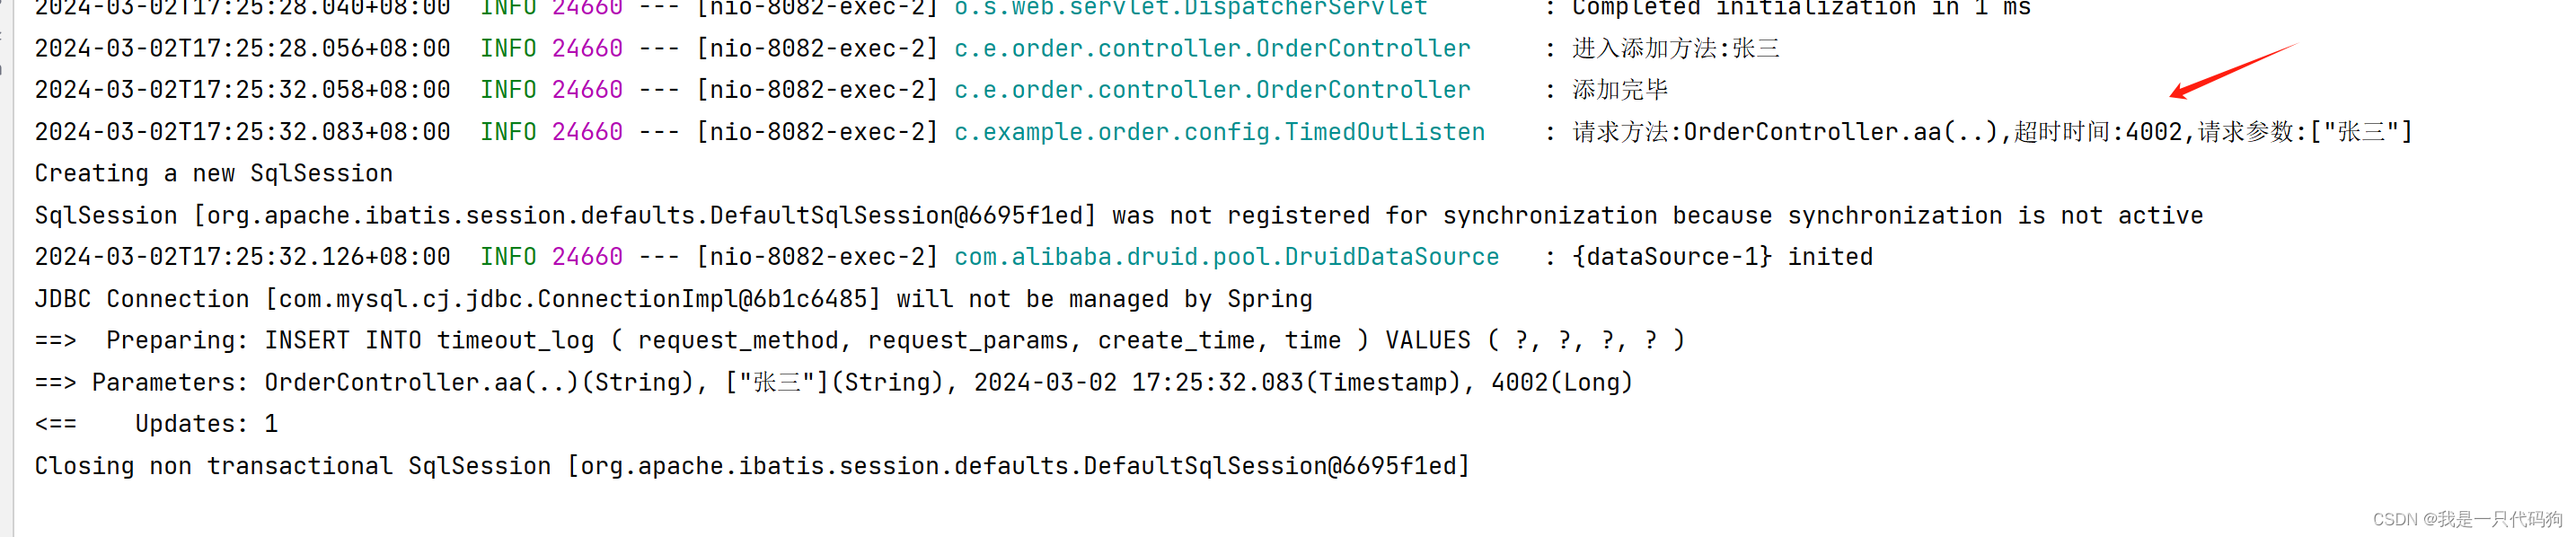
在浏览器访问aa这个接口
可以看到超时的信息都记录到数据库中了


 663
663


 被折叠的 条评论
为什么被折叠?
被折叠的 条评论
为什么被折叠?
 到【灌水乐园】发言


