


批处理作业通常针对大数据量进行处理,同时框架需要将作业处理的状态实时地持久化到数据库中,如果读取一条记录就进行写操作或者状态数据的提交,会大量消耗系统资源,导致批处理框架性能下降。在面向批处理Chunk的操作中,可以通过属性commit-interval设置read多少条记录后进行一次提交。通过设置commit-interval的间隔值,减少提交频次,降低资源使用率。
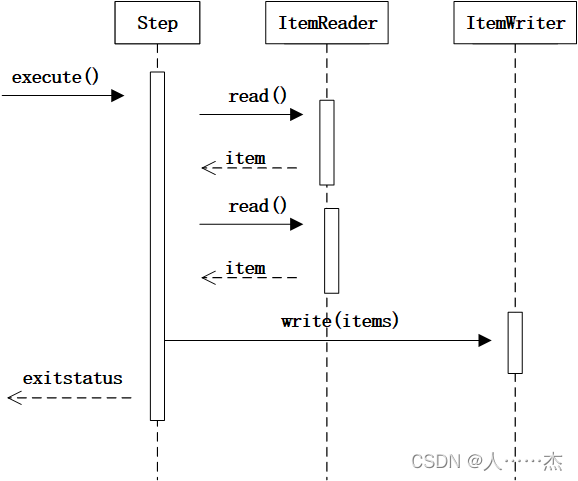
通过commit-interval设置Chunk的提交频次:
<!--定义名字为billJob的作业-->
<batch:job id="billJob">
  <!--定义名字为billStep的作业步-->
  <batch:step id="billStep">
     <batch:tasklet transaction-manager="transactionManager">
        <!--规定每处理3条数据,进行一次写入操作,这样可以提高写的效率-->
        <batch:chunk reader="read" processor="processor" writer="writer"
                commit-interval="3">
        </batch:chunk>
     </batch:tasklet>
  </batch:step>
</batch:job>
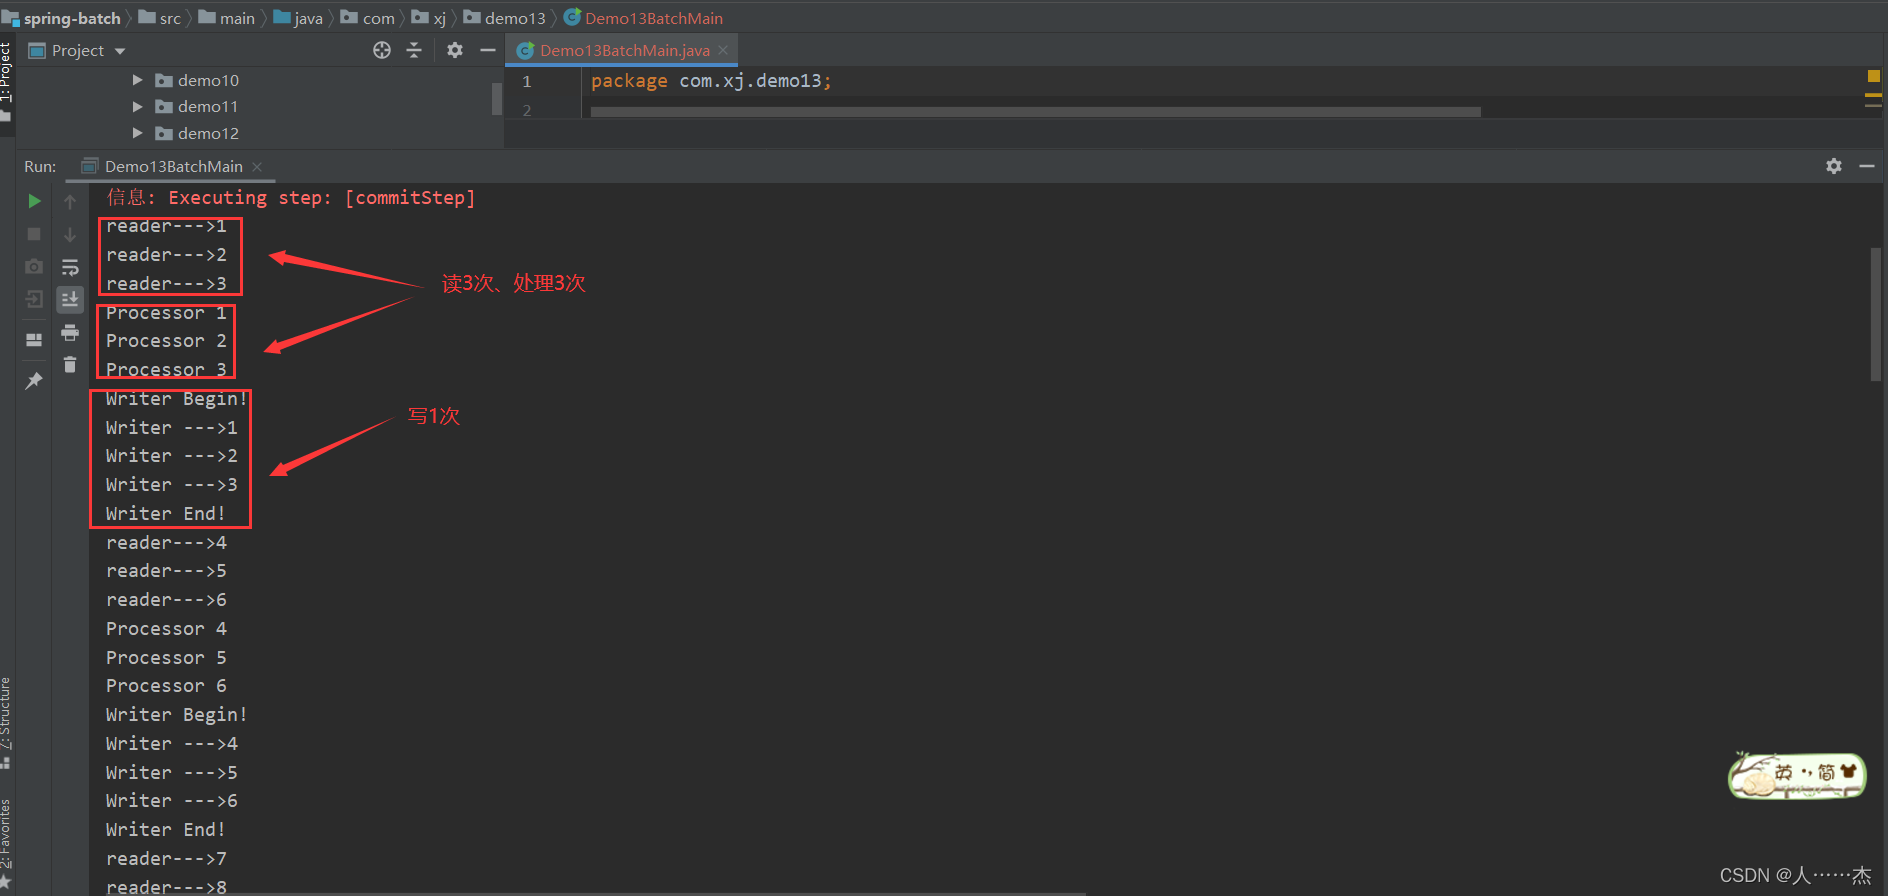
按照上面的Chunk的操作,提交间隔是3次,那么读操作被调用3次,处理操作被调用3次,写操作只被调用1次。
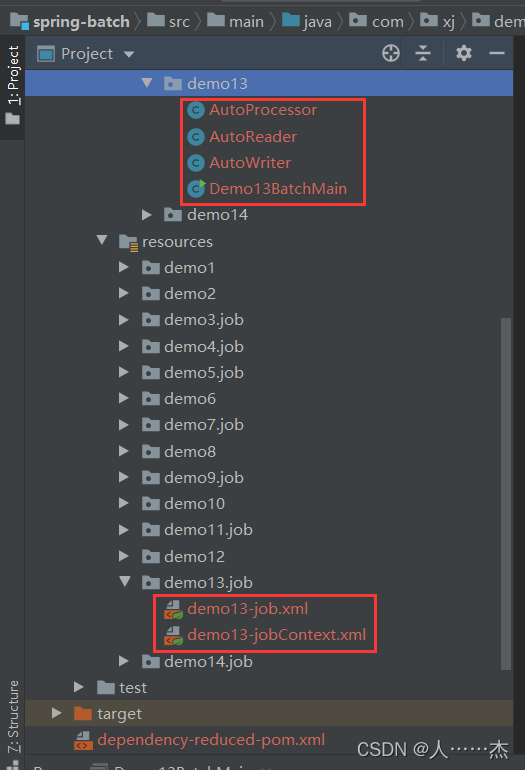
项目实例
1.项目框架
2.代码实现
AutoProcessor.java:
package com.xj.demo13;

import org.springframework.batch.item.ItemProcessor;

public class AutoProcessor implements ItemProcessor<String, String> {

    @Override
    public String process(String item) throws Exception {
        System.out.println("Processor "+ item);
        return item;
    }
}
AutoReader.java:
package com.xj.demo13;

import org.springframework.batch.item.ItemReader;
import org.springframework.batch.item.NonTransientResourceException;
import org.springframework.batch.item.ParseException;
import org.springframework.batch.item.UnexpectedInputException;


public class AutoReader implements ItemReader<String> {
    private int count = 0;
    private int maxCount = 30;
    @Override
    public String read() throws Exception, UnexpectedInputException, ParseException, NonTransientResourceException {

        if(count > maxCount){
            return null;
        }else{
            count++;
            System.out.println("reader--->" + count);
            return count + "";
        }
    }
}
AutoWriter.java:
package com.xj.demo13;

import org.springframework.batch.item.ItemWriter;
import java.util.List;


public class AutoWriter implements ItemWriter<String> {
    @Override
    public void write(List<? extends String> list) throws Exception {
        System.out.println("Writer Begin!");
        for(String item : list){
            System.out.println("Writer --->" + item);
        }
        System.out.println("Writer End!");
    }
}
Demo13BatchMain.java:
package com.xj.demo13;

import org.springframework.batch.core.Job;
import org.springframework.batch.core.JobExecution;
import org.springframework.batch.core.JobParameters;
import org.springframework.batch.core.JobParametersBuilder;
import org.springframework.batch.core.launch.JobLauncher;
import org.springframework.context.ApplicationContext;
import org.springframework.context.support.ClassPathXmlApplicationContext;


public class Demo13BatchMain {
    public static void main(String[] args) {
        Demo13BatchMain batchMain = new Demo13BatchMain();
        //测试skip
        batchMain.executeJob("demo13/job/demo13-job.xml", "commitJob", "jobLauncher", new JobParametersBuilder().toJobParameters());
    }

    /**
     *执行Job
     * @param jobXmlPath 配置job的xml文件路径
     * @param jobId job的id
     * @param jobLauncherId jobLauncher的id
     * @param jobParameters 参数
     */
    public void executeJob(String jobXmlPath, String jobId, String jobLauncherId, JobParameters jobParameters){
        ApplicationContext context = new ClassPathXmlApplicationContext(jobXmlPath);
        JobLauncher jobLauncher = (JobLauncher) context.getBean(jobLauncherId);
        //获取要执行的Job
        Job job = (Job)context.getBean(jobId);

        try{
            //开始执行作业Job
            JobExecution jobExecution =  jobLauncher.run(job, jobParameters);
            //输出执行结果
            System.out.println(jobExecution.toString());
        }catch (Exception e){
            e.printStackTrace();
        }
    }
}
demo13-job.xml:
<?xml version="1.0" encoding="UTF-8"?>
<beans xmlns="http://www.springframework.org/schema/beans"
       xmlns:xsi="http://www.w3.org/2001/XMLSchema-instance" xmlns:batch="http://www.springframework.org/schema/batch"
       xsi:schemaLocation="http://www.springframework.org/schema/beans
       http://www.springframework.org/schema/beans/spring-beans.xsd
       http://www.springframework.org/schema/batch
       http://www.springframework.org/schema/batch/spring-batch.xsd">

    <import resource="classpath:demo13/job/demo13-jobContext.xml"/>

    <batch:job id="commitJob">
        <batch:step id="commitStep">
            <batch:tasklet transaction-manager="transactionManager">
                <batch:chunk reader="autoReader" processor="autoProcessor" writer="autoWriter" commit-interval="3"/>
            </batch:tasklet>
        </batch:step>
    </batch:job>

</beans>
demo13-jobContext.xml:
<?xml version="1.0" encoding="UTF-8"?>
<beans xmlns="http://www.springframework.org/schema/beans"
       xmlns:xsi="http://www.w3.org/2001/XMLSchema-instance"
       xsi:schemaLocation="http://www.springframework.org/schema/beans http://www.springframework.org/schema/beans/spring-beans.xsd">

    <bean id="jobRepository" class="org.springframework.batch.core.repository.support.MapJobRepositoryFactoryBean"/>

    <bean id="jobLauncher" class="org.springframework.batch.core.launch.support.SimpleJobLauncher">
        <property name="jobRepository" ref="jobRepository"/>
    </bean>

    <bean id="transactionManager" class="org.springframework.batch.support.transaction.ResourcelessTransactionManager"/>

    <!--定义读方法-->
    <bean id="autoReader" class="com.xj.demo13.AutoReader"/>

    <!--定义处理方法-->
    <bean id="autoProcessor" class="com.xj.demo13.AutoProcessor"/>

    <!--定义写方法-->
    <bean id="autoWriter" class="com.xj.demo13.AutoWriter"/>

</beans>
3.运行结果


 1386
1386

 被折叠的 条评论
为什么被折叠?
被折叠的 条评论
为什么被折叠?
 到【灌水乐园】发言


