


学习目标
-
能够实现spring基于注解的IoC案例
-
能够编写spring的IOC的注解代码
-
能够编写spring使用注解实现组件扫描
-
能够说出spring的IOC的相关注解的含义
-
能够理解AOP相关概念
-
能够说出AOP相关术语的含义
-
能够掌握基于XML的AOP配置
第一章-Spring的IOC注解开发
学习基于注解的 IoC 配置,大家脑海里首先得有一个认知,即注解配置和 xml 配置要实现的功能都是一样的,都是要降低程序间的耦合。只是配置的形式不一样。
关于实际的开发中到底使用 xml 还是注解,每家公司有不同的习惯。所以这两种配置方式我们都需要掌握。
案例-注解开发入门
1.目标
- 能够编写spring的IOC的注解代码(代替xml里面配置的Bean标签)
2.分析
- 创建工程, 添加坐标
- 在类上面添加@Component
- 在applicationContext.xml 开启包扫描
3. 实现
3.1 创建Maven工程,添加依赖
<dependencies>
    <dependency>
    <groupId>org.springframework</groupId>
    <artifactId>spring-context</artifactId>
    <version>5.0.2.RELEASE</version>
    </dependency>
 </dependencies>
3.2 使用@Component注解配置管理的资源
- eg: 需要给AccountServiceImpl
@Component("accountService")//如果没有指定id,则会使用类名首字母改小写作为对象的id
public class AccountServiceImpl implements AccountService {} // 等同于 在xml里面,<bean id="accountService" class="具体的类">
3.3 引入context的命名空间
- applicationContext.xml中需要引入context的命名空间,可在xsd-configuration.html中找到
<beans xmlns="http://www.springframework.org/schema/beans"
       xmlns:xsi="http://www.w3.org/2001/XMLSchema-instance"
       xmlns:context="http://www.springframework.org/schema/context" xsi:schemaLocation="
        http://www.springframework.org/schema/beans http://www.springframework.org/schema/beans/spring-beans.xsd
        http://www.springframework.org/schema/context http://www.springframework.org/schema/context/spring-context.xsd">


</beans>
3.4 配置扫描
在beans标签内部,使用context:component-scan ,让spring扫描该基础包下的所有子包注解
<context:component-scan base-package="com.itheima"></context:component-scan>
4.小结
- 在类上面添加@Component(“id”)
- 在applicationContext.xml 开启包扫描
案例-注解开发进阶
1.目标
- 能够编写spring使用注解实现组件扫描
- 能够说出spring的IOC的相关注解的含义
2.路径
- 用于创建对象的注解
- 用于改变作用范围的注解
- 和生命周期相关的注解
3.讲解
3.1 用于创建对象的
相对于相当于: <bean id="" class="">
3.1.1 @Component
作用:
把资源让 spring 来管理。相当于在 xml 中配置一个 bean。
属性:
value:指定 bean 的 id。如果不指定 value 属性,默认 bean 的 id 是当前类的类名。首字母小写。
3.1.2 @Controller @Service @Repository
web里面的三层结构中的所有类,在spring里面都称之为 Component (组件) , 但是它也提供了更详细的注解来针对不同的层级声明 。
三个衍生注解如下:
   		 	 @Controller               :修饰WEB层类	 --->web | SpringMVC

  		  	 @Service                    :修饰业务层类	 --->service

  		  	 @Repository             :修饰DAO层类	 --->dao
在需要spring创建对象的类上面使用注解 @Component(“us”) 即可.Spring看类上是否有该注解,如果有该注解,生成这个类的实例。如果不指定value值, 那么默认的id值就是类名的名字, 第一个字母小写.
3.2 用于改变作用范围的@Scope
@Scope
singleton: 单例(默认)
prototype:多例
@Scope注解用来描述类的作用范围的,默认值singleton。如同xml中bean标签的属性scope <bean scope=""/>.如果配置成多例的使用prototype。
@Scope("prototype")
@Component("accountService")
public class AccountServiceImpl implements AccountService {}
3.3 和生命周期相关的【了解】
-
初始化和销毁回调方法对应的注解
@PostConstrut:如同xml中bean标签的属性init-method
<bean init-method=""/>,用来设置spring框架初始化此类实例时调用的初始化方法,标注在此类的初始化方法上 @PreDestroy:如同xml中bean标签的属性destroy-method
<bean destroy-method=""/>,用来设置spring框架销毁此类实例时调用的销毁方法,标注在此类的销毁方法上注意:这两个注解都是配在方法上的
4.小结
-
注册Bean的 相当于配置了
<bean id="" class=""/>- @Component(“id”)
- @Controller(“id”) 配置web层
- @Service(“id”) 配置Service层
- @Repository(“id”) 配置持久层
如果id不配, 默认就是类的名字,首字母小写
- 配置bean的作用范围
<bean scope=""></bean>- @Scope(“类型”)
- singleton 单例【默认】
- prototype 多例
- @Scope(“类型”)
- 配置和生命周期相关的
<bean init-method="" destroy-method=""></bean>- @PostConstruct
init-method="" - @PreDestroy
destroy-method=""
- @PostConstruct
知识点-使用注解注入属性
1.目标
- 掌握使用注解注入属性
2.路径
- @Value : 注入简单类型的数据
- @Autowired
- @Qualifier
- @Resource
3.讲解
3.1@Value
-
作用:
注入基本数据类型和 String 类型数据的
-
属性:
value:用于指定值 , 可以通过表达式动态获得内容再赋值
-
实例:
@Value("奥巴马")
private String name;
3.2 @Autowired
-
作用:
自动按照类型注入。当使用注解注入属性时, set 方法可以省略。它只能注入其他 bean 类型。
如果只有一个实现类, 可以自动注入成功
如果有两个或者两个以上的实现类, 找到变量名一致的id对象给注入进去, 如果找不到,就报错
-
实例:
@Component("accountService")
public class AccountServiceImpl implements AccountService {
    @Autowired
    //当有多个AccountDao实现类时候, @Autowired会在在Spring容器里面找id为accountDao的对象注入,找不到就报错
    private AccountDao accountDao;
    @Override
    public void save() {
        System.out.println("AccountServiceImpl---save()");
        accountDao.save();
    }
}
3.3 @Qualifier
-
作用
在自动按照类型注入(@Autowired)的基础之上,再按照Bean的id注入。 它在给字段注入时不能独立使用,必须和@Autowire一起使用;
但是给方法参数注入时,可以独立使用。
-
属性
value:指定bean的id。
-
实例
package com.itheima.controller;

import com.itheima.service.UserService;
import org.springframework.stereotype.Controller;

import javax.annotation.Resource;

/**
 * 包名:com.itheima.controller
 *
 * @author Leevi
 * 日期2020-08-11  09:08
 * 注入对象类型的属性:
 *    1. Autowired: 自动装配, 如果spring的核心容器中,只有一个该类型的对象,则自动把那个对象注入给当前属性;
 *       如果spring的核心容器中,不止有一个该类型的对象,那么就会根据属性名匹配对象的id,匹配上哪个就注入哪个;
 *       如果一个都匹配不上,那么我们还可以通过Qualifier指定要注入的对象的id
 */
@Controller
public class UserController {
    @Autowired
    @Qualifier("userServiceImplAnother")
    private UserService userService;
    public String getName(){
        //调用业务层的getName()方法
        return userService.getName();
    }
}
3.4 @Resource
如果上面一个接口有多种实现,那么现在需要指定找具体的某一个实现,那么可以使用@Resource
package com.itheima.controller;

import com.itheima.service.UserService;
import org.springframework.stereotype.Controller;

import javax.annotation.Resource;

/**
 * 包名:com.itheima.controller
 *
 * @author Leevi
 * 日期2020-08-11  09:08
 * 注入对象类型的属性:
 *    1. Autowired: 自动装配, 如果spring的核心容器中,只有一个该类型的对象,则自动把那个对象注入给当前属性;
 *       如果spring的核心容器中,不止有一个该类型的对象,那么就会根据属性名匹配对象的id,匹配上哪个就注入哪个;
 *       如果一个都匹配不上,那么我们还可以通过Qualifier指定要注入的对象的id
 *
 *   2. Resource: 能够进行自动装配以及手动装配
 */
@Controller
public class UserController {
    @Resource(name = "userServiceImpl")
    private UserService userService;
    public String getName(){
        //调用业务层的getName()方法
        return userService.getName();
    }
}
4.小结
- 注入简单类型
@Value("值/表达式") - 注入对象类型
- 如果只有一个实现类, 建议使用@Autowired
- 如果有多个实现类, 建议使用@Resource("name=“id”)
知识点-混合开发
1.目标
- 掌握混合(xml和注解)开发
2.路径
- 注解和XML开发比较
- 混合开发特点
- 混合开发环境搭建
3. 讲解
3.1 注解和XML比较
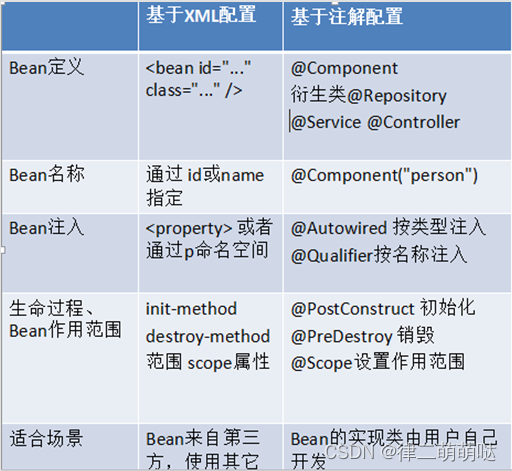
- xml
- 优点: 方便维护, 改xml文件
- 缺点: 相对注解而言, 麻烦一点
- 注解
- 优点: 开发简洁方便
- 缺点: 维护没有xml那么方便, 需要改源码
3.2 混合开发特点
IOC: 自己写的类使用注解进行IOC,非自己写的类使用配置文件进行IOC
DI: 如果一个类是使用注解进行IOC的,那么它的属性使用注解进行注入;如果一个类是使用配置文件进行IOC,那么它的属性使用配置文件进行注入
3.3 混合开发环境搭建
-
创建spring配置文件,编写头信息配置
<?xml version="1.0" encoding="UTF-8"?> <beans xmlns="http://www.springframework.org/schema/beans" xmlns:xsi="http://www.w3.org/2001/XMLSchema-instance" xmlns:context="http://www.springframework.org/schema/context" xsi:schemaLocation=" http://www.springframework.org/schema/beans http://www.springframework.org/schema/beans/spring-beans.xsd http://www.springframework.org/schema/context http://www.springframework.org/schema/context/spring-context.xsd "> </beans> -
配置扫描
<context:component-scan base-package="com.itheima" /> -
需要用配置文件进行IOC和依赖注入的就写在配置文件中
-
需要使用注解进行IOC和依赖注入的就在类中添加注解
4. 小结
- xml注册(管理bean)
- 注解注入(给对象里面字段/属性赋值)
知识点-spring整合mybatis(非常重要)
目标
能够使用spring整合mybatis
步骤
- 引入mybatis以及整合的相关依赖
- 在spring的IOC容器中创建DataSource对象(可以使用spring内置的DataSource)
- 在spring的IOC容器中创建SqlSessionFactoryBean对象,并且可以指定要配置别名的包或者是加载核心配置文件
- 在spring的IOC容器中创建MapperScannerConfigurer对象,用于扫描Dao接口创建代理对象
- 通过注解的方式注入Dao代理对象
实现
- 引入依赖
<properties>
    <project.build.sourceEncoding>UTF-8</project.build.sourceEncoding>
    <maven.compiler.source>1.8</maven.compiler.source>
    <maven.compiler.target>1.8</maven.compiler.target>
    <!--spring-->
    <spring.version>5.0.2.RELEASE</spring.version>
    <!--日志打印框架-->
    <slf4j.version>1.6.6</slf4j.version>
    <log4j.version>1.2.12</log4j.version>
    <!--mysql-->
    <mysql.version>5.1.6</mysql.version>
    <!--mybatis-->
    <mybatis.version>3.5.3</mybatis.version>
</properties>

<dependencies>
    <!--引入依赖-->
    <dependency>
        <groupId>org.springframework</groupId>
        <artifactId>spring-jdbc</artifactId>
        <version>${spring.version}</version>
    </dependency>
    <dependency>
        <groupId>org.springframework</groupId>
        <artifactId>spring-context</artifactId>
        <version>${spring.version}</version>
    </dependency>
    <!--mysql依赖-->
    <dependency>
        <groupId>mysql</groupId>
        <artifactId>mysql-connector-java</artifactId>
        <version>${mysql.version}</version>
    </dependency>
    <!-- log start -->
    <dependency>
        <groupId>log4j</groupId>
        <artifactId>log4j</artifactId>
        <version>${log4j.version}</version>
    </dependency>

    <dependency>
        <groupId>org.slf4j</groupId>
        <artifactId>slf4j-api</artifactId>
        <version>${slf4j.version}</version>
    </dependency>

    <dependency>
        <groupId>org.slf4j</groupId>
        <artifactId>slf4j-log4j12</artifactId>
        <version>${slf4j.version}</version>
    </dependency>
    <!-- log end -->

    <!--mybatis的依赖-->
    <dependency>
        <groupId>org.mybatis</groupId>
        <artifactId>mybatis</artifactId>
        <version>${mybatis.version}</version>
    </dependency>

    <!--
          mybatis整合spring的依赖
        -->
    <dependency>
        <groupId>org.mybatis</groupId>
        <artifactId>mybatis-spring</artifactId>
        <version>1.3.0</version>
    </dependency>

    <!--lombok-->
    <dependency>
        <groupId>org.projectlombok</groupId>
        <artifactId>lombok</artifactId>
        <version>1.18.10</version>
    </dependency>

    <!--junit-->
    <dependency>
        <groupId>junit</groupId>
        <artifactId>junit</artifactId>
        <version>4.12</version>
        <scope>test</scope>
    </dependency>
</dependencies>
- spring.xml文件配置
<?xml version="1.0" encoding="UTF-8"?>
<beans xmlns="http://www.springframework.org/schema/beans"
       xmlns:xsi="http://www.w3.org/2001/XMLSchema-instance"
       xmlns:context="http://www.springframework.org/schema/context"
       xsi:schemaLocation="http://www.springframework.org/schema/beans
                           http://www.springframework.org/schema/beans/spring-beans.xsd http://www.springframework.org/schema/context http://www.springframework.org/schema/context/spring-context.xsd">
    <!--1. 包扫描-->
    <context:component-scan base-package="com.itheima"/>

    <!--
        2. spring整合mybatis
    -->
    <!--
        1. 配置jdbc的环境:
            1.1 配置dataSource(既可以使用spring内置的DataSource,又可以使用第三方的DataSource)
            1.2 配置事务管理者(现在不做),后面学习声明式事务的时候再讲
        2. 将SqlSessionFactoryBean 对象进行IOC配置到spring的核心容器中,并且将dataSource注入进去
        3. 扫描dao包,创建出dao的代理对象,交给spring的核心容器管理
           各种dao代理对象的id,就是接口名首字母改小写
    -->
    <bean id="dataSource" class="org.springframework.jdbc.datasource.DriverManagerDataSource">
        <property name="username" value="root"></property>
        <property name="password" value="123"></property>
        <property name="url" value="jdbc:mysql:///day20?characterEncoding=utf8"></property>
        <property name="driverClassName" value="com.mysql.jdbc.Driver"></property>
    </bean>

    <bean id="sqlSessionFactory" class="org.mybatis.spring.SqlSessionFactoryBean">
        <property name="dataSource" ref="dataSource"></property>
        <!--加载mybatis的主配置文件-->
        <!--<property name="configLocation" value="classpath:SqlMapConfig.xml"></property>-->
        <!--别名配置的包扫描-->
        <property name="typeAliasesPackage" value="com.itheima.pojo"></property>
    </bean>

    <bean id="scannerConfigurer" class="org.mybatis.spring.mapper.MapperScannerConfigurer">
        <property name="basePackage" value="com.itheima.dao"></property>
    </bean>
</beans>
案例 - 使用mybatis和注解改造增删改查案例
1.需求
- 使用注解改造练习
2.分析
-
在业务类上面添加@Service
-
在业务类的accountDao字段上面添加@Autowird注解
-
开启包扫描
3.实现
- AccountController的代码
package com.itheima.controller;

import com.itheima.pojo.Account;
import com.itheima.service.AccountService;
import org.springframework.beans.factory.annotation.Autowired;
import org.springframework.stereotype.Controller;

import java.sql.SQLException;
import java.util.List;

/**
 * 包名:com.itheima.controller
 *
 * @author Leevi
 * 日期2020-08-09  15:06
 */
@Controller
public class AccountController {
    @Autowired
    private AccountService accountService;

    public List<Account> findAll() throws SQLException {
        return accountService.findAll();
    }

    public Account findById(int id) throws SQLException {
        return accountService.findById(id);
    }

    public void deleteById(int id) throws SQLException {
        accountService.deleteById(id);
    }

    public void add(Account account) throws SQLException {
        accountService.add(account);
    }

    public void update(Account account) throws SQLException {
        accountService.update(account);
    }
}
- 使用注解配置业务层
package com.itheima.service.impl;

import com.itheima.dao.AccountDao;
import com.itheima.pojo.Account;
import com.itheima.service.AccountService;
import org.springframework.beans.factory.annotation.Autowired;
import org.springframework.stereotype.Service;

import java.sql.SQLException;
import java.util.List;

/**
 * 包名:com.itheima.service.impl
 *
 * @author Leevi
 * 日期2020-08-09  15:05
 */
@Service
public class AccountServiceImpl implements AccountService {
    @Autowired
    private AccountDao accountDao;

    @Override
    public List<Account> findAll() throws SQLException {
        return accountDao.findAll();
    }

    @Override
    public Account findById(int id) throws SQLException {
        return accountDao.findById(id);
    }

    @Override
    public void deleteById(int id) throws SQLException {
        accountDao.deleteById(id);
    }

    @Override
    public void add(Account account) throws SQLException {
        accountDao.add(account);
    }

    @Override
    public void update(Account account) throws SQLException {
        accountDao.update(account);
    }
}
- AccountDao的代码
package com.itheima.dao;

import com.itheima.pojo.Account;

import java.sql.SQLException;
import java.util.List;

/**
 * 包名:com.itheima.dao
 *
 * @author Leevi
 * 日期2020-08-09  14:56
 */
public interface AccountDao {
    /**
     * 查询所有账号信息
     * @return
     */
    public List<Account> findAll() throws SQLException;

    /**
     * 根据id查询账号信息
     * @param id
     * @return
     */
    public Account findById(int id) throws SQLException;

    /**
     * 根据id删除账号信息
     * @param id
     */
    public void deleteById(int id) throws SQLException;

    /**
     * 添加账号信息
     * @param account
     */
    public void add(Account account) throws SQLException;

    /**
     * 修改账号信息
     * @param account
     */
    public void update(Account account) throws SQLException;
}
- AccountDao.xml配置文件
<?xml version="1.0" encoding="UTF-8" ?>
<!DOCTYPE mapper
        PUBLIC "-//mybatis.org//DTD Mapper 3.0//EN"
        "http://mybatis.org/dtd/mybatis-3-mapper.dtd">
<mapper namespace="com.itheima.dao.AccountDao">
    <insert id="add" parameterType="Account">
        insert into account(name,money) values (#{name},#{money})
    </insert>
    <update id="update" parameterType="Account">
        update account set name=#{name},money=#{money} where id=#{id}
    </update>
    <delete id="deleteById" parameterType="int">
        delete from account where id=#{id}
    </delete>

    <select id="findAll" resultType="Account">
        select * from account
    </select>

    <select id="findById" resultType="Account" parameterType="int">
        select * from account where id=#{id}
    </select>
</mapper>
- 修改applicationContext.xml
<?xml version="1.0" encoding="UTF-8"?>
<beans xmlns="http://www.springframework.org/schema/beans"
       xmlns:xsi="http://www.w3.org/2001/XMLSchema-instance"
       xmlns:context="http://www.springframework.org/schema/context"
       xsi:schemaLocation="http://www.springframework.org/schema/beans
       http://www.springframework.org/schema/beans/spring-beans.xsd
       http://www.springframework.org/schema/context
       http://www.springframework.org/schema/context/spring-context.xsd">
    <!--混合开发-->
    <!--1. 包扫描-->
    <context:component-scan base-package="com.itheima"/>
    <!--
        整合mybatis:
            1. 配置DataSource
            2. 配置SqlSessionFactoryBean
               注入数据源
               注入别名包扫描
            3. 配置MapperScannerConfigurer,进行Dao接口的包扫描
               注入要扫描的dao接口所在的包
    -->
    <bean id="dataSource" class="org.springframework.jdbc.datasource.DriverManagerDataSource">
        <property name="username" value="root"></property>
        <property name="password" value="123"></property>
        <property name="url" value="jdbc:mysql:///day20?characterEncoding=utf8"></property>
        <property name="driverClassName" value="com.mysql.jdbc.Driver"></property>
    </bean>
    <bean id="sqlSessionFactory" class="org.mybatis.spring.SqlSessionFactoryBean">
        <property name="dataSource" ref="dataSource"></property>
        <property name="typeAliasesPackage" value="com.itheima.pojo"></property>
    </bean>
    <bean id="mapperScannerConfigurer" class="org.mybatis.spring.mapper.MapperScannerConfigurer">
        <property name="basePackage" value="com.itheima.dao"></property>
    </bean>
</beans>
- log4j.properties
log4j.rootLogger=DEBUG,stdout
log4j.appender.stdout=org.apache.log4j.ConsoleAppender
log4j.appender.stdout.layout=org.apache.log4j.PatternLayout
#[%-5p] %t %l %d %rms:%m%n
#%d{yyyy-MM-dd HH:mm:ss,SSS\} %-5p [%t] {%c}-%m%n
log4j.appender.stdout.layout.ConversionPattern=[%-5p] %t %l %d %rms:%m%n
log4j.appender.file=org.apache.log4j.FileAppender
log4j.appender.file.File=D:\\idea_project\\itheima_mm_backend.log
log4j.appender.file.layout=org.apache.log4j.PatternLayout
log4j.appender.file.layout.ConversionPattern=%d{yyyy-MM-dd HH:mm:ss,SSS\} %-5p [%t] {%c}-%m%n
4.小结
案例-使用纯注解改造增删改查(了解)
1.需求
- 使用纯注解改造作业
2.分析
基于注解的IoC配置已经完成,但是大家都发现了一个问题:我们依然离不开spring的xml配置文件,那么能不能不写这个applicationContext.xml,所有配置都用注解来实现呢?
当然,同学们也需要注意一下,我们选择哪种配置的原则是简化开发和配置方便,而非追求某种技术
学习纯注解开发原因:
- 方便大家学习SpringBoot
- 以防万一真遇到了Spring纯注解开发(不可能)
<?xml version="1.0" encoding="UTF-8"?>
<beans xmlns="http://www.springframework.org/schema/beans"
       xmlns:xsi="http://www.w3.org/2001/XMLSchema-instance"
       xmlns:context="http://www.springframework.org/schema/context"
       xsi:schemaLocation="http://www.springframework.org/schema/beans
                           http://www.springframework.org/schema/beans/spring-beans.xsd
                           http://www.springframework.org/schema/context
                           http://www.springframework.org/schema/context/spring-context.xsd">
    <!--包扫描,扫描注解-->
    <context:component-scan base-package="com.itheima"/>
    <!--spring整合mybatis的配置文件-->
    <!--
        要进行ssm的整合,第一步:将sqlSessionFactory对象交给spring核心容器管理
        sqlSessionFactoryBean对象,就是管理SQLSession创建Dao代理对象的
        创建代理对象的目的是执行SQL语句

    -->
    <bean id="sqlSessionFactory" class="org.mybatis.spring.SqlSessionFactoryBean">
        <!--将数据源注入进来-->
        <property name="dataSource" ref="dataSource"/>
        <!--注入核心配置文件的路径-->
        <property name="configLocation" value="classpath:SqlMapConfig.xml"/>
    </bean>
    <bean id="dataSource" class="com.alibaba.druid.pool.DruidDataSource">
        <property name="username" value="root"/>
        <property name="password" value="123"/>
        <property name="url" value="jdbc:mysql:///day11?characterEncoding=utf-8"/>
        <property name="driverClassName" value="com.mysql.jdbc.Driver"/>
    </bean>
    <!--
        第二步:一定要让spring核心容器去扫描dao接口,去加载dao接口的代理对象
    -->
    <bean id="mapperScannerConfigurer" class="org.mybatis.spring.mapper.MapperScannerConfigurer">
        <!--指定要扫描的dao接口的包-->
        <property name="basePackage" value="com.itheima.dao"/>
    </bean>
</beans>
3.实现
3.1 @Configuration
-
作用:
用于指定当前类是一个spring配置类,当创建容器时会从该类上加载注解。
获取容器时需要使用AnnotationApplicationContext(类.class)。
-
属性:
value:用于指定配置类的字节码
-
示例代码:
@Configuration
public class SpringConfig {

}
3.2 @ComponentScan
-
作用:
用于指定spring在初始化容器时要扫描的包。作用和在spring的xml配置文件中的:
<context:component-scan base-package="com.itheima"/>是一样的。 -
属性:
basePackages:用于指定要扫描的包。和该注解中的value属性作用一样。
-
示例代码:
@Configuration
@ComponentScan(basePackages = "com.itheima")
public class SpringConfig {

}
3.3 @Bean
-
作用:
该注解只能写在方法上,表明使用此方法创建一个对象,并且放入spring容器。
-
属性:
name:给当前@Bean注解方法创建的对象指定一个名称(即bean的id)。
-
示例代码:
@Configuration
@ComponentScan(basePackages = "com.itheima")
public class SpringConfig {
	@Bean
    public DataSource getDataSource(){
        DriverManagerDataSource dataSource = new DriverManagerDataSource();
        dataSource.setUsername("root");
        dataSource.setPassword("123");
        dataSource.setUrl("jdbc:mysql:///day20?characterEncoding=utf8");
        dataSource.setDriverClassName("com.mysql.jdbc.Driver");
        return dataSource;
    }

    @Bean
    public SqlSessionFactoryBean getSqlSessionFactoryBean(DataSource dataSource){
        SqlSessionFactoryBean sqlSessionFactoryBean = new SqlSessionFactoryBean();
        //设置dataSource属性
        sqlSessionFactoryBean.setDataSource(dataSource);
        //设置typeAliasesPackage
        sqlSessionFactoryBean.setTypeAliasesPackage("com.itheima.pojo");
        return sqlSessionFactoryBean;
    }

    @Bean
    public MapperScannerConfigurer getMapperScannerConfigurer(){
        MapperScannerConfigurer mapperScannerConfigurer = new MapperScannerConfigurer();
        mapperScannerConfigurer.setBasePackage("com.itheima.dao");
        return mapperScannerConfigurer;
    }
}
3.4通过注解获取容器
ApplicationContext ac = new AnnotationConfigApplicationContext(SpringConfiguration.class);
3.小结
第二章-Spring整合测试
知识点-Spring整合测试(简单的了解)
1.目标
在测试类中,每个测试方法都有以下两行代码:
ApplicationContext ac = new ClassPathXmlApplicationContext(“bean.xml”);
AccountService as= ac.getBean("accountService",AccountService.**class**);
这两行代码的作用是获取容器,如果不写的话,直接会提示空指针异常。所以又不能轻易删掉。
2.分析
早前我们测试业务逻辑,一般都使用Junit 框架来测试, 其实在spring框架里面它也做出来了自己的一套测试逻辑, 里面是对junit进行了整合包装。让我们在执行spring的单元测试上面,可以少写一些代码.
- 导入Spring整合单元测试的坐标
- 在测试类上面添加注解(指定运行的环境, 加载配置文件或者配置类)
3.实现
-
导入spring整合Junit的坐标
<dependency> <groupId>org.springframework</groupId> <artifactId>spring-test</artifactId> <version>5.0.2.RELEASE</version> </dependency> -
在测试类上面标记注解
package com.itheima.test;

import com.itheima.controller.AccountController;
import com.itheima.pojo.Account;
import org.junit.Test;
import org.junit.runner.RunWith;
import org.springframework.beans.factory.annotation.Autowired;
import org.springframework.test.context.ContextConfiguration;
import org.springframework.test.context.junit4.SpringJUnit4ClassRunner;

import java.sql.SQLException;
import java.util.List;

/**
 * 包名:com.itheima.test
 *
 * @author Leevi
 * 日期2020-08-09  15:16
 * 直接在测试用例中,注入要使用的对象AccountController
 * 1. 我们自己不创建核心容器,那么我们就应该交给别人(Junit)去创建核心容器
 *    1. 引入spring整合Junit的依赖  spring-test
 *    2. 保证Junit的版本是4.12以及以上的版本
 *    3. 在单元测试类上添加RunWith注解
 *       @RunWith(SpringJUnit4ClassRunner.class)
 *    4. 指定有Junit创建核心容器的时候,要加载的配置文件/配置类
 *       @ContextConfiguration(locations = "classpath:applicationContext.xml") 混合开发
 *       @ContextConfiguration(classes = 配置类名.class) 纯注解开发
 */
@RunWith(SpringJUnit4ClassRunner.class)
@ContextConfiguration(locations = {"classpath:applicationContext.xml"})
public class TestSpring {
    @Autowired
    private AccountController accountController;
    @Test
    public void testFindAll() throws SQLException {
        List<Account> accountList = accountController.findAll();
        System.out.println(accountList);
    }

    @Test
    public void testFindById() throws SQLException {
        Account account = accountController.findById(1);
        System.out.println(account);
    }

    @Test
    public void testDeleteById() throws SQLException {
        accountController.deleteById(3);
    }

    @Test
    public void testAdd() throws SQLException {
        Account account = new Account();
        account.setName("ww");
        account.setMoney(1000.0);

        accountController.add(account);
    }

    @Test
    public void testUpdate() throws SQLException {
        Account account = accountController.findById(5);
        account.setName("aobama");
        account.setMoney(1500.0);

        accountController.update(account);
    }
}
4.小结
- 添加Spring整合单元测试的坐标
- 在测试类上面添加注解
- @RunWith(SpringJUnit4ClassRunner.class) 指定运行的环境
- @ContextConfiguration() 加载配置文件或者配置类的
第三章-混合开发方式补充
知识点-import标签
目标
使用import标签导入外部的xml配置文件
实现
<import resource="classpath:spring-mybatis.xml"/>
知识点-引入外部properties文件
目标
引入外部的properties属性文件
实现
<context:property-placeholder location="classpath:jdbc.properties"/>

<!--1. 创建DataSource对象-->
<bean id="dataSource" class="org.springframework.jdbc.datasource.DriverManagerDataSource">
    <property name="username" value="${jdbc.username}"></property>
    <property name="password" value="${jdbc.password}"></property>
    <property name="url" value="${jdbc.url}"></property>
    <property name="driverClassName" value="${jdbc.driver}"></property>
</bean>
第四章-AOP相关的概念
知识点-AOP概述
1.目标
- 能够理解AOP相关概念
2.路径
- 什么是AOP
- AOP的作用和优势
- AOP实现原理
3.讲解
3.1 什么是AOP

AOP:全称是AspectOriented Programming, 即面向切面编程。在不修改源码的基础上,对我们的已有方法进行增强。
说白了就是把我们程序重复的代码抽取出来,在需要执行的时候,使用动态代理的技术,进行增强
3.2 AOP的作用和优势
作用:
在程序运行期间,不修改源码对已有方法进行增强。
优势:
减少重复代码

提高开发效率

维护方便
3.3 AOP实现原理
使用动态代理技术
- JDK动态代理: 必须需要接口的
- Cglib动态代理: 不需要接口的,只需要类就好了
4.小结
- AOP: 面向切面编程
- 作用: 不需要改变源代码 对目标方法进行增强
- 底层实现: 动态代理
知识点-AOP的具体应用
1.需求
在所有的service层的save()方法逻辑调用之前,进行权限的校验
2.分析
在AOP 这种思想还没有出现的时候,我们解决 切面的问题思路无非有以下两种:
-
方式一:通过静态方法实现(缺点:需要修改源码,后期不好维护)
把需要添加的代码抽取到一个地方,然后在需要添加那些方法中引用
-
方式二:通过继承方案来解决(缺点:需要修改源码,继承关系复杂,后期不好维护)
抽取共性代码到父类, 子类在需要的位置,调用父类方法。
上述两种方式的缺点
都会打破原来代码的平静(也就是必须要修改代码 , 或者就是必须事先固定好。) 如果我们想在原有代码基础上扩展。 并且不改动原来的代码, 就可以使用AOP了。
其实AOP 字面直译过来是面向切面编程,其实通俗一点它就是在不修改类的源码的基础之上对我们的具体某个方法进行了增强而已。在之前我们对某个方法进行增强无非是两种手段 ,一种是装饰者模式 、 一种是代理模式 (静态代理 & 动态代理) 。 AOP 的底层使用的是动态代理方式 。
3.实现
AOP 的底层动态代理实现有两种方案。
一种是使用JDK的动态代理。 这种是早前我们在前面的基础增强说过的。 这一种主要是针对有接口实现的情况。 它的底层是创建接口的实现代理类, 实现扩展功能。也就是我们要增强的这个类,实现了某个接口,那么我就可以使用这种方式了. 而另一种方式是使用了cglib 的动态代理,这种主要是针对没有接口的方式,那么它的底层是创建被目标类的子类,实现扩展功能.
3.1 JDK方式
要求: 必须有接口
package com.itheima.proxy;

import com.itheima.dao.AccountDao;
import com.itheima.pojo.Account;

import java.lang.reflect.InvocationHandler;
import java.lang.reflect.Method;
import java.lang.reflect.Proxy;
import java.sql.Connection;
import java.sql.DriverManager;
import java.sql.PreparedStatement;
import java.sql.ResultSet;
import java.util.ArrayList;
import java.util.List;

/**
 * 包名:com.itheima.proxy
 *
 * @author Leevi
 * 日期2020-11-11  14:53
 */
public class JDKProxyTest {
    public static void main(String[] args) {
        //使用jdk的动态代理,来代理AccountDao接口
        AccountDao accountDao = (AccountDao) Proxy.newProxyInstance(AccountDao.class.getClassLoader(), new Class[]{AccountDao.class}, new InvocationHandler() {
            @Override
            public Object invoke(Object proxy, Method method, Object[] args) throws Throwable {
                //proxy就是代理对象
                //method就是需要被代理的方法
                //args就是方法的参数
                if (method.getName().equals("findAll")) {
                    //执行查询所有的sql语句
                    String sql = "select * from account";
                    Class.forName("com.mysql.jdbc.Driver");
                    Connection conn = DriverManager.getConnection("jdbc:mysql:///day29?characterEncoding=utf8", "root", "123");
                    PreparedStatement pstm = conn.prepareStatement(sql);
                    ResultSet rst = pstm.executeQuery();
                    List<Account> accountList = new ArrayList<>();
                    while (rst.next()) {
                        int id = rst.getInt("id");
                        String name = rst.getString("name");
                        double money = rst.getDouble("money");
                        Account account = new Account();
                        account.setId(id);
                        account.setName(name);
                        account.setMoney(money);
                        accountList.add(account);
                    }
                    return accountList;
                }
                return null;
            }
        });

        System.out.println(accountDao.findAll());
    }
}
3.2 CgLib方式【了解】
- 添加坐标
  <dependencies>
    <!--Spring核心容器-->
    <dependency>
      <groupId>org.springframework</groupId>
      <artifactId>spring-context</artifactId>
      <version>5.0.2.RELEASE</version>
    </dependency>
    <!--SpringAOP相关的坐标-->
    <dependency>
      <groupId>org.aspectj</groupId>
      <artifactId>aspectjweaver</artifactId>
      <version>1.8.7</version>
    </dependency>

    <!--Spring整合单元测试-->
    <dependency>
      <groupId>org.springframework</groupId>
      <artifactId>spring-test</artifactId>
      <version>5.0.2.RELEASE</version>
    </dependency>
    <!--单元测试-->
    <dependency>
      <groupId>junit</groupId>
      <artifactId>junit</artifactId>
      <version>4.12</version>
      <scope>test</scope>
    </dependency>
  </dependencies>
-
使用CgLib方式实现: 第三方的代理机制,不是jdk自带的. 没有实现接口的类产生代理,使用的是字节码的增强技术,其实就是产生这个类的子类。
不需要有接口
package com.itheima.proxy;

import com.itheima.service.AccountService;
import org.springframework.cglib.proxy.Enhancer;
import org.springframework.cglib.proxy.MethodInterceptor;
import org.springframework.cglib.proxy.MethodProxy;

import java.lang.reflect.Method;

/**
 * 包名:com.itheima.proxy
 *
 * @author Leevi
 * 日期2020-11-11  15:06
 */
public class CglibProxyTest {
    public static void main(String[] args) {
        //使用cglib的动态代理,代理AccountService对象
        AccountService accountService = new AccountService();
        Enhancer enhancer = new Enhancer();

        //设置enhancer的父类
        enhancer.setSuperclass(AccountService.class);
        enhancer.setCallback(new MethodInterceptor() {
            @Override
            public Object intercept(Object o, Method method, Object[] objects, MethodProxy methodProxy) throws Throwable {
                //o 表示代理对象
                // method表示方法
                //objects表示参数
                if (method.getName().equals("save")) {
                    //先进行权限校验
                    System.out.println("校验添加权限。。。");
                    //再调用save()方法
                    method.invoke(accountService,objects);
                    return null;
                }
                //其它方法就不增强
                return method.invoke(accountService,objects);
            }
        });

        //创建代理对象
        AccountService proxyService = (AccountService) enhancer.create();

        proxyService.save();
    }
}
4.小结
-
AOP的底层就是封装了动态代理
- JDK的动态代理
- CgLib的动态代理
-
JDK的动态代理: 依赖接口的, 必须有接口
CgLib的动态代理: 如果要代理的类没有实现接口,那么就只能使用cglib的动态代理
知识点-AOP术语
1.目标
- 能够说出AOP相关术语的含义
2.路径
- Spring中的AOP说明
- AOP中的术语
3.讲解
3.1 学习spring中的AOP要明确的事
-
编译期
编写核心业务代码(开发主线):大部分程序员来做,要求熟悉业务需求。
把公用代码抽取出来,制作成切面中的通知。(开发阶段最后再做)
在配置文件中,声明切入点与通知间的关系,即切面 -
运行期(Spring框架完成的)
Spring框架监控切入点方法的执行。一旦监控到切入点方法被运行,使用代理机制,动态创建目标对象的代理对象,根据通知类别,在代理对象的对应位置,将通知对应的功能织入,完成完整的代码逻辑运行。
在spring中,框架会根据目标类是否实现了接口来决定采用哪种动态代理的方式。
3.2. AOP中的术语
-
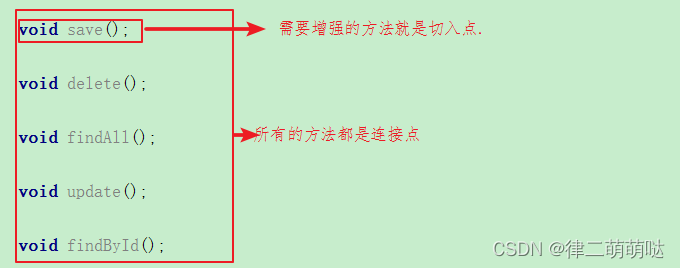
JoinPoint: 连接点(所有可以被增强的方法)
类里面哪些方法可以被增强,这些方法称为连接点. 在spring的AOP中,指的是业务层的类的所有现有的方法。
-
Pointcut: 切入点(具体项目中真正已经被增强的方法)
在类里面可以有很多方法被增强,但是实际开发中,我们只对具体的某几个方法而已,那么这些实际增强的方法就称之为切入点
-
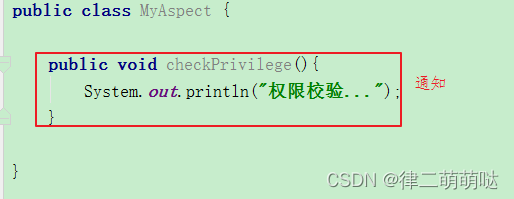
Advice: 通知/增强 (具体用于增强方法的代码)
增强的逻辑、称为增强,比如给某个切入点(方法) 扩展了校验权限的功能,那么这个校验权限即可称之为增强 或者是通知
通知分为:
前置通知: 在被增强的方法之前执行.
后置通知: 在被增强的方法之后执行. 特点: 可以得到被增强方法的返回值
异常通知: 在被增强的方法执行出现异常的时候执行. 如果方法没有异常,不会执行. 特点:可以获得异常的信息
最终通知: 指的是无论是否有异常,总是被执行的。
环绕通知:在方法之前和方法之后执行. 特点:可以阻止目标方法执行
-
Aspect: 切面(所有的通知都是在切面中的)
4.小结
- 使用AOP: 逻辑需要我们写的, 怎么切是Spring做(运行阶段), 源码阶段看不到
- 术语:
切面: 让通知和切入点进行结合


 564
564


 被折叠的 条评论
为什么被折叠?
被折叠的 条评论
为什么被折叠?
 到【灌水乐园】发言


