


Runnble
先说说Runnable接口:
package cic.threadpractice;

public class RunnbaleTest implements Runnable {
    @Override
    public void run() {
        System.out.println(Thread.currentThread().getName());

    }
    public static void main(String[] args) {
        RunnbaleTest test1 = new RunnbaleTest();
        RunnbaleTest test2 = new RunnbaleTest();
        test1.run();
        test2.run();
    }
}
结果:
main
main
实现Runnable接口需要重写其run方法,然后实现类运行run方法即可,可以看到俩个实例运行时都是主线程,然后我们再看看Runnable另一种运行方式:
public class RunnableTest2 implements Runnable{
    private int count = 10;
    @Override
    public void run() {
        //while(count>0)
        System.out.println(Thread.currentThread().getName());

    }
    public static void main(String[] args) {
        RunnableTest2 test1 = new RunnableTest2();
        RunnableTest2 test2 = new RunnableTest2();
        new Thread(test1).start();
        new Thread(test1).start();
        new Thread(test2).start();
        new Thread(test2).start();
    }
结果:
Thread-2
Thread-3
Thread-0
Thread-1
可以看到每次新建了一个线程去执行,并且同一个runnable对象依然是新建线程
为了更好的对比,我们更加深入的进行测试:
采用第一种方式进行私有变量的共享:
public class RunnbaleTest implements Runnable {
    private  int count = 10;
    @Override
    public void run() {
        while(count>0)
        System.out.println(Thread.currentThread().getName()+"-----"+count--);

    }
    public static void main(String[] args) {
        RunnbaleTest test1 = new RunnbaleTest();
        RunnbaleTest test2 = new RunnbaleTest();
        test1.run();
        test2.run();

    }
}
结果:
main-----10
main-----9
main-----8
main-----7
main-----6
main-----5
main-----4
main-----3
main-----2
main-----1
main-----10
main-----9
main-----8
main-----7
main-----6
main-----5
main-----4
main-----3
main-----2
main-----1
可以看到私有变量是跟随runnable实例进行的,这里俩个实例,于是启动了主线程分别执行了俩个实例的操作,目前看起来是串行的,因为没有起新线程。
而当我们将变量修改成全局static
结果为:
main-----10
main-----9
main-----8
main-----7
main-----6
main-----5
main-----4
main-----3
main-----2
main-----1
于是变量依然是由主线程执行,只有一个共享实例。
我们再看看另一种实现方式下的变量情况
public class RunnableTest2 implements Runnable{
    private int count = 10;
    @Override
    public void run() {
        while(count>0)
        System.out.println(Thread.currentThread().getName()+"-----"+count--);

    }
    public static void main(String[] args) {
        RunnableTest2 test1 = new RunnableTest2();
        new Thread(test1).start();
        new Thread(test1).start();

    }
}
结果:
Thread-1-----10
Thread-1-----9
Thread-1-----8
Thread-1-----7
Thread-1-----6
Thread-1-----5
Thread-1-----4
Thread-1-----3
Thread-1-----2
Thread-1-----1
Thread-0-----0
可以看到,当为同一个runnable实例时,依然只有一个变量在被消耗,同时消耗这个变量的为俩个不同进程
到这里,我想读者为和我有一样的疑惑这里为什么会有这样的区别,一个是由主线程执行,一个是新建线程执行,我们接着进行Thread类测试
Thread
想让新线程执行你想要做的任务,那只有定义一个Thread的子类并重写run()方法,这时新线程就会去执行你写的run()方法中的代码。这也是最传统的Java线程实现方式。
public class ThreadTest extends Thread{
    private int count = 10;
        @Override
        public void run() {
            while(count>0)
                System.out.println(Thread.currentThread().getName()+"-----"+count--);

        }


    public static void main(String[] args) {
        System.out.println(Thread.currentThread().getName());
        ThreadTest test = new ThreadTest();
        ThreadTest test1 = new ThreadTest();
        //new Thread(test).start();
        //new Thread(test1).start();
        test.run();
        test1.run();
    }
}
结果:
main
main-----10
main-----9
main-----8
main-----7
main-----6
main-----5
main-----4
main-----3
main-----2
main-----1
main-----10
main-----9
main-----8
main-----7
main-----6
main-----5
main-----4
main-----3
main-----2
main-----1
可以看到,在Tread类中直接执行run方法同实现runnble接口是一样的结果
然后我们再看start方式
public class ThreadTest extends Thread{
    private int count = 10;
        @Override
        public void run() {
            while(count>0)
                System.out.println(Thread.currentThread().getName()+"-----"+count--);

        }


    public static void main(String[] args) {
        System.out.println(Thread.currentThread().getName());
        ThreadTest test = new ThreadTest();
        ThreadTest test1 = new ThreadTest();
     test.start();
     test1.start();
    }
}
结果:
main
Thread-0-----10
Thread-0-----9
Thread-0-----8
Thread-0-----7
Thread-0-----6
Thread-0-----5
Thread-0-----4
Thread-0-----3
Thread-0-----2
Thread-0-----1
Thread-1-----10
Thread-1-----9
Thread-1-----8
Thread-1-----7
Thread-1-----6
Thread-1-----5
Thread-1-----4
Thread-1-----3
Thread-1-----2
Thread-1-----1
于是,同前面runnable使用start方式一样,新建了线程,
可以从Java虚拟机的角度分析一下。

堆是由所有线程共享的数据区,假设我们new了3个Thread对象,实质是在堆里面创建了3个对象:

3个线程分别访问自己的num成员,互相不干扰,所以每个线程都会输出10到1这几个数字。
当我们使用runnable同一个实例进行构造三个线程的时候,

堆内存中,num只有一个,3个线程访问的都是这个num,所以10到1每个只打印了一次。
因此 Runnable接口和Thread配合使用,可以实现对共享资源的访问,当然需要配上同步互斥机制。
源码分析
我们先解析下Tread类的start方法
    public synchronized void start() {
        /**
         * This method is not invoked for the main method thread or "system"
         * group threads created/set up by the VM. Any new functionality added
         * to this method in the future may have to also be added to the VM.
         *
         * A zero status value corresponds to state "NEW".
         */
        if (threadStatus != 0)
            throw new IllegalThreadStateException();

        /* Notify the group that this thread is about to be started
         * so that it can be added to the group's list of threads
         * and the group's unstarted count can be decremented. */
        group.add(this);

        boolean started = false;
        try {
            start0();
            started = true;
        } finally {
            try {
                if (!started) {
                    group.threadStartFailed(this);
                }
            } catch (Throwable ignore) {
                /* do nothing. If start0 threw a Throwable then
                  it will be passed up the call stack */
            }
        }
    }

    private native void start0();
可以看出,start()方法的核心是调用了start0(),而这是一个native的方法,属于Java虚拟机的底层实现,我们看不到源码。Java虚拟机底层实质是调用了操作系统的系统调用去启动这个线程,比如在Linux下面,肯定就是调用了pthread_create,这个细节我们不用管,反正就是启动了一个线程。这个线程做了什么,我们可以通过start()的注释了解一下:
/**
* Causes this thread to begin execution; the Java Virtual Machine
* calls therunmethod of this thread.
*
* The result is that two threads are running concurrently: the
* current thread (which returns from the call to the
*startmethod) and the other thread (which executes its
*runmethod).
*
* It is never legal to start a thread more than once.
* In particular, a thread may not be restarted once it has completed
* execution.
*
* @exception IllegalThreadStateException if the thread was already
* started.
* @see #run()
* @see #stop()
*/
第一句话很明显:Causes this thread to begin execution; the Java Virtual Machine calls the run method of this thread.意思是:导致这个线程开始执行,Java虚拟机调用这个线程 的run方法。也就是说:你执行了start()方法时,一个新线程被创建,执行的是该线程的run()方法。
一个 Java 线程的创建本质上就对应了一个本地线程(native thread)的创建,两者是一一对应的。
关键问题是:本地线程执行的应该是本地代码,而 Java 线程提供的线程函数(run)是 Java 方法,编译出的是 Java 字节码。
所以, Java 线程其实提供了一个统一的线程函数,该线程函数通过 Java 虚拟机调用 Java 线程方法 , 这是通过 Java 本地方法 start0 调用来实现的。
也就是新创建的线程启动调用native start0方法,而这些native方法的注册是在Thread对象初始化的时候完成的
 private static native void registerNatives();
    static {
        registerNatives();
    }
Thread 类有个 registerNatives 本地方法,该方法主要的作用就是注册一些本地方法供 Thread 类使用,如 start0(),stop0() 等等,可以说,所有操作本地线程的本地方法都是由它注册的。
这个方法放在一个 static 语句块中,当该类被加载到 JVM 中的时候,它就会被调用,进而注册相应的本地方法。(查看本地方法的源码需要前往 http://jdk.java.net/java-se-ri/8 下载openjdk的源代码)
而本地方法 registerNatives 是定义在 Thread.c 文件中的。Thread.c 是个很小的文件,它定义了各个操作系统平台都要用到的关于线程的公用数据和操作,如下:
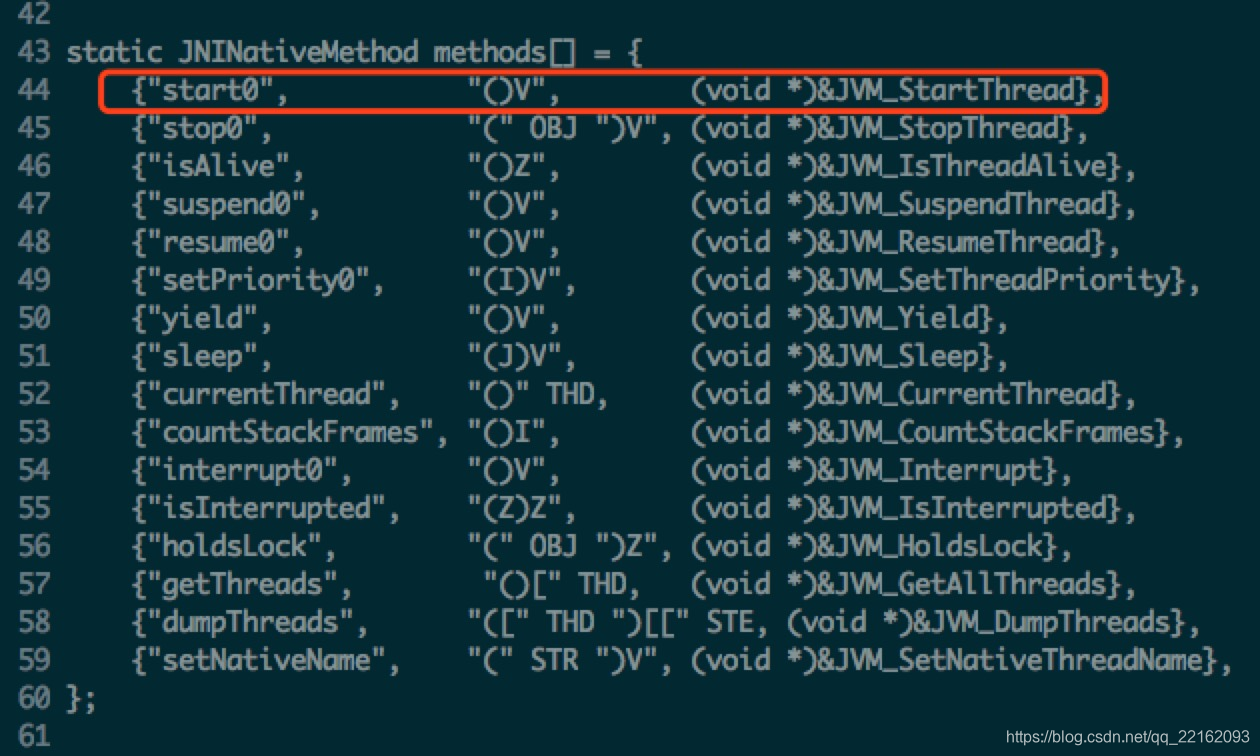
可以看出 Java 线程调用 start->start0 的方法,实际上会调用到 JVM_StartThread 方法,而 JVM_StartThread 最终调用的是 Java 线程的 run 方法。
在 jvm.cpp 中,有如下代码段:

这里 JVM_ENTRY 是一个宏,用来定义 JVM_StartThread 函数,可以看到函数内创建了真正的平台相关的本地线程,其线程函数是 thread_entry,如下:

可以看到调用了 vmSymbols::run_method_name 方法,而 run_method_name 是在 vmSymbols.hpp 用宏定义的:

我们再看一下Thread类中的默认run方法:
 @Override
    public void run() {
        if (target != null) {
            target.run();
        }
    }
非常简单的一个方法,target对象是runnbale实现类。
 /* What will be run. */
    private Runnable target;

 public Thread(Runnable target) {
        init(null, target, "Thread-" + nextThreadNum(), 0);
    }
run()方法里面的target就是这个构造target,如果在创建Thread对象时,你是用一个Runable实现类进行初始化的,那么target将不为null,我们继续看看源码,这里调用了init方法:
  private void init(ThreadGroup g, Runnable target, String name,
                      long stackSize) {
        init(g, target, name, stackSize, null, true);
    }
 private void init(ThreadGroup g, Runnable target, String name,
                      long stackSize, AccessControlContext acc,
                      boolean inheritThreadLocals) {
        if (name == null) {
            throw new NullPointerException("name cannot be null");
        }
        ......
        this.name = name;
        ......
        this.target = target;
        ......
    }
其实就是用传入的target参数来初始化当前Thread类中的target
如果不对Thread的任务target进行设置,因为Thread自身就是一个Runnable,本身具备任务,执行的是本实例重写的run方法;
Callable
由于run()方法返回值为void类型,所以在执行完任务之后无法返回任何结果。对于这个缺陷,有了Callable,Callable位于java.util.concurrent包下,它也是一个接口,在它里面只声明了一个方法,这个方法叫做call():
public interface Callable<V> {
    /**
     * Computes a result, or throws an exception if unable to do so.
     *
     * @return computed result
     * @throws Exception if unable to compute a result
     */
    V call() throws Exception;
}
许多任务实际上都是存在延迟的计算,对于这些任务,Callable是一种更好的抽象:它会返回一个值,并可能抛出一个异常。可以看到,这是一个泛型接口,该接口声明了一个名称为call()的方法,同时这个方法可以有返回值V,也可以抛出异常。call()方法返回的类型就是传递进来的V类型。
Runnable和Callable描述的都是抽象的计算任务。这些任务通常是有生命周期的。Executor执行的任务有4个生命周期阶段:创建、提交、开始和完成。由于有些任务可能要执行很长时间,因此通常希望可以取消这些任务。在Executor框架中,已提交但尚未开始的任务可以取消,对于已经开始执行的任务,只有当它们响应中断时才能取消。
Future
Future就是对具体的Callable和Runnable任务进行操作,如:取消任务,查询任务是否完成,获取任务完成之后的返回结果(如果有返回值)
public interface Future<V> {
    boolean cancel(boolean mayInterruptIfRunning);

    boolean isCancelled();

    boolean isDone();

    V get() throws InterruptedException, ExecutionException;

    V get(long timeout, TimeUnit unit)
        throws InterruptedException, ExecutionException, TimeoutException;
}
在Future接口中声明了5个方法,下面依次解释每个方法的作用:
1、cancel方法用来取消任务,如果取消任务成功则返回true,如果取消任务失败则返回false。参数mayInterruptIfRunning表示是否允许取消正在执行却没有执行完毕的任务,如果设置true,则表示可以取消正在执行过程中的任务。如果任务已经完成,则无论mayInterruptIfRunning为true还是false,此方法肯定返回false,即如果取消已经完成的任务会返回false;如果任务正在执行,若mayInterruptIfRunning设置为true,则返回true,若mayInterruptIfRunning设置为false,则返回false;如果任务还没有执行,则无论mayInterruptIfRunning为true还是false,肯定返回true。
2、isCancelled方法表示任务是否被取消成功,如果在任务正常完成前被取消成功,则返回 true。
3、isDone方法表示任务是否已经完成,若任务完成,则返回true;
4、get()方法用来获取执行结果,这个方法会产生阻塞,会一直等到任务执行完毕才返回;
5、get(long timeout, TimeUnit unit)用来获取执行结果,如果在指定时间内,还没获取到结果,就直接返回null。
也就是说实际上Future提供了四种功能:
取消任务;
判断任务是否完成;
中断任务;
获取任务执行结果。
Future与Callable的关系与ExecutorService与Executor的关系对应。
FutureTask
Future只是一个接口,无法直接创建对象,因此有了FutureTask。
我们先来看下FutureTask的实现:
public class FutureTask<V> implements RunnableFuture<V>
FutureTask类实现了RunnableFuture接口
public interface RunnableFuture<V> extends Runnable, Future<V> {
    void run();
}
RunnableFuture继承了Runnable和Future接口,而FutureTask实现了RunnableFuture接口。
要区分“声明多继承”与“实现多继承”。Java是不允许“实现多继承”,简称不允许“多继承”。但是Java支持“声明多继承”——Java的接口的多继承——一个类可以实现多个接口(“继承”了多个接口上的方法声明),而一个接口可以继承多个接口(同样是“继承”了多个接口上的方法声明)。
FutureTask的继承关系和方法如图所示:

FutureTask是一个可取消的异步计算,FutureTask 实现了Future的基本方法,提供start cancel 操作,可以查询计算是否已经完成,并且可以获取计算的结果。结果只可以在计算完成之后获取,get方法会阻塞当计算没有完成的时候,一旦计算已经完成, 那么计算就不能再次启动或是取消。
一个FutureTask 可以用来包装一个 Callable 或是一个Runnable对象。因为FurtureTask实现了Runnable方法,所以一个 FutureTask可以提交(submit)给一个Excutor执行(excution). 它同时实现了Callable, 所以也可以作为Future得到Callable的返回值。
FutureTask执行方式
我们先看下FutureTask的任务有哪些执行方式:
先定义一个task:
class Task implements Callable<String>{
    public String call() throws Exception {
        System.out.println("正在做运算...");
        Thread.sleep(5000);
        String taskResultStr = "hello world";
        System.out.println("[Task] " + Thread.currentThread().getName());
        return taskResultStr;
    }
第一种方式接执行:
 public static void testFutureTaskSelf() throws Exception{
        System.out.println("[testFutureTaskSelf] " + Thread.currentThread().getName());
        Task task = new Task();
        FutureTask<String> futureTask = new FutureTask<String>(task);

        //没有起到多线程的作用,只是执行了run方法而已
        futureTask.run();
        System.out.println(futureTask.get());
    }
结果:
[testFutureTaskSelf] main
正在做运算…
[Task] main
hello world
主线程执行,代表没有新起线程
第二种ExecutorService执行
 public static void testFutureTaskWithExecutorService() throws Exception{
        System.out.println("[testFutureTaskWithExecutorService] " + Thread.currentThread().getName());
        ExecutorService executorService = Executors.newCachedThreadPool();
        Task task = new Task();
        FutureTask<String> futureTask = new FutureTask<String>(task);
       //或者Future<String> futureTask = new FutureTask<String>(task);
        executorService.submit(futureTask);

        // shutdown只是将线程池的状态设置成SHUTDOWN状态,然后等所有的线程执行完再关闭线程池
        executorService.shutdown();

        //shutdownNow首先将线程池的状态设置成STOP,然后尝试停止所有的正在执行或暂停任务的线程,并返回等待执行任务的列表
        //executorService.shutdownNow();
        /**
         * 只要调用了这两个关闭方法的其中一个,isShutdown方法就会返回true。
         * 当所有的任务都已关闭后,才表示线程池关闭成功,这时调用isTerminaed方法会返回true
         */
        System.out.println(futureTask.get());
    }
结果:
[testFutureWithExecutorService] main
正在做运算…
[Task] pool-2-thread-1
hello world
线程池的线程执行
第三种使用线程Thread类执行
 public static void testFutureTaskWithThread() throws Exception{
        System.out.println("[testFutureTaskWithThread] " + Thread.currentThread().getName());
        Task task = new Task();
        FutureTask<String> futureTask = new FutureTask<String>(task);
        //或者Future<String> futureTask = new FutureTask<String>(task);
        Thread t = new Thread(futureTask);
        t.start();
        System.out.println(futureTask.get());
    }
结果:
[testFutureTaskWithThread] main
正在做运算…
[Task] Thread-0
hello world
新起线程执行
FutureTask属性讲解
FutureTask有两个很重要的属性分别是state和runner, FutureTask之所以支持canacel操作,也是因为这两个属性。
其中state为枚举值:
    private volatile int state; // 注意volatile关键字
    /**
     * 在构建FutureTask时设置,同时也表示内部成员callable已成功赋值,
     * 一直到worker thread完成FutureTask中的run();
     */
    private static final int NEW = 0;

    /**
     * woker thread在处理task时设定的中间状态,处于该状态时,
     * 说明worker thread正准备设置result.
     */
    private static final int COMPLETING = 1;

    /**
     * 当设置result结果完成后,FutureTask处于该状态,代表过程结果,
     * 该状态为最终状态final state,(正确完成的最终状态)
     */
    private static final int NORMAL = 2;

    /**
     * 同上,只不过task执行过程出现异常,此时结果设值为exception,
     * 也是final state
     */
    private static final int EXCEPTIONAL = 3;

    /**
     * final state, 表明task被cancel(task还没有执行就被cancel的状态).
     */
    private static final int CANCELLED = 4;

    /**
     * 中间状态,task运行过程中被interrupt时,设置的中间状态
     */
    private static final int INTERRUPTING = 5;

    /**
     * final state, 中断完毕的最终状态,几种情况,下面具体分析
     */
    private static final int INTERRUPTED = 6;
state初始化为NEW。只有在set, setException和cancel方法中state才可以转变为终态。在任务完成期间,state的值可能为COMPLETING或INTERRUPTING。
state有四种可能的状态转换:
NEW -> COMPLETING -> NORMAL
NEW -> COMPLETING -> EXCEPTIONAL
NEW ->CANCELLED
NEW -> INTERRUPTING -> INTERRUPTED
其他成员变量:
    /** The underlying callable; nulled out after running */
    private Callable<V> callable;   // 具体run运行时会调用其方法call(),并获得结果,结果时置为null.

    /** The result to return or exception to throw from get() */
    private Object outcome; // non-volatile, protected by state reads/writes   没必要为votaile,因为其是伴随state 进行读写,而state是FutureTask的主导因素。

    /** The thread running the callable; CASed during run() */
    private volatile Thread runner;   //具体的worker thread.

    /** Treiber stack of waiting threads */
    private volatile WaitNode waiters;     //Treiber stack 并发stack数据结构,用于存放阻塞在该futuretask#get方法的线程。
lock-tree算法可以看这篇文章Lock-Free 算法
下面分析下Task的状态变化,也就一个任务的生命周期:
创建一个FutureTask首先调用构造方法:
 public FutureTask(Runnable runnable, V result) {
        this.callable = Executors.callable(runnable, result);
        this.state = NEW;       // ensure visibility of callable
 }
此时将state设置为初始态NEW。这里注意Runnable是怎样转换为Callable的,看下this.callable = Executors.callable(runnable, result); 调用Executors.callable:
public static <T> Callable<T> callable(Runnable task, T result) {
        if (task == null)
            throw new NullPointerException();
        return new RunnableAdapter<T>(task, result);
}
static final class RunnableAdapter<T> implements Callable<T> {
        final Runnable task;
        final T result;
        RunnableAdapter(Runnable task, T result) {
            this.task = task;
            this.result = result;
        }
        public T call() {
            task.run();
            return result;
        }
}
其实就是通过Callable的call方法调用Runnable的run方法,把传入的 T result 作为callable的返回结果;
当创建完一个Task通常会提交给Executors来执行,当然也可以使用Thread来执行,Thread的start()方法会调用Task的run()方法。看下FutureTask的run()方法的实现:
public void run() {
        if (state != NEW ||
            !UNSAFE.compareAndSwapObject(this, runnerOffset,
                                         null, Thread.currentThread()))
            return;
        try {
        //私有private Callable<V> callable;
            Callable<V> c = callable;
            if (c != null && state == NEW) {
                V result;
                boolean ran;
                try {
                //RunnableAdapter的call
                    result = c.call();
                    ran = true;
                } catch (Throwable ex) {
                    result = null;
                    ran = false;
                    setException(ex);
                }
                if (ran)
                //设置private Object outcome
                    set(result);
            }
        } finally {
            // runner must be non-null until state is settled to
            // prevent concurrent calls to run()
            runner = null;
            // state must be re-read after nulling runner to prevent
            // leaked interrupts
            int s = state;
            if (s >= INTERRUPTING)
                handlePossibleCancellationInterrupt(s);
        }
    }
首先判断任务的状态,如果任务状态不是new,说明任务状态已经改变(说明他已经走了上面4种可能变化的一种,比如caller调用了cancel,此时状态为Interrupting, 也说明了上面的cancel方法,task没运行时,就interrupt, task得不到运行,总是返回);
如果状态是new, 判断runner是否为null, 如果为null, 则把当前执行任务的线程赋值给runner,如果runner不为null, 说明已经有线程在执行,返回。此处使用cas来赋值worker thread是保证多个线程同时提交同一个FutureTask时,确保该FutureTask的run只被调用一次, 如果想运行多次,使用runAndReset()方法。
这里
!UNSAFE.compareAndSwapObject(this, runnerOffset,
                                  null, Thread.currentThread())
语义相当于
if (this.runner == null ){
//把当前执行任务的线程赋值给runner
    this.runner = Thread.currentThread();
}
使用compareAndSwap能够保证原子性.
接着开始执行任务,如果要执行的任务不为空,并且state为New就执行,可以看到这里调用了Callable的call方法。如果执行成功则set结果,如果出现异常则setException。最后把runner设为null。
接着看下set方法:
protected void set(V v) {
        if (UNSAFE.compareAndSwapInt(this, stateOffset, NEW, COMPLETING)) {
            outcome = v;
            UNSAFE.putOrderedInt(this, stateOffset, NORMAL); // final state
            finishCompletion();
        }
    }
如果现在的状态是NEW就把状态设置成COMPLETING,然后设置成NORMAL。这个执行流程的状态变化就是: NEW->COMPLETING->NORMAL。
最后执行finishCompletion()方法:
private void finishCompletion() {
        // assert state > COMPLETING;
        for (WaitNode q; (q = waiters) != null;) {
            if (UNSAFE.compareAndSwapObject(this, waitersOffset, q, null)) {
                for (;;) {
                    Thread t = q.thread;
                    if (t != null) {
                        q.thread = null;
                        LockSupport.unpark(t);
                    }
                    WaitNode next = q.next;
                    if (next == null)
                        break;
                    q.next = null; // unlink to help gc
                    q = next;
                }
                break;
            }
        }

        done();

        callable = null;        // to reduce footprint
 }
finishCompletion()会解除所有阻塞的worker thread, 调用done()方法,将成员变量callable设为null。这里使用了LockSupport类来解除线程阻塞,关于LockSupport,可参见LockSupport原理剖析
get方法:
    public V get() throws InterruptedException, ExecutionException {
        int s = state;
        if (s <= COMPLETING)
            s = awaitDone(false, 0L);
        return report(s);
    }
首先判断FutureTask的状态是否为完成状态,如果是完成状态,说明已经执行过set或setException方法,返回report(s):
    private V report(int s) throws ExecutionException {
        Object x = outcome;
        if (s == NORMAL)
            return (V)x;
        if (s >= CANCELLED)
            throw new CancellationException();
        throw new ExecutionException((Throwable)x);
    }
可以看到,如果FutureTask的状态是NORMAL, 即正确执行了set方法,get方法直接返回处理的结果, 如果是取消状态,即执行了setException,则抛出CancellationException异常。
如果get时,FutureTask的状态为未完成状态,则调用awaitDone方法进行阻塞。awaitDone():
    private int awaitDone(boolean timed, long nanos)
        throws InterruptedException {
        final long deadline = timed ? System.nanoTime() + nanos : 0L;
        WaitNode q = null;
        boolean queued = false;
        for (;;) {
            if (Thread.interrupted()) {
                removeWaiter(q);
                throw new InterruptedException();
            }

            int s = state;
            if (s > COMPLETING) {
                if (q != null)
                    q.thread = null;
                return s;
            }
            else if (s == COMPLETING) // cannot time out yet
                Thread.yield();
            else if (q == null)
                q = new WaitNode();
            else if (!queued)
                queued = UNSAFE.compareAndSwapObject(this, waitersOffset,
                                                     q.next = waiters, q);
            else if (timed) {
                nanos = deadline - System.nanoTime();
                if (nanos <= 0L) {
                    removeWaiter(q);
                    return state;
                }
                LockSupport.parkNanos(this, nanos);
            }
            else
                LockSupport.park(this);
        }
    }
awaitDone方法可以看成是不断轮询查看FutureTask的状态。在get阻塞期间:
如果执行get的线程被中断,则移除FutureTask的所有阻塞队列中的线程(waiters),并抛出中断异常;
如果FutureTask的状态转换为完成状态(正常完成或取消),则返回完成状态;
如果FutureTask的状态变为COMPLETING, 则说明正在set结果,此时让线程等一等;
如果FutureTask的状态为初始态NEW,则将当前线程加入到FutureTask的阻塞线程中去;
如果get方法没有设置超时时间,则阻塞当前调用get线程;如果设置了超时时间,则判断是否达到超时时间,如果到达,则移除FutureTask的所有阻塞列队中的线程,并返回此时FutureTask的状态,如果未到达时间,则在剩下的时间内继续阻塞当前线程。
除了以上几个创建线程的方式外,还有CompletableFuture类
如果想了解CompletableFuture类可以看我的这篇文章CompletableFuture分析和实战


 568
568


 被折叠的 条评论
为什么被折叠?
被折叠的 条评论
为什么被折叠?
 到【灌水乐园】发言


