


最近用NextJS框架做全栈项目做的很顺手,现在想给项目加上登录、注册、鉴权拦截、分角色路由控制等功能,并接入Github、Notion等第三方登录。
可以使用NextJS官方提供的Auth框架实现。
Intro
阅读本篇,你将学会:
1、登录、注册等逻辑,和如何接入第三方(以Github、Notion为例)
2、建立用户、角色等数据模型,存储用户数据
3、公开、私有路由守卫
技术栈
- NextJs(前端框架) v14.2.3
- React(前端框架) 18
- NextAuth(鉴权框架) v5.0.0-beta.18
- Convex (后端接口 + ORM)
背景知识学习
在开始实现之前,需要知道NextJS中服务端组件和客户端组件的概念。
NextJS中使用”use client“和”use server“标识服务端和客户端组件,客户端运行在浏览器中,服务端运行在服务器端。不标识时,默认为服务端组件。
服务端组件用于异步请求等,负责与服务端交互、请求数据等,客户端组件主要用于和用户交互。React的钩子也有明确的区分,比如useEffect等钩子只能在客户端组件中使用。
实现步骤
代码框架搭建
npx create-next-app@latest
使用NextAuth(v5版本)
npm install next-auth@beta
开始之前,需要在环境变量文件.env.local中配置变量
AUTH_SECRET=**********************
Credentials
我们首先实现一个简单的账号密码注册、登录、登出。
参考: Credentials
1.基础配置
在项目根目录下,新建auth.js文件,并写入以下内容:
import NextAuth from "next-auth"
import Credentials from "next-auth/providers/credentials"
// Your own logic for dealing with plaintext password strings; be careful!
import {
    saltAndHashPassword } from "@/utils/password"

export const {
    handlers, signIn, signOut, auth } = NextAuth({

  providers: [
    Credentials({

      authorize: async (credentials) => {

        let user = null

       // logic to salt and hash password
        const pwHash = saltAndHashPassword(credentials.password)

        // logic to verify if user exists
        user = await getUserFromDb(credentials.email, pwHash)

        if (!user) {

          // No user found, so this is their first attempt to login
          // meaning this is also the place you could do registration
          throw new Error("User not found.")
        }

        // return user object with the their profile data
        return user
      },
    }),
  ],
})
在根目录下,新建文件middleware.ts
import NextAuth from 'next-auth';

import {

DEFAULT_LOGIN_REDIRECT,
apiAuthPrefix,
authRoutes,
publicRoutes,
} from "@/routes"

import {
    auth } from './auth';
export default auth((req) => {


const {
    nextUrl } = req;
// console.log("NEXT URL" + nextUrl.pathname)
const isLoggedIn = !!req.auth;
const isApiAuthRoute = nextUrl.pathname.startsWith(apiAuthPrefix);
const isPublicRoutes = publicRoutes.includes(nextUrl.pathname);
const isAuthRoute = authRoutes.includes(nextUrl.pathname);
if (isApiAuthRoute) {

// DO NOTHING!
return null;

}
if (isAuthRoute) {

if (isLoggedIn) {

return Response.redirect(new URL(DEFAULT_LOGIN_REDIRECT, nextUrl))
} else {

return null;
}
}

if (!isLoggedIn && !isPublicRoutes) {


return Response.redirect(new URL("/auth/login", nextUrl))

}

})
// invoke the middle ware!

export const config = {


matcher: ["/((?!.+\\.[\\w]+$|_next).*)", "/", "/(api|trpc)(.*)"],

};
routes.ts
// Public Routes
export const publicRoutes = [
"/",
]
// redirect logged in users to /settings
export const authRoutes = [
"/auth/login",
"/auth/register",
]
export const apiAuthPrefix = "/api/auth"
export const DEFAULT_LOGIN_REDIRECT = "/dashboard"
middleware.ts为保留文件名,其中config变量定义了触发中间件方法的匹配规则。该文件中,定义了auth方法的过滤器。
在route.ts中定义公开路径、用于鉴权的路径、鉴权接口前缀及默认重定向地址。
在过滤方法中,返回null说明无需执行权限检查。对于公开路径及鉴权接口,无需登录即可访问。登录后,再访问注册和登录页面,会自动重定向到DEFAULT_LOGIN_REDIRECT定义的/dashboard路由中。
配置NextAuth路由:
api/auth/[...nextauth]/route.ts
import {
    handlers } from "@/auth"
export const {
    GET, POST } = handlers
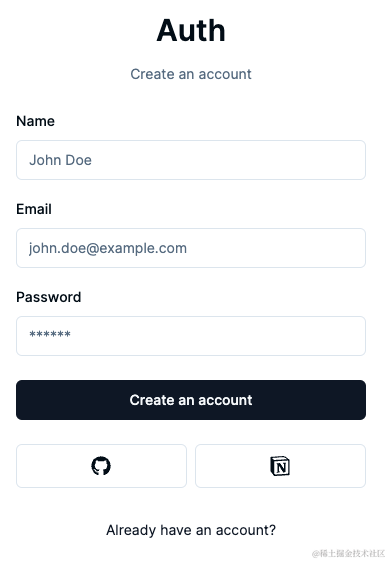
2.注册页面
实现形如下图的注册页面,核心为可提交的表单,包含name、email、password等字段。
使用zod进行字段的合法性校验。在schemas/index.ts中,定义注册使用的schema:
import * as z from "zod"
export const RegisterSchema = z.object({

    email: z.string().email({

        message: "Email is Required."
    }),
    password: z.string().min(6,
最低0.47元/天 解锁文章


 22万+
22万+

 被折叠的 条评论
为什么被折叠?
被折叠的 条评论
为什么被折叠?
 到【灌水乐园】发言


