


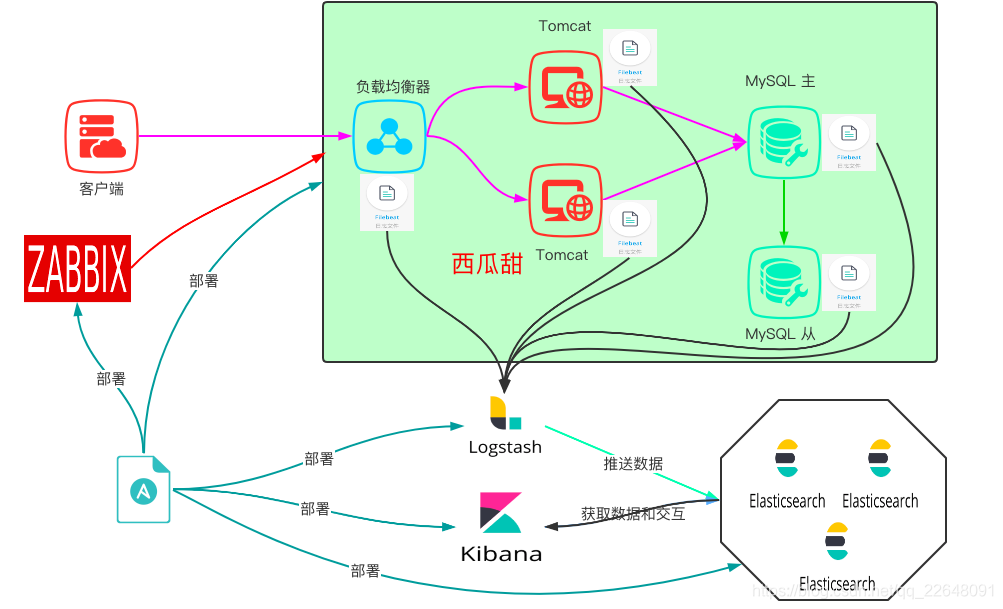
一、架构图
二、部署 Filebeat
1 项目目录结构
filebeat/
├── deploy-filebeat.yml
├── filebeat-vars.yml
├── filebeat.yml.j2
├──filebeat-7.10.0-linux-x86_64.tar.gz
└── modules.d
    └── mysql.yml

1 directory, 4 files
2 filebeat/deploy-filebeat.yml
---
- name: 部署 Filebeat
  hosts: all_filebeat
  gather_facts: no
  vars_files:
    - filebeat-vars.yml
  tasks:
    - name: 传输 二进制压缩包
      copy:
        src: "{{ filebeat_name }}"
        dest: /usr/local/src/
      tags: deploy

    - name: 解压本地二进制包
      ansible.builtin.unarchive:
        src: "/usr/local/src/{{ filebeat_name }}"
        dest: /usr/local/
        remote_src: yes
        list_files: yes
      register: ret
      tags: deploy

    - name: 创建软链接
      ansible.builtin.file:
        src: "/usr/local/{{ ret.files.0 | regex_replace('/.*') }}"
        dest: /usr/local/filebeat
        state: link
      tags: deploy

    - name: 传输主配置文件
      template:
        src: filebeat.yml.j2
        dest: /usr/local/filebeat/filebeat.yml
      tags:
        - deploy
        - config
##################### 配置 Filebeat 模块  #####################
    - name: "配置 MySql"
      loop:  "{{ group_names }}"
      when:  item  == "mysql"
      shell:
        chdir: /usr/local/filebeat/
        cmd: ./filebeat -e setup --pipelines --modules mysql
      tags: config

    - name: 传输 日志搜集模块配置文件
      loop:  "{{ group_names }}"
      when:  item  == "mysql"
      copy:
        src: modules.d/mysql.yml
        dest: /usr/local/filebeat/modules.d/mysql.yml
      tags: config

    - name: "配置 Nginx 摄取管道"
      loop:  "{{ group_names }}"
      when:  item  == "nginx"
      shell:
        chdir: /usr/local/filebeat/
        cmd: ./filebeat setup --pipelines --modules nginx
      tags: config

    - name: "配置 Nginx"
      loop:  "{{ group_names }}"
      when:  item  == "nginx"
      shell:
        cmd: ./filebeat modules enable nginx
        chdir: /usr/local/filebeat/
      tags: config

    - name: "配置 Tomcat 摄取管道"
      loop:  "{{ group_names }}"
      when:  item  == "tomcat"
      shell:
        chdir: /usr/local/filebeat/
        cmd: ./filebeat setup --pipelines --modules tomcat
      tags: config

    - name: "配置 Tomcat"
      loop:  "{{ group_names }}"
      when:  item  == "tomcat"
      shell:
        chdir: /usr/local/filebeat/
        cmd: ./filebeat modules enable tomcat
      tags: config
...
3 filebeat/filebeat-vars.yml
es_cluster:
  - "http://es01:9200"
  - "http://es02:9200"
kibana_host: kibana01:5601
logstash_hosts:
  - logstash01:5044
4 filebeat/filebeat.yml.j2
filebeat.inputs:
- type: log
  enabled: false
  paths:
    - /var/log/*.log
- type: filestream
  enabled: false
  paths:
    - /var/log/*.log
filebeat.config.modules:
  path: ${path.config}/modules.d/*.yml
  reload.enabled: false
setup.template.settings:
  index.number_of_shards: 1
setup.kibana:
  # 这里能连接到 kibana  的 IP 或者主机名
  host: "{{ kibana_host }}"
output.elasticsearch:
  # 连接到 elasticsearch 的主机名或者 IP
  hosts:
  {% for es in es_cluster %}
  - "{{ es }}"
  {% endfor %}
#output.console:
  #pretty: true
#output.logstash:
  #hosts:
  {% for host in logstash_hosts %}
  #- "{{ host }}"
  {% endfor %}
processors:
  - add_host_metadata:
      when.not.contains.tags: forwarded
  - add_cloud_metadata: ~
  - add_docker_metadata: ~
  - add_kubernetes_metadata: ~
⚠️说明:
1 es_cluster 和 logstash_hosts 是在 ilebeat-vars.yml 文件中定义的变量
2 要想使用 Filebeat 提供的日志搜集模块中的 dashboard 的模板,需要连接到 kinbana ,所以需要配置如下内容:
setup.kibana:
  # 这里能连接到 kibana  的 IP 或者主机名
  host: "{{ kibana_host }}"
实现这一功能的单独命令如下:
你不用单独执行他们,应用已经在 playbook 中了
./filebeat setup --pipelines --modules 模块名称
例如:
./filebeat setup --pipelines --modules nginx
3 要想使用 Filebeat 提供的日志搜集模块中的摄取管道来对日志内容进行处理,需要在启动 Filebeat 进程之前连接到 ES 集群,因此先需要做如下配置:
output.elasticsearch:
  # 连接到 elasticsearch 的主机名或者 IP
  hosts: {{ es_cluster | replace('u','') }}
实现这一功能的单独命令如下:
你不用单独执行他们,应用已经在 playbook 中了
./filebeat modules enable 模块名
例如:
./filebeat modules enable nginx
5 filebeat/modules.d/mysql.yml
- module: mysql
  error:
    enabled: true

  slowlog:
    enabled: true
    var.paths: ["/var/log/mysql/mysql_slow.log"]
三、部署和配置
1 建议的资产清单内容如下
hosts.ini
这里其实是整个 Elatic stack 项目使用的资产清单内容
[nginx]
slb

[tomcat]
tomcat1
tomcat2

[mysql]
mysql-master
mysql-slave

[es]
es01 node_name=ela1
es01 node_name=ela1
es02 node_name=ela2
es03 node_name=ela3

[es:vars]
es_nodes=["ela1", "ela2", "ela3"]

[kibana]
kibana01

[logstash]
logstash01

[all_filebeat]
[all_filebeat:children]
nginx
mysql
tomcat
es
logstash
kibana
2 第一次部署
ansible-playbook -i hosts.ini filebeat/deploy-filebeat.yml
2 只部署
ansible-playbook -i hosts.ini filebeat/deploy-filebeat.yml -t deploy
3 更新配置
ansible-playbook -i hosts.ini filebeat/deploy-filebeat.yml -t config


 918
918


 被折叠的 条评论
为什么被折叠?
被折叠的 条评论
为什么被折叠?
 到【灌水乐园】发言


