


第1节 什么是AOP
AOP: Aspect oriented Programming ⾯向切⾯编程/⾯向⽅⾯编程
AOP是OOP的延续,从OOP说起
OOP三⼤特征:封装、继承和多态
oop是⼀种垂直继承体系

AOP独辟蹊径提出横向抽取机制,将横切逻辑代码和业务逻辑代码分离

再举个例子:

第2节AOP(底层原理)
1、AOP 底层使用动态代理
(1)有两种态代理
第一种 有接口情况,使用 JDK 动态代理
创建接口实现类代理对象,增强类的方法

第二种 没有接口情况,使用 CGLIB 动态代理
创建子类的代理对象,增强类的方法

2、AOP(JDK 动态代理)

newProxyInstance 方法
方法有三个参数:
第一参数,类加载器
第二参数,增强方法所在的类,这个类实现的接口,支持多个接口
第三参数,实现这个接口 InvocationHandler,创建代理对象,写增强的部分
编写 JDK 动态代理代码
1、创建接口,定义方法
public interface UserDao {
    public int add(int a,int b);
    public String update(String id);
}
2、创建接口实现类,实现方法
public class UserDaoImpl implements UserDao {
    @Override
    public int add(int a, int b) {
        return a+b;
    }
    @Override
    public String update(String id) {
        return id;
    }
}
3、使用 Proxy 类创建接口代理对象
package cn.yiliedu;

import java.lang.reflect.InvocationHandler;
import java.lang.reflect.Method;
import java.lang.reflect.Proxy;
import java.util.Arrays;

public class JDKProxy {

    public static void main(String[] args) {
        //创建接口实现类代理对象
        //1.创建需要【增强的方法所在的类】所实现的【接口】
        Class[] interfaces = {UserDao.class};
        //2.创建被代理对象
        UserDaoImpl userDao = new UserDaoImpl();
        //3.创建代理对象(类加载器,接口,被代理对象注入InvocationHandler)
        UserDao dao = (UserDao)Proxy.newProxyInstance(JDKProxy.class.getClassLoader(), interfaces, new UserDaoProxy(userDao));
        //4.执行代理对象增强的方法
        int result = dao.add(1, 2);
        System.out.println("result:"+result);
    }
}

//创建代理对象代码
class UserDaoProxy implements InvocationHandler {

    //1 把创建的是谁的代理对象,把谁传递过来
    //有参数构造传递
    private Object obj;
    public UserDaoProxy(Object obj) {
        this.obj = obj;
    }

    //增强的逻辑
    @Override
    public Object invoke(Object proxy, Method method, Object[] args) throws Throwable {
        //方法之前
        System.out.println("方法之前执行...."+method.getName()+" :传递的参数..."+ Arrays.toString(args));

        //被增强的方法执行
        int res = (int) method.invoke(obj, args);

        //方法之后
        System.out.println("方法之后执行...."+obj);
        return res;
    }
}
第3节AOP 术语

连接点:⽅法开始时、结束时、正常运⾏完毕时、⽅法异常时等这些特殊的时机点,我们称之为连接点,项⽬中每个⽅法都有连接点,连接点是⼀种候选点
切⼊点:指定AOP思想想要影响的具体⽅法是哪些,描述感兴趣的⽅法
Advice增强:指的是横切逻辑
Aspect切⾯:切⾯概念是对上述概念的⼀个综合
Aspect切⾯= 切⼊点+增强
第4节Spring中AOP的配置⽅式
在Spring的AOP配置中,也和IoC配置⼀样,⽀持3类配置⽅式。
i.第⼀类:使⽤XML配置
 <!--创建对象-->
    <bean id="book" class="cn.yiliedu.aopxml.Book"></bean>
    <bean id="bookProxy" class="cn.yiliedu.aopxml.BookProxy"></bean>

    <!--配置aop增强-->
    <aop:config>
        <!--切入点-->
        <aop:pointcut id="p" expression="execution(* cn.yiliedu.aopxml.Book.buy(..))"/>
        <!--配置切面-->
        <aop:aspect ref="bookProxy">
            <!--增强作用在具体的方法上-->
            <aop:before method="before" pointcut-ref="p"/>
        </aop:aspect>
    </aop:config>
ii.第⼆类:使⽤XML+注解组合配置
 <!-- 开启注解扫描 -->
    <context:component-scan base-package="cn.yiliedu.aopanno"></context:component-scan>

    <!-- 开启Aspect生成代理对象-->
    <aop:aspectj-autoproxy></aop:aspectj-autoproxy>
iii.第三类:使⽤纯注解配置(推荐)
在SpringConfig类中定义:
@Configuration
@ComponentScan(basePackages = {"cn.yiliedu"})
@EnableAspectJAutoProxy(proxyTargetClass = true,exposeProxy=true)
public class ConfigAop {
}
在代理类中定义:
@Component
@Aspect //开启代理类(工具类)
@Order(1)//代理类的顺序

//定义切入点(增强的方法)
//Before表示注解作为前置通知
    @Before(value = "execution(* cn.yiliedu.aopanno.User.update(..))")
public void before() {
        System.out.println("PersonProxy的 Before.........");
    }

 //AfterReturning后置通知(返回通知)
    @AfterReturning(value = "pointdemo()")
    public void afterReturning() {
        System.out.println("afterReturning.........");
    }

//After最终通知(在AfterReturning之前)
    @After(value = "pointdemo()")
    public void after() {
        System.out.println("after.........");
    }

//AfterThrowing异常通知
    @AfterThrowing(value = "execution(* cn.yiliedu.aopanno.User.*(..))")
   public void afterThrowing() {
        System.out.println("afterThrowing.........");
    }

//Around环绕通知
    @Around(value = "execution(* cn.yiliedu.aopanno.User.*(..))")
    public int around(ProceedingJoinPoint proceedingJoinPoint) throws Throwable {
        System.out.println("环绕之前.........");

        //被增强的方法执行
        int i= (int) proceedingJoinPoint.proceed();

        System.out.println("环绕之后.........");

        return i;
    }
顺序:
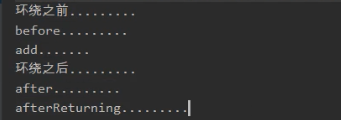
先环绕通知之前的—>Before前置通知—>被代理对象方法—>环绕通知之后—>After后置通知—>AfterReturning返回通知
切入点抽取:
//相同切入点抽取
    @Pointcut(value = "execution(* cn.yiliedu.aopanno.User.*(..))")
    public void pointdemo() {

    }
//只需要引入pointdemo()即可设置切入点
    //@Before注解表示作为前置通知
    @Before(value = "pointdemo()")
    public void before() {
        System.out.println("before.........");
    }
Test类:
@Test
    public void testAopAnno2() {
        ApplicationContext context =
                new AnnotationConfigApplicationContext(ConfigAop.class);
        User user = context.getBean("user",User.class);
        user.update();

    }
第5节Spring中AOP的代理选择
Spring 实现AOP思想使⽤的是动态代理技术 默认情况下,Spring会根据被代理对象是否实现接⼝来选择使⽤JDK还是CGLIB。当被代理对象没有实现 任何接⼝时,Spring会选择CGLIB。当被代理对象实现了接⼝,Spring会选择JDK官⽅的代理技术,不过 我们可以通过配置的⽅式,让Spring强制使⽤CGLIB。
@EnableAspectJAutoProxy:开启AOP支持
如果配@EnableAspectJAutoProxy(proxyTargetClass = true)
表示使用cglib进行代理对象的生成;
从@EnableAspectJAutoProxy的定义可以看得出,它引入AspectJAutoProxyRegister.class对象,该对象是基于注解@EnableAspectJAutoProxy注册一个AnnotationAwareAspectJAutoProxyCreator,该对象通过调用AopConfigUtils.registerAspectJAnnotationAutoProxyCreatorIfNecessary(registry);注册一个aop代理对象生成器。
@EnableAspectJAutoProxy(exposeProxy=true)
设置@EnableAspectJAutoProxy(exposeProxy=true)表示通过aop框架暴露该代理对象,aopContext能够访问。
AopContext.currentProxy()).do(info);
第6节Debug模式观察代理对象
如果在被代理类的方法中调用被代理类的另一个方法,则不会走代理类的增强逻辑,因为在一个类中的一个方法调用另一个方法用的是this.xxx();谁调用的这个方法,this就指向谁。
如果要解决,就需要在SpringConfig文件中加入:
第一种情况,使用JDK的代理:
@EnableAspectJAutoProxy(exposeProxy=true)
被代理类中:
UserInterface o = (UserInterface) AopContext.currentProxy();
o.update();
Test类中:
ApplicationContext context = new AnnotationConfigApplicationContext(ConfigAop.class);
UserInterface user=context.getBean(“user”,UserInterface.class);
user.add();
第二种情况,使用CGLIB代理:
@EnableAspectJAutoProxy(proxyTargetClass = true,exposeProxy=true)
被代理类中:
User o = (User) AopContext.currentProxy();
o.update();
Test类中:
ApplicationContext context =new AnnotationConfigApplicationContext(ConfigAop.class);
User user = context.getBean(“user”,User.class);
user.add();
补充知识点:
1、singletonObjects 单例对象列表, beanName -> bean实例
2、singletonFactories 单例工厂列表 beanName -> beanFactory
3、earlySingletonObjects 循环对象依赖列表,对象在创建之后,进行注入过程中,发现产生了循环依赖,那么会将对象放入到这个队列,并且从singletonFactories中移除掉。


 3894
3894


 被折叠的 条评论
为什么被折叠?
被折叠的 条评论
为什么被折叠?
 到【灌水乐园】发言


