


支持原创,支持arrAy_1
关于servlet。我想大多数java初学者或多或少都有点困惑。arrAy也不例外,记得第一次面试的时候,面试官让在笔记本上编写一个servlet实现密码验证功能。后面。。。你们懂得。
废话不多说,这篇文章,主要是通过编写一个简单的servlet来让大家能对servlet能有更好的掌握。
第一步:新建web project 大致的包结构如下:
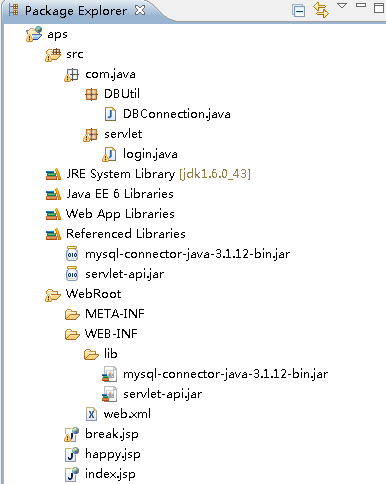
需要连接数据库查询。这里采用了mysql3.1.12版本jar包。在导入servlet必备servlet-api.jar。src下,建立DBUtil和servlet两个文件夹。ok,项目结构大概就是这样。
第二步:在servlet下新建一个名为login的class,继承HttpServlet类。重写它的doGet和doPost方法。
package com.java.servlet;

import java.io.IOException;
import java.io.PrintWriter;
import java.sql.SQLException;

import javax.servlet.http.HttpServlet;
import javax.servlet.http.HttpServletRequest;
import javax.servlet.http.HttpServletResponse;

public class login extends HttpServlet {

    public void doPost(HttpServletRequest req,HttpServletResponse rson){

    }

    public void doGet(HttpServletRequest req,HttpServletResponse rson){
    //通过调用doPost方法可将用户的get请求用post方法处理(如果需要)。
        doPost(req, rson);
    }
}
第三步:这个时候,我们就可以进行配置我们的web.xml文件了。在web.xml里面写一个servlet和一个servlet-mapping.把刚才写的login路径放进去,并将两个servlet-name对应一样。
<?xml version="1.0" encoding="UTF-8"?>
<web-app version="3.0"
    xmlns="http://java.sun.com/xml/ns/javaee"
    xmlns:xsi="http://www.w3.org/2001/XMLSchema-instance"
    xsi:schemaLocation="http://java.sun.com/xml/ns/javaee
    http://java.sun.com/xml/ns/javaee/web-app_3_0.xsd">
  <display-name></display-name>
  <welcome-file-list>
    <welcome-file>index.jsp</welcome-file>
  </welcome-file-list>
  <servlet>
    <servlet-name>login</servlet-name>
    <servlet-class>com.java.servlet.login</servlet-class>
  </servlet>
  <servlet-mapping>
    <servlet-name>login</servlet-name>
    <url-pattern>/login</url-pattern>
  </servlet-mapping>
</web-app>
ok,简单的servlet就已经搭建完成,现在我们开始连接数据库。在DBUtil里面新建类DBConnection,连接mysql需要url、用户名和密码三个参数。这里由于是测试例子,所有这三个参数我直接写成静态变量。
package com.java.DBUtil;

import java.sql.Connection;
import java.sql.DriverManager;
import java.sql.ResultSet;
import java.sql.SQLException;
import java.sql.Statement;

public class DBConnection {
    static String username="root";
    static String password="22222";
    static String url="jdbc:mysql://192.168.0.9:3306/244-maxapp";

}
这时我们需要通过java的反射机制去加载mysql驱动。class.forname通过传入的字符串到java虚拟机加载,抛出classnotfoundException。加载通过后我们通过DriverManager去获取mysql连接。
public static  void InitDriver() throws ClassNotFoundException{
        Class.forName("com.mysql.jdbc.Driver");
    }

    public static Connection getConnection() throws ClassNotFoundException, SQLException{
        Connection c=null;
        InitDriver();
        c=DriverManager.getConnection(url, username, password);
        return c;
    }
现在新建一个登录验证的方法,通过页面传入的用户名和密码,在将从数据库里面查询到的用户密码进行匹配。返回布尔值。
public static boolean logininfo(String username,String password) throws ClassNotFoundException, SQLException{
        boolean b=false;
        Statement s=null;
        ResultSet r=null;
        String sql="select vcuser,vcpassword from msdtb1701";
        Connection c=getConnection();
        s=c.createStatement();
        r=s.executeQuery(sql);
        while(r.next()){
            if(r.getString(1).equals(username) && r.getString(2).equals(password)){
                b=true;
                break;
            }
        }
        return b;
    }
ok,现在我们回到login类,开始编写doPost请求进行的操作。
package com.java.servlet;

import java.io.IOException;
import java.io.PrintWriter;
import java.sql.SQLException;

import javax.servlet.http.HttpServlet;
import javax.servlet.http.HttpServletRequest;
import javax.servlet.http.HttpServletResponse;

import com.java.DBUtil.DBConnection;

public class login extends HttpServlet {

    public void doPost(HttpServletRequest req,HttpServletResponse rson){
        String username=req.getParameter("username");
        String password=req.getParameter("password");
        try {
            boolean b=DBConnection.logininfo(username,password);
            if(b){
                rson.sendRedirect("happy.jsp");
            }else{
                rson.sendRedirect("break.jsp");
            }
        } catch (ClassNotFoundException e) {
            // TODO Auto-generated catch block
            e.printStackTrace();
        } catch (SQLException e) {
            // TODO Auto-generated catch block
            e.printStackTrace();
        } catch (IOException e) {
            // TODO Auto-generated catch block
            e.printStackTrace();
        }

    }

    public void doGet(HttpServletRequest req,HttpServletResponse rson){
        doPost(req, rson);
    }
}
关于jsp页面:
1、登录页面 index.jsp
<%@ page language="java" import="java.util.*" pageEncoding="utf-8"%>
<%
String path = request.getContextPath();
String basePath = request.getScheme()+"://"+request.getServerName()+":"+request.getServerPort()+path+"/";
%>

<!DOCTYPE HTML PUBLIC "-//W3C//DTD HTML 4.01 Transitional//EN">
<html>
  <head>
    <base href="<%=basePath%>">

    <title>My JSP 'index.jsp' starting page</title>
    <meta http-equiv="pragma" content="no-cache">
    <meta http-equiv="cache-control" content="no-cache">
    <meta http-equiv="expires" content="0">
    <meta http-equiv="keywords" content="keyword1,keyword2,keyword3">
    <meta http-equiv="description" content="This is my page">
    <!--
    <link rel="stylesheet" type="text/css" href="styles.css">
    -->
  </head>

  <body>
   <form action="logon" method="get">
    用户名:<input name="username"/><br>
    密码: <input name="password" /><br>
    <input type="submit"/>
   </form>
  </body>
</html>
2、登录验证失败页面break.jsp
<%@ page language="java" import="java.util.*" pageEncoding="utf-8"%>
<%
String path = request.getContextPath();
String basePath = request.getScheme()+"://"+request.getServerName()+":"+request.getServerPort()+path+"/";
%>

<!DOCTYPE HTML PUBLIC "-//W3C//DTD HTML 4.01 Transitional//EN">
<html>
  <head>
    <base href="<%=basePath%>">

    <title>My JSP 'index.jsp' starting page</title>
    <meta http-equiv="pragma" content="no-cache">
    <meta http-equiv="cache-control" content="no-cache">
    <meta http-equiv="expires" content="0">
    <meta http-equiv="keywords" content="keyword1,keyword2,keyword3">
    <meta http-equiv="description" content="This is my page">
    <!--
    <link rel="stylesheet" type="text/css" href="styles.css">
    -->
  </head>

  <body>
   验证失败,请重新<a href="./index.jsp">登录</a>
   </form>
  </body>
</html>
以及最后一个登录成功之后返回的happy.jsp
<%@ page language="java" import="java.util.*" pageEncoding="utf-8"%>
<%
String path = request.getContextPath();
String basePath = request.getScheme()+"://"+request.getServerName()+":"+request.getServerPort()+path+"/";
%>

<!DOCTYPE HTML PUBLIC "-//W3C//DTD HTML 4.01 Transitional//EN">
<html>
  <head>
    <base href="<%=basePath%>">

    <title>My JSP 'index.jsp' starting page</title>
    <meta http-equiv="pragma" content="no-cache">
    <meta http-equiv="cache-control" content="no-cache">
    <meta http-equiv="expires" content="0">
    <meta http-equiv="keywords" content="keyword1,keyword2,keyword3">
    <meta http-equiv="description" content="This is my page">
    <!--
    <link rel="stylesheet" type="text/css" href="styles.css">
    -->
  </head>

  <body>
    恭喜你登录成功!
   </form>
  </body>
</html>
通过启动tomcat访问http://localhost:8080/aps可直接到达index.jsp。需要源码可邮箱我zhonglian520@gmail.com.


 8629
8629

 被折叠的 条评论
为什么被折叠?
被折叠的 条评论
为什么被折叠?
 到【灌水乐园】发言


