


1.自定义控件有一个方法是在原生控件的基础上进行的拓展,增加新的功能,修改显示的UI等,一般我们可以子啊onDraw()方法中队原生的控件进行的拓展。
2.下面以为textvew的背景增加更多的颜色为例:
如何实现:
当我们自定义的view继承TextView的后,若不重写onDraw()方法,则不会修改TextView的任何效果。
 @Override
    protected void onDraw(Canvas canvas) {
     super.onDraw(canvas);
      }
程序调用的是super.onDraw(canvas);方法来实现原生控件的功能,但我我们可以在调用super.onDraw(canvas)之前和之后实现自己的逻辑,即在系统绘制文字的前后完成操作。
3.在自定义view的构造方法中完成必要的初始化工作。
    // 创建画笔
    private Paint paint1;
    private Paint paint2;
    private Paint paint3;
    private Paint paint4;

    public MyTextView(Context context) {
        this(context, null);
    }

    public MyTextView(Context context, AttributeSet attrs) {
        this(context, attrs, 0);
    }

    public MyTextView(Context context, AttributeSet attrs, int defStyleAttr) {
        super(context, attrs, defStyleAttr);
        // 初始化工作(创建画笔)

        paint1 = new Paint();
        paint1.setColor(getResources().getColor(android.R.color.holo_blue_light));
        paint1.setStyle(Paint.Style.FILL);

        paint2 = new Paint();
        paint2.setColor(Color.YELLOW);
        paint2.setStyle(Paint.Style.FILL);

        paint3 = new Paint();
        paint3.setColor(Color.GREEN);
        paint3.setStyle(Paint.Style.FILL);

        paint4 = new Paint();
        paint4.setColor(Color.GRAY);
        paint4.setStyle(Paint.Style.FILL);

    }
4.在onDraw()方法中,在super.onDraw(canvas)前绘制几个不同大小的矩形,形成重叠的效果。再让系统调用super.onDraw(canvas)方法完成绘制文字的工作。
@Override
protected void onDraw(Canvas canvas) {
// 绘制文本前的的逻辑
/**
* 绘制外层矩形
* getMeasuredWidth():对View上的内容进行测量后得到的View内容占据的宽度
* getMeasuredHeight():对View上的内容进行测量后得到的View内容占据的高度
*/
canvas.drawRect(0,0,getMeasuredWidth(),getMeasuredHeight(),paint1);
// 第二层矩形
canvas.drawRect(10, 10, getMeasuredWidth() - 10, getMeasuredHeight() - 10, paint2);
// 第三层矩形
canvas.drawRect(20, 20, getMeasuredWidth() - 20, getMeasuredHeight() - 20, paint3);
// 第四层矩形
canvas.drawRect(30, 30, getMeasuredWidth() - 30, getMeasuredHeight() - 30, paint4);
// save:用来保存Canvas的状态。save之后,可以调用Canvas的平移、放缩、旋转、错切、裁剪等操作
canvas.save();
// 绘制文字前平移(100px,30px)。
canvas.translate(100, 30);
// 父类绘制文本
super.onDraw(canvas);
// 绘制文本之后的逻辑
// restore:用来恢复Canvas之前保存的状态。防止save后对Canvas执行的操作对后续的绘制有影响,
// 也就是防止translate对后来的绘制有影响。
canvas.restore();
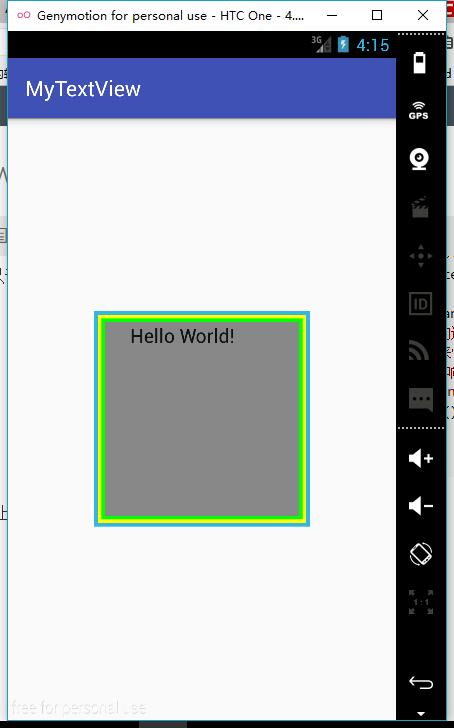
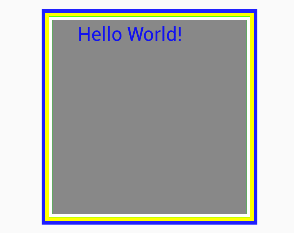
}效果图如下:
5利用LinearGradient Shader 和Matrix来实现动态的文字闪动的的效果。充分利用android中的paint对象的Shader渲染器。通过设置一个不断变化的LinearGradient ,并且使用带有该属性的paint对象来绘制要显示的文字。
在onSizeChanged()方法中进行一些对象的初始化的的工作,根据view的宽度设置一个LinearGradient 的渐变渲染器。
    // 组件大小改变的时候调用
    @Override
    protected void onSizeChanged(int w, int h, int oldw, int oldh) {
        super.onSizeChanged(w, h, oldw, oldh);

        if (viewWidth == 0) {
            viewWidth = getMeasuredWidth();
            if (viewWidth > 0) {
            // 使用getPaint()方法获取到当前绘制textview的paint对象。
                paint1 = getPaint();

                /** Create a shader that draws a linear gradient along a line.
                 @param x0           The x-coordinate for the start of the gradient line
                 @param y0           The y-coordinate for the start of the gradient line
                 @param x1           The x-coordinate for the end of the gradient line
                 @param y1           The y-coordinate for the end of the gradient line
                 @param  colors      The colors to be distributed along the gradient line
                 @param  positions   May be null. The relative positions [0..1] of
                 each corresponding color in the colors array. If this is null,
                 the the colors are distributed evenly along the gradient line.
                 @param  tile        The Shader tiling mode
                 */
                linearGradient = new LinearGradient(0, 0, viewWidth,
                        0, new int[]{Color.RED, 0xffffff, Color.BLUE},
                        null, Shader.TileMode.CLAMP);
                        //给当前的paint对象设置linearGradient属性
                paint1.setShader(linearGradient);
                // matrix是图像处理的类
                matrix = new Matrix();
            }
        }
    }
6.在onDraw()方法中通过矩阵的平移的方式来不断的设置平移渐变效果。
 if (matrix != null) {
        // X轴每次平移的距离
            translate = translate + viewWidth / 5;
            if (translate > 2 * viewWidth) {
                translate = -viewWidth;
            }
            // 设置平移,x轴移动的距离,和Y轴移动的距离
            matrix.setTranslate(translate, 0);
            linearGradient.setLocalMatrix(matrix);
            // 100毫秒刷新一次view
            postInvalidateDelayed(100);
        }


 793
793


 被折叠的 条评论
为什么被折叠?
被折叠的 条评论
为什么被折叠?
 到【灌水乐园】发言


