


xmlns:tools="http://schemas.android.com/tools"
xmlns:lu="http://schemas.android.com/apk/res-auto"
给困惑了,不明白是什么意思,特地查了一下
Android开发中在布局文件里面都会有如下面的内容:
<RelativeLayout xmlns:android="http://schemas.android.com/apk/res/android"
    xmlns:tools="http://schemas.android.com/tools"
    xmlns:lu="http://schemas.android.com/apk/res-auto"
    android:layout_width="match_parent"
    android:layout_height="match_parent"
    tools:context="com.example.abc.progressbar_lu.MainActivity"
    >
其中tools起什么作用呢?可以参考文档http://tools.android.com/tech-docs/tools-attributes
在该文档中列举了很多tools的方法,比如tools:ignore/tools:targetApi/tools:locale等方法,但是我们今天要讨论的则是该文档中最后面提到的内容Designtime Attributes,文档地址为http://tools.android.com/tips/layout-designtime-attributes
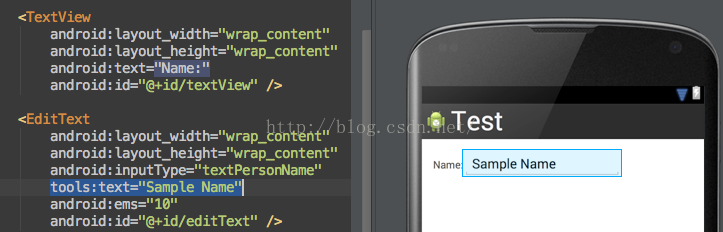
在官方文档中有说这么一句: These are attributes which are used when the layout is rendered inthe tool, but have no impact on the runtime. This is useful if you for examplewant to put sample data in your textfields for when you are editing the layout,but you don't want those attributes to affect your running app.
这些属性用于渲染布局,而不会影响到程序运行。也就是说只在预览布局时出现,在程序运行时相当于该属性不存在。
这个说明非常有意思,比如我们在布局文件中想要显示一段文字时,而该文字内容在程序中可能动态变化,特别是有参数的字符串内容%1$s之类的内容,以前必须使用android:text显示,然后调整这段文字的大小颜色参数,然后完成后删除android:text属性。有了tools参数后,可以直接使用tools:text在预览时显示文字即可,省却了上面删除的麻烦。
目前常用的有tools:text, tools:visibility, tools.src, tools.background
比如我自定义的加速球:
<com.example.abc.progressbar_lu.CircleDotProgressBar
        android:id="@+id/bar_all"
        android:layout_width="200dp"
        android:layout_height="200dp"
        android:layout_below="@+id/bar_null"
        android:layout_margin="5dp"
        android:background="#94aac1"
        lu:showMode="ALL"
        lu:percentTextSize="70sp"
        lu:unitText="分"
        lu:unitTextAlignMode="CN"
        lu:unitTextSize="20sp"
        lu:buttonTextSize="20sp"
        lu:buttonTopOffset="20dp"
        />
官方文档中也列出了一些限制,如下:
- Currently only overriding existing attributes is supported. We may want to define some additional convenience attributes to make it simple to for example choose which child in a ViewFlipper to show etc. 当前只支持overriding已有的属性
- You have to manually edit in your designtime attributes at this time
- They do not appear as an option in for example the layout editor property sheet.
- Editor code completion does not help you enter these attributes; the easiest way to use them is to first enter them in the Android namespace, and when done replacing the prefix. 目前还只能手动输入该部分,代码自动填充还无法完成
- Note that designtime attributes are supported only for layout files themselves. You cannot use them anywhere else -- in menu XML files, in string resource definitions, etc.只支持layout布局,menu/resource/string暂时不支持,这个说法和http://tools.android.com/tech-docs/tools-attributes中内容有冲突,tools-attributes中提供了<string name="show_all_apps" tools:ignore="MissingTranslation">All</string>以及<resources xmlns:tools="http://schemas.android.com/tools" tools:locale="es">内容
- Designtime attributes can only be used for framework resources, not custom attributes at this point.只能适用于系统提供的属性,自定义属性不再这个范围
- See https://code.google.com/p/android/issues/detail?id=46186 for background or additional requests or comments.


 被折叠的 条评论
为什么被折叠?
被折叠的 条评论
为什么被折叠?
 到【灌水乐园】发言


