


首先看下RequestQueue的实例化过程.从这里可以看出来,volley是自带有硬存的,并且当adk版本低于9时,网络交互运用的是HttpClient,大于9时运用的是HttpURLConnection
public static RequestQueue newRequestQueue(Context context, HttpStack stack) {
File cacheDir = new File(context.getCacheDir(), DEFAULT_CACHE_DIR);
String userAgent = "volley/0";
try {
String packageName = context.getPackageName();
PackageInfo info = context.getPackageManager().getPackageInfo(packageName, 0);
userAgent = packageName + "/" + info.versionCode;
} catch (NameNotFoundException e) {
}
if (stack == null) {
if (Build.VERSION.SDK_INT >= 9) {
stack = new HurlStack();
} else {
// Prior to Gingerbread, HttpUrlConnection was unreliable.
// See: http://android-developers.blogspot.com/2011/09/androids-http-clients.html
stack = new HttpClientStack(AndroidHttpClient.newInstance(userAgent));
}
}
Network network = new BasicNetwork(stack);
RequestQueue queue = new RequestQueue(new DiskBasedCache(cacheDir), network);
queue.start();
return queue;
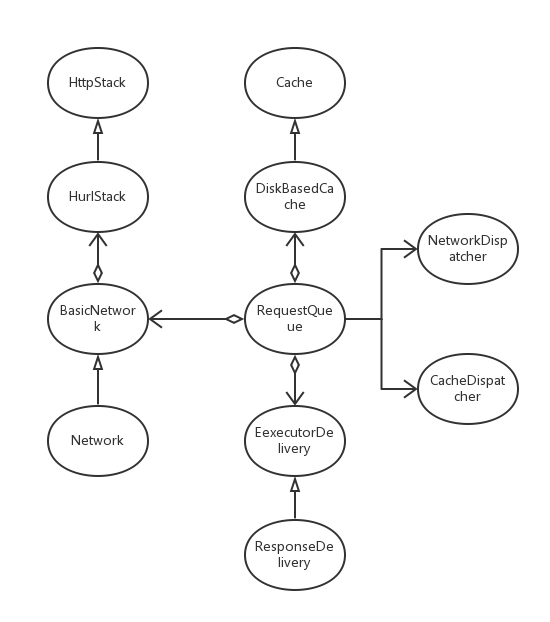
}这里配张图讲解下ResquestQueue的构成。
接下来看看RequestQueue的全局变量:
    //用于为每个request生成单调递增的编号
    private AtomicInteger mSequenceGenerator = new AtomicInteger();

     //暂存区域,存放已经有一个重复的请求request在发送的request。
     //正在发送的request并不会保存在此队列中,当没有重复的request时,get(cacheKey)返回的是null。
     //containsKey(cacheKey)   指向的是与正在发送的request拥有相同缓存键的队列
    private final Map<String, Queue<Request<?>>> mWaitingRequests =
            new HashMap<String, Queue<Request<?>>>();

    //所有调用了RequestQueue.add的request都在此队列中。
    private final Set<Request<?>> mCurrentRequests = new HashSet<Request<?>>();

    //缓存队列
    private final PriorityBlockingQueue<Request<?>> mCacheQueue =
        new PriorityBlockingQueue<Request<?>>();

    //存放正在与网络交互的request
    private final PriorityBlockingQueue<Request<?>> mNetworkQueue =
        new PriorityBlockingQueue<Request<?>>();

    //默认与网络交互开启的线程数量
    private static final int DEFAULT_NETWORK_THREAD_POOL_SIZE = 4;

    //硬盘缓存
    private final Cache mCache;

    //用于执行网络请求
    private final Network mNetwork;

    //用于当网络请求返回时的响应
    private final ResponseDelivery mDelivery;

    //执行网络交互的线程
    private NetworkDispatcher[] mDispatchers;

    //缓存线程
    private CacheDispatcher mCacheDispatcher;

    private List<RequestFinishedListener> mFinishedListeners =
            new ArrayList<RequestFinishedListener>();
接下来看一下ReqestQueue的add方法:
 public <T> Request<T> add(Request<T> request) {
        // Tag the request as belonging to this queue and add it to the set of current requests.
        request.setRequestQueue(this);
        synchronized (mCurrentRequests) {
            mCurrentRequests.add(request);
        }

        // Process requests in the order they are added.
        request.setSequence(getSequenceNumber());
        request.addMarker("add-to-queue");

        //当request并不进行缓存时,直接插入mNetworkQueue
        if (!request.shouldCache()) {
            mNetworkQueue.add(request);
            return request;
        }

        // 当有与request的cacheKey相同的request正在与网络交互时,将后进入RequestQueue的request插入mWaitingRequest
        synchronized (mWaitingRequests) {
            String cacheKey = request.getCacheKey();
            if (mWaitingRequests.containsKey(cacheKey)) {
                // There is already a request in flight. Queue up.
                Queue<Request<?>> stagedRequests = mWaitingRequests.get(cacheKey);
                if (stagedRequests == null) {
                    stagedRequests = new LinkedList<Request<?>>();
                }
                stagedRequests.add(request);
                mWaitingRequests.put(cacheKey, stagedRequests);
                if (VolleyLog.DEBUG) {
                    VolleyLog.v("Request for cacheKey=%s is in flight, putting on hold.", cacheKey);
                }
            } else {
                // 当mWaitiingRequest中没有cacheKey这个键时,插入键值对cacheKey-null,表明这里已有request正在与网络进行交互
                mWaitingRequests.put(cacheKey, null);
                mCacheQueue.add(request);
            }
            return request;
        }
    }
这个方法实际上是在调用Volley.newRequestQueue时调用的。可以看到的是这里仅是开启了线程。
   public void start() {
        stop();  // Make sure any currently running dispatchers are stopped.
        // Create the cache dispatcher and start it.
        mCacheDispatcher = new CacheDispatcher(mCacheQueue, mNetworkQueue, mCache, mDelivery);
        mCacheDispatcher.start();

        // Create network dispatchers (and corresponding threads) up to the pool size.
        for (int i = 0; i < mDispatchers.length; i++) {
            NetworkDispatcher networkDispatcher = new NetworkDispatcher(mNetworkQueue, mNetwork,
                    mCache, mDelivery);
            mDispatchers[i] = networkDispatcher;
            networkDispatcher.start();
        }
    }
停用RequestQueue也是调用各线程的interrupt方法
 public void stop() {
        if (mCacheDispatcher != null) {
            mCacheDispatcher.quit();
        }
        for (int i = 0; i < mDispatchers.length; i++) {
            if (mDispatchers[i] != null) {
                mDispatchers[i].quit();
            }
        }
    }
接下来分析一下缓存线程CacheDispatcher :
它接受的参数有四个:mCacheQueue(缓存队列), mNetworkQueue(网络交互队列), mCache(硬盘缓存), mDelivery(交互完成后回调)。
 public void run() {
        if (DEBUG) VolleyLog.v("start new dispatcher");
        Process.setThreadPriority(Process.THREAD_PRIORITY_BACKGROUND);

        // Make a blocking call to initialize the cache.
        mCache.initialize();

        while (true) {
            try {
                // 从缓存队列中取出request,此处会堵塞
                final Request<?> request = mCacheQueue.take();
                request.addMarker("cache-queue-take");

                // If the request has been canceled, don't bother dispatching it.
                if (request.isCanceled()) {
                    request.finish("cache-discard-canceled");
                    continue;
                }

                // 从硬盘缓存中取出该request对应的缓存
                Cache.Entry entry = mCache.get(request.getCacheKey());
                if (entry == null) {
                    request.addMarker("cache-miss");
                    // Cache miss; send off to the network dispatcher.
                    mNetworkQueue.put(request);
                    continue;
                }

                // 缓存过期
                if (entry.isExpired()) {
                    request.addMarker("cache-hit-expired");
                    request.setCacheEntry(entry);
                    mNetworkQueue.put(request);
                    continue;
                }

                // We have a cache hit; parse its data for delivery back to the request.
                request.addMarker("cache-hit");
                Response<?> response = request.parseNetworkResponse(
                        new NetworkResponse(entry.data, entry.responseHeaders));
                request.addMarker("cache-hit-parsed");

                if (!entry.refreshNeeded()) {
                    // Completely unexpired cache hit. Just deliver the response.
                    mDelivery.postResponse(request, response);
                } else {
                    // Soft-expired cache hit. We can deliver the cached response,
                    // but we need to also send the request to the network for
                    // refreshing.
                    request.addMarker("cache-hit-refresh-needed");
                    request.setCacheEntry(entry);

                    // Mark the response as intermediate.
                    response.intermediate = true;

                    // Post the intermediate response back to the user and have
                    // the delivery then forward the request along to the network.
                    mDelivery.postResponse(request, response, new Runnable() {
                        @Override
                        public void run() {
                            try {
                                mNetworkQueue.put(request);
                            } catch (InterruptedException e) {
                                // Not much we can do about this.
                            }
                        }
                    });
                }

            } catch (InterruptedException e) {
                // We may have been interrupted because it was time to quit.
                if (mQuit) {
                    return;
                }
                continue;
            }
        }
    }
网络交互线程mDispatchers接受的参数有四个:mNetworkQueue(网络交互队列), mNetwork(执行网络交互), mCache(硬盘缓存), mDelivery(交互完成后回调)。
public void run() {
Process.setThreadPriority(Process.THREAD_PRIORITY_BACKGROUND);
while (true) {
long startTimeMs = SystemClock.elapsedRealtime();
Request<?> request;
try {
//从队列中取出request,此处会堵塞。
request = mQueue.take();
} catch (InterruptedException e) {
// We may have been interrupted because it was time to quit.
if (mQuit) {
return;
}
continue;
}
try {
request.addMarker("network-queue-take");
// If the request was cancelled already, do not perform the
// network request.
if (request.isCanceled()) {
request.finish("network-discard-cancelled");
continue;
}
addTrafficStatsTag(request);
// 执行网络交互
NetworkResponse networkResponse = mNetwork.performRequest(request);
request.addMarker("network-http-complete");
// If the server returned 304 AND we delivered a response already,
// we're done -- don't deliver a second identical response.
if (networkResponse.notModified && request.hasHadResponseDelivered()) {
request.finish("not-modified");
continue;
}
//解析返回来的数据
Response<?> response = request.parseNetworkResponse(networkResponse);
request.addMarker("network-parse-complete");
//将缓存写入
// TODO: Only update cache metadata instead of entire record for 304s.
if (request.shouldCache() && response.cacheEntry != null) {
mCache.put(request.getCacheKey(), response.cacheEntry);
request.addMarker("network-cache-written");
}
// Post the response back.
request.markDelivered();
mDelivery.postResponse(request, response);
} catch (VolleyError volleyError) {
volleyError.setNetworkTimeMs(SystemClock.elapsedRealtime() - startTimeMs);
parseAndDeliverNetworkError(request, volleyError);
} catch (Exception e) {
VolleyLog.e(e, "Unhandled exception %s", e.toString());
VolleyError volleyError = new VolleyError(e);
volleyError.setNetworkTimeMs(SystemClock.elapsedRealtime() - startTimeMs);
mDelivery.postError(request, volleyError);
}
}
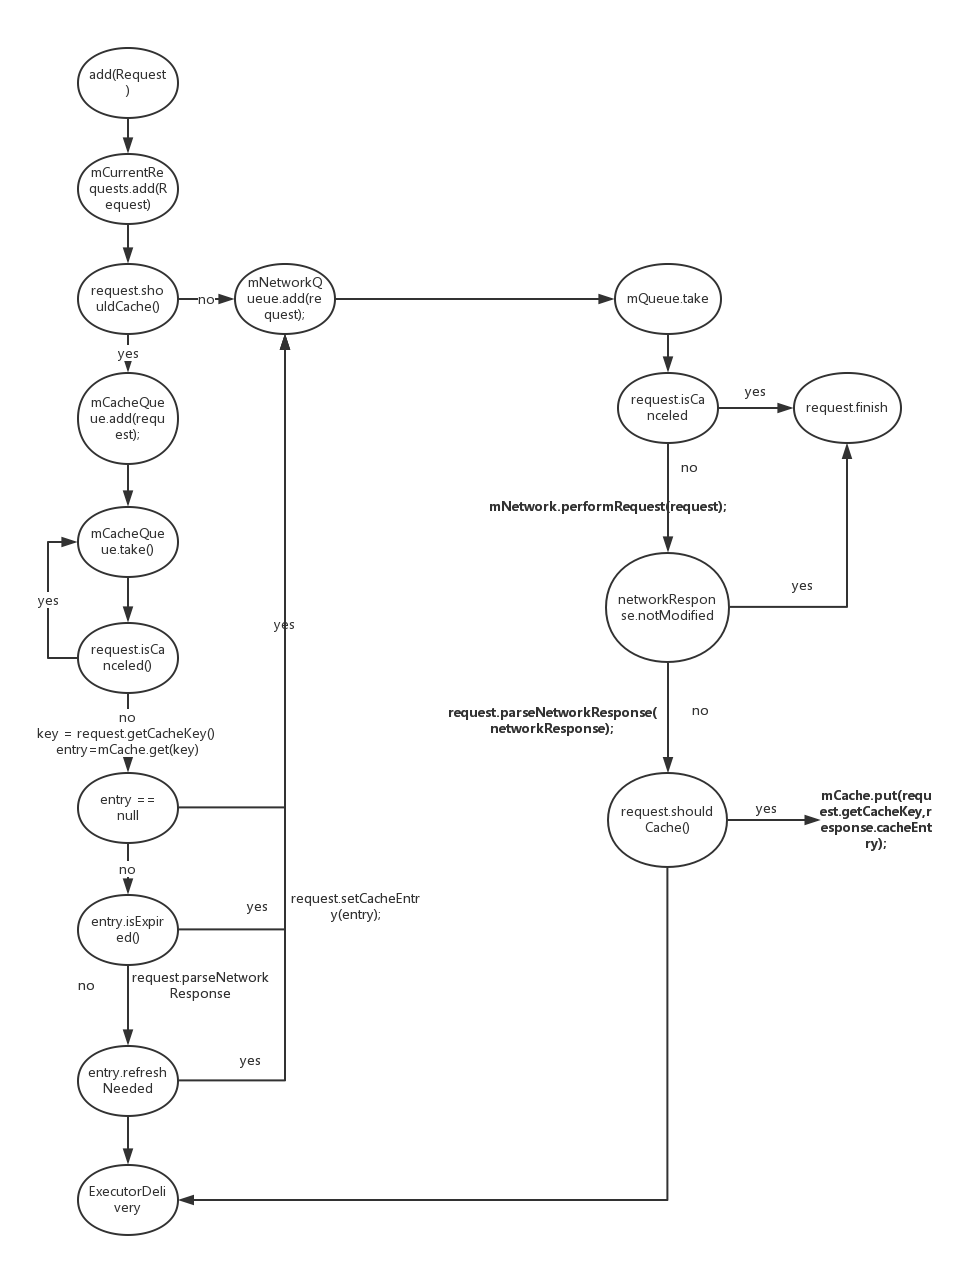
}最后用一张图概括全流程:


 420
420


 被折叠的 条评论
为什么被折叠?
被折叠的 条评论
为什么被折叠?
 到【灌水乐园】发言


