


Vue-Router
一、改变url,页面不刷新
- 更改url的hash
location.hash = 'aaa'
- html5中的history对象,该方法可以按栈规则返回前一链接(先进后出)
history.pushState({},'','home')
history.back() 可以返回上一连接
history.go(-1)等同于history.back
history.forwary == histiry.go(1) 向前
- history的replaceState,该方法使用后不能返回前一链接
history.replaceState({},'','home')
二、路由的使用
//router/index.js
import VueRouter from 'vue-router'//导入
import Vue from 'vue' //导入Vue

//通过Vue.use(插件),安装插件
Vue.use(VueRouter)
//创建VueRouter对象
const routers = [
//配置路由映射关系
]
const router = new VueRouter({
    routers
})

//将router对象传入到Vue实例
export default router
//main.js
import router from './router'

new Vue({
    el: '#App',
    router,
    render: h => h(App)
})
三、配置路由映射关系
//导入vue文件
import Home from '../components/home'
import About from '../components/about'

//index.js   一个路由就是一个对象
const routes = [
    {
        path: '/home',
        component: Home
    },
    {
        path: '/about',
        component: About
    }
]
四、使用路由组件
- //路由配置标签
- 属性:
- to: 跳转
- tag=“button” 将router-link渲染成button标签
- replace 使用replace模式,用户不能点击返回
- router-link-active 是点击按钮自动渲染的样式,可以通过active-class=“active”,将该样式的名字重命名为active,也可在路由配置中更改,见router/index.js
- 属性:
- //内容站位显示
五、路由重定向
router = [
    {
        path: '',
        redirect: '/home'
    }
]
六、通过history改变路由
//index.js
const router = new VueRouter({
    routers,
    mode: "history",  //默认为hash
    linkActiveClass: 'active'  //全局重命名router-link-active
})
七、通过代码跳转路由
this.$router.push('/home')   //this.$router 对象就是new VueRouter创建出来的对象
this.$router.replace('/home')

this.$route  //拿到的目前处于活跃的路由
八、动态路由
- index.js中路由配置,通过:userId动态绑定
{ path: '/user/:userId', component: User }
- app.vue,将变量与to标签动态绑定
<template>
  <div id="app">
    <router-link to="/home">首页</router-link>
    <router-link to="/about">关于</router-link>
    <router-link :to="'/user/'+userId">用户</router-link>
    <router-view></router-view>
  </div>
</template>

<script>
export default {
  name: 'App',
  data () {
    return {
      userId: "zhangsj"
    }
  }
}
</script>

<style>

</style>
- user页面获取userId
<template>
    <div>
        <h2>我是用户标题</h2>
        <p>我是用户页面</p>
        <p>{{$route.params.userId}}</p>  //$route可以获取当前活跃的route
    </div>
</template>

<script>

export default ({
    name: "user"
})
</script>
九、路由懒加载
按使用的的路由,把当前路由的所有组件和js从服务器中请求过来
cosnt routes = [
    {
        path: '/home',
        component: () => import('../components/Home')
    },
    {
        path: '/about',
        component: () => import('../components/About')
    }
]
三种写法:
-
结合异步组件的写法

-
AMD写法

-
ES6,通过箭头函数

十、路由的嵌套
-
创建子组件
-
为子组件配置路由
  {
    path: "/home",
    component: home,
    children: [
      {
        path: "",
        component: news
      },
      {
        path: "news",
        component: news
      },
      {
        path: "mess",
        component: mess
      }
    ]
  }
子组件路由中path中不能加"/"
-
使用路由
<template>
    <div>
      <h2>我是home标题</h2>
      <p>我是home内容</p>
      <router-link to="/home/news">新闻</router-link>
      <router-link to="/home/mess">消息</router-link>
      <router-view></router-view>
  </div>
</template>
使用子组件路由时,地址必须写全路径
十一、路由参数传递
- $route.params方式
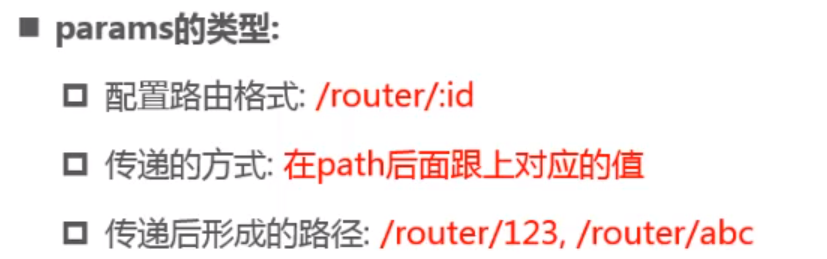
- $route.query类型,可传对象,传大量数据
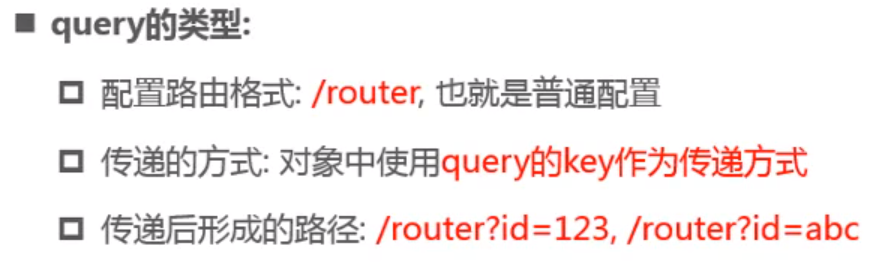
- 传参
<router-link :to="{path:'/about',query:{'name':'zhangsj','age':18}}">关于</router-link>
<button @click="aboutBtu">关于</button>

<script>
export default {
  name: 'App',
  data () {
    return {
      userId: "zhangsj"
    }
  },
  methods:{
    aboutBtu(){
      return this.$router.push({
        path: "/about",
        query: {
          name: "test111",
          age: 19
        }
      })
    }
  }
}
</script>
- 接收
<template>
  <div>
      <h2>我是about标题</h2>
      <p>我是about内容</p>
      <p>{{$route.query.name}}</p>
      <p>{{$route.query.age}}</p>
  </div>
</template>
十一、导航守卫
对跳转的过程进行监听,并做一些事情
需求:
为每次跳转的title赋值,显示当前页面
- 为路由添加一个meta对象,meta为元数据,描述数据的数据
const routes = [
  {
    path: "",
    meta: {
      title: "首页"
    },
    component: home
  }
]
- 使用router对象的beforeEach方法为title赋值,该方法在路由跳转之前调用
router.beforeEach( (to,from,next) => {
 document.title = to.matched[0].meta.title, //matched是to对象中的一个数组,解决首页无法获取meta的问题
 console.log(to);
 next() //该方法为跳转方法,必须调用
})
- beforeEach,前置钩子,路由跳转前回调,全局守卫
- afterEach,后置钩子,路由跳转完的回调,全局守卫
- 路由独享守卫,进入路由后调用的函数
- 组件内守卫,进入组件后调用
十二、keep-alive
保存组件,避免重新渲染
- 组件被keep-alive组件包围时,能够将组件状态缓存至内存,保存组件状态
keep-alive标签下会有两个生命周期函数:
- activated() //组件被激活前调用
- deactivated() //组件不激活调用
无该标签则两函数不生效。
- 属性
- exclude="要排除的组件1name,要排除的组件2name“
- include,只有被匹配的组件会被缓存


 81
81


 被折叠的 条评论
为什么被折叠?
被折叠的 条评论
为什么被折叠?
 到【灌水乐园】发言


