


商城项目练习
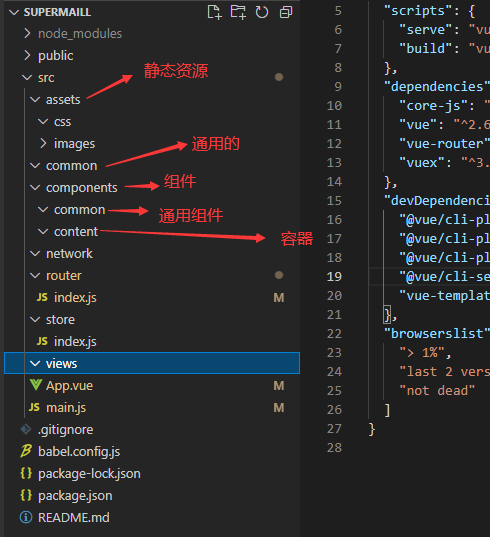
一、目录结构组织
二、别名配置
//vue.config.js
module.exports = {
    configureWebpack: {
        resolve: {
            alias: {
                'assets': '@/assets',
                'common': '@/common',
                'network': '@/network',
                'components': '@/components',
                'views': '@/views',
            }
        }
    }
}
三、tabbar吸顶效果css原生实现
.tab-control{
    position: sticky;
    top: 44px;
}
四、滚动条移动端适配
使用better-scroll
<script src="./bacroll.js"><script>
<script>
  const bscroll = new BScroll('.wapper',{
      probeType: 3,//只要移动都会侦测,0和1是不侦测,2是只侦测指头在的位置,不能监听惯性滚动
      click: true,//只有设置了改属性,才能监听管理的组件的事件
      pullUpLoad: true //可以监听上拉加载更多
  })
	bscroll.on('scroll', (position) => {
        console.log(position)//position对象中为侦测的滚动条的位置
    })
	bscroll.on('pullingUp', () => {
        console.log('上拉加载更多')//上拉到底部时回调该函数
        setTimeout(() => {
            bscroll.finishPullUp()//结束上次回调,可以解决回调函数只能调用一次的问题
        },2000)
    })
</script>
<script>
    this.scroll.scrollTo(x,y,time)//滚动条滚动到一个位置,time设置滚动的时间
</script>
better-scroll的bug,当加载内容为加载完成是,会计算可滚动区域大小,导致可滚动区域大小不正确,因此需要在所有内容加载完毕后重新刷新可加载区域大小,使用scroll.refresh()方法即可。如何监听图片是否加载完成,在vue中可在img标签内使用@load=“load”,图片加载完后会调用load方法。
五、防抖函数
防抖debounce/节流throttle
methods: {
    debounce(func, delay) {
        let timer = null
        return function(...args){
            if(timer) clearTimeout(timer)
            timer =setTimeout(() => {
                func.apply(this, args)
            },delay)
        }
    }
}
六、获取组件下的元素
每个组件下都有一个$el的属性,该属性就可拿到该组件下的元素,拿到元素以后可以通过offsetTop属性,拿到元素的上边到顶部的距离
七、better-scroll内组件吸顶效果
- 原生组件吸顶,可通过css属性完成
position: sticky;
top: 44px;
z-index: 9;
- 非原生better-scroll思路
- 新复制一个,放到better-scroll外
- 监控better-scroll滚动条位置
- 拿到组件原来位置
- 对比滚动位置,到组件该吸顶时显示复制出来的组件
- 处理两组件点击的效果
八、better-scroll是有keep-alive不保存位置bug处理
- 通过activated、deactivated两个状态函数,拿到页面是否处于激活和离开状态
- 在离开时记录scroll的Y值
- 在回来时跳转值之前记录的Y值,并refresh()刷新scroll
九、事件总线
可通过事件总线跨组件传递状态。
Vue.prototype.$bus = new Vue() //在main.js 中为VUe对象添加$bus
this.$bus.$emit("imgLoad")  //通过方法发送事件

 this.$bus.$on('imgLoad', () => {
            refres()
        })//在需要监听该时间的地方监听该事件的触发

this.$bus.$off('imgLoad', 函数)//停止指定函数中监听该事件
十、混入
- 创建混入js文件
- 在文件中将需要混入的生命周期函数在该文件中导出
- 在需要混入的代码中导入
- 在mixins中加入该函数
minin.js文件
import {debouce} from './utils'

export const intemLister = {
    mounted(){
        const refres = debouce(this.$refs.scroll.refresh,500)
        this.homeItemListener = () => {
            /*this.$refs.scroll.refresh() */
            refres()}
        this.$bus.$on('imgLoad', this.homeItemListener)
    },
    methehods(){

    }
}

//引用该文件
import {intemLister} from 'common/mixin'
//Vue对象中定义
mixins:[intemLister],
十一、toast封装成插件
-
在需要导出成插件的模块目录建立一个index.js文件
-
在项目main.js文件中导入该index.js文件,通过Vue.use(toast)进行安装
//tost/index.jsimport Tost from "./Toast.vue"const Obj = {}Obj.install = function (Vue) { //1.创建组件构造器 const toastContrutor = Vue.extend(Tost) //2.new的方式,柑橘组件构造器,可以创建出来一个组件对象 const toast = new toastContrutor() //3.将组建对象,手动挂载到某一个元素上 toast.$mount(document.createElement('div')) //4.toast.$el对应的就是div document.body.appendChild(toast.$el) Vue.prototype.$toast = toast};export default Obj//toast.vue<template> <div class="toast" v-show="isShow"> <div>{{message}}</div> </div></template><script>export default { name: "Toast", data(){ return{ message: "", isShow: false } }, methods:{ showToast(message){ console.log(message); this.message=message this.isShow=true setTimeout(() => { this.message="" this.isShow=false }, 5000); } }}</script><style scoped> .toast{ position: fixed; top: 50%; left: 50%; transform: translate(-50%, -50%); z-index: 999; padding: 6px 10px; background-color: rgba(0, 0, 0, .5); border-radius: 8%; color: #fff; line-height: 30px; width: 90px; }</style>//main.jsimport Vue from 'vue'import App from './App.vue'import router from './router'import store from './store'import toast from 'components/common/toast/index'Vue.config.productionTip = falseVue.prototype.$bus = new Vue()Vue.use(toast)new Vue({ el: '#app', router, store, render: h => h(App)})//调用this.$toast.showToast(res)
十二、图片懒加载
vue-lazyload
npm i vue-lazyload -S或者npm install vue-lazyload --save
//使用import VueLazyLoad from 'vue-lazyload'Vue.use(VueLazyLoad)//然后在加载图片的位置把img标签的src属性替换成v-lazy
十三、移动端300ms延迟
- FastClick
- ES6用法
//main.jsimport FastClick from 'fastclick'FastClick.attach(document.body)
十四、vw-css单位转化插件
- 安装postcss-px-to-viewport
npm install postcss-px-to-viewport --save-dev
- 配置postcss.config.js文件
//postcss.config.jsmodule.exports = { plugins: { autoprefixer: {}, 'postcss-px-to-viewport': { viewportWidth: 375, // 视窗的宽度,对应的是我们设计稿的宽度,一般是750 viewportHeight: 667, // 视窗的高度,根据750设备的宽度来指定,一般指定1334,也可以不配置 unitPrecision: 3, // 指定`px`转换为视窗单位值的小数位数 viewportUnit: "vw", //指定需要转换成的视窗单位,建议使用vw selectorBlackList: ['.ignore'],// 指定不转换为视窗单位的类,可以自定义,可以无限添加,建议定义一至两个通用的类名 minPixelValue: 1, // 小于或等于`1px`不转换为视窗单位,你也可以设置为你想要的值 mediaQuery: false // 允许在媒体查询中转换`px` } } }


 88
88


 被折叠的 条评论
为什么被折叠?
被折叠的 条评论
为什么被折叠?
 到【灌水乐园】发言


