


Service
是一个可以在后台执行长时间运行操作而不使用用户界面的应用组件。服务可由其他应用组件启动,而且即使用户切换到其他应用,服务仍将在后台继续运行。 此外,组件可以绑定到服务,以与之进行交互,甚至是执行进程间通信 (IPC)。 例如,服务可以处理网络事务、播放音乐,执行文件 I/O 或与内容提供程序交互,而所有这一切均可在后台进行。
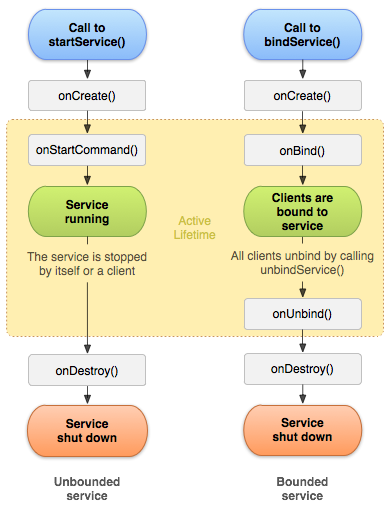
服务基本上分为两种形式:
启动
当应用组件(如 Activity)通过调用 startService() 启动服务时,服务即处于“启动”状态。一旦启动,服务即可在后台无限期运行,即使启动服务的组件已被销毁也不受影响。 已启动的服务通常是执行单一操作,而且不会将结果返回给调用方。例如,它可能通过网络下载或上传文件。 操作完成后,服务会自行停止运行。
绑定
当应用组件通过调用 bindService() 绑定到服务时,服务即处于“绑定”状态。绑定服务提供了一个客户端-服务器接口,允许组件与服务进行交互、发送请求、获取结果,甚至是利用进程间通信 (IPC) 跨进程执行这些操作。 仅当与另一个应用组件绑定时,绑定服务才会运行。 多个组件可以同时绑定到该服务,但全部取消绑定后,该服务即会被销毁。
服务可以同时以这两种方式运行,也就是说,它既可以是启动服务(以无限期运行),也允许绑定。问题只是在于是否实现了一组回调方法:onStartCommand()(允许组件启动服务)和 onBind()(允许绑定服务)。
首先,附上参考文章的链接:http://blog.csdn.net/guolin_blog/article/details/11952435
1、首先创建一个Service,重写它的方法
onCreate()
首次创建服务时,系统将调用此方法来执行一次性设置程序(在调用 onStartCommand() 或 onBind() 之前)。如果服务已在运行,则不会调用此方法。
onStartCommand()
当另一个组件(如 Activity)通过调用 startService() 请求启动服务时,系统将调用此方法。一旦执行此方法,服务即会启动并可在后台无限期运行。 如果您实现此方法,则在服务工作完成后,需要由您通过调用 stopSelf() 或 stopService() 来停止服务。(如果您只想提供绑定,则无需实现此方法。
onDestroy()
当服务不再使用且将被销毁时,系统将调用此方法。服务应该实现此方法来清理所有资源,如线程、注册的侦听器、接收器等。 这是服务接收的最后一个调用。
onBind()
当另一个组件想通过调用 bindService() 与服务绑定(例如执行 RPC)时,系统将调用此方法。在此方法的实现中,您必须通过返回 IBinder 提供一个接口,供客户端用来与服务进行通信。请务必实现此方法,但如果您并不希望允许绑定,则应返回 null。
public class MyService extends Service {

    @Override
    public void onCreate() {
        super.onCreate();
        Log.d("TAG","onCreate()...");
        Log.d("TAG","Service Thread id is "+Thread.currentThread().getId());
    }

    @Override
    public int onStartCommand(Intent intent, int flags, int startId) {
        Log.d("TAG","onStartCommand()...");
        return super.onStartCommand(intent, flags, startId);
    }

    @Override
    public void onDestroy() {

        super.onDestroy();
        Log.d("TAG","onDestroy()...");
    }

    @Nullable
    @Override
    public IBinder onBind(Intent intent) {
        return null;
    }


}
还需要声明文件清单
<application
       ......
       <service android:name=".MyService"/>
    </application>
2.可以通过Activity组件来启动Service
如果组件通过调用 startService() 启动服务(这会导致对 onStartCommand() 的调用),则服务将一直运行,直到服务使用 stopSelf() 自行停止运行,或由其他组件通过调用 stopService() 停止它为止。
public class MainActivity extends AppCompatActivity implements View.OnClickListener {
    private Button mStartServiceBtn;
    private Button mStopServiceBtn;


    @Override
    protected void onCreate(Bundle savedInstanceState) {
        super.onCreate(savedInstanceState);
        setContentView(R.layout.activity_main);
        Log.d("TAG","Activity Thread id is "+Thread.currentThread().getId());
        mStartServiceBtn = (Button) findViewById(R.id.start_service_btn);
        mStopServiceBtn = (Button) findViewById(R.id.stop_service_btn);

        mStartServiceBtn.setOnClickListener(this);
        mStopServiceBtn.setOnClickListener(this);
    }

    @Override
    public void onClick(View v) {
        switch (v.getId()){
            case R.id.start_service_btn:
                Intent startIntent = new Intent(this,MyService.class);
                startService(startIntent);
                break;
            case R.id.stop_service_btn:
                Intent stopIntent = new Intent(this,MyService.class);
                stopService(stopIntent);
                break;

            default:
                break;
        }
    }
}
3、在Service的onStartCommand()中执行任务
服务在其托管进程的主线程中运行,它既不创建自己的线程,也不在单独的进程中运行(除非另行指定)。
通过日志:
Log.d(“TAG”,”Service Thread id is “+Thread.currentThread().getId());
Log.d(“TAG”,”Activity Thread id is “+Thread.currentThread().getId());
可以发现Service和Activity是在同一个线程中。
如果在Service中执行耗时操作,会发生应用无响应”(ANR) 错误。所以可以在onStartCommand()中执行多线程。
 @Override
    public int onStartCommand(Intent intent, int flags, int startId) {
        Log.d("TAG","onStartCommand()...");
        new Thread(new Runnable() {
            @Override
            public void run() {
                //多线程后台处理
                Log.d("TAG","多线程后台处理");
            }
        }).start();
        return super.onStartCommand(intent, flags, startId);
    }
4,如果想创建前台Service,可以调用startForeground()
@Override
    public void onCreate() {
        super.onCreate();
        Log.d("TAG","onCreate()...");
        Log.d("TAG","Service Thread id is "+Thread.currentThread().getId());

        Intent intent = new Intent(getApplicationContext(),MainActivity.class);
        PendingIntent pendingIntent = PendingIntent.getActivity(getApplicationContext(),0,intent,0);
        Notification.Builder budilder = new Notification.Builder(MyService.this)
                    .setContentTitle("有通知。")
                    .setContentText("这是一条通知")
                    .setSmallIcon(R.drawable.notify_icon)
                    .setContentIntent(pendingIntent)
                    .setWhen(System.currentTimeMillis());
        Notification notification = budilder.build();
        startForeground(1,notification);
        Log.d("TAG","startForegroud()...");

}5、接下来如果想绑定服务,
使Activitiy组件与Service进行交互通过调用 bindService().
如果组件是通过调用 bindService() 来创建服务(且未调用 onStartCommand()),则服务只会在该组件与其绑定时运行。一旦该服务与所有客户端之间的绑定全部取消,系统便会销毁它。
//绑定
Intent bindIntent = new Intent(this,MyService.class);
bindService(bindIntent,connection,BIND_AUTO_CREATE);
break;
这里bindService()三个参数中的connection,是ServiceConnection的实例
private ServiceConnection connection = new ServiceConnection() {
        @Override
        public void onServiceConnected(ComponentName name, IBinder service) {
            Log.d("TAG","onServiceConnected()...");

        }

        @Override
        public void onServiceDisconnected(ComponentName name) {
            Log.d("TAG","onServiceDisconnected()...");
        }
};绑定之后要实现OnBind()方法,通过返回 IBinder 提供一个接口,供客户端用来与服务进行通信
public class MyService extends Service {

    private MyBinder mBinder = new MyBinder();

    ......

    @Nullable
    @Override
    public IBinder onBind(Intent intent) {
        return mBinder;
    }

    class MyBinder extends Binder {

        public void serviceTask(){
            Log.d("TAG","serviceTask()...");
        }
    }
}
在Activity中,在ServiceConnection的实例onServiceConnected()中,调用MyService中onBind()返回的IBinder的方法,来与服务进行通信
 private MyService.MyBinder mBinder;
 private ServiceConnection connection = new ServiceConnection() {
     @Override
     public void onServiceConnected(ComponentName name, IBinder service) {
         Log.d("TAG","onServiceConnected()...");
         mBinder = (MyService.MyBinder) service;
         mBinder.serviceTask();
     }

     @Override
     public void onServiceDisconnected(ComponentName name) {
         Log.d("TAG","onServiceDisconnected()...");
     }
 };
注:如果同时调用startService() 和bindService() ,那么如果这时候再调用stopService()是不能销毁Service,应可以直接调用 unbindService() 消毁Service。
客户端完成与服务的交互后,会调用 unbindService() 取消绑定。一旦没有客户端绑定到该服务,系统就会销毁它。
//解绑
unbindService(connection);最后附上完整的官方文档解释:https://developer.android.com/guide/components/services.html


 7545
7545

 被折叠的 条评论
为什么被折叠?
被折叠的 条评论
为什么被折叠?
 到【灌水乐园】发言


