


RN的Guide文档详细地介绍了整个过程,不过其中有些地方没说清楚,可能会给初学者埋下深坑。
开发环境准备
首先需要搭建开发环境,才能进行后面的步骤。
添加JS环境
命令行,cd到app到根文件夹下(也可直接在android studio控制台的Terminal下执行),然后按顺序执行下列命令:
$npm init

$npm install --save react

$npm install --save react-native

$curl -o .flowconfighttps://raw.githubusercontent.com/facebook/react-native/master/.flowconfig
注意一:init命令记住name参数
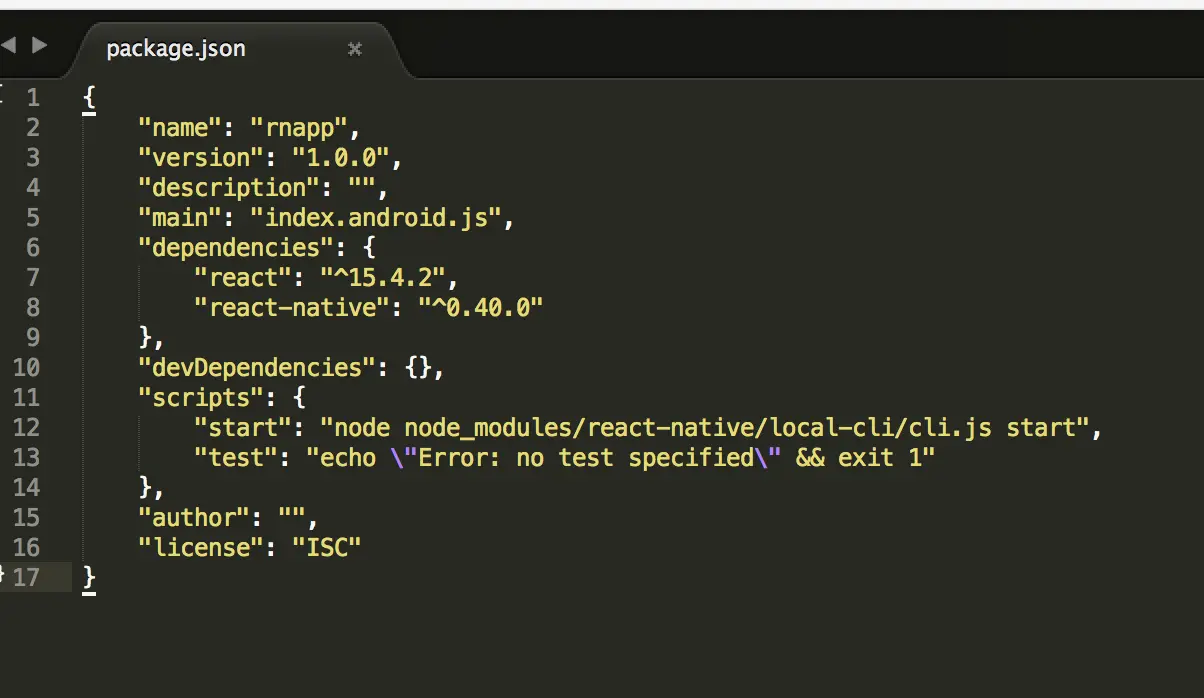
init命令,需要填写诸如name、version等参数,输入后按回车接着输入下一个参数。init之后会生出package.json文件。name最为重要,工程名,在后面的index.android.js和MyJReactActivity里都要用到。其它的都可以一路回车使用默认值。
注意二:别忘了引入react
上面npm install --save react,下载react相关的资源包。原文里缺了这步命令,最终导致App跑起来就crash,大概是这样的:
java.lang.RuntimeException: Error: Requiring unknown module "react" (index.android.bundle:2 )注意三:添加start,Json格式
打开刚生出的 package.json文件,在“scripts”内添加“start”,注意符合Json格式,逗号别忘了。
"scripts": {

"test":"echo \"Error:notestspecified\" && exit 1",

"start":"node node_modules/react-native/local-cli/cli.js start"

},
注意四:index.android.js里的name
按理说init的时候已经指定了“main”,也就是index.android.js,可是没有看到自动生成的文件。我们可以手动创建这份文件,名字就按照它给的来吧,作为hello world,我们照抄AwesomeProject的好了。这里特别要注意的是,最后的AppRegistry.registerComponent,第一个参数是前面package.json里设置的name,第二个参数是自定义的component。为什么是这样,现在还没去深究,到此为止,Js的环境就配置完成了,后面开始Native部分的配置。
'use strict'

import React from 'react';
import {
  AppRegistry,
  StyleSheet,
  Text,
  View
} from 'react-native';

class HelloWorld extends React.Component {
  render() {
    return (
      <View style={styles.container}>
        <Text style={styles.hello}>
          Hello world!
        </Text>
      </View>
    );
  }
}

var styles = StyleSheet.create({
  container: {
    flex: 1,
    justifyContent: 'center',
  },
  hello: {
    fontSize: 20,
    textAlign: 'center',
    margin: 10,
  },
});

AppRegistry.registerComponent('rnapp', () => HelloWorld);
配置Native部分
gradle
app的gradle里添加react-native依赖
compile"com.facebook.react:react-native:+"// From node_modules
项目的gradle的repositories里添加url:
allprojects {
    repositories {
        jcenter()
            maven {
                // All of React Native (JS, Android binaries) is installed from npm
                url "$rootDir/node_modules/react-native/android"
            }
     }
}
添加权限
AndroidManifest.xml:
<uses-permission android:name="android.permission.INTERNET"/>
/**设置调试 的权限**/
<uses-permission android:name="android.permission.SYSTEM_ALERT_WINDOW"/>
<uses-permission android:name="android.permission.SYSTEM_OVERLAY_WINDOW" />
####添加RN的调试Activity:
<activity android:name="com.facebook.react.devsupport.DevSettingsActivity"/>我们刚开始都是先用debug模式,以自己的开发计算机作为服务器。那份index.android.js就是hello world界面。手机在debug模式下从自己的计算机下载index页面。下载的过程会有个提示的dialog,显示它需要上面的权限。6.0及以上的系统,除了在Manifest里授权,还需要在系统设置里的“应用”里的“在其他应用的上层显示”里,找到我们的应用,勾选上允许。不同厂家的设置不太一样,我的是这样的:

如果没有这些权限和设置,会抛这样的异常:
android.view.WindowManager$BadTokenException: Unable to add window android.view.ViewRootImpl$W@fc0db15 -- permission denied for this window type添加RN界面
MyReactActivity完整代码如下。需要注意的是,
setUseDeveloperSupport可以直接设为true,在debug期间
mReactRootView.startReactApplication()的第二个参数,必须是package.json里的name
import android.app.Activity;
import android.content.Context;
import android.content.Intent;
import android.os.Bundle;

import com.facebook.react.LifecycleState;
import com.facebook.react.ReactInstanceManager;
import com.facebook.react.ReactRootView;
import com.facebook.react.modules.core.DefaultHardwareBackBtnHandler;
import com.facebook.react.shell.MainReactPackage;


/**
 * Created by Byron on 16/9/6.
 */
public class MyReactActivity extends Activity implements DefaultHardwareBackBtnHandler {
    private ReactRootView mReactRootView;
    private ReactInstanceManager mReactInstanceManager;

    public static void startActivity(Context context){
        Intent intent = new Intent(context, MyReactActivity.class);
        context.startActivity(intent);
    }

    @Override
    protected void onCreate(Bundle savedInstanceState) {
        super.onCreate(savedInstanceState);

        mReactRootView = new ReactRootView(this);
        mReactInstanceManager = ReactInstanceManager.builder()
                .setApplication(getApplication())
                .setBundleAssetName("index.android.bundle")
                .setJSMainModuleName("index.android")
                .addPackage(new MainReactPackage())
                .setUseDeveloperSupport(true)
                .setInitialLifecycleState(LifecycleState.RESUMED)
                .build();
        mReactRootView.startReactApplication(mReactInstanceManager, "rntest", null);

        setContentView(mReactRootView);
    }

    @Override
    protected void onResume() {
        super.onResume();

        if(mReactInstanceManager != null){
            mReactInstanceManager.onHostResume(this, this);
        }
    }

    @Override
    protected void onPause() {
        super.onPause();

        if(mReactInstanceManager != null){
            mReactInstanceManager.onHostPause();
        }
    }

    @Override
    protected void onDestroy() {
        super.onDestroy();

        if(mReactInstanceManager != null){
            mReactInstanceManager.onHostDestroy();
        }
    }

    @Override
    public void onBackPressed() {
        super.onBackPressed();

        if(mReactInstanceManager != null){
            mReactInstanceManager.onBackPressed();
        }else{
            super.onBackPressed();
        }
    }

    @Override
    public void invokeDefaultOnBackPressed() {
        super.onBackPressed();
    }
}
-运行你的应用
-还是在项目的根文件夹下,命令行运行如下命令,启动测试服务器。
$ npm start或者:
$ react-native startnpm start成功
回到Android Studio,跟平常一样,把App运行起来。如果要运行在真机上,要注意在设备上运行的相关事项是否已经做过。我的测试机是6.0点系统,那每次连上usb,都需要先命令行运行一次:
真机测试 记住一定要执行
adb reverse tcp:8081 tcp:8081然后再运行app,否则手机无法连上测试服务器,会出现“红屏”(添加了DevSettingsActivity的情况下)。同样,如果测试服务器没有开启,也会出现同样的错误,也就是取不到打好包的js,控制台的crash log:
java.lang.RuntimeException: Could not get BatchedBridge, make sure your bundle is packaged corr========================报错解决办法============================
如果出现32 64等.so包的报错
1.在build.gradle加入
android {
  ...
    defaultConfig {
            ...
        ndk {
            abiFilters "armeabi", "armeabi-v7a", "x86", "mips"
        }

        packagingOptions {
            exclude "lib/arm64-v8a/librealm-jni.so"
        }
    }
2.在gradle.properties尾部加入
Android.useDeprecatedNdk=true


 431
431


 被折叠的 条评论
为什么被折叠?
被折叠的 条评论
为什么被折叠?
 到【灌水乐园】发言


