


NavigationView中的fragment
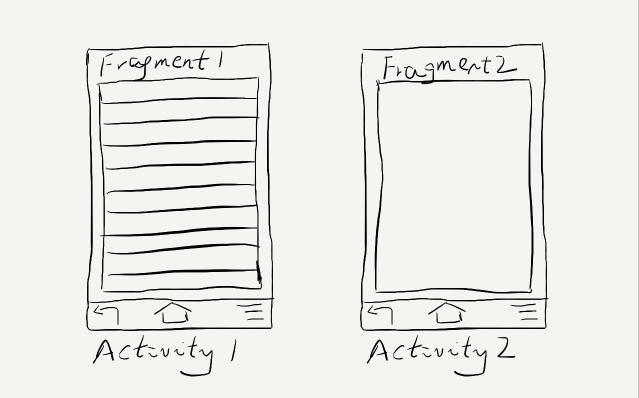
为了让界面可以在平板上更好地展示,Android在3.0版本引入了Fragment(碎片)功能,它非常类似于Activity,可以像Activity一样包含布局。Fragment通常是嵌套在Activity中使用的,现在想象这种场景:有两个Fragment,Fragment 1包含了一个ListView,每行显示一本书的标题。Fragment 2包含了TextView和ImageView,来显示书的详细内容和图片。
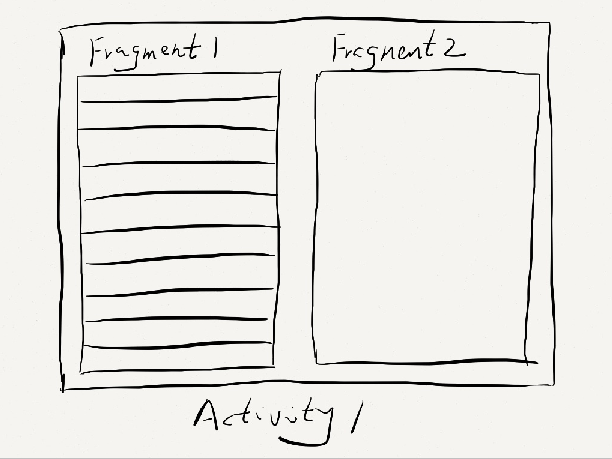
而如果现在程序运行在横屏模式的平板上,两个Fragment就可以嵌入在同一个Activity中了,如下图所示:
由此可以看出,使用Fragment可以让我们更加充分地利用平板的屏幕空间。
或者在NavigationView中可以将Fragment填充于content_main.xml布局中,用于菜单栏到内容栏的对应。
现附相关代码如下:
(1)在content_main.xml中添加FramLayout布局文件(每个fragment可以完全填充整个content_main.xml布局),每个新添加的Fragment碎片都将被填充到此布局中。
content_main.xml(被Fragment填充):
<?xml version="1.0" encoding="utf-8"?>
<LinearLayout xmlns:android="http://schemas.android.com/apk/res/android"
    xmlns:app="http://schemas.android.com/apk/res-auto"
    xmlns:tools="http://schemas.android.com/tools"
    android:id="@+id/content_main"
    android:layout_width="match_parent"
    android:layout_height="match_parent"
    android:orientation="vertical"
    app:layout_behavior="@string/appbar_scrolling_view_behavior"
    tools:context="com.example.along.ashcar_version1.MainActivity"
    tools:showIn="@layout/app_bar_main">
    <FrameLayout
        android:id="@+id/fragment"
        android:layout_width="match_parent"
        android:layout_height="match_parent"
        android:name="com.example.along.ashcar_version1.Util.fragments.fragment_appointment"
        />
</LinearLayout>
(2)Fragment的布局文件,appointment.xml是Fragment_1对应的布局文件(home布局中只是一张照片)。
<?xml version="1.0" encoding="utf-8"?>
<RelativeLayout
    xmlns:android="http://schemas.android.com/apk/res/android"
    android:layout_width="match_parent"
    android:layout_height="match_parent">

      <ImageView
         android:id="@+id/rg_img_backgroud"
         android:layout_width="match_parent"
         android:layout_height="match_parent"
         android:layout_marginLeft="-50dp"
         android:layout_marginRight="-300dp"
         android:scaleType="centerCrop"
         android:src="@drawable/de_bg" />

</RelativeLayout><?xml version="1.0" encoding="utf-8"?>
<LinearLayout
xmlns:android="http://schemas.android.com/apk/res/android"
android:layout_width="match_parent"
android:layout_height="match_parent"
android:background="@drawable/image_about"
>
<TextView
style="@style/single_layout"
android:layout_height="wrap_content"
android:layout_marginLeft="20dp"
android:layout_marginRight="20dp"
android:layout_marginTop="30dp"
android:layout_weight="0.28"
android:maxLines="20"
android:text="第二个Fragment"
android:textColor="#000000" />
</LinearLayout>View view=inflater.inflate(R.layout.appointment,container,false);
public class fragment_1 extends Fragment {
    @Nullable
public View onCreateView(LayoutInflater inflater, @Nullable ViewGroup container, @Nullable Bundle savedInstanceState) {
    View view=inflater.inflate(R.layout.appointment,container,false);
    return view;
    }
public class fragment_2 extends Fragment {
@Nullable
@Override
public View onCreateView(LayoutInflater inflater, @Nullable ViewGroup container, @Nullable Bundle savedInstanceState) {
View view=inflater.inflate(R.layout.about,container,false);
return view;
}
(5)在MainActivity主活动中调用fragment_1和fragment_2。先实例化fragment并使用FragmentManager(详见http://blog.csdn.net/jaysong2012/article/details/46696241),用replace()方法将content_main.xml中内容替换(R.id.fragment)。
public boolean onNavigationItemSelected(MenuItem item) {
    // Handle navigation view item clicks here.
    int id = item.getItemId();
    if (id == R.id.nav_appointment) {
        appointment fragment = new appointment();
        FragmentManager fragmentTransaction=getSupportFragmentManager();
        FragmentTransaction transaction=fragmentTransaction.beginTransaction();
        transaction.replace(R.id.fragment,fragment);
        transaction.addToBackStack(null);
        transaction.commit();

    } else if (id == R.id.nav_about) {
       about fragment = new about();
        FragmentManager fragmentTransaction=getSupportFragmentManager();
        FragmentTransaction transaction=fragmentTransaction.beginTransaction();
        transaction.replace(R.id.fragment,fragment);
        transaction.addToBackStack(null);
        transaction.commit();
    }
    DrawerLayout drawer = (DrawerLayout) findViewById(R.id.drawer_layout);
    drawer.closeDrawer(GravityCompat.START);
    return true;
}


 277
277

 被折叠的 条评论
为什么被折叠?
被折叠的 条评论
为什么被折叠?
 到【灌水乐园】发言


