


目录
2.1.3 实现Callable 重写call方法,配合FutureTask
4.3.1 通过判断isInterrupted()状态,结束循环退出线程
一、线程的基础概念
1.1 线程与进程的概念
1.1.1 什么是线程
线程是操作系统能够进行运算调度的最小单位,它是进程中的实际运作单位。每个线程执行的都是某一个进程的代码的某个片段。
1.1.2 什么是进程
广义:进程是一个具有一定独立功能的程序关于某个数据集合的一次运行活动。它是操作系统动态执行的基本单元,在传统的操作系统中,进程既是基本的分配单元,也是基本的执行单元。
狭义:进程是指运行中的程序。 比如我们使用钉钉,浏览器,需要启动这个程序,操作系统会给这个程序分配一定的资源(占用内存资源)。
1.1.3 进程和线程的区别
1.1.3.1 本质不同
进程是操作系统分配的资源,而线程是CPU调度的基本单位。
1.1.3.2 资源方面
同一个进程下的线程共享进程中的一些资源。线程同时拥有自身的独立存储空间。进程之间的资源通常是独立的。
1.1.3.3 数量方面
进程一般指的就是一个进程。而线程是依附于某个进程的,而且一个进程中至少会有一个或多个线程。
1.1.3.4 消耗方面
毕竟进程和线程不是一个级别的内容,线程的创建和终止的时间是比较短的。而且线程之间的切换比进程之间的切换速度要快很多。而且进程之间的通讯很麻烦,一般要借助内核才可以实现,而线程之间通讯,相当方便。
1.2 多线程
1.2.1 什么是多线程
多线程是指:单个进程中同时运行多个线程。
1.2.2 多线程设计的目的
多线程的设计是为了提高CPU的利用率,可以通过避免一些网络IO或者磁盘IO等需要等待的操作,让CPU去调度其他线程,这样可以大幅度的提升程序的效率,提高用户的体验。
比如Tomcat可以做并行处理,提升处理的效率,而不是一个一个排队。
1.2.3 多线程的局限
- 如果线程数量特别多,CPU在切换线程上下文时,会额外造成很大的消耗。
- 任务的拆分需要依赖业务场景,有一些异构化的任务,很难对任务拆分,还有很多业务并不是多线程处理更好。
- 线程安全问题:虽然多线程带来了一定的性能提升,但是再做一些操作时,多线程如果操作临界资源,可能会发生一些数据不一致的安全问题,甚至涉及到锁操作时,会造成死锁问题。
1.3 串行、并行、并发
1.3.1 串行
串行是指多个任务时,各个任务按顺序执行,完成一个之后才能进行下一个。
1.3.2 并行
并行指的是多个任务可以同时执行
1.3.3 并发
CPU调度线程,在极短的时间内,反复切换执行不同的线程,看似好像是并行,但是只是CPU高速的切换。
1.4 同步异步、阻塞非阻塞
1.4.1 同步与异步
执行某个功能后,被调用者是否会主动反馈信息。
1.4.1.1 同步阻塞
比如用锅烧水,水开后,不会主动通知你。烧水开始执行后,需要一直等待水烧开。
1.4.1.2 同步非阻塞
比如用锅烧水,水开后,不会主动通知你。烧水开始执行后,不需要一直等待水烧开,可以去执行其他功能,但是需要时不时的查看水开了没。
1.4.2 阻塞非阻塞
执行某个功能后,调用者是否需要**一直等待结果**的反馈。
1.4.2.1 异步阻塞
比如用水壶烧水,水开后,会主动通知你水烧开了。烧水开始执行后,需要一直等待水烧开。
1.4.2.2 异步非阻塞
比如用水壶烧水,水开后,会主动通知你水烧开了。烧水开始执行后,不需要一直等待水烧开,可以去执行其他功能。
异步非阻塞这个效果是最好的,平时开发时,提升效率最好的方式就是采用异步非阻塞的方式处理一些多线程的任务。
二、线程的创建
2.1 线程创建的四种方式
2.1.1 继承Thread类,重写run方法
启动线程调用start方法,会创建一个新的线程,并执行线程的任务。
package com.ningzhaosheng.thread.extend;

/**
 * @author ningzhaosheng
 * @date 2024/1/26 16:09:31
 * @description 继承Thread类,重写run方法
 */
public class MyThread extends Thread{
    @Override
    public void run() {
        for (int i = 0; i < 100; i++) {
            System.out.println("MyThread:" + i);
        }
    }
}
package com.ningzhaosheng.thread.extend;

/**
 * @author ningzhaosheng
 * @date 2024/1/26 16:05:44
 * @description 测试类
 */
public class ThreadTest {
    public static void main(String[] args) {
        // new 出线程类
        MyThread t1 = new MyThread();
        // 调用start()方法
        t1.start();
        for (int i = 0; i < 100; i++) {
            System.out.println("main:" + i);
        }
    }
}
2.1.2 实现Runnable接口,重写run方法
package com.ningzhaosheng.thread.runable;

/**
 * @author ningzhaosheng
 * @date 2024/1/26 16:17:30
 * @description 实现Runnable接口,重写run方法
 */
public class MyRunnable implements Runnable {
    @Override
    public void run() {
        for (int i = 0; i < 1000; i++) {
            System.out.println("MyRunnable:" + i);
        }
    }
}
package com.ningzhaosheng.thread.runable;

/**
 * @author ningzhaosheng
 * @date 2024/1/26 16:18:12
 * @description 实现Runnable接口的线程测试类
 */
public class ThreadTest {
    public static void main(String[] args) {
        MyRunnable myRunnable = new MyRunnable();
        Thread t1 = new Thread(myRunnable);
        t1.start();
        for (int i = 0; i < 1000; i++) {
            System.out.println("main:" + i);
        }
    }
}
2.1.3 实现Callable 重写call方法,配合FutureTask
Callable一般用于有返回结果的非阻塞的执行方法.
package com.ningzhaosheng.thread.callable;

import java.util.concurrent.Callable;

/**
 * @author ningzhaosheng
 * @date 2024/1/26 16:22:32
 * @description 实现Callable 重写call方法
 */
public class MyCallable implements Callable {
    @Override
    public Object call() throws Exception {
        int count = 0;
        for (int i = 0; i < 100; i++) {
            count += i;
        }
        return count;
    }
}
package com.ningzhaosheng.thread.callable;

import java.util.concurrent.ExecutionException;
import java.util.concurrent.FutureTask;

/**
 * @author ningzhaosheng
 * @date 2024/1/26 16:23:37
 * @description Callable 方式实现线程测试类
 */
public class ThreadTest {
    public static void main(String[] args) throws ExecutionException, InterruptedException {
        //1. 创建MyCallable
        MyCallable myCallable = new MyCallable();
        //2. 创建FutureTask,传入Callable
        FutureTask futureTask = new FutureTask(myCallable);
        //3. 创建Thread线程
        Thread t1 = new Thread(futureTask);
        //4. 启动线程
        t1.start();
        //5. 做一些操作
        //6. 要结果
        Object count = (Object) futureTask.get();
        System.out.println("总和为:" + count);
    }
}
2.1.4 基于线程池构建
package com.ningzhaosheng.thread.pool;


import java.util.concurrent.*;

/**
 * @author ningzhaosheng
 * @date 2024/1/26 16:31:21
 * @description 线程池测试类
 */
public class ThreadTest {
    public static void main(String[] args) throws ExecutionException, InterruptedException {
        // 新建线程池
        ThreadPoolExecutor threadPoolExecutor = new ThreadPoolExecutor(2,5,10L, TimeUnit.MINUTES, new LinkedBlockingDeque<>(), Executors.defaultThreadFactory(),new ThreadPoolExecutor.AbortPolicy());
        // 调用execute方法,实现Runnable接口,无返回值
        threadPoolExecutor.execute(new Runnable(){
            @Override
            public void run() {
                for (int i = 0; i < 100; i++) {
                    System.out.println("ThreadPoolExecutor execute():" + i);
                }
            }
        });
        FutureTask futureTask = new FutureTask(new Callable() {
            @Override
            public Object call() throws Exception {
                int count = 0;
                for (int i = 0; i < 100; i++) {
                    count += i;
                }
                return count;
            }
        });
        // 调用submit方法,传入FutureTask,有返回值
        threadPoolExecutor.submit(futureTask);
        Object count = (Object) futureTask.get();
        System.out.println("总和为:" + count);
        // 需要执行shutdown(),不然不会结束。
        threadPoolExecutor.shutdown();
    }

}
三、线程的使用
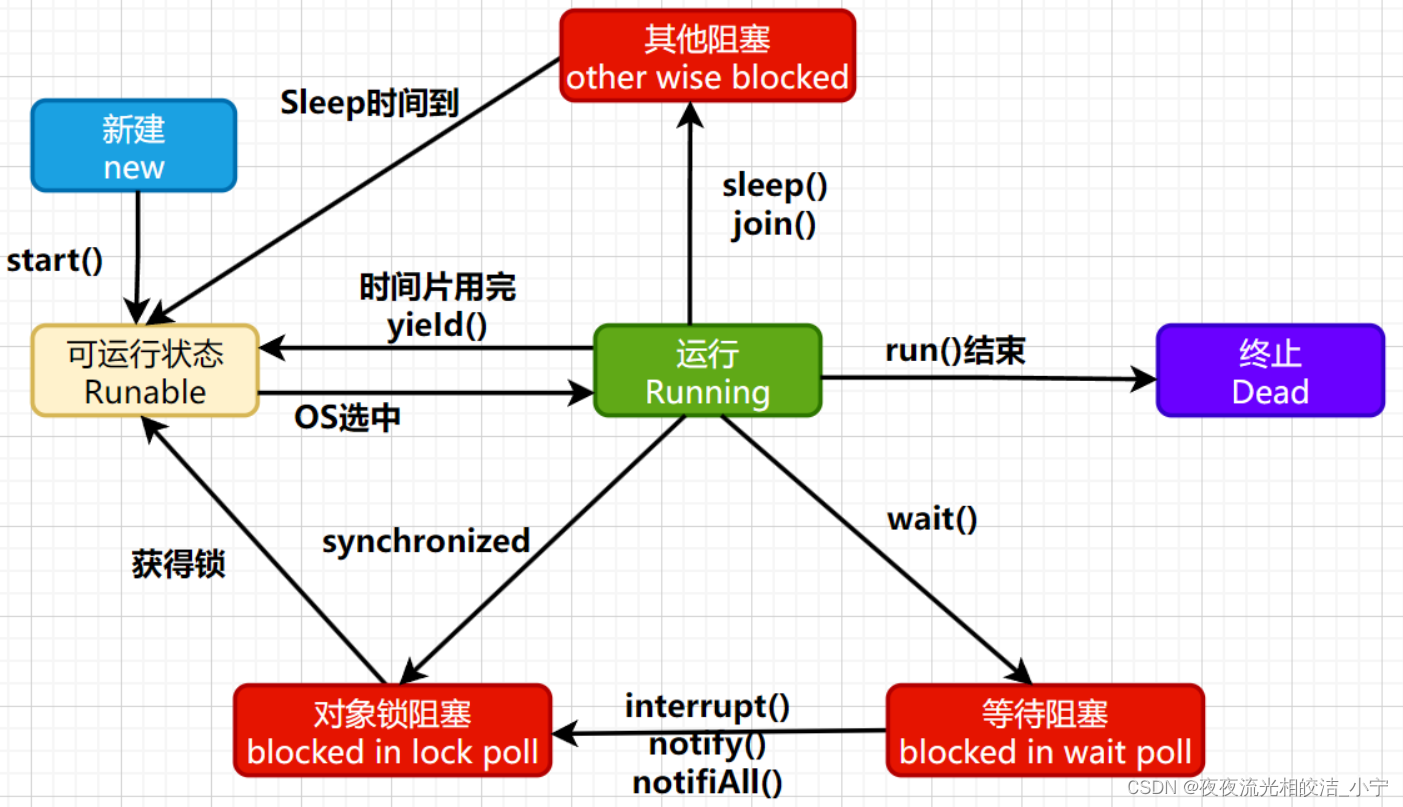
3.1 线程的状态
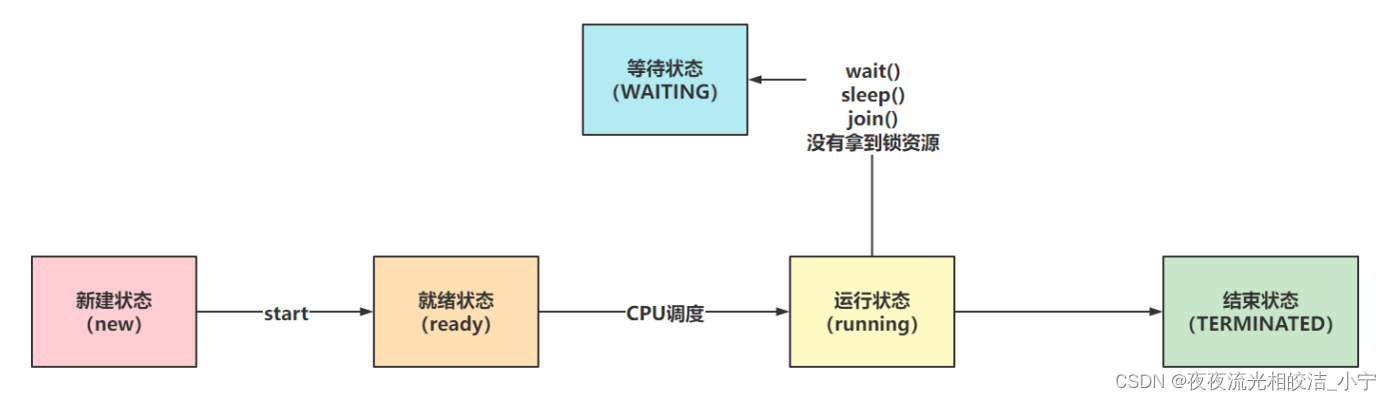
3.1.1 五种状态(操作系统层面)
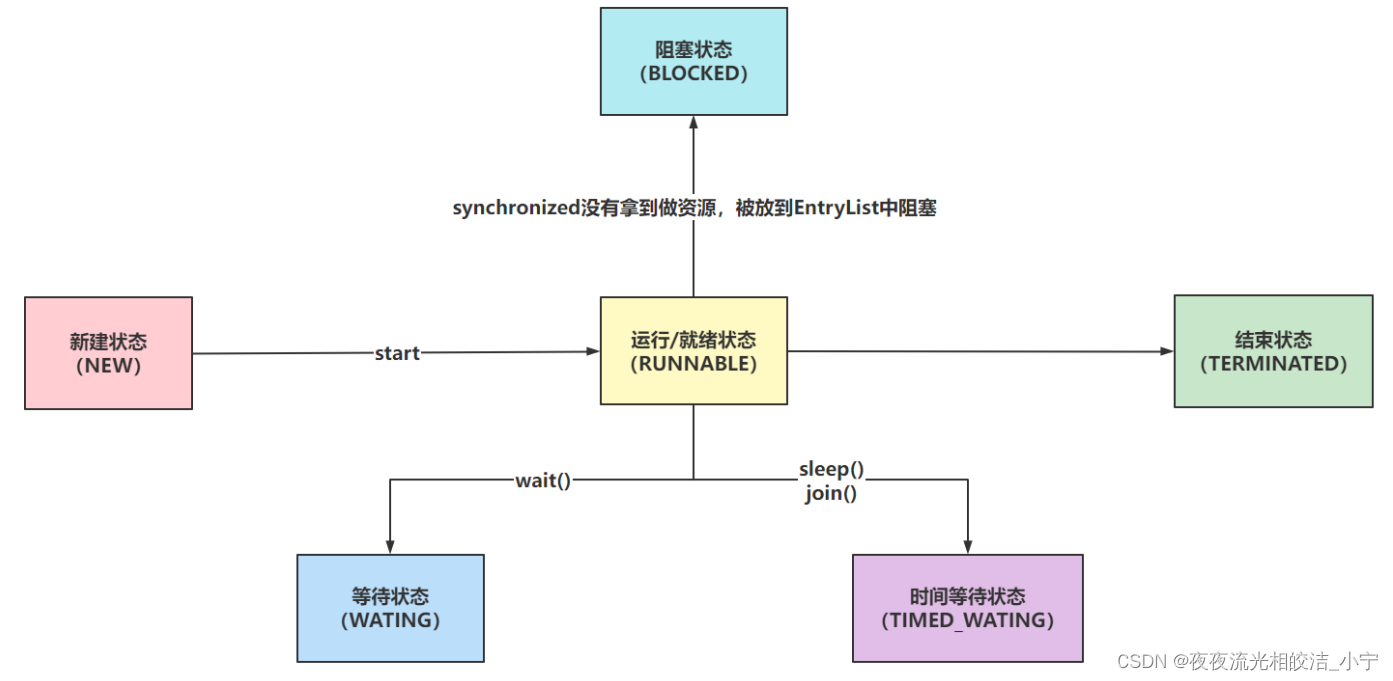
3.1.2 6种状态(Java层面)
3.1.2.1 状态说明
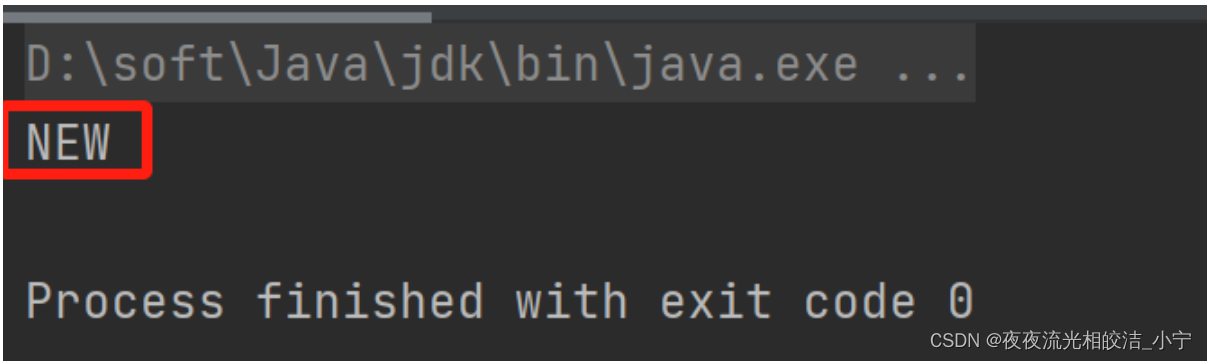
3.1.2.1.1 NEW状态
Thread对象被创建出来了,但是还没有执行start方法。
package com.ningzhaosheng.thread.status;

/**
 * @author ningzhaosheng
 * @date 2024/1/26 17:23:50
 * @description 测试 new 状态
 */
public class TestNewStatus {
    public static void main(String[] args) {
        Thread t1 = new Thread(() -> {

        });
        System.out.println(t1.getState());
    }
}
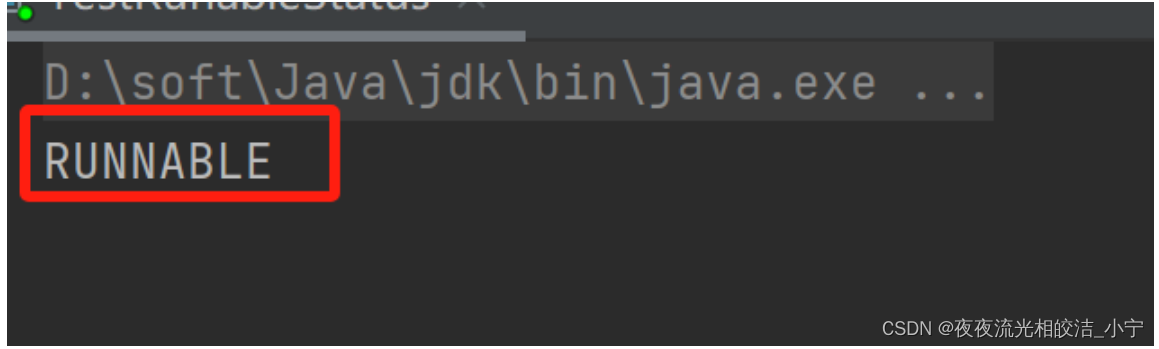
3.1.2.1.2 RUNNABLE 状态
Thread对象调用了start方法,就为RUNNABLE状态(CPU调度/没有调度)。
package com.ningzhaosheng.thread.status;

/**
 * @author ningzhaosheng
 * @date 2024/1/26 17:26:06
 * @description 测试 RUNNABLE 状态
 */
public class TestRunableStatus {
    public static void main(String[] args) throws InterruptedException {
        Thread t1 = new Thread(() -> {
            while(true){

            }
        });
        t1.start();
        Thread.sleep(500);
        System.out.println(t1.getState());
    }
}
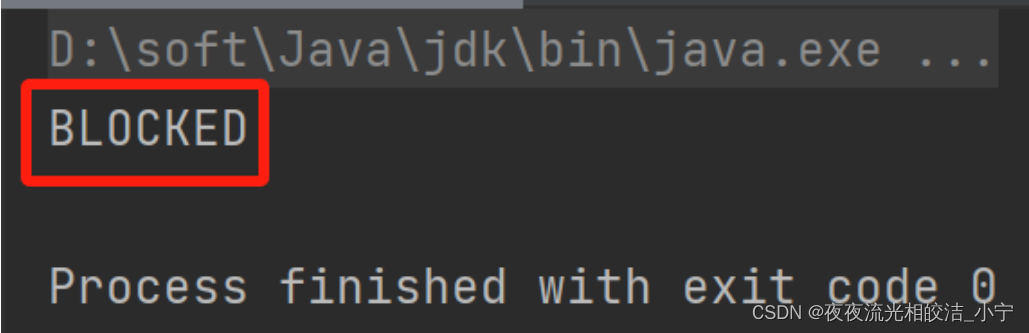
3.1.2.1.3 BLOCKED 状态
synchronized没有拿到同步锁,被阻塞的情况。
package com.ningzhaosheng.thread.status;

/**
 * @author ningzhaosheng
 * @date 2024/1/26 17:29:46
 * @description 测试 BLOCKED 状态
 */
public class TetsBlockedStatus {
    public static void main(String[] args) throws InterruptedException {
        Object obj = new Object();
        Thread t1 = new Thread(() -> {
            // t1线程拿不到锁资源,导致变为BLOCKED状态
            synchronized (obj){

            }
        });
        // main线程拿到obj的锁资源
        synchronized (obj) {
            t1.start();
            Thread.sleep(500);
            System.out.println(t1.getState());
        }
    }
}
3.1.2.1.4 WAITING 状态
调用wait方法就会处于WAITING状态,需要被手动唤醒。
package com.ningzhaosheng.thread.status;

/**
 * @author ningzhaosheng
 * @date 2024/1/26 17:32:53
 * @description 测试WAITING状态
 */
public class TestWaitingStatus {
    public static void main(String[] args) throws InterruptedException {
        Object obj = new Object();
        Thread t1 = new Thread(() -> {
            synchronized (obj){
                try {
                    obj.wait();
                } catch (InterruptedException e) {
                    e.printStackTrace();
                }
            }
        });
        t1.start();
        Thread.sleep(500);
        System.out.println(t1.getState());
    }
}
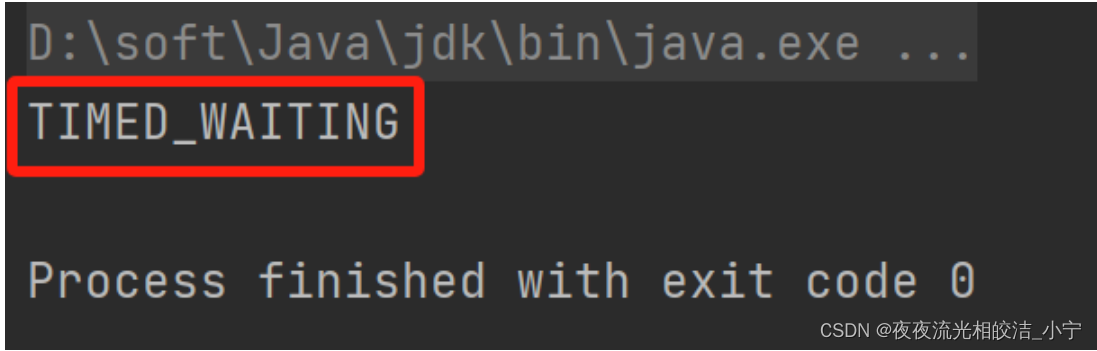
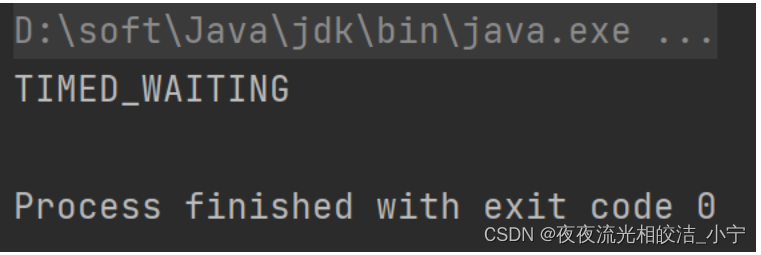
3.1.2.1.5 TIME_WAITING 状态
调用sleep方法或者join方法,会被自动唤醒,无需手动唤醒。
package com.ningzhaosheng.thread.status;

/**
 * @author ningzhaosheng
 * @date 2024/1/26 17:35:53
 * @description 测试TIME_WAITING状态
 */
public class TestTimeWaitingStatus {
    public static void main(String[] args) throws InterruptedException {
        Thread t1 = new Thread(() -> {
            try {
                Thread.sleep(1000);
            } catch (InterruptedException e) {
                e.printStackTrace();
            }
        });
        t1.start();
        Thread.sleep(500);
        System.out.println(t1.getState());
    }
}
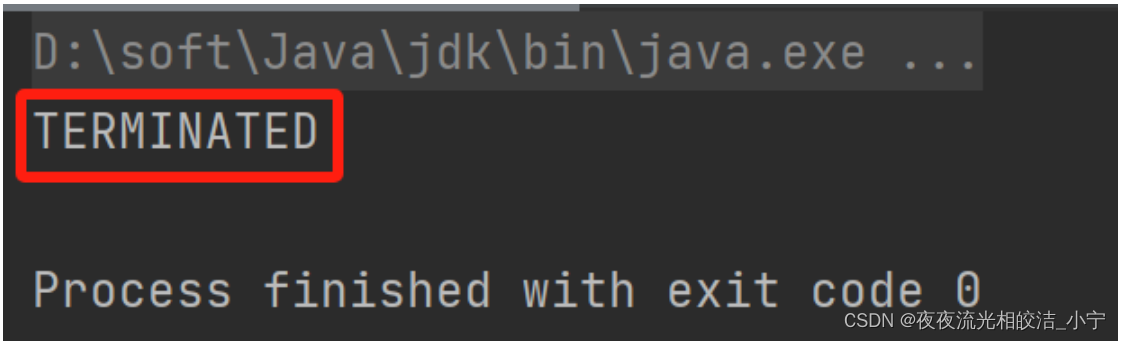
3.1.2.1.6 TERMINATED 状态
run方法执行完毕,线程生命周期到头了。
package com.ningzhaosheng.thread.status;

/**
 * @author ningzhaosheng
 * @date 2024/1/26 17:39:09
 * @description 测试 TERMINATED 状态
 */
public class TestTerminatedStatus {
    public static void main(String[] args) throws InterruptedException {
        Thread t1 = new Thread(() -> {
            try {
                Thread.sleep(500);
            } catch (InterruptedException e) {
                e.printStackTrace();
            }
        });
        t1.start();
        Thread.sleep(1000);
        System.out.println(t1.getState());
    }
}
3.1.3 7 种状态
3.2 线程的常用方法
3.2.1 获取当前线程
package com.ningzhaosheng.thread.operate;
/**
* @author ningzhaosheng
* @date 2024/1/26 17:44:46
* @description 测试获取线程
*/
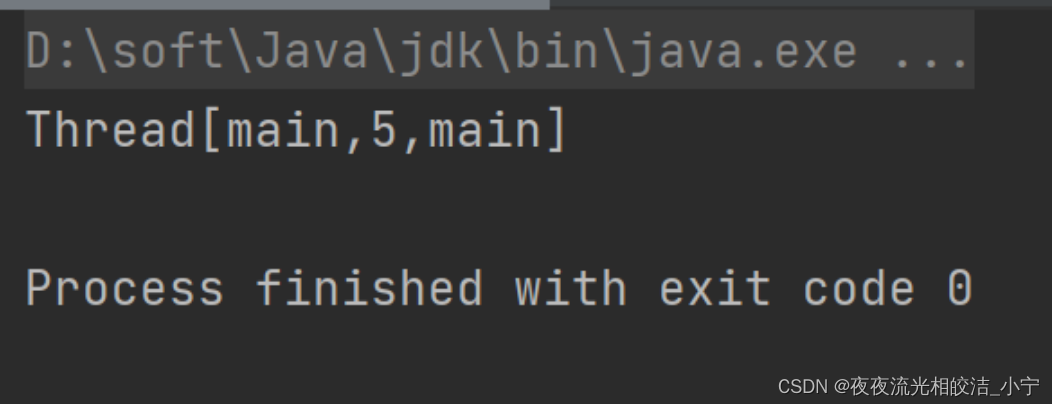
public class TestGetThread{
public static void main(String[] args) {
// 获取当前线程的方法
Thread main = Thread.currentThread();
System.out.println(main);
}
}
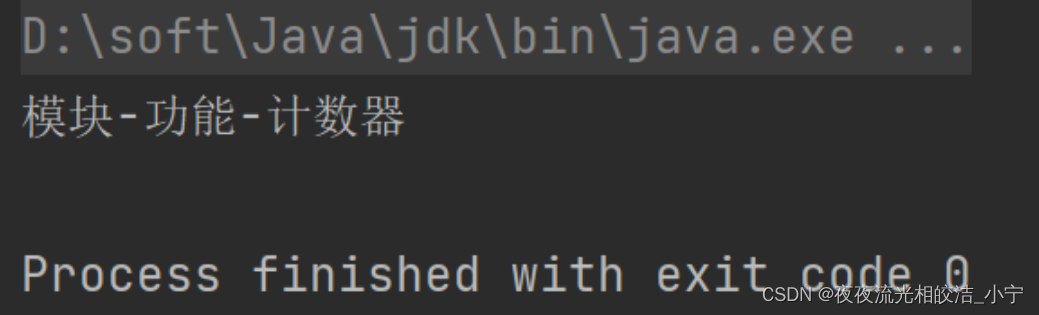
3.2.2 获取线程的名称
在构建Thread对象完毕后,一定要设置一个有意义的名称,方面后期排查错误。
package com.ningzhaosheng.thread.operate;

/**
 * @author ningzhaosheng
 * @date 2024/1/26 17:48:36
 * @description 测试获取线程名称
 */
public class TestGetThreadName {
    public static void main(String[] args) {
        Thread t1 = new Thread(() -> {
            System.out.println(Thread.currentThread().getName());
        });
        t1.setName("模块-功能-计数器");
        t1.start();
    }
}
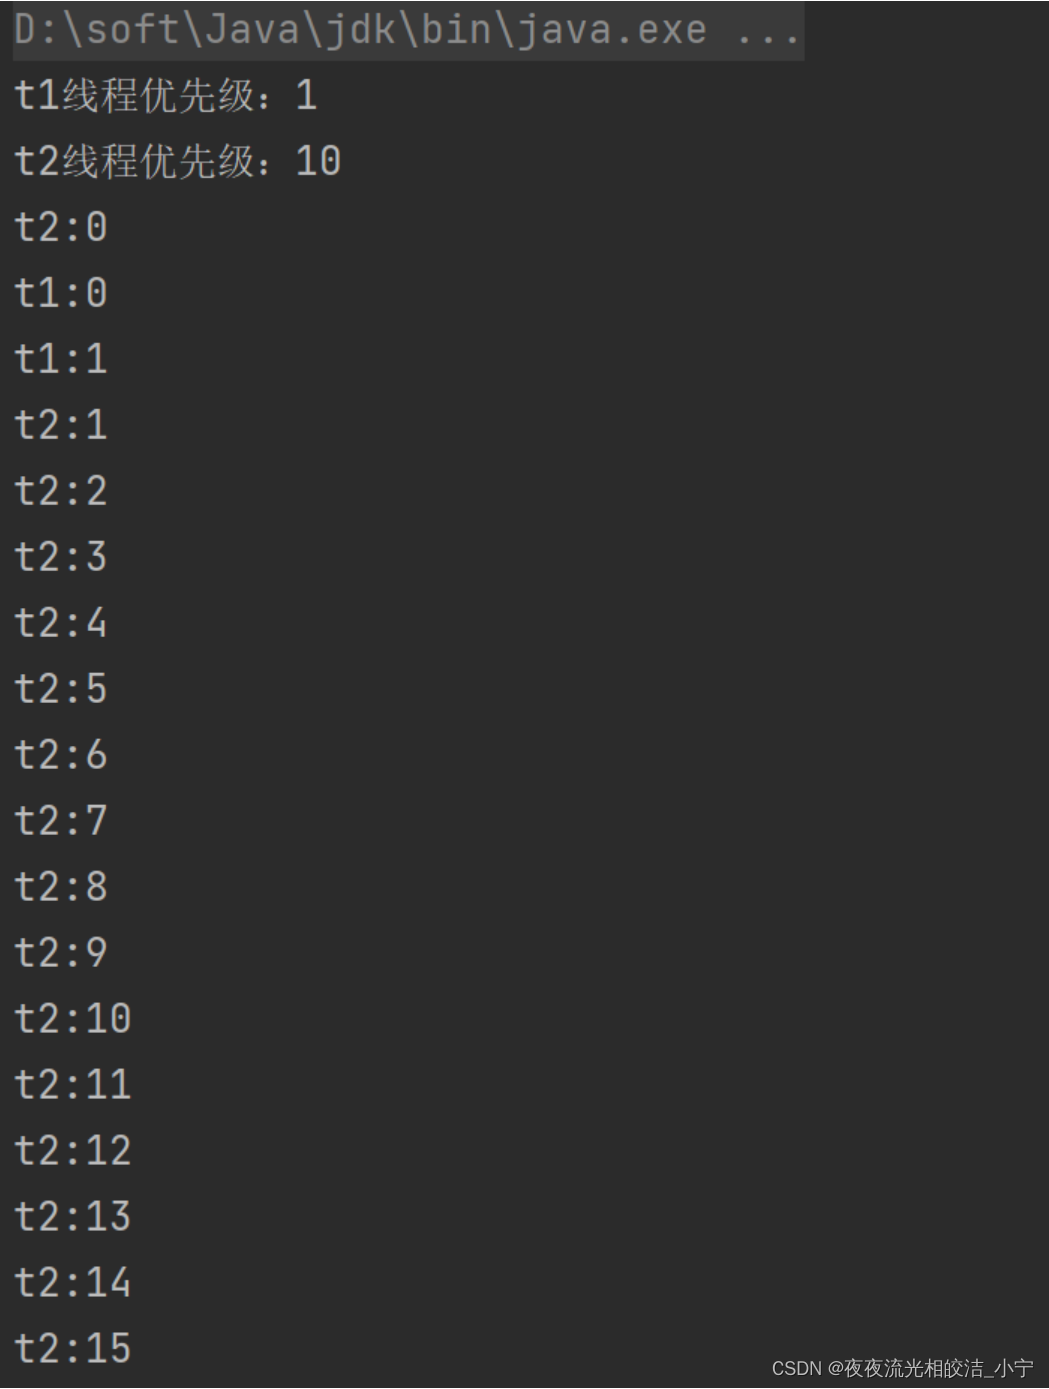
3.2.3 线程的优先级
其实就是CPU调度线程的优先级,java中给线程设置的优先级别有10个级别,从1~10任取一个整数。
如果超出这个范围,会排除参数异常的错误。
package com.ningzhaosheng.thread.operate;
/**
* @author ningzhaosheng
* @date 2024/1/26 17:51:41
* @description 测试设置、获取线程优先级
*/
public class TestThreadPriority {
public static void main(String[] args) {
Thread t1 = new Thread(() -> {
for (int i = 0; i < 1000; i++) {
System.out.println("t1:" + i);
}
});
Thread t2 = new Thread(() -> {
for (int i = 0; i < 1000; i++) {
System.out.println("t2:" + i);
}
});
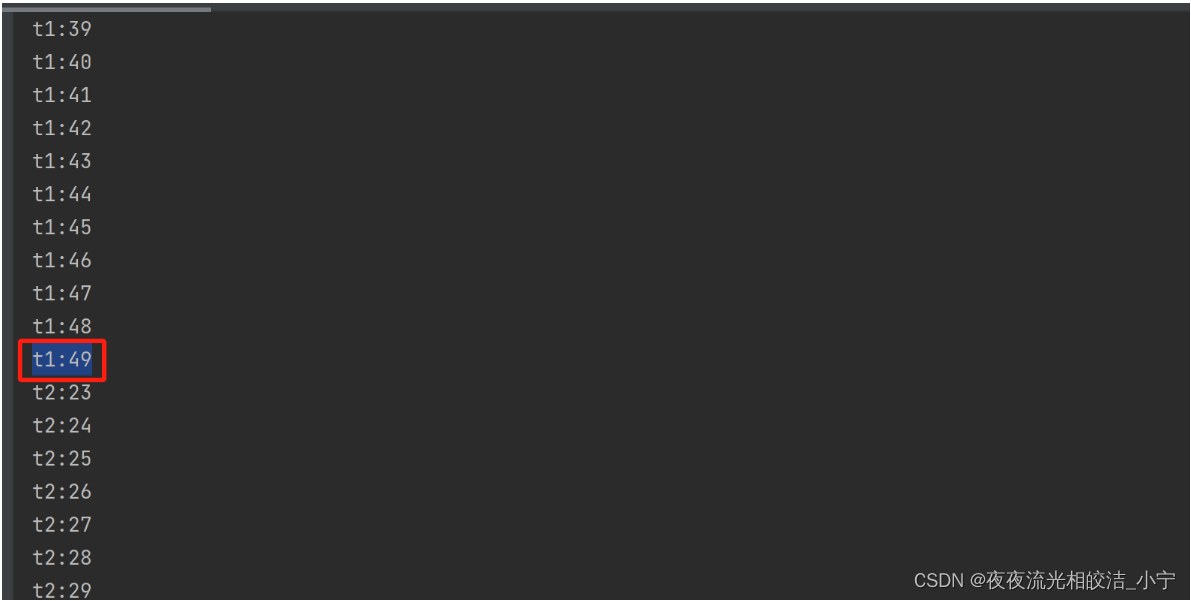
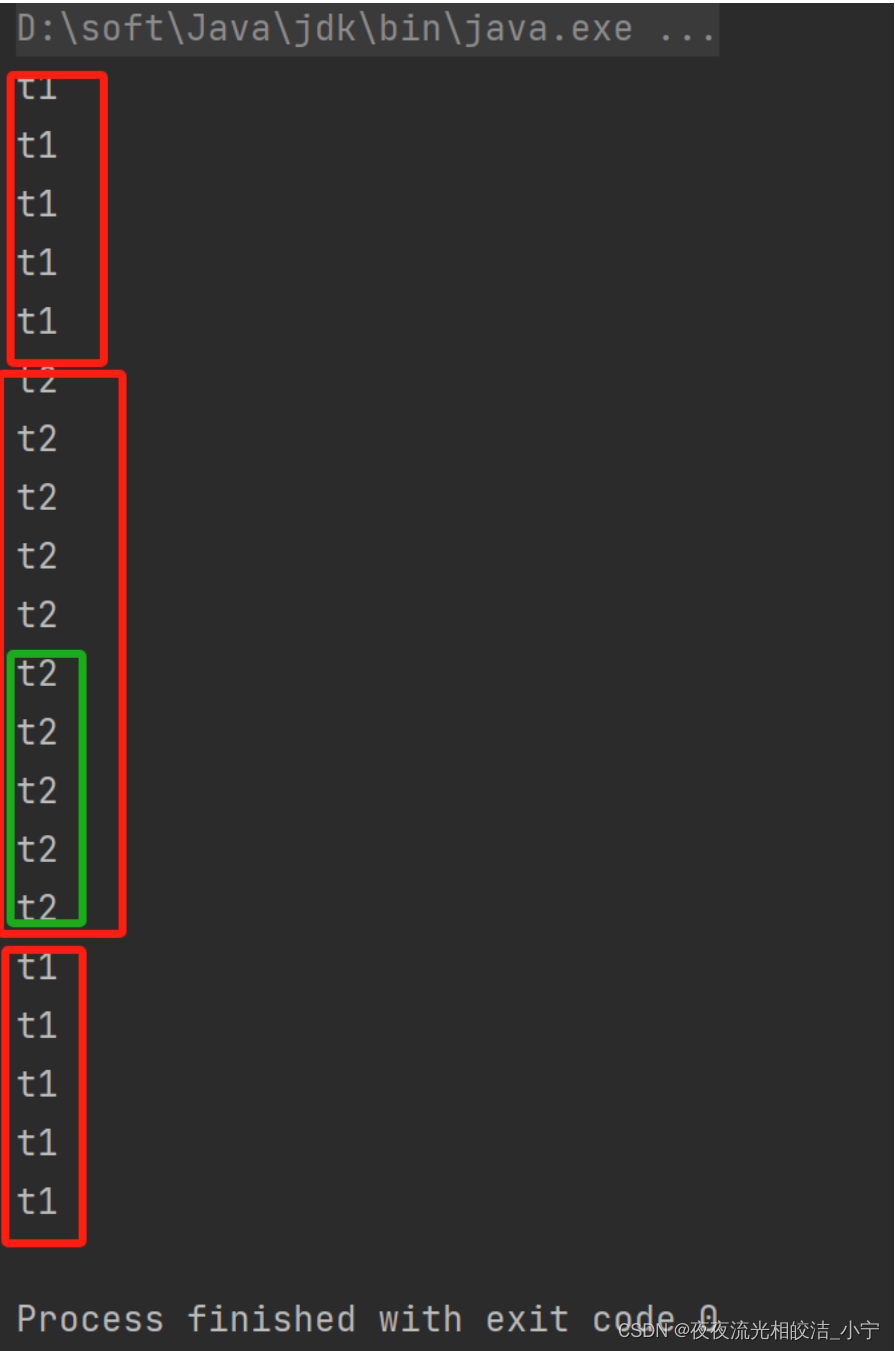
t1.setPriority(1);
t2.setPriority(10);
System.out.println("t1线程优先级:"+t1.getPriority());
System.out.println("t2线程优先级:"+t2.getPriority());
t2.start();
t1.start();
}
}
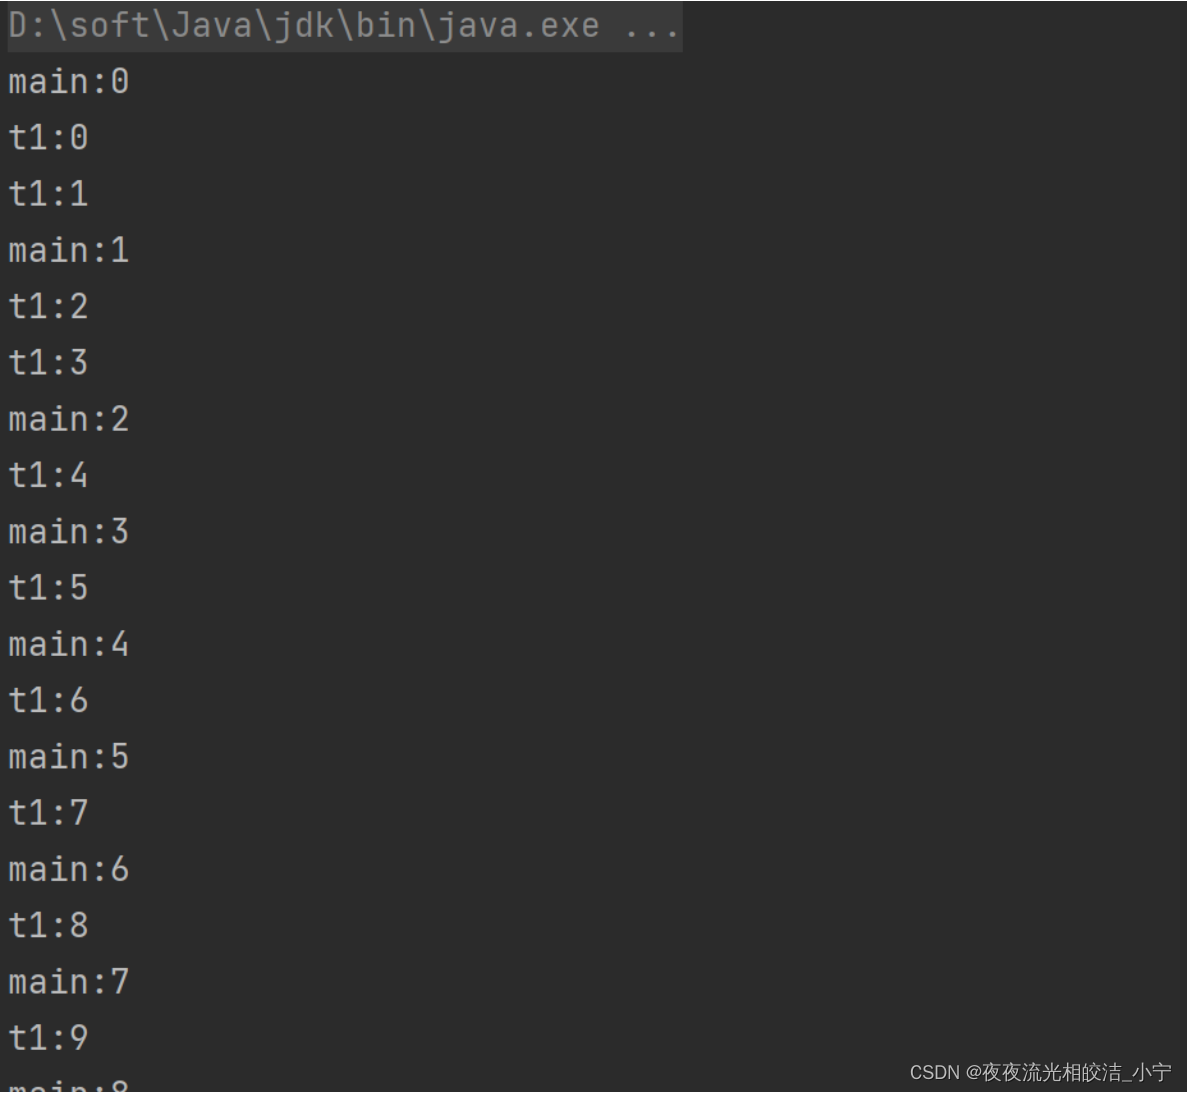
3.2.4 线程的让步
可以通过Thread的静态方法yield,让当前线程从运行状态转变为就绪状态。
package com.ningzhaosheng.thread.operate;

/**
 * @author ningzhaosheng
 * @date 2024/1/26 17:56:24
 * @description 测试线程让步
 */
public class TestThreadYield {
    public static void main(String[] args) {
        Thread t1 = new Thread(() -> {
            for (int i = 0; i < 100; i++) {
                if(i == 50){
                    Thread.yield();
                }
                System.out.println("t1:" + i);
            }
        });
        Thread t2 = new Thread(() -> {
            for (int i = 0; i < 100; i++) {
                System.out.println("t2:" + i);
            }
        });
        t2.start();
        t1.start();
    }
}
3.2.5 线程的休眠
Thread的静态方法,让线程从运行状态转变为等待状态。
package com.ningzhaosheng.thread.operate;

/**
 * @author ningzhaosheng
 * @date 2024/1/27 9:54:28
 * @description 测试线程休眠
 */
public class TestThreadSleep {
    public static void main(String[] args) throws InterruptedException {

        System.out.println(System.currentTimeMillis());
        Thread.sleep(1000);
        System.out.println(System.currentTimeMillis());


    }
}
3.2.6 线程的强占
Thread的非静态方法join方法。
需要在某一个线程下去调用这个方法。
如果在main线程中调用了t1.join(),那么main线程会进入到等待状态,需要等待t1线程全部执行完毕,在恢复到就绪状态等待CPU调度。
如果在main线程中调用了t1.join(2000),那么main线程会进入到等待状态,需要等待t1执行2s后,在恢复到就绪状态等待CPU调度。如果在等待期间,t1已经结束了,那么main线程自动变为就绪状态等待CPU调度。
package com.ningzhaosheng.thread.operate;

/**
 * @author ningzhaosheng
 * @date 2024/1/27 9:57:15
 * @description 测试线程 Join 强占
 */
public class TestThreadJoin {
    public static void main(String[] args) {
        Thread t1 = new Thread(() -> {
            for (int i = 0; i < 10; i++) {
                System.out.println("t1:" + i);
                try {
                    Thread.sleep(1000);
                } catch (InterruptedException e) {
                    e.printStackTrace();
                }
            }
        });
        t1.start();
        for (int i = 0; i < 10; i++) {
            System.out.println("main:" + i);
            try {
                Thread.sleep(1000);
            } catch (InterruptedException e) {
                e.printStackTrace();
            }
            if (i == 1) {
                try {
                    t1.join(2000);
                } catch (InterruptedException e) {
                    e.printStackTrace();
                }
            }
        }
    }
}
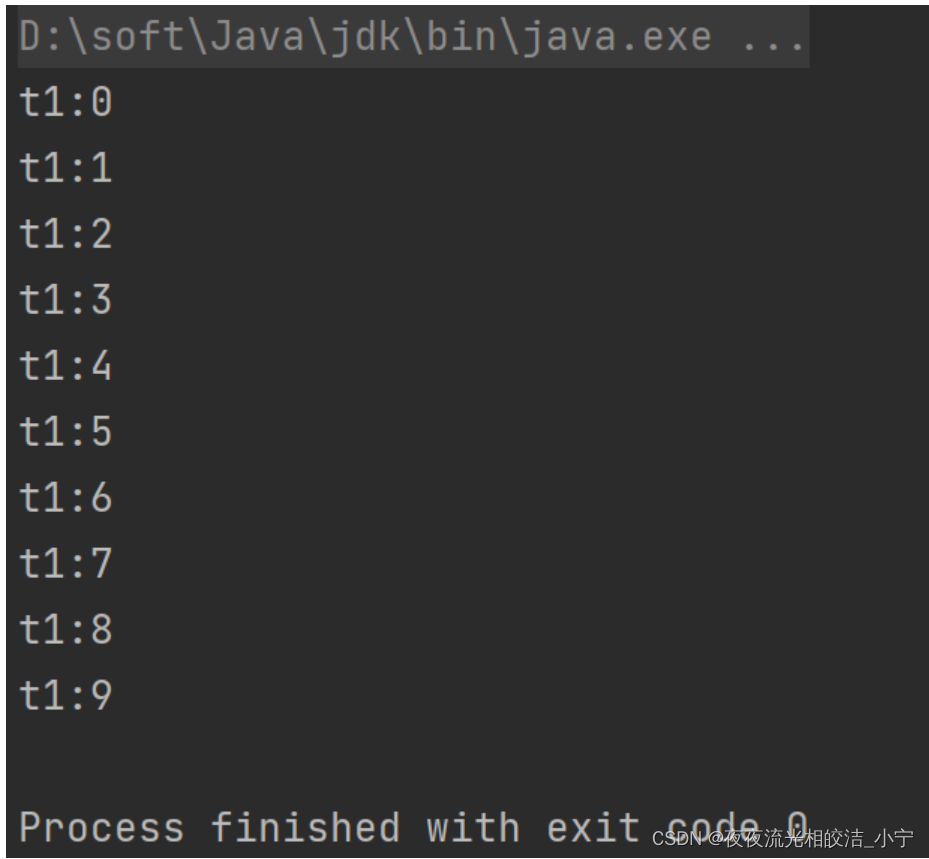
3.2.7 守护线程
默认情况下,线程都是非守护线程
JVM会在程序中没有非守护线程时,结束掉当前JVM
主线程默认是非守护线程,如果主线程执行结束,需要查看当前JVM内是否还有非守护线程,如果没有,JVM直接停止。
package com.ningzhaosheng.thread.operate;

/**
 * @author ningzhaosheng
 * @date 2024/1/27 10:01:29
 * @description 测试线程守护模式
 */
public class TestThreadDaemon {
    public static void main(String[] args) {
        Thread t1 = new Thread(() -> {
            for (int i = 0; i < 10; i++) {
                System.out.println("t1:" + i);
                try {
                    Thread.sleep(1000);
                } catch (InterruptedException e) {
                    e.printStackTrace();
                }
            }
        });
        t1.setDaemon(true);
        t1.start();
    }
}
可以看到,守护模式下,主线程执行结束,休眠线程t1也结束了。
我们看下非守护线程模式的运行状态是什么样的,对比下。
package com.ningzhaosheng.thread.operate;

/**
 * @author ningzhaosheng
 * @date 2024/1/27 10:01:29
 * @description 测试线程守护模式
 */
public class TestThreadDaemon {
    public static void main(String[] args) {
        Thread t1 = new Thread(() -> {
            for (int i = 0; i < 10; i++) {
                System.out.println("t1:" + i);
                try {
                    Thread.sleep(1000);
                } catch (InterruptedException e) {
                    e.printStackTrace();
                }
            }
        });
        t1.setDaemon(false);
        t1.start();
    }
}
我们看到,t1线程并没有随着主线程结束而结束,而是执行完才结束。
3.2.8 线程的等待和唤醒
可以让获取synchronized锁资源的线程通过wait方法进去到锁的等待池,并且会释放锁资源
可以让获取synchronized锁资源的线程,通过notify或者notifyAll方法,将等待池中的线程唤醒,添加到锁池中
notify随机的唤醒等待池中的一个线程到锁池
notifyAll将等待池中的全部线程都唤醒,并且添加到锁池
在调用wait方法和notify以及norifyAll方法时,必须在synchronized修饰的代码块或者方法内部才可以,因为要操作基于某个对象的锁的信息维护。
package com.ningzhaosheng.thread.operate;

/**
 * @author ningzhaosheng
 * @date 2024/1/27 10:28:56
 * @description 测试wait() 和 notifyAll()
 */
public class TestThreadWaitAndNotifyAll {
    public static void main(String[] args) throws InterruptedException {
        Thread t1 = new Thread(() -> {
            sync();
        },"t1");

        Thread t2 = new Thread(() -> {
            sync();
        },"t2");
        t1.start();
        t2.start();
        Thread.sleep(12000);
        synchronized (TestThreadWaitAndNotifyAll.class) {
            TestThreadWaitAndNotifyAll.class.notifyAll();
        }
    }

    public static synchronized void sync()  {
        try {
            for (int i = 0; i < 10; i++) {
                if(i == 5) {
                    TestThreadWaitAndNotifyAll.class.wait();
                }
                Thread.sleep(1000);
                System.out.println(Thread.currentThread().getName());
            }
        } catch (InterruptedException e) {
            e.printStackTrace();
        }
    }
}
四、线程结束方式
线程结束方式很多,最常用就是让线程的run方法结束,无论是return结束,还是抛出异常结束,都可以。
4.1 stop方法(不用)
这种方式强制让线程结束,无论你在干嘛,不推荐使用此种方式,但是,他确实可以把线程干掉。
package com.ningzhaosheng.thread.operate;

/**
 * @author ningzhaosheng
 * @date 2024/1/27 10:43:57
 * @description 测试stop()
 */
public class TestThreadStop {
    public static void main(String[] args) throws InterruptedException {
        Thread t1 = new Thread(() -> {
            try {
                Thread.sleep(5000);
            } catch (InterruptedException e) {
                e.printStackTrace();
            }
        });
        t1.start();
        Thread.sleep(500);
        t1.stop();
        System.out.println(t1.getState());
    }
}
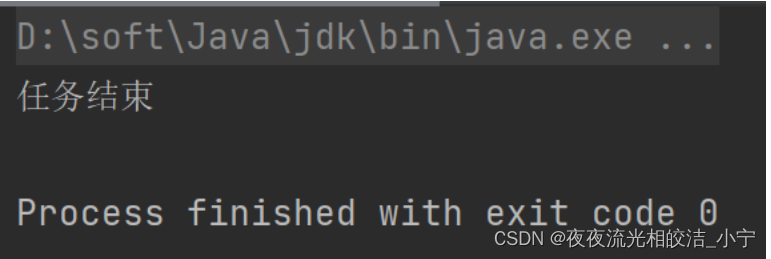
4.2 使用共享变量(很少会用)
这种方式用的也不多,有的线程可能会通过死循环来保证一直运行。
咱们可以通过修改共享变量在破坏死循环,让线程退出循环,结束run方法。
package com.ningzhaosheng.thread.operate;

/**
 * @author ningzhaosheng
 * @date 2024/1/27 10:46:55
 * @description 测试通过共享变量结束线程
 */
public class TestThreadShareStatus {
    static volatile boolean flag = true;
    public static void main(String[] args) throws InterruptedException {
        Thread t1 = new Thread(() -> {
            while(flag){
                // 处理任务
            }
            System.out.println("任务结束");
        });
        t1.start();
        Thread.sleep(500);
        flag = false;
    }
}
4.3 interrupt方式
4.3.1 通过判断isInterrupted()状态,结束循环退出线程
调用线程的interrupt()方法,循环内部通过调用Thread.currentThread().isInterrupted()获取线程的状态,判断状态跳出循环,退出线程。
package com.ningzhaosheng.thread.operate;

/**
 * @author ningzhaosheng
 * @date 2024/1/27 10:49:13
 * @description 测试线程interrupt结束线程
 */
public class TestThreadInterrupt {
    public static void main(String[] args) throws InterruptedException {
        // 线程默认情况下,    interrupt标记位:false
        System.out.println(Thread.currentThread().isInterrupted());
        // 执行interrupt之后,再次查看打断信息
        Thread.currentThread().interrupt();
        // interrupt标记位:ture
        System.out.println(Thread.currentThread().isInterrupted());
        // 返回当前线程,并归位为false interrupt标记位:ture
        System.out.println(Thread.interrupted());
        // 已经归位了
        System.out.println(Thread.interrupted());

        // =====================================================
        Thread t1 = new Thread(() -> {
            while (!Thread.currentThread().isInterrupted()) {
                // 处理业务
            }
            System.out.println("t1结束");
        });
        t1.start();
        Thread.sleep(500);
        t1.interrupt();
    }
}

4.3.2 通过抛出异常自行处理
通过打断WAITING或者TIMED_WAITING状态的线程,从而抛出异常自行处理。
这种停止线程方式是最常用的一种,在框架和JUC中也是最常见的。
package com.ningzhaosheng.thread.operate;

/**
 * @author ningzhaosheng
 * @date 2024/1/27 11:02:19
 * @description 测试通过InterruptException异常结束线程
 */
public class TestThreadInterruptException {
    public static void main(String[] args) throws InterruptedException {
        Thread t1 = new Thread(() -> {
            while (true) {
                // 获取任务
                // 拿到任务,执行任务
                // 没有任务了,让线程休眠
                try {
                    Thread.sleep(1000);
                } catch (InterruptedException e) {
                    e.printStackTrace();
                    System.out.println("基于打断形式结束当前线程");
                    return;
                }
            }
        });
        t1.start();
        Thread.sleep(500);
        t1.interrupt();
    }
}

好了,本次内容就分享到这,如果有帮助到大家,欢迎大家点赞+关注+收藏,有疑问也欢迎大家评论留言!


 14万+
14万+


 被折叠的 条评论
为什么被折叠?
被折叠的 条评论
为什么被折叠?
 到【灌水乐园】发言


