


瀑布流介绍
瀑布流可以在保证图片原始比例的情况下,灵活的展现内容,相对于传统的使用相同大小的网格展现大量图片,效果上要好上很多,而实现瀑布流的方式有很多种,网上比较流行的有三种实现方式。
1,使用UIScrollView,主要技术点在于视图的重用。
2,使用UITableView,这种方式应该是最易想到的,因为需要展现几列就用几个tabelview就ok了,而且不需要考虑重用,因为苹果已经做好了,只需要考虑如何在几列tabelView滑动的时候,保持同步不出现BUG。
3,使用UICollectionView,UICollectionView在iOS6中第一次被介绍,它与UITableView有许多相似点,但它多了一个布局类,而实现瀑布流,就与这个布局类有关。此种方式实现,也不需要考虑视图重用。
UITableView的重用机制做瀑布流思路
- 总先做成几列是事先要清楚,有多少条记录,这个可以从json或者xml中读取后知道(json或xml最好将图片的高度和宽度也显示出来,便于后面用到。
- 假设要做成3列,就用三个uitableview,宽度平均,高度动态,页面高度取uitableview中最高的。
- 三个uitableview初始化的时候用到tag(我越来越觉得tag在ios中的用处很大,就像js中读取html控件中的id一样),然后 showsVerticalScrollIndicator和scrollEnabled设为no,separatorStyle设为 UITableViewCellSeparatorStyleNone,添加到UIview中。
下面详细讲一下用UICollectionView做瀑布流
1.故事板中拖拽一个UICollectionView放在视图中
2.新建一个继承子UICollectionViewCell的子类MyCollectionViewCell,将单元格的Class选定为MyCollectionViewCell,并且设置Identifier为MyCell。
3.实现UICollectionViewDelegate,UICollectionViewDataSource,设置区域,设置区域中的Item个数,生成可复用的单元格:
-(NSInteger)numberOfSectionsInCollectionView:(UICollectionView *)collectionView{
return 1;
}
-(NSInteger)collectionView:(UICollectionView *)collectionView numberOfItemsInSection:(NSInteger)section{
return 100;
}
-(UICollectionViewCell *)collectionView:(UICollectionView *)collectionView cellForItemAtIndexPath:(NSIndexPath *)indexPath{
MyCollectionViewCell *myCell=[collectionView dequeueReusableCellWithReuseIdentifier:
@"MyCell" forIndexPath:indexPath];
[myCell setBackgroundColor:[UIColor greenColor]];
return myCell;
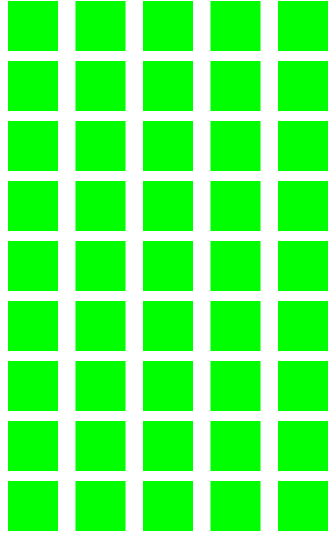
}viewDidLoad中设置一下数据源和代理:
self.collectionView.delegate=self;
self.collectionView.dataSource=self;
self.collectionView.backgroundColor=[UIColor whiteColor];
最终效果:
进行masonry layout (布局)
很多情况下所有的单元格的宽度是一定的,只是高度不确定,这就是有些人说的定宽不定高,主要是从视觉上的美感来看,当然我们可以通过实现
UICollectionViewDelegateFlowLayout去改变单元格大小:
-(CGSize)collectionView:(UICollectionView *)collectionView layout:(UICollectionViewLayout *)collectionViewLayout sizeForItemAtIndexPath:(NSIndexPath *)indexPath{
CGFloat height=100+(arc4random()%100);
return CGSizeMake(100, height);
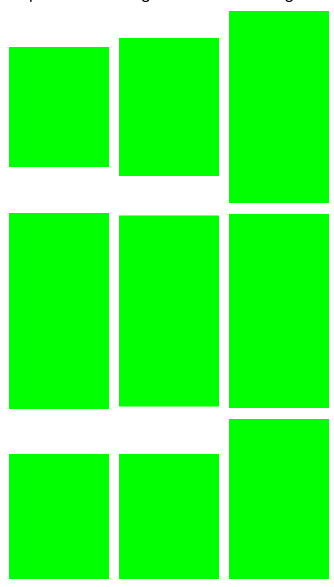
}通过效果我们可以发现,同一行的单元格的圆心所在的Y轴坐标都是一样的:
设置存储所有高度的数组:
//存储所有的高度的数组
@property (strong,nonatomic) NSMutableArray *heightArr;将高度添加到数组中:
-(CGSize)collectionView:(UICollectionView *)collectionView layout:(UICollectionViewLayout *)collectionViewLayout sizeForItemAtIndexPath:(NSIndexPath *)indexPath{

    CGFloat height=100+(arc4random()%160);
    [self.heightArr addObject:[NSString stringWithFormat:@"%f",height]];

    return  CGSizeMake(100, height);

}
修改每一行单元格的位置:
-(UICollectionViewCell *)collectionView:(UICollectionView *)collectionView cellForItemAtIndexPath:(NSIndexPath *)indexPath{

    MyCollectionViewCell *myCell=[collectionView dequeueReusableCellWithReuseIdentifier:
                    @"MyCell" forIndexPath:indexPath];

    [myCell setBackgroundColor:[UIColor redColor]];
    NSInteger remainder=indexPath.row%3;

    NSInteger currentRow=indexPath.row/3;

    CGFloat   currentHeight=[self.heightArr[indexPath.row] floatValue];


    CGFloat positonX=100*remainder+10*(remainder+1);
    CGFloat positionY=(currentRow+1)*10;
    for (NSInteger i=0; i<currentRow; i++) {

        NSInteger position=remainder+i*3;

        positionY+=[self.heightArr[position] floatValue];
    }
   myCell.frame = CGRectMake(positonX, positionY,100,currentHeight) ;


    NSUInteger *randomNumber=arc4random_uniform(9);

    NSString *girlFilename = [NSString stringWithFormat:@"Girl%lu.jpg", (unsigned long)randomNumber];

    UIImageView *imageView = [[UIImageView alloc] initWithImage:[UIImage imageNamed:girlFilename]];


    [myCell setBackgroundView:imageView];
    return  myCell;

}
最终效果

比较简单,仅供学习参考


 433
433


 被折叠的 条评论
为什么被折叠?
被折叠的 条评论
为什么被折叠?
 到【灌水乐园】发言


