


虚拟环境
pipenv 工作流
安装pipenv
pip install pipenv
查看pipenv 版本
pipenv --version
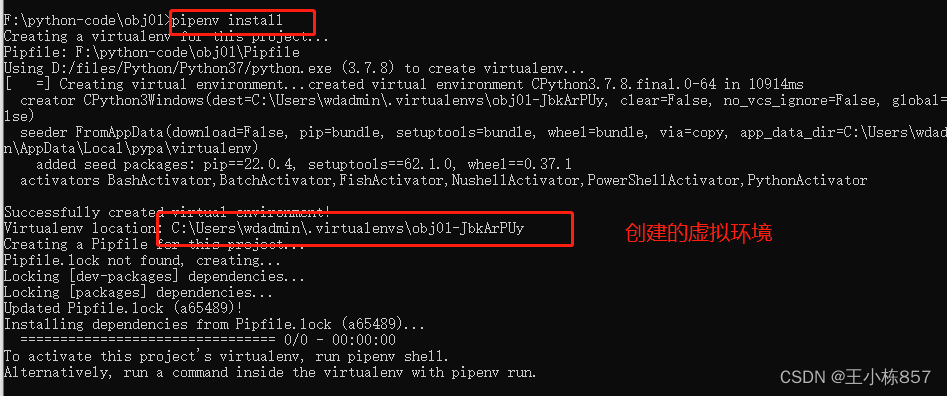
创建虚拟环境,进入工作文件夹下执行
pipenv install
激活虚拟环境
pipenv shell

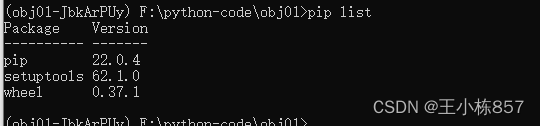
这时候虚拟环境中只有简单的几个基础包,还需要安装需要的模块
还可以直接使用 pipenv run python hello.py
使用虚拟环境中的解释器来运行py程序

安装依赖包
pipenv install flask
升级依赖包
pipenv update flask
删除依赖
pipenv uninstall flask
使用pycharm打开
文件->打开-找到虚拟目录打开,pycharm会自动把虚拟环境解释器作为默认解释器
pycharm版本:2020.2.3
安装pipenv时,pip升级导致安装命令无法使用

解决:
在控制台输入以下命令后即可解决
python -m ensurepip
正确的升级方式是
python -m pip install --upgrade pip
scrapy 简单使用
1 安装scrapy模块
pip install scrapy
2 创建一个爬虫项目
scrapy startproject mySpider
3 创建一个爬虫文件
cd mySpider
scrapy genspider itcast "itcast.cn"

4 打开spiders/itcast.py 文件 设置start_url ,使用xpath对结果进行分组解析,并传递 给pipelines管道文件
import scrapy


class ItcastSpider(scrapy.Spider):
    name = 'itcast'
    allowed_domains = ['itcast.cn']
    start_urls = ['http://www.itcast.cn/channel/teacher.shtml']

    def parse(self, response):
        # rest = response.xpath("//div[@class='tea_con']//h3/text()").extract()
        # print(rest)
        # 分组查询
        rest_group = response.xpath("//div[@class='tea_con']//li")
        for rest in rest_group:
            item = {}
            item["name"] = rest.xpath(".//h3/text()").extract_first()
            item["title"] = rest.xpath(".//h4/text()").extract_first()
            item["info"] = rest.xpath(".//p/text()").extract_first()
            yield item
5 在pipelines管道文件中给解析的数据添加一组键值对
class Myspider01Pipeline:
    def process_item(self, item, spider):
        item["hello"] = "word"
        return item


class Myspider01Pipeline2:
    def process_item(self, item, spider):
        print(item)
        return item
6 在setting配置文件中开启管道文件,并设置实行顺序
ITEM_PIPELINES = {
   'mySpider01.pipelines.Myspider01Pipeline': 200,
   'mySpider01.pipelines.Myspider01Pipeline2': 300,
}
7 启动爬虫项目
scrapy crawl itcast
常见flask扩展包安装
模板渲染
pipenv install bootstrap-flask
数据库
pipenv install flask-sqlalchemy
邮件
pipenv install flask-mail
时间管理
pipenv install flask-moment
富文本编辑器
pipenv install flask-ckeditor
环境变量
pipenv install python-dotenv


 707
707


 被折叠的 条评论
为什么被折叠?
被折叠的 条评论
为什么被折叠?
 到【灌水乐园】发言


