


(尊重劳动成果,转载请注明出处:http://blog.csdn.net/qq_25827845/article/details/79498075冷血之心的博客)
wav音频文件是一种无损的音频文件,相对于MP3来说音质较好,当然文件大小也很大。
A WAVE file is often just a RIFF file with a single “WAVE” chunk which consists of two sub-chunks – a “fmt ” chunk specifying the data format and a “data” chunk containing the actual sample data. Call this form the “Canonical form”
其文件的内部格式如下:
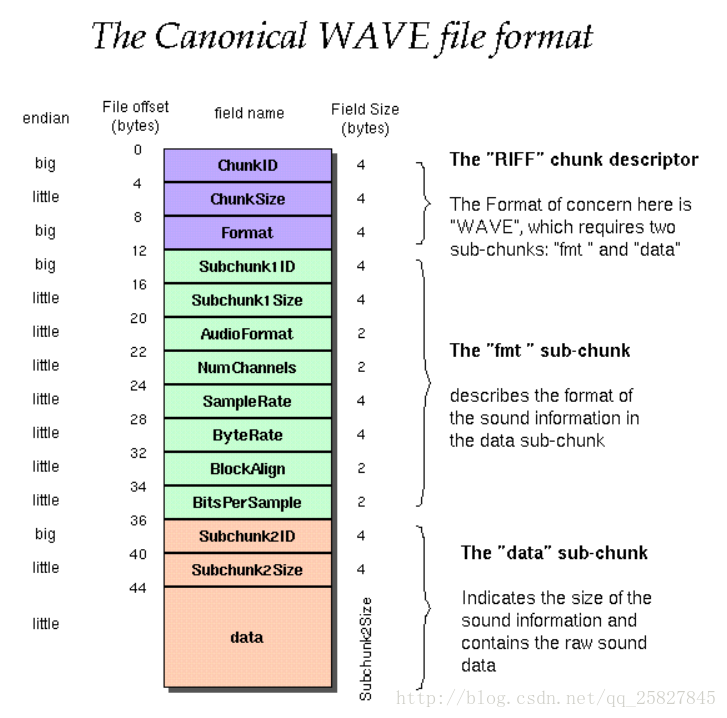
用表格统计各个部分的含义如下:

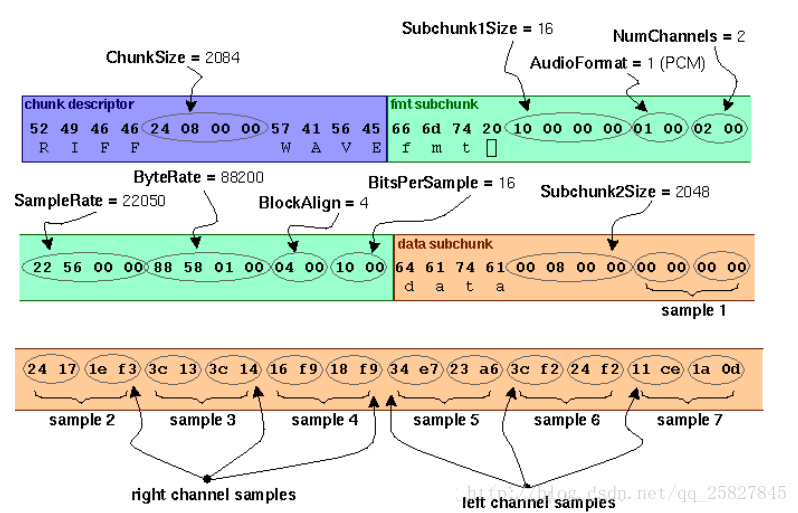
一个简单的示例如下所示:
获取内部结构
那么我们如何使用Java程序来获取wav文件的内部结构信息呢?使用RandomAccessFile实现,代码如下所示:
package cn.pak1;

import java.io.File;
import java.io.IOException;
import java.io.RandomAccessFile;

public class My {

	public static void main(String[] args) throws IOException {

		File f = new File("C://Users//yangwenqiang//Desktop//auoy.wav");
		RandomAccessFile rdf = null;
		rdf = new RandomAccessFile(f, "r");
		System.out.println("audio size: " + toInt(read(rdf, 4, 4))); // 音频文件大小

		System.out.println("audio format: " + toShort(read(rdf, 20, 2))); // 音频格式,1-PCM

		System.out.println("num channels: " + toShort(read(rdf, 22, 2))); // 1-单声道;2-双声道

		System.out.println("sample rate: " + toInt(read(rdf, 24, 4))); // 采样率、音频采样级别

		System.out.println("byte rate: " + toInt(read(rdf, 28, 4))); // 每秒波形的数据量

		System.out.println("block align: " + toShort(read(rdf, 32, 2))); // 采样帧的大小

		System.out.println("bits per sample: " + toShort(read(rdf, 34, 2))); // 采样位数

		rdf.close();
	}

	public static int toInt(byte[] b) {
		return ((b[3] << 24) + (b[2] << 16) + (b[1] << 8) + (b[0] << 0));
	}

	public static short toShort(byte[] b) {
		return (short) ((b[1] << 8) + (b[0] << 0));
	}

	public static byte[] read(RandomAccessFile rdf, int pos, int length) throws IOException {
		rdf.seek(pos);
		byte result[] = new byte[length];
		for (int i = 0; i < length; i++) {
			result[i] = rdf.readByte();
		}
		return result;
	}
}
结果如下所示:
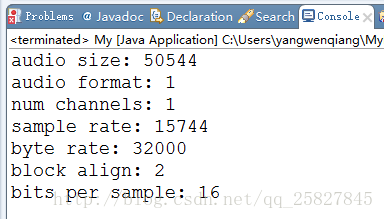
我们分别得出该音频文件的大小、format、通道数量、采样率、字节率等消息。
RandomAccessFile的构造函数除了指定了要写入了文件,还有另外一个参数:mod,主要用来指定打开文件的访问模式。

修改内部结构
修改内部结构,我们需要将RandomAccessFile的构造函数模式设为“rw”,并且write方法实现修改音频文件内部结构,代码如下所示:
package cn.pak1;

import java.io.File;
import java.io.IOException;
import java.io.RandomAccessFile;

public class My {

	public static void main(String[] args) throws IOException {

		File f = new File("C://Users//yangwenqiang//Desktop//auoy.wav");
		RandomAccessFile rdf = null;
		rdf = new RandomAccessFile(f, "rw");
		write(rdf, 22);

		System.out.println("audio size: " + toInt(read(rdf, 4, 4))); // 音频文件大小

		System.out.println("audio format: " + toShort(read(rdf, 20, 2))); // 音频格式,1-PCM

		System.out.println("num channels: " + toShort(read(rdf, 22, 2))); // 1-单声道;2-双声道

		System.out.println("sample rate: " + toInt(read(rdf, 24, 4))); // 采样率、音频采样级别

		System.out.println("byte rate: " + toInt(read(rdf, 28, 4))); // 每秒波形的数据量

		System.out.println("block align: " + toShort(read(rdf, 32, 2))); // 采样帧的大小

		System.out.println("bits per sample: " + toShort(read(rdf, 34, 2))); // 采样位数

		rdf.close();
	}

	public static int toInt(byte[] b) {
		return ((b[3] << 24) + (b[2] << 16) + (b[1] << 8) + (b[0] << 0));
	}

	public static short toShort(byte[] b) {
		return (short) ((b[1] << 8) + (b[0] << 0));
	}

	public static byte[] read(RandomAccessFile rdf, int pos, int length) throws IOException {
		rdf.seek(pos);
		byte result[] = new byte[length];
		for (int i = 0; i < length; i++) {
			result[i] = rdf.readByte();
		}
		return result;
	}

	public static void write(RandomAccessFile rdf, int pos) throws IOException {
		rdf.seek(pos);
		byte[] b = {02,00};
		rdf.write(b);

	}
}
结果如下所示:
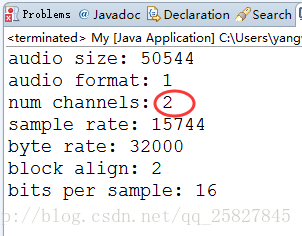
我们通过代码,就将通道数修改为2。实现其内部结构的修改。
以上就是如何使用Java代码获取和修改wav音频文件内部结构的小Demo。如果对你有帮助,记得点赞哦~欢迎大家关注我的博客,可以进群366533258(请备注来源)一起交流学习哦~
本群给大家提供一个学习交流的平台,内设菜鸟Java管理员一枚、精通算法的金牌讲师一枚、Android管理员一枚、蓝牙BlueTooth管理员一枚、Web前端管理一枚以及C#管理一枚。欢迎大家进来交流技术。


 759
759

 被折叠的 条评论
为什么被折叠?
被折叠的 条评论
为什么被折叠?
 到【灌水乐园】发言


