


 本文详细介绍了PyQt5中的布局管理,包括水平布局、垂直布局、网格布局、表单布局等,以及如何使用QBoxLayout、QGridLayout和QFormLayout等进行控件的排列。同时,讨论了绝对位置布局、布局的嵌套、QSplitter的使用,帮助理解PyQt5界面设计的灵活性。
一、好软件的三个维度
好用
易用
能用
二、PyQt5中的布局管理
对PyQt5的界面进行布局管理主要有两种方法,即采用绝对位置和布局类。在PyQt5中有四种布局方式,即水平布局、垂直布局、网格布局、表单布局,以及两种布局方法,即addLayout()和addWidget(),其中addLayout()用于在布局中插入子布局,addWidget()用于在布局中插入控件。
四种布局方式对应四个布局类:
水平布局类(QHBoxLayout),可以把所添加的控件在水平方向上依次排列
垂直布局类(QVBoxLayout),可以把所添加的控件在垂直方向上依次排列
网格布局类(QGridLayout),可以把所添加的控件以网格的形式排列
表单布局类(QFormLayout),可以把所添加的控件以两列的形式排列
在窗口中进行单一的布局不难,但是若是进行比较复杂的布局,就涉及布局的嵌套了,推荐使用Qt Designer的可视化管理工具来进行界面布局。
三、PyQt5的绝对位置布局
绝对布局是通过在窗口程序中指定每一个控件的显示坐标和大小来实现的。
四、QBoxLayout(框布局)
采用QBoxLayout类可以在水平和垂直方向上排列控件,QHBoxLayout和QVBoxLayout类继承自QBoxLayout。
1、QHBoxLayout(水平布局)
采用该类,是按照从左到右的顺序来添加控件的。常用方法:
addLayout(self,QLayout,stretch=0) 在窗口的右边添加布局,使用stretch进行伸缩,伸缩量默认为0
addWidget(self,QWidget,stretch,Qt.Alignment allignment) 在布局中添加控件 其中stretch只适用于QBoxLayout,控件和窗口会随着伸缩量的变大而增大; alignment是指定对其的方式的。
addSpacing(self,int) 设置各控件的上下间距,通过该方法可以增加额外的空间
QHBoxLayout的对齐方式参数有:
Qt.AlignLeft 水平方向居左对齐
Qt.AlignRight 水平方向居右对齐
Qt.AlignCenter 水平方向居中对齐
Qt.AlignJustify 水平方向两端对齐
Qt.AlignTop 垂直方向靠上对齐
Qt.AlignBotton 垂直方向靠下对齐
Qt.AlignVCenter 垂直方向居中对齐
例子:
| """ | |
| 【简介】 | |
| 水平布局管理例子 | |
| """ | |
| import sys | |
| from PyQt5.QtWidgets import QApplication ,QWidget ,QHBoxLayout , QPushButton | |
| class Winform(QWidget): | |
| def __init__(self,parent=None): | |
| super(Winform,self).__init__(parent) | |
| self.setWindowTitle("水平布局管理例子") | |
| # 水平布局按照从左到右的顺序进行添加按钮部件。 | |
| hlayout = QHBoxLayout() | |
| hlayout.addWidget( QPushButton(str(1))) | |
| hlayout.addWidget( QPushButton(str(2))) | |
| hlayout.addWidget( QPushButton(str(3))) | |
| hlayout.addWidget( QPushButton(str(4))) | |
| hlayout.addWidget( QPushButton(str(5))) | |
| self.setLayout(hlayout) | |
| if __name__ == "__main__": | |
| app = QApplication(sys.argv) | |
| form = Winform() | |
| form.show() | |
| sys.exit(app.exec_()) |
运行结果:

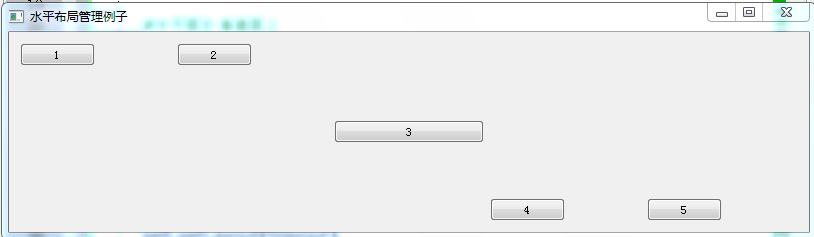
若需要将布局中的某些控件居上、居下显示,可以通过对齐方式参数Qt.Alignment来设置,例子如下:
| """ | |
| 【简介】 | |
| 水平布局管理例子 | |
| """ | |
| import sys | |
| from PyQt5.QtWidgets import QApplication ,QWidget ,QHBoxLayout , QPushButton | |
| from PyQt5.QtCore import Qt | |
| class Winform(QWidget): | |
| def __init__(self,parent=None): | |
| super(Winform,self).__init__(parent) | |
| self.setWindowTitle("水平布局管理例子") | |
| self.resize(800, 200) | |
| # 水平布局按照从左到右的顺序进行添加按钮部件。 | |
| hlayout = QHBoxLayout() | |
| #水平居左 垂直居上 | |
| hlayout.addWidget( QPushButton(str(1)) , 0 , Qt.AlignLeft | Qt.AlignTop) | |
| hlayout.addWidget( QPushButton(str(2)) , 0 , Qt.AlignLeft | Qt.AlignTop) | |
| hlayout.addWidget( QPushButton(str(3))) | |
| #水平居左 垂直居下 | |
| hlayout.addWidget( QPushButton(str(4)) , 0 , Qt.AlignLeft | Qt.AlignBottom ) | |
| hlayout.addWidget( QPushButton(str(5)), 0 , Qt.AlignLeft | Qt.AlignBottom) | |
| self.setLayout(hlayout) | |
| if __name__ == "__main__": | |
| app = QApplication(sys.argv) | |
| form = Winform() | |
| form.show() | |
| sys.exit(app.exec_()) |
运行结果:
还可以使用setSpacing(int)设置各控件之间的间距,例子如下:
| """ | |
| 【简介】 | |
| 水平布局管理例子 | |
| """ | |
| import sys | |
| from PyQt5.QtWidgets import QApplication ,QWidget ,QHBoxLayout , QPushButton | |
| from PyQt5.QtCore import Qt | |
| class Winform(QWidget): | |
| def __init__(self,parent=None): | |
| super(Winform,self).__init__(parent) | |
| self.setWindowTitle("水平布局管理例子") | |
| # 水平布局按照从左到右的顺序进行添加按钮部件。 | |
| hlayout = QHBoxLayout() | |
| hlayout.addWidget( QPushButton(str(1)) ) | |
| hlayout.addWidget( QPushButton(str(2)) ) | |
| hlayout.addWidget( QPushButton(str(3))) | |
| hlayout.addWidget( QPushButton(str(4)) ) | |
| hlayout.addWidget( QPushButton(str(5))) | |
| #设置控件间的间距 | |
| hlayout.setSpacing( 0 ) | |
| self.setLayout(hlayout) | |
| if __name__ == "__main__": | |
| app = QApplication(sys.argv) | |
 最低0.47元/天 解锁文章


 5425
5425


 被折叠的 条评论
为什么被折叠?
被折叠的 条评论
为什么被折叠?
 到【灌水乐园】发言


