


我们经常能够看到有很多View或者控件跟着手势移动或者一定时间内产生一个动画的效果,感觉到很酷炫,其实有很多方法可以产生相同的效果,如动画,重新计算layout,或者使用非常高大上的ViewDragHelper,还有就是今天要学习的Scroller类啦。
ScrollTo和ScrollBy
在看Scroller类的之前,我们先来看一下两个方法:
scrollTo(),还有scrollBy()两个方法,下面是源码
/**
     * Set the scrolled position of your view. This will cause a call to
     * {@link #onScrollChanged(int, int, int, int)} and the view will be
     * invalidated.
     * @param x the x position to scroll to
     * @param y the y position to scroll to
     */
    public void scrollTo(int x, int y) {
        if (mScrollX != x || mScrollY != y) {
            int oldX = mScrollX;
            int oldY = mScrollY;
            mScrollX = x;
            mScrollY = y;
            invalidateParentCaches();
            onScrollChanged(mScrollX, mScrollY, oldX, oldY);
            if (!awakenScrollBars()) {
                postInvalidateOnAnimation();
            }
        }
    }

    /**
     * Move the scrolled position of your view. This will cause a call to
     * {@link #onScrollChanged(int, int, int, int)} and the view will be
     * invalidated.
     * @param x the amount of pixels to scroll by horizontally
     * @param y the amount of pixels to scroll by vertically
     */
    public void scrollBy(int x, int y) {
        scrollTo(mScrollX + x, mScrollY + y);
    }
可以看到官方给我们的解释是我们可以通过这两个方法进行View的移动,那两个方法有什么差别呢,我们会发现scrollBy其实是调用scrollTo方法进行的。
scrollby和scrollTo差别在于scrollTo是移动到我们设置的坐标(x,y)的位置,而scrollby则是传入一个偏移量,举个例子:
比如我们View的初始坐标是(4,4),如果我们调用scrollTo(10,10),则View就会移动到(10,10)这个位置,而我们调用scrollBy(10,10),那么他就会移动到(4+10,4+10)=(14,14)这个位置上。
需要注意的是,上述两个方法并不能更改view的位置,而是只改变了view中内容的位置,而且当我们使用这两个方法的时候需要注意的是你需要往相反的地方移动,也就是说当你调用scrollTo(10,10)时候,其实内容是会往(-10,-10)移动的,所以我们要移动(10,10)的话,就得写成scrollTo(-10,-10)
接下来就要介绍主角了:
Scroller
scroller类的主要作用是实现渐进式的滑动效果,上述的scrollTo和scrollBy是一瞬间完成的,我们如果要实现慢慢的移动,或者说渐进式的,就需要这个小东东了.
我们先看固定代码,一般Scroller固定代码如下:
 private  void init(Context context){
        scroller=new Scroller(context);
    }
    //移动要移动到得位置坐标destX,destY
    public void smoothScrollTo(int destX,int destY){
        int scrollX=getScrollX();
        int deltaX=destX-scrollX;
        //3000ms内缓慢的移动到destX的位置
        int scrollY=getScrollY();
        int deltaY=destY-scrollY;
        scroller.startScroll(scrollX,scrollY,deltaX,deltaY,3000);
        invalidate();
    }
@Override
    public void computeScroll() {
        super.computeScroll();
        if (scroller.computeScrollOffset()){
            scrollTo(scroller.getCurrX(),scroller.getCurrY());
            postInvalidate();
        }
    }
下面看个例子:
代码:
package com.my.scrollerdemo;

import android.content.Context;
import android.util.AttributeSet;
import android.widget.Scroller;
import android.widget.TextView;

/**
 * Created by linchen on 15/12/17.
 */
public class ScrollerTextView extends TextView {
    private Scroller scroller;
    public ScrollerTextView(Context context) {
        super(context);
        init(context);
    }

    public ScrollerTextView(Context context, AttributeSet attrs) {
        super(context, attrs);
        init(context);
    }

    @Override
    public void computeScroll() {
        super.computeScroll();
        if (scroller.computeScrollOffset()){
            scrollTo(scroller.getCurrX(),scroller.getCurrY());
            postInvalidate();
        }
    }
    private  void init(Context context){
        scroller=new Scroller(context);
    }
    public void smoothScrollTo(int destX,int destY){
        int scrollX=getScrollX();
        int deltaX=destX-scrollX;
        //1000ms内缓慢的移动到destX的位置
        int scrollY=getScrollY();
        int deltaY=destY-scrollY;
        scroller.startScroll(scrollX,scrollY,deltaX,deltaY,3000);
        invalidate();
    }
}
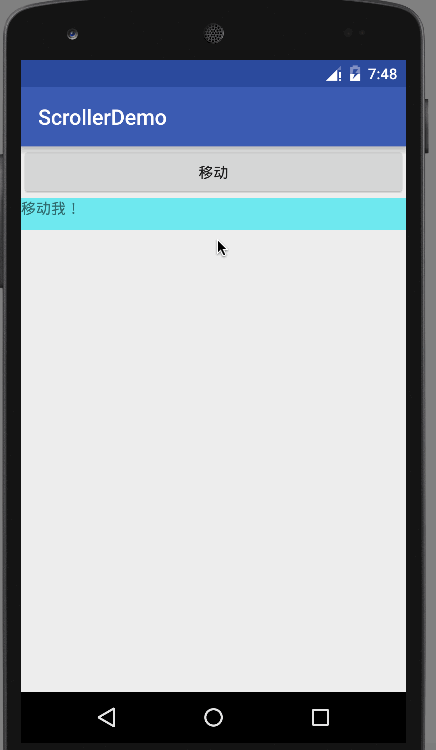
我们可以看到,确实是动了,但是好像只是内容动了,这也间接说明了scrollTo方法是只移动View的内容的。
也许你会说那这个根本没什么用啊,别急,我们可以这么想,如果scroller只是移动View里面的内容的话,那我们是不是可以写一个布局或者viewgrup把我闷闷需要移动的视图放在里面呢?
尝试一下:
代码:
跟上面的一样,只不过继承了linearLayout而已
搞定,我们看到了,确实在里面移动了两个控件,那证明了我们的猜想是正确的,当我们要关于”动”的东西的时候,可以想想看Scroller是否可以实现你所需要实现的控件,因为用起来比较简单。
下面看Scroller源码解析
我们从startScroll看起,从名字我们可以直到他就是一个开始的类:
    public void startScroll(int startX, int startY, int dx, int dy) {
        startScroll(startX, startY, dx, dy, DEFAULT_DURATION);
    }

    /**
     * Start scrolling by providing a starting point, the distance to travel,
     * and the duration of the scroll.
     *
     * @param startX Starting horizontal scroll offset in pixels. Positive
     *        numbers will scroll the content to the left.
     * @param startY Starting vertical scroll offset in pixels. Positive numbers
     *        will scroll the content up.
     * @param dx Horizontal distance to travel. Positive numbers will scroll the
     *        content to the left.
     * @param dy Vertical distance to travel. Positive numbers will scroll the
     *        content up.
     * @param duration Duration of the scroll in milliseconds.
     */
    public void startScroll(int startX, int startY, int dx, int dy, int duration) {
        mMode = SCROLL_MODE;
        mFinished = false;
        mDuration = duration;
        mStartTime = AnimationUtils.currentAnimationTimeMillis();
        mStartX = startX;
        mStartY = startY;
        mFinalX = startX + dx;
        mFinalY = startY + dy;
        mDeltaX = dx;
        mDeltaY = dy;
        mDurationReciprocal = 1.0f / (float) mDuration;
    }
从里面我们可以变量的名字就可以知道他的含义,startX和startY表示开始的位置dx和dy表示偏移要滑动的距离,duration表示滑动经历的时间,剩下的参数我们在下面在一一的查看。
在其中我们并没有看到scroller是如何进行相关移动的操作,原因在于我们在我们的代码中调用invalidate()方法:
public void smoothScrollTo(int destX,int destY){
        int scrollX=getScrollX();
        int deltaX=destX-scrollX;
        //1000ms内缓慢的移动到destX的位置
        int scrollY=getScrollY();
        int deltaY=destY-scrollY;
        scroller.startScroll(scrollX,scrollY,deltaX,deltaY,3000);
        invalidate();
    }
View会进行刷新视图的操作,我们在view的源代码中可以找到:
/**
     * Called by a parent to request that a child update its values for mScrollX
     * and mScrollY if necessary. This will typically be done if the child is
     * animating a scroll using a {@link android.widget.Scroller Scroller}
     * object.
     */
    public void computeScroll() {
    }
说明在View刷新的时候,会重新调用computeScroll这个方法,我们在自己的View中重新覆盖了这个方法:
  @Override
    public void computeScroll() {
        super.computeScroll();
        if (scroller.computeScrollOffset()){
            scrollTo(scroller.getCurrX(),scroller.getCurrY());
            postInvalidate();
        }
    }
并且又重新调用了postInvalidate在再次刷新视图,所以结果就很明了了,view通过不断地刷新视图进行scrollTo(scroller.getCurrX(),scroller.getCurrY())的操作直到我们指定的位置。
我们再看看computeScrollOffset这个方法的作用:
//判断移动效果是否结束,结束返回false,正在进行返回true
 /**
     * Call this when you want to know the new location.  If it returns true,
     * the animation is not yet finished.
     */
    public boolean computeScrollOffset() {
        if (mFinished) {
            return false;
        }
        //
        int timePassed = (int)(AnimationUtils.currentAnimationTimeMillis() - mStartTime);

        if (timePassed < mDuration) {
        //SCROLL_MODE手动拖动平滑模式,FLING_MODEL是由于手指滑动速率来判断惯性滑动
            switch (mMode) {
            case SCROLL_MODE:
                final float x = mInterpolator.getInterpolation(timePassed * mDurationReciprocal);
                mCurrX = mStartX + Math.round(x * mDeltaX);
                mCurrY = mStartY + Math.round(x * mDeltaY);
                break;
            case FLING_MODE:
                final float t = (float) timePassed / mDuration;
                final int index = (int) (NB_SAMPLES * t);
                float distanceCoef = 1.f;
                float velocityCoef = 0.f;
                if (index < NB_SAMPLES) {
                    final float t_inf = (float) index / NB_SAMPLES;
                    final float t_sup = (float) (index + 1) / NB_SAMPLES;
                    final float d_inf = SPLINE_POSITION[index];
                    final float d_sup = SPLINE_POSITION[index + 1];
                    velocityCoef = (d_sup - d_inf) / (t_sup - t_inf);
                    distanceCoef = d_inf + (t - t_inf) * velocityCoef;
                }

                mCurrVelocity = velocityCoef * mDistance / mDuration * 1000.0f;

                mCurrX = mStartX + Math.round(distanceCoef * (mFinalX - mStartX));
                // Pin to mMinX <= mCurrX <= mMaxX
                mCurrX = Math.min(mCurrX, mMaxX);
                mCurrX = Math.max(mCurrX, mMinX);

                mCurrY = mStartY + Math.round(distanceCoef * (mFinalY - mStartY));
                // Pin to mMinY <= mCurrY <= mMaxY
                mCurrY = Math.min(mCurrY, mMaxY);
                mCurrY = Math.max(mCurrY, mMinY);

                if (mCurrX == mFinalX && mCurrY == mFinalY) {
                    mFinished = true;
                }

                break;
            }
        }
        else {
            mCurrX = mFinalX;
            mCurrY = mFinalY;
            mFinished = true;
        }
        return true;
    }
关于computeScrollOffset的作用代码中已经解释了,我就不再详细的说明一次了,在其中我们会看到一系列的计算的问题,里面有个类似于动画插值器的变量mInterpolator,作用是根据时间流逝的百分比计算应该滑动的距离。
其他的这里也不在分析了,重点我们掌握如何使用以及他的源代码的大体实现过程即可。
总结
scroller总体流程:Scroller本身并不能让view移动,移动的只是View中包含的所有内容,需要配合computeSroll以及view的刷新操作(invalidate(),postInvalidate())进行view的动态效果的展示,通过每次小幅度的滑动组成了弹性滑动。


 2290
2290


 被折叠的 条评论
为什么被折叠?
被折叠的 条评论
为什么被折叠?
 到【灌水乐园】发言


