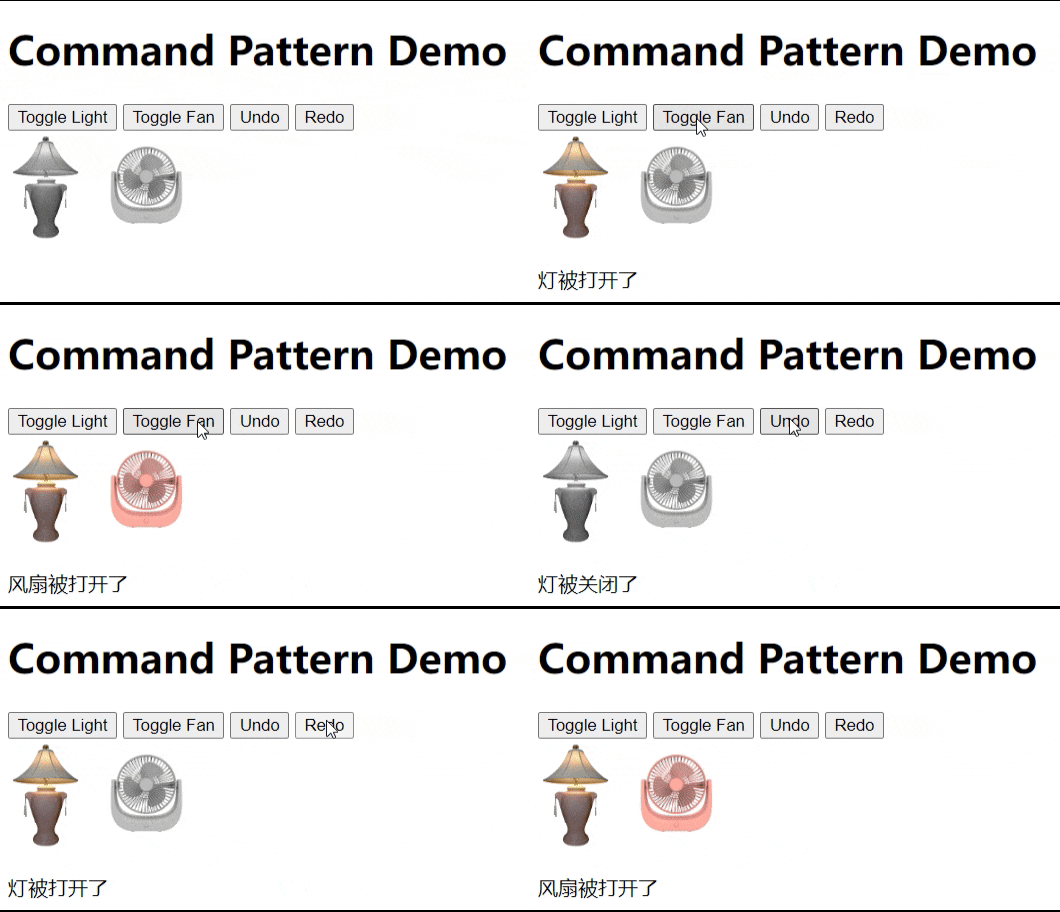
命令模式是一种行为设计模式,其目的是将请求发送者和接收者解耦,从而允许发送者发送请求,而无需知道请求的具体处理方式。在命令模式中,请求被封装为一个对象,这个对象包含了执行请求所需的所有信息,包括调用方法、参数等。这样,请求的发送者只需知道如何发送命令对象,而不需要关心命令的具体执行。
关键角色和概念:
命令接口(Command): 声明了执行命令的方法 execute(),以及可能的撤销方法 undo() 和重做方法 redo()。这个接口可以有多个具体实现类,每个类代表不同的命令。
具体命令(ConcreteCommand): 实现了命令接口,负责执行具体的操作。它通常包含一个接收者对象,通过调用接收者的方法来完成实际的工作。
调用者(Invoker): 请求的发送者,负责将命令发送给接收者。它并不知道命令的具体执行细节,只是负责发送请求。
接收者(Receiver): 实际执行命令操作的对象。命令对象通常会包含一个接收者,通过调用接收者的方法来完成命令的执行。
客户端(Client): 创建命令对象、接收者对象以及调用者对象的地方。客户端将命令对象与调用者关联,并发送请求。
命令模式的优点包括:
解耦请求发送者和接收者: 命令模式将请求的发送者和接收者解耦,使得它们不需要直接了解对方。这提高了系统的灵活性和可维护性。
支持撤销和重做: 通过在命令对象中添加 undo() 和 redo() 方法,可以轻松实现撤销和重做操作。
容易扩展: 可以轻松添加新的命令类,无需修改现有的代码。
命令模式通常在需要对请求进行参数化、排队、记录日志、支持撤销和重做等场景中发挥作用。
简易命令模式示例:
<!DOCTYPE html>
<html lang="en">
  <head>
    <meta charset="UTF-8" />
    <meta name="viewport" content="width=device-width, initial-scale=1.0" />
    <title>Command Pattern Demo</title>
  </head>
  <body>
    <!-- 页面标题 -->
    <h1>Command Pattern Demo</h1>

    <!-- 按钮触发灯的开关命令 -->
    <button onclick="pressLightButton()">Toggle Light</button>
    <!-- 按钮触发风扇的开关命令 -->
    <button onclick="pressFanButton()">Toggle Fan</button>
    <!-- 按钮触发撤销操作 -->
    <button onclick="undo()">Undo</button>
    <!-- 按钮触发重做操作 -->
    <button onclick="redo()">Redo</button>

    <!-- 图片显示灯和风扇状态 -->
    <div>
      <img
        id="light"
        src="./light.png"
        height="90"
        style="filter: grayscale(100%)"
      />
      <img
        id="fan"
        src="./fan.png"
        height="90"
        style="filter: grayscale(100%)"
      />
    </div>

    <!-- 显示命令执行信息的区域 -->
    <div id="output"></div>

    <script>
      // 命令接口
      class Command {
        execute() {}
        undo() {}
        redo() {}
      }

      // 具体命令 - 打开灯
      class LightOnCommand extends Command {
        constructor(light) {
          super();
          this.light = light;
        }

        execute() {
          this.light.turnOn();
          addCommandToHistory(this);
        }

        undo() {
          this.light.turnOff();
        }

        redo() {
          this.light.turnOn();
        }
      }

      // 具体命令 - 关闭灯
      class LightOffCommand extends Command {
        constructor(light) {
          super();
          this.light = light;
        }

        execute() {
          this.light.turnOff();
          addCommandToHistory(this);
        }

        undo() {
          this.light.turnOn();
        }

        redo() {
          this.light.turnOff();
        }
      }

      // 具体命令 - 打开风扇
      class FanOnCommand extends Command {
        constructor(fan) {
          super();
          this.fan = fan;
        }

        execute() {
          this.fan.turnOn();
          addCommandToHistory(this);
        }

        undo() {
          this.fan.turnOff();
        }

        redo() {
          this.fan.turnOn();
        }
      }

      // 具体命令 - 关闭风扇
      class FanOffCommand extends Command {
        constructor(fan) {
          super();
          this.fan = fan;
        }

        execute() {
          this.fan.turnOff();
          addCommandToHistory(this);
        }

        undo() {
          this.fan.turnOn();
        }

        redo() {
          this.fan.turnOff();
        }
      }

      // 接收者 - 灯
      class Light {
        constructor() {
          this.isOn = false;
        }

        turnOn() {
          this.isOn = true;
          // 获取灯的 DOM 元素并设置为彩色(非灰度)
          const dom = document.getElementById("light");
          dom.style.filter = "grayscale(0%)";
          // 更新信息
          updateOutput("灯被打开了");
        }

        turnOff() {
          this.isOn = false;
          // 获取灯的 DOM 元素并设置为灰度
          const dom = document.getElementById("light");
          dom.style.filter = "grayscale(100%)";
          // 更新信息
          updateOutput("灯被关闭了");
        }
      }

      // 接收者 - 风扇
      class Fan {
        constructor() {
          this.isOn = false;
        }

        turnOn() {
          this.isOn = true;
          // 获取风扇的 DOM 元素并设置为彩色(非灰度)
          const dom = document.getElementById("fan");
          dom.style.filter = "grayscale(0%)";
          // 更新信息
          updateOutput("风扇被打开了");
        }

        turnOff() {
          this.isOn = false;
          // 获取风扇的 DOM 元素并设置为灰度
          const dom = document.getElementById("fan");
          dom.style.filter = "grayscale(100%)";
          // 更新信息
          updateOutput("风扇被关闭了");
        }
      }

      // 创建灯和风扇的实例
      const light = new Light();
      const fan = new Fan();

      // 创建具体命令实例
      const lightOnCommand = new LightOnCommand(light);
      const lightOffCommand = new LightOffCommand(light);
      const fanOnCommand = new FanOnCommand(fan);
      const fanOffCommand = new FanOffCommand(fan);

      // 命令历史记录和索引
      let commandHistory = [];
      let historyIndex = -1;

      // 将命令添加到历史记录
      function addCommandToHistory(command) {
        if (commandHistory.length >= 100) commandHistory.shift();
        commandHistory.push(command);
        historyIndex = commandHistory.length - 1;
      }

      // 撤销操作
      function undo() {
        if (historyIndex >= 0) {
          // 执行当前索引对应的命令的撤销操作
          commandHistory[historyIndex].undo();
          historyIndex--;
        }
      }

      // 重做操作
      function redo() {
        if (historyIndex < commandHistory.length - 1) {
          // 增加历史索引并执行对应命令的操作
          historyIndex++;
          commandHistory[historyIndex].redo();
        }
      }

      // 按钮点击触发灯的开关命令
      function pressLightButton() {
        if (light.isOn) {
          lightOffCommand.execute();
        } else {
          lightOnCommand.execute();
        }
      }

      // 按钮点击触发风扇的开关命令
      function pressFanButton() {
        if (fan.isOn) {
          fanOffCommand.execute();
        } else {
          fanOnCommand.execute();
        }
      }

      // 更新页面上显示命令执行信息的区域
      function updateOutput(message) {
        const outputDiv = document.getElementById("output");
        outputDiv.innerHTML = `<p>${message}</p>`;
      }
    </script>
  </body>
</html>
运行演示:


 1857
1857


 被折叠的 条评论
为什么被折叠?


