


1.简介
多进程在使用中是非常常见的,如果对多进程比较陌生,那可以换个说法,叫多任务。
那什么叫做多任务呢?顾名思义就是多个任务。比如我们使用电脑时,打开浏览器,是一个任务、打开视频,是一个任务、打开聊天工具,是一个任务。同时打开多个软件,就是多任务了。
一个CPU可以运行一个任务,也可以运行多个任务。例如现在的电脑一般都是4核或8核,就是有几个CPU的意思。如果我们此时同时打开4个软件,那操作系统可以让每个CPU去执行一个任务,这样任务之间是同时在进行的。
如果设备只有一个CPU,比如MCU,那是不是就只能运行一个任务了?也不是,同样也可以执行多个任务。那就需要轮流让多个任务交替执行。比如有ABC三个任务,那此时只有一个CPU,那CPU就会让A任务运行1毫秒,马上切换到B任务运行1毫秒,再切换到C任务运行1毫秒。因为CPU切换任务的速度很快,所以我们看起来就好像3个任务同时在运行一样。
那什么是线程呢?线程可以理解为进程的小弟。那一个进程就可以有一个或多个线程,线程之间协同工作,共同维持进程的工作。
比如当我们打开视频软件时,就开启了一个任务,此时播放画面需要一个线程,播放声音需要一个线程,播放弹幕又需要一个线程。所以当我们在看视频时,只要有三个线程在维持着这个进程。
那单个CPU维持多个任务是不是多进程呢?严格来说是不算的。只有多个CPU执行多个任务,才能叫多进程。
那当需要同时执行多个任务时怎么办?有三种方法:
- 启动多个进程,每个进程只启动一个线程来完成一种任务。多个进程就能同时执行多个任务。即多进程模式。
- 启动一个进程,这个进程启动多个线程。多个线程同时执行多个任务。即多线程模式。
- 创建多个进行,每个进程启动多个线程。多线程来执行多任务。即多进程+多线程模式。
这三种方式都可以执行多任务,不过第三种复杂度比较高,很少会使用。
2.多进程
Linux和Unix提供了fork()函数。因为windows没有fork功能,所以这里不做过多介绍。这里我们介绍可以跨平台使用的multiprocessing模块。
multiprocessing
multiprocessing模块提供了一个Porcess类来代表一个进程对象。Process函数有两个传参,Process(target=函数名,args=("参数",))。
这里要介绍一下os.getpid和os.getppid函数。os.getpid获取当前任务的ID值,os.getppid获取当前任务的父任务ID值。
见如下代码:
from multiprocessing import Process

def test_process(name):
    print("test process start,name:(%s), pid:(%s), ppid:(%d)" %(name,os.getpid(),os.getppid()))
    print("test process end")

if __name__ == '__main__':
    print(f"process pid:({os.getpid()}) start..")

    pro = Process(target=test_process,args=("test",))
    print("child process will start")
    pro.start()
    pro.join()
    print("child process end")
结果:
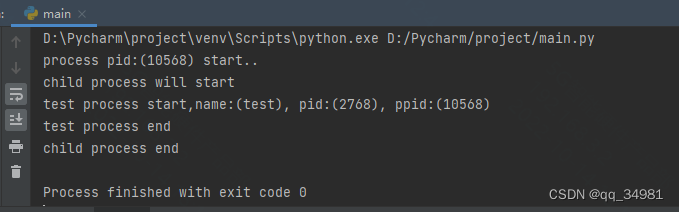
可以看到,调用Process函数后,创建了一个id为2768的子任务test,在子任务test里获取父ID为10568,与在程序最初运行时打印为ID相同,说明产生的子任务是通过父任务创建的。
start方法用来启动创建的子任务,join方法是父任务等待,等待到子任务结束后再继续往下执行(通常用于任务间的同步)。
POOL
如果要同时启动多个子进程的时候,Pool函数就可以帮我们实现。
先看测试代码:
from multiprocessing import Process,Pool
import time,random

def test_process(name):
    print("name:(%s) process start, pid:(%s), ppid:(%d)" %(name,os.getpid(),os.getppid()))
    start = time.time()
    time.sleep(random.randint(1,10))
    end = time.time()
    print("name:(%s) process end,run (%d) time" %(name,end - start))

if __name__ == '__main__':
    print(f"process pid:({os.getpid()}) start..")

    p = Pool(3) #同时可以运行的最大进程数量
    for i in range(4):
        p.apply_async(test_process,args=(i,))   #异步非阻塞启动进程
    print("Waiting all child process done..")
    p.close()
    print("pool close")
    p.join()
    print("all child process end")
结果:
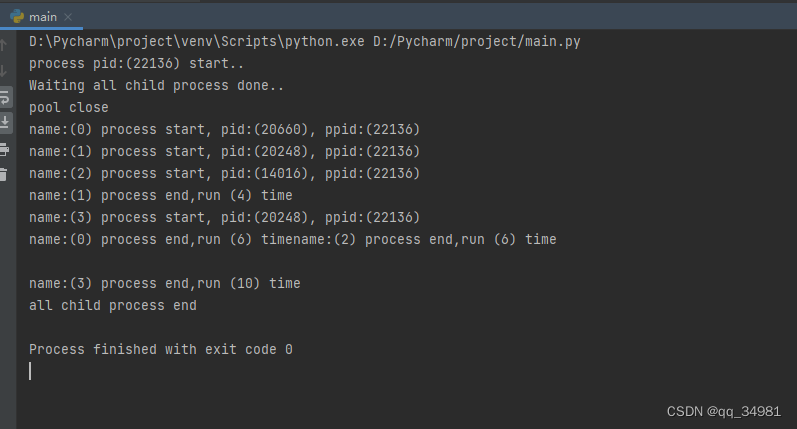
可以看到,首先我们先Pool了3个进程。这个方法就是说当前能同时运行的最大进程数量。然后调用 apply_async 创建4个进程。
apply_async
创建非阻塞异步任务
方法原型:def apply_async(self, func, args=(), kwds={}, callback=None,error_callback=None):
参数:func为任务执行内容,args为参数。
p.close停止任务添加。调用该方法后,就不能继续添加新的任务了。
p.join 主任务挂起,等待子任务全部执行完成。
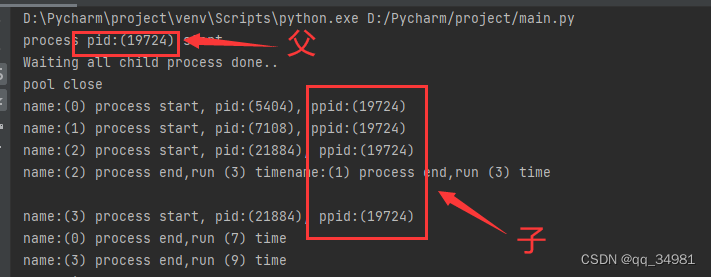
在子任务中,我们打印了任务的ID和其父ID。可以看到创建的4个子任务的父ID都是主任务ID。
这里可以看出几个事情。
第一,因为我们Pool了3个任务,即最大同时运行的任务只有3个,所以任务0、1、2顺序先被创建。但是因为达到了最大同时运行的数量,所以任务3并没有开始执行,而是等待。当任务2运行结束的时候,任务3马上开始执行。
第二,可以看到任务2和任务3的ID是相同的,也就是说,任务2在执行完之后释放掉了ID,而该ID又被任务3继续使用。即ID在被释放后,可以被其他任务使用。
当所有任务都执行完之后,主任务才继续开始执行。
apply
阻塞同步任务
方法原型:def apply(self, func, args=(), kwds={}):
参数:func为任务执行内容,args为参数。
参考代码:
from multiprocessing import Process,Pool
import time,random

def test_process(name):
    print("name:(%s) process start, pid:(%s), ppid:(%d)" %(name,os.getpid(),os.getppid()))
    start = time.time()
    time.sleep(random.randint(1,3))
    end = time.time()
    print("name:(%s) process end,run (%d) time" %(name,end - start))

if __name__ == '__main__':
    print(f"process pid:({os.getpid()}) start..")

    p = Pool(3) #同时可以运行的最大进程数量
    for i in range(4):
        p.apply(test_process,args=(i,))
    print("Waiting all child process done..")
    p.close()
    print("pool close")
    p.join()
    print("all child process end")
结果:
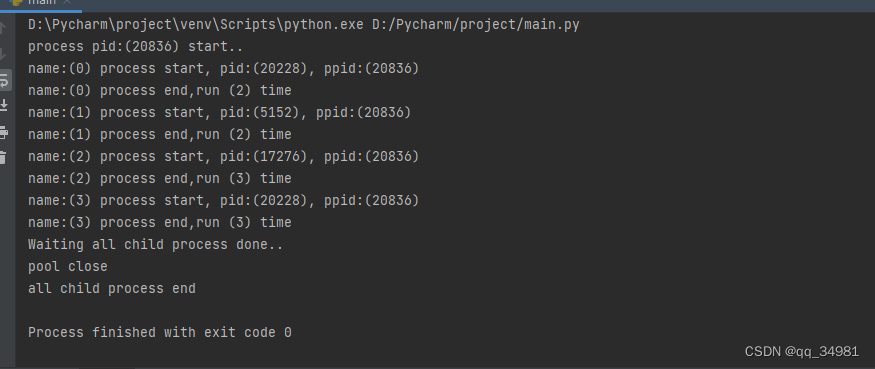
可以看到,主任务在调用appply后,就立刻执行了该任务,并且是阻塞式的。如果当前任务不执行完成,则不继续向下执行。以顺序的方式,一个一个执行子任务。结束后再执行apply后面的主任务代码。
3.进程间通讯
很多时候多个进程之间是需要相互通讯的,Python提供了Queue、Pipes等方式来实现数据交互。
Queue
Queue可以说是进程间通讯最安全的方式了。创建一个被多个线程共享的Queue对象,多个线程通过Queue的put()和get()来向队列中添加和删除元素。
注:Queue对象已经包含了必要的锁,所以可以通过Queue在多个线程间安全的共享数据。
Queue.qsize()返回队列的大小

Queue.empty() 如果队列为空,返回True,否则False

Queue.full()如果队列满,返回True,否则False

Queue.get(True,timeout) 获取队列数据。True则挂起任务,等待队列非空。或等待timeout时间超时。timeout不填,则默认持续等待。超时则抛出异常,并停止进程

Queue.put(data,timeout) 向队列中发送数据。data为需要发送的数据。如果队列full,则等待timeout时间。超时则抛出异常,并停止进程

Queue.join() 等待队列为空,再继续执行。
见例程
from multiprocessing import Process,Pool,Queue,Pipe
import time,random

def process_queue_input(q):
    print("queue input process start, pid:(%s), ppid:(%d)" %(os.getpid(),os.getppid()))
    count = 0
    while True:
        count += 1
        print("input count:%d" %count)
        print("queue size:%d" % q.qsize())
        if q.full():
            print("queue full")
            break
        q.put(count)
        time.sleep(1)


def process_queue_output(q):
    print("queue output process start, pid:(%s), ppid:(%d)" % (os.getpid(), os.getppid()))
    while True:
        data = q.get(True)
        print("output data is:%s" %data)
        time.sleep(2)

if __name__ == '__main__':
    print(f"process pid:({os.getpid()}) start..")

    q = Queue(10)
    print("queue size:%d" %q.qsize())
    qout = Process(target=process_queue_output, args=(q,))
    qin = Process(target=process_queue_input,args=(q,))

    qin.start()
    qout.start()

    print("wait qin process end")
    qin.join()  #等待运行结束
    print("force stop qout process")
    qout.terminate()    #强行终止
    print("all process stop")
结果:

q=Queue(X) 这个X表示当前队列最多可容纳的数据条数。比如在上面程序中,就创建了一个可容纳10条数据的队列。q=Queue(10)。而在process_queue_input中会判断队列长度。如果队列满,则打印消息直接退出。
        Queue默认会创建一个先进先出的队列。

        queue.LifoQueue()创建一个后进先出的队列

        queue.PriorityQueue()创建一个优先级的队列
在input中,每1秒向队列中输送一个数据。而ouput线程中,每2秒才会获取一个元素,所以20秒后队列就会满。
在主程序中,qin_join会阻塞程序,等待进程运行完成。因为output线程中并没有任何异常判断,且是一个死循环。所以这里调用.terminate将该线程强行终止。
Pipes
Pipe方法会返回一个管道的两个端口(以列表的形式),一个端口作为输入端,一个端口作为输出端。 Pipe方法可以使用send()发送数据,使用recv()接收数据。如果管道中没有消息,则一直阻塞。如果管道关闭,则抛出EOFError异常
见代码
def process_pipes_input(p):
    print("pipes input process start, pid:(%s), ppid:(%d)" % (os.getpid(), os.getppid()))
    count = 0
    while True:
        count += 1
        print("input count:%d" % count)
        p.send(count)
        time.sleep(1)


def process_pipes_output(p):
    print("pipes output process start, pid:(%s), ppid:(%d)" % (os.getpid(), os.getppid()))
    while True:
        data = p.recv()
        print("output data is:%s" % data)
        time.sleep(1)

if __name__ == '__main__':
    print(f"process pid:({os.getpid()}) start..")

    p = Pipe()
    pin = Process(target=process_pipes_input, args=(p[0],)) #pipe[0] 管道发送消息的端口
    pout = Process(target=process_pipes_output, args=(p[1],))   #Pipe[1] 管道接收消息的端口

    pin.start()
    pout.start()
结果:
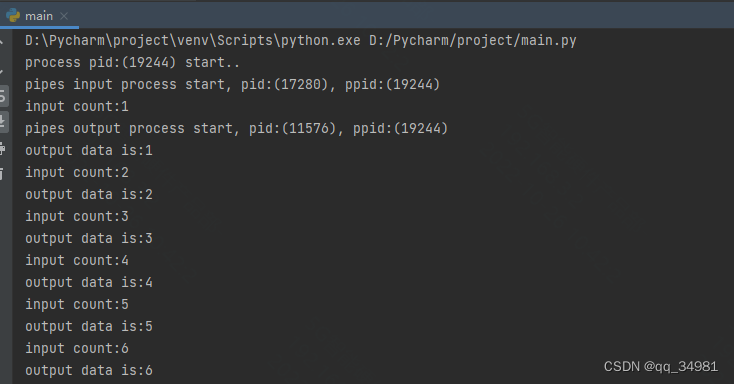
这里需要注意的是,操作时需要注明管道号。在申请管道的时候是申请了一个管道元组(tuple),这个管道元组上有很多可用的管道。我们在调用的时候要指定固定的管道。所以我们看到在传入参数时,传入的是元组对应的特定元素。
![]()
如果直接传入管道元组,如下:
![]()
发现是直接报错的。

进程见的数据共享
见如下代码:
g_count = 1000

def process_queue_output(q):
    print("queue output process start, pid:(%s), ppid:(%d)" % (os.getpid(), os.getppid()))
    while True:
        data = q.get(True)
        print("output data is:%s,g_count:%s" %(data,g_count))
        time.sleep(2)


def process_pipes_input(p):
    print("pipes input process start, pid:(%s), ppid:(%d)" % (os.getpid(), os.getppid()))
    count = 0
    while True:
        count += 1
        print("input count:%d" % count)
        p.send(count)
        time.sleep(1)

if __name__ == '__main__':
    q = Queue(10)
    print("queue size:%d" %q.qsize())
    qout = Process(target=process_queue_output, args=(q,))
    qin = Process(target=process_queue_input,args=(q,))

    qin.start()
    qout.start()

    print("wait qin process end")
    qin.join()  #等待运行结束
    print("force stop qout process")
    qout.terminate()    #强行终止
    print("all process stop")
结果:
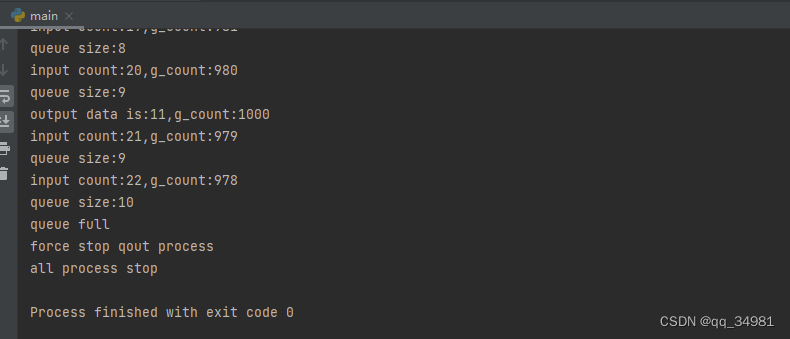
可以看到,进程input在不断的操作全局变量g_count,但是进程output中检查g_count的值是不会变化的。这也就说明了,全局变量在进程中是不共享的。


 769
769


 被折叠的 条评论
为什么被折叠?
被折叠的 条评论
为什么被折叠?
 到【灌水乐园】发言


