nginx
下载
http://nginx.org/en/download.html

下载稳定版本
linux环境:nginx-1.16.0
windows环境:nginx/windows-1.16.0
windows使用nginx
windows版本直接解压就可以使用
解压路径为:E:\nginx-1.16.0
E:\nginx-1.16.0>nginx.exe -v
E:\nginx-1.16.0>start nginx.exe
E:\nginx-1.16.0>nginx.exe -t
E:\nginx-1.16.0>nginx.exe -s reload
E:\nginx-1.16.0>nginx.exe -s quit
- 查看nginx版本
- 启动nginx
- 检查nginx配置文件是否正常
- 重新加载配置文件
- 退出nginx
启动成功访问页面:http://127.0.0.1/

linux使用nginx
直接使用 xx.tar.gz 安装比较复杂
https://yq.aliyun.com/articles/655855
下面用yum进行安装
[root@zhengzc /]# rpm -ivh http://nginx.org/packages/centos/7/noarch/RPMS/nginx-release-centos-7-0.el7.ngx.noarch.rpm
[root@zhengzc /]# yum -y install nginx
[root@zhengzc /]# systemctl start nginx
nginx -c /usr/local/nginx/conf/nginx.conf
配置访问本地文件夹和反向代理
server {
    listen       80;
    server_name  localhost;
    client_max_body_size 10M;

	root	/www/test;
    location / {
        autoindex on;
        index  index.html;
    }
   	location /hello-web/ {
		proxy_set_header Host $host:$server_port;
   		proxy_set_header X-Real-IP $remote_addr;
   		proxy_set_header X-Forwarded-For $proxy_add_x_forwarded_for;
		proxy_pass http://localhost:8080/hello-web/;
	}
}
- listen:监听端口
- client_max_body_size:上传文件大小,不设置或者超过该值,反向代理上传附件会失败
- root:指定本地文件夹路径
- location:映射到虚拟目录
- autoindex:Nginx默认是不允许列出整个目录的
- index: 访问根路径时默认访问页面
Host h o s t : host: host:server_port;- proxy_pass: 访问
:80/hello-web/的页面映射到地址http://localhost:8080/hello-web/
proxy_set_header: 用来重定义发往后端服务器的请求头 proxy_set_header Field Value;
- 1、proxy_set_header Host $http_host;
如果没有这个设置,Nginx转发的请求就不会有Host字段,而服务器是靠这个Host值来区分你请求的是哪个域名的资源 - 2、proxy_set_header X-Real-IP r e m o t e a d d r ; 如果没有使用这个设置,在应用端使用 ‘ r e q u e s t . g e t R e m o t e A d d r ( ) ‘ 得到的 i p 将会是 N g i n x 服务器的,这个设置的作用是把浏览器客户端的 i p ,也就是 remote_addr; 如果没有使用这个设置,在应用端使用`request.getRemoteAddr()`得到的ip将会是Nginx服务器的,这个设置的作用是把浏览器客户端的ip,也就是 remoteaddr;如果没有使用这个设置,在应用端使用‘request.getRemoteAddr()‘得到的ip将会是Nginx服务器的,这个设置的作用是把浏览器客户端的ip,也就是remote_addr 作为参数传入X-Real-IP,然后转交给后台服务器。
- 3、proxy_set_header X-Forwarded-For $proxy_add_x_forwarded_for
如果有做X-Forwarded-For设置的话,每次经过proxy转发都会有记录,格式就是
client1,proxy1,proxy2,以逗号隔开各个地址,由于它是非rfc标准,所以默认是没有的,需要强制添加。

-
删掉默认首页后

配置错误页面,拦截服务器返回错误信息
server{
	省略...
	proxy_intercept_errors on;
    fastcgi_intercept_errors on;
    error_page 404 400 405 /error.html;
    location / {
        root   /web/pc_web/dist;
    }
	省略...
}
放置文件 error.html 在 /web/pc_web/dist 中
1、error_page 404 400 405 /error.html;
404 400 405都会返回 error.html页面;
2、proxy_intercept_errors on|off;
1)当上游响应的响应码’大于等于’300[常见"404"、"500"等]时;
2) 应将响应’直接返回’客户端、还是nginx捕获后"自定义"错误页面’按error_page指令’处理
3、fastcgi_intercept_errors on;
nginx根据访问状态(404、500…)跳转到指定页面
允许指定来源的域名可以iframe自己的页面
	location /ldy/ {
		proxy_pass http://localhost:3444/;
		proxy_set_header X-Real-IP $remote_addr;
		proxy_set_header Host $http_host;
		proxy_set_header X-Forwarded-For $remote_addr;
		client_max_body_size    1000m;

		proxy_hide_header X-Frame-Options;
		add_header X-Frame-Options "ALLOW-FROM localhost:9530 172.26.238.74:8081 www.baidu.com";
		add_header Content-Security-Policy "frame-ancestors https://localhost:9530 http://172.26.238.74:8081 https:/www.baidu.com/" always;
	}
有时候站长不希望自己网页页面被其他站的FRAME嵌套进去, 这时候就需要的HTTP协议头里增加X-Frame-Options这一项。
X-Frame-Options的值有三个:
(1)DENY — 表示该页面不允许在 frame 中展示,即便是在相同域名的页面中嵌套也不允许。
(2)SAMEORIGIN — 表示该页面可以在相同域名页面的 frame 中展示。
(3)ALLOW-FROM example.com — 表示该页面可以在指定来源的 frame 中展示。多个域名 空格 分隔
有些浏览器 add_header X-Frame-Options 不生效
那要实现允许指定域名以iframe的方式加载就没有方法了吗?当然不是。一个新的header,Content-Security-Policy 完全可以实现这个功能。他有非常强大的功能,其中frame-ancestors可以控制允许iframe嵌套的父级域名。
配置swagger反向代理
原地址:http://xx_service/swagger-ui.html
配置后地址:http://yy_service/xx/swagger-ui.html
server {
    listen       80;
    server_name  yy_service;
	 location /xx/ {
				proxy_pass http://xx_service/;
				proxy_set_header X-Real-IP $remote_addr;
				proxy_set_header Host $host;
				proxy_set_header X-Forwarded-For $remote_addr;
				proxy_set_header   X-Forwarded-Prefix /xx/;
				proxy_connect_timeout 180;
				proxy_send_timeout 1800;
				proxy_read_timeout 1800;
		}
}
proxy_set_header X-Forwarded-Prefix /xx/;
将路由名称"/xx/"告知被代理服务器
配置https
1、服务器生成ssl证书
2、Nginx要安装ssl模块:
检查Nginx是否安装ssl模块:使用nginx -V
如果出现:–with-http_stub_status_module --with-http_ssl_module 则满足条件
没有就需要额外安装
[root@DEV-YWZTV1-SE02 ~]# nginx -V
nginx version: nginx/1.10.1
built by gcc 4.8.5 20150623 (Red Hat 4.8.5-4) (GCC)
built with OpenSSL 1.0.1e-fips 11 Feb 2013
TLS SNI support enabled
configure arguments: --prefix=/etc/nginx --sbin-path=/usr/sbin/nginx --modules-path=/usr/lib64/nginx/modules --conf-path=/etc/nginx/nginx.conf --error-log-path=/var/log/nginx/error.log --http-log-path=/var/log/nginx/access.log --pid-path=/var/run/nginx.pid --lock-path=/var/run/nginx.lock --http-client-body-temp-path=/var/cache/nginx/client_temp --http-proxy-temp-path=/var/cache/nginx/proxy_temp --http-fastcgi-temp-path=/var/cache/nginx/fastcgi_temp --http-uwsgi-temp-path=/var/cache/nginx/uwsgi_temp --http-scgi-temp-path=/var/cache/nginx/scgi_temp --user=nginx --group=nginx --with-http_ssl_module --with-http_realip_module --with-http_addition_module --with-http_sub_module --with-http_dav_module --with-http_flv_module --with-http_mp4_module --with-http_gunzip_module --with-http_gzip_static_module --with-http_random_index_module --with-http_secure_link_module --with-http_stub_status_module --with-http_auth_request_module --with-http_xslt_module=dynamic --with-http_image_filter_module=dynamic --with-http_geoip_module=dynamic --with-http_perl_module=dynamic --add-dynamic-module=njs-1c50334fbea6/nginx --with-threads --with-stream --with-stream_ssl_module --with-http_slice_module --with-mail --with-mail_ssl_module --with-file-aio --with-ipv6 --with-http_v2_module --with-cc-opt='-O2 -g -pipe -Wall -Wp,-D_FORTIFY_SOURCE=2 -fexceptions -fstack-protector-strong --param=ssp-buffer-size=4 -grecord-gcc-switches -m64 -mtune=generic'
3、https配置
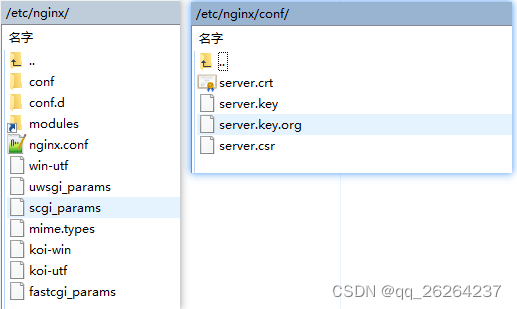
证书存放目录:/etc/nginx/conf

server{
    listen 443 default ssl;
	ssl on;
	ssl_certificate conf/server.crt;
	ssl_certificate_key conf/server.key;

    server_name localhost;
    charset utf8;
    location / {
        root   /mpjava/IMTC;
        if ($request_filename ~* ^.*?\.(doc|docx|xlsx|xls|pptx|ppt|txt|rar|zip|7z|jpg|png|gif|bmp|xml|pdf|apk)$){
            add_header Content-Disposition: 'attachment;';
        }
        index  index.html index.htm;
            proxy_buffer_size 64k;
            proxy_buffers 32 32k;
            proxy_busy_buffers_size 128k;
            client_max_body_size    1000m;
        proxy_set_header X-Forwarded-For $remote_addr;
    }
}
3、http重定向到https
http://localhost
=> https://localhost
server {
    listen 80;
    server_name localhost;
	location / {
		rewrite ^(.*)$ https://$host$1 permanent;
	}
}
负载均衡
ip_hash
http {
    include       mime.types;
    default_type  application/octet-stream;
    sendfile        on;
    keepalive_timeout  65;
    upstream upstream_name{
		ip_hash;
        server 11.8.127.200:18080;
        server 11.8.127.200:28080;
        server 11.8.127.198:38080;
    }
    server {
        listen       9999;
        server_name  11.8.127.200;
		location / {
			proxy_set_header Host $host:$server_port;
			proxy_set_header X-Real-IP $remote_addr;
			proxy_set_header X-Real-Port $remote_port;
			proxy_set_header X-Forwarded-For $proxy_add_x_forwarded_for;
			proxy_pass http://upstream_name/;
		}
    }
}
测试情况:
通过修改本机的ip地址测试 ip_hash策略的负载均匀情况
ip_hash(通过客户端请求ip进行hash,再通过hash值选择后端server):
这样一个客户端只访问同一个后台服务器应用,负载均衡就不存在的session同步问题了
备注:ip_hash对比的是 ip的前3个段作为参数加入hash函数,所以局域网不能做到有效的负载均衡,下面通过修改源码达到局域网有效的负载均衡:
https://blog.csdn.net/qq_45367825/article/details/111355402

后台controller
@Value("${server.port}")
private Integer port;
@GetMapping({"/getServerInfo"})
@ResponseBody
Object getServerInfo(HttpServletRequest request) {
	Map<String, String> map = new LinkedHashMap<>();
	map.put("ipAddr", getIpAddr(request));
	map.put("remoteAddr", request.getRemoteAddr());
	map.put("localAddr", request.getLocalAddr());
	map.put("serverName", request.getServerName());
	map.put("serverPort", request.getServerPort() + "");
	map.put("port", port + "");
	map.put("realPath", request.getServletContext().getRealPath("/"));
	return map;
}
private String getIpAddr(HttpServletRequest request) {
	String ip = request.getHeader("X-Real-IP");//先从nginx自定义配置获取
	if (ip == null || ip.length() == 0 || "unknown".equalsIgnoreCase(ip)) {
		ip = request.getHeader("x-forwarded-for");
	}
	if (ip == null || ip.length() == 0 || "unknown".equalsIgnoreCase(ip)) {
		ip = request.getHeader("Proxy-Client-IP");
	}
	if (ip == null || ip.length() == 0 || "unknown".equalsIgnoreCase(ip)) {
		ip = request.getHeader("WL-Proxy-Client-IP");
	}
	if (ip == null || ip.length() == 0 || "unknown".equalsIgnoreCase(ip)) {
		ip = request.getRemoteAddr();
	}
	return ip;
}
ip_hash的缺陷
1:nginx不是最前端的服务器
ip_hash要求nginx一定是最前端的服务器,否则nginx得不到正确ip,就不能根据ip作hash
2:nginx的后端还有其它方式的负载均衡
假如nginx后端又有其它负载均衡,将请求又通过另外的方式分流了,那么某个客户端的请求肯定不能定位到同一 台session应用服务器上


 3201
3201


 被折叠的 条评论
为什么被折叠?


