


上篇:spring的IoC(Inversion of Control)
下面的一张图形象的比喻了IoC的作用,也就是解耦。
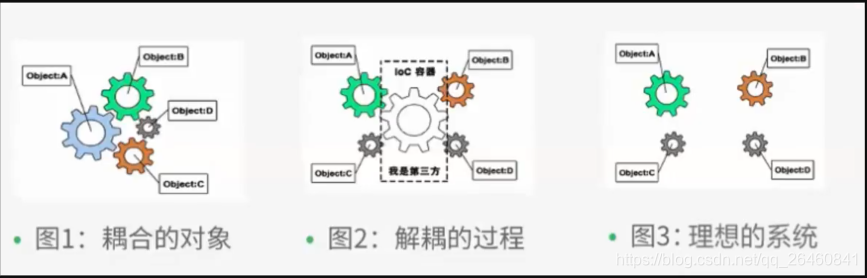
IoC是Spring框架的核心内容,使用多种方式实现了IoC,可以使用XML配置,也可使用注解。在Spring中控制反转的实现方式是依赖注入(Dependency Injection, DI)。
那么不妨来体验下
1. XML实现IoC
路径:

Hello.java内容:
package com.weizu;

public class Hello {
    private String name;

    public Hello() {
    }

    public String getName() {
        return name;
    }

    public void setName(String name) {
        this.name = name;
    }

    @Override
    public String toString() {
        return "Hello{" +
                "name='" + name + '\'' +
                '}';
    }
}
然后定义beans.xml内容:
<?xml version="1.0" encoding="UTF-8"?>
<beans xmlns="http://www.springframework.org/schema/beans"
       xmlns:xsi="http://www.w3.org/2001/XMLSchema-instance"
       xsi:schemaLocation="http://www.springframework.org/schema/beans
        https://www.springframework.org/schema/beans/spring-beans.xsd">

    <bean id="hello" class="com.weizu.Hello">
        <property name="name" value="Xiao wang."/>
    </bean>

</beans>
最后,使用测试:
import com.weizu.Hello;
import org.junit.Test;
import org.springframework.context.ApplicationContext;
import org.springframework.context.support.ClassPathXmlApplicationContext;

public class myTest {

    @Test
    public void Test(){
        // create and configure beans
        ApplicationContext context = new ClassPathXmlApplicationContext("beans.xml");
        Hello hello = (Hello) context.getBean("hello");
        System.out.println(hello.getName());
    }
}
测试结果:

对应的官方文档:https://docs.spring.io/spring-framework/docs/current/reference/html/core.html#beans-factory-instantiation
以上我们了解了使用XML方式来加载Bean对象,那么我们可以将上一篇文章中的进行改进,用Spring来进行自动托管。
也就是在beans.xml文件中指定Dao层装载的数据源。
2. 案例2
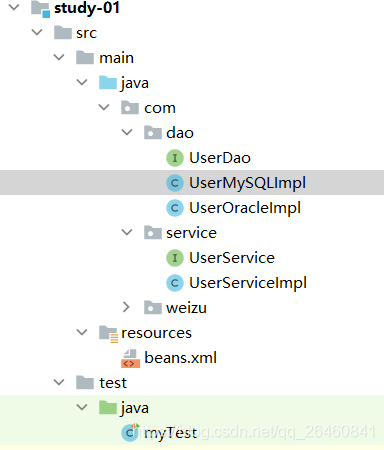
项目结构:
UserDao.java:
public interface UserDao {
    void getUser();
}
UserMySQLImpl .java:
public class UserMySQLImpl implements UserDao{
    public void getUser() {
        System.out.println("MySQL impl.");
    }
}
UserOracleImpl.java:
public class UserOracleImpl implements UserDao{
    public void getUser() {
        System.out.println("Oracle impl.");
    }
}
UserService.java:
public interface UserService {
    void getUserService();
}
UserServiceImpl.java
public class UserServiceImpl implements UserService{

    private UserDao userDao;

    // set注入
    public void setUserDao(UserDao dao){
        this.userDao = dao;
    }

    public void getUserService() {
        userDao.getUser();
    }
}
然后,我们定义beans.xml文件,定义需要装载的dao层数据源:
<?xml version="1.0" encoding="UTF-8"?>
<beans xmlns="http://www.springframework.org/schema/beans"
       xmlns:xsi="http://www.w3.org/2001/XMLSchema-instance"
       xsi:schemaLocation="http://www.springframework.org/schema/beans
        https://www.springframework.org/schema/beans/spring-beans.xsd">

    <bean id="mySqlDao" class="com.dao.UserMySQLImpl"/>
    <bean id="oracleDao" class="com.dao.UserOracleImpl"/>

    <bean id="userService" class="com.service.UserServiceImpl">
        <property name="UserDao" ref="mySqlDao"/>
    </bean>
</beans>
然后,在测试中进行测试:
public class myTest {

    @Test
    public void Test(){
        // create and configure beans
        ApplicationContext context = new ClassPathXmlApplicationContext("beans.xml");
        UserService userService = (UserService) context.getBean("userService");
        userService.getUserService();
    }
}
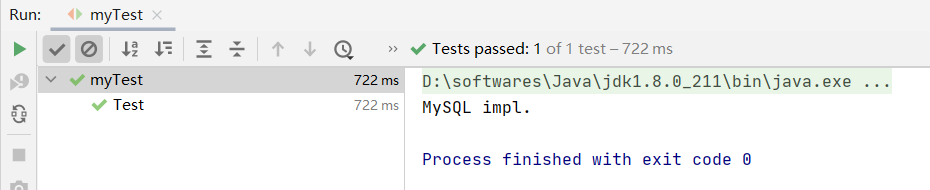
结果:
也就是,可以在xml进行简单指定所需要的数据源对象,由Spring决定如何加载。不需要再使用new来进行对象的创建,从而可以降低代码的耦合度。记住:ApplicationContext和ClassPathXmlApplicationContext。
仅仅修改配置文件即可,而不需要修改程序。
对象由Spring来进行分配和管理。
视频地址:https://www.bilibili.com/video/BV1WE411d7Dv?p=5&spm_id_from=pageDriver


 4046
4046


 被折叠的 条评论
为什么被折叠?
被折叠的 条评论
为什么被折叠?
 到【灌水乐园】发言


