


目录[-]
- 一。分布式环境搭建
- 1.在master主控机安装HBase
- 1)解压
- 2)配置环境变量
- 3)修改%HBASE%/conf/hbase-env.sh
- 4)修改$HBASE_HOME/conf/hbase-site.xml
- 5)$HBASE_HOME/conf/regionservers 文件增加
- 2.把HBase复制到slave从属机
- 3.启动HBase集群
- 4.停止HBase集群
- 二。HBase Shell
- 1.建表create
- 2.列出全部表list
- 3.表描述describe
- 4.删除表disable,drop
- 5.插入条目put
- 6.展示全表scan
- 7.查询条目get
- 8.更新条目put
- 9.删除条目delete
- 10.统计参数
- 三。JavaAPI
- 1.创建一张表
- 2.添加一条记录
- 3.读取指定行记录
- 4.显示所有数据
- 5.更新条目
- 6.删除单元格
- 7.删除整行
- 8.删除表单
以下操作在Hadoop分布式集群基础上进行。
一。分布式环境搭建
下载:http://www.apache.org/dyn/closer.cgi/hbase/ ,hbase-0.98.0-hadoop2-bin.tar.gz。
1.在master主控机安装HBase
1)解压
SHELL$ tar -zxvf hbase-0.98.0-hadoop2-bin.tar.gz
SHELL$ mv hbase-0.98.0-hadoop2 ~/hbase0.98.0hadoop2
2)配置环境变量
(1)修改/etc/profile文件
SHELL$ sudo gedit /etc/profile

(2)验证

3)修改%HBASE%/conf/hbase-env.sh

4)修改$HBASE_HOME/conf/hbase-site.xml
|
1
2
3
4
5
6
7
8
9
10
11
12
13
14
15
16
17
18
19
20
21
22
23
24
25
26
27
28
29
30
31
32
33
34
35
36
37
|
<?
xml
version
=
"1.0"
?>
<?
xml-stylesheet
type
=
"text/xsl"
href
=
"configuration.xsl"
?>
<
configuration
>
<
property
>
<!-- hbase的master主机名和端口 -->
<
name
>hbase.master</
name
>
<
value
>hdfs://192.168.1.240:60000</
value
>
</
property
>
<
property
>
<!-- Hbase数据保存目录 -->
<
name
>hbase.rootdir</
name
>
<!-- 主机和端口号与$HADOOP_HOME/.../core-site.xml的fs.defaultFS的主机和端口号一致 -->
<
value
>hdfs://192.168.1.240:9000/hbase</
value
>
</
property
>
<
property
>
<!-- 开启分布式 -->
<
name
>hbase.cluster.distributed</
name
>
<
value
>true</
value
>
</
property
>
<
property
>
<!-- hbase集群中zookeeper的主机各节点,使用奇数可尽量确保选举leader公平 -->
<
name
>hbase.zookeeper.quorum</
name
>
<!-- value>hapsalve1,hapsalve2,hapsalve3</value -->
<
value
>192.168.1.241,192.168.1.242,192.168.1.243</
value
>
</
property
>
<
property
>
<!-- hbase临时文件位置 -->
<
name
>hbase.tmp.dir</
name
>
<
value
>/home/hadoop/hbase0.98.0hadoop2/hbase-tmp</
value
>
</
property
>
<
property
>
<!-- hbase临时zookeeper数据存放位置 -->
<
name
>hbase.zookeeper.property.dataDir</
name
>
<
value
>/home/hadoop/hbase0.98.0hadoop2/zookeeper-temp</
value
>
</
property
>
</
configuration
>
|
5)$HBASE_HOME/conf/regionservers 文件增加

2.把HBase复制到slave从属机
SHELL$ sudo scp -rpv /home/hadoop/hbase0.98.0hadoop2/ hadoop@hapslave*:/home/hadoop/
3.启动HBase集群
在Hadoop集群启动后,再启动HBase集群。
SHELL$ start-hbase.sh

在主控机通过web界面查看(本例配置4个节点):

4.停止HBase集群
SHELL$ stop-hbase.sh

二。HBase Shell
SHELL$ hbase shell

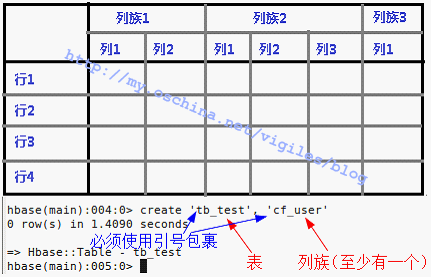
1.建表create
2.列出全部表list

3.表描述describe

4.删除表disable,drop

5.插入条目put

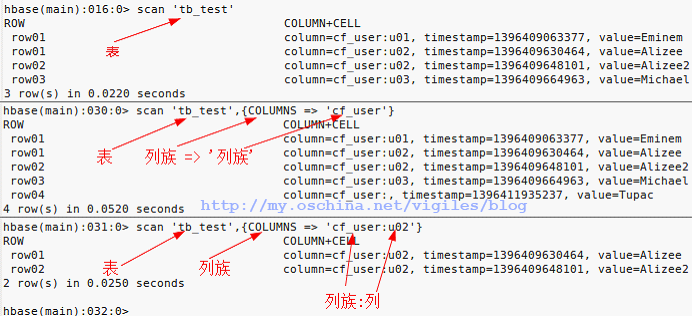
6.展示全表scan
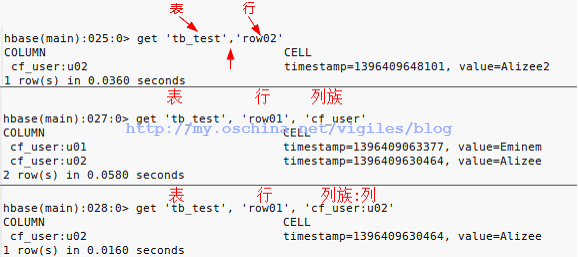
7.查询条目get
8.更新条目put

9.删除条目delete

清空表:
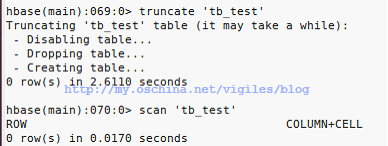
truncate是一个能够快速清空资料表内所有资料的SQL语法。并且能针对具有自动递增值的字段,做计数重置归零重新计算的作用
10.统计参数

三。JavaAPI
全部API在%HBase%/docs目录里,完全是英文的。
本例所须全部jar都可以在%HBase安装目录%/lib目录中找到。图省事,我一股脑儿全导入了。

1.创建一张表
|
1
2
3
4
5
6
7
8
9
10
11
12
13
14
15
16
17
18
19
20
21
22
23
24
25
26
27
28
29
30
31
32
33
34
35
36
37
38
39
40
41
42
43
44
45
46
47
48
49
50
51
52
53
54
55
56
57
58
59
60
61
62
63
64
|
package
com.cuiweiyou.test;
import
java.io.IOException;
import
java.util.Iterator;
import
java.util.List;
import
org.apache.hadoop.conf.Configuration;
import
org.apache.hadoop.hbase.Cell;
import
org.apache.hadoop.hbase.CellUtil;
import
org.apache.hadoop.hbase.HBaseConfiguration;
import
org.apache.hadoop.hbase.HColumnDescriptor;
import
org.apache.hadoop.hbase.HTableDescriptor;
import
org.apache.hadoop.hbase.TableName;
import
org.apache.hadoop.hbase.client.Delete;
import
org.apache.hadoop.hbase.client.Get;
import
org.apache.hadoop.hbase.client.HBaseAdmin;
import
org.apache.hadoop.hbase.client.HTable;
import
org.apache.hadoop.hbase.client.Put;
import
org.apache.hadoop.hbase.client.Result;
import
org.apache.hadoop.hbase.client.ResultScanner;
import
org.apache.hadoop.hbase.client.Scan;
import
org.apache.hadoop.hbase.util.Bytes;
import
org.junit.Test;
public
class
HBaseTest {
//创建表
@Test
public
void
creatTable()
throws
Exception {
String strTBName =
"tb_test"
;
//表
String strColFamily =
"cf"
;
//列族
//配置
Configuration conf = HBaseConfiguration.create();
conf.set(
"hbase.zookeeper.quorum"
,
"192.168.1.241,192.168.1.242,192.168.1.243"
);
//管理员
HBaseAdmin hbaseAdmin =
new
HBaseAdmin(conf);
//addColumn(String tableName, HColumnDescriptor column) //向一个已经存在的表添加咧
//checkHBaseAvailable(HBaseConfiguration hbaseConf) //静态函数,查看HBase是否处于运行状态
//deleteTable(byte[] tableName) //删除一个已经存在的表
//enableTable(byte[] tableName) //使表处于有效状态
//disableTable(byte[] tableName) //使表处于无效状态
//HTableDescriptor[] listTables() //列出所有用户控件表项
//modifyTable(byte[] tableName, HTableDescriptor tableDesc) //修改表的模式,是异步的操作,耗时
//tableExists(String tableName) //检查表是否存在
//表名称
TableName tableName = TableName.valueOf(strTBName);
//表描述器
HTableDescriptor tableDesc =
new
HTableDescriptor(tableName);
//removeFamily(byte[] column) //移除一个列族
//getName() //获取表的名字
//getValue(byte[] key) //获取属性的值
//setValue(String key, String value) //设置属性的值
tableDesc.addFamily(
new
HColumnDescriptor(strColFamily));
//添加列族
//创建一个表,同步操作
hbaseAdmin.createTable(tableDesc);
System.out.println(
"创建表"
+ strTBName +
"成功"
);
}
}
|

2.添加一条记录
|
1
2
3
4
5
6
7
8
9
10
11
12
13
14
15
16
17
18
19
20
21
22
23
24
25
26
27
28
29
30
31
32
33
34
35
36
37
38
39
40
41
42
43
44
45
46
47
48
49
50
51
52
53
54
|
//为表添加数据
@Test
public
void
addData()
throws
IOException {
String strTBName =
"tb_test"
;
String strColFamily =
"cf"
;
String strColumn =
"col"
;
//列名
String strRowKey =
"row1"
;
//行号
String strValue =
"values"
;
//值
Configuration conf = HBaseConfiguration.create();
conf.set(
"hbase.zookeeper.quorum"
,
"192.168.1.241,192.168.1.242,192.168.1.243"
);
//表实例
HTable table =
new
HTable(conf, strTBName);
//close() 释放所有的资源或挂起内部缓冲区中的更新
//exists(Get get) 检查Get实例所指定的值是否存在于HTable的列中
//get(Get get) 获取指定行的某些单元格所对应的值
//getEndKeys() 获取当前一打开的表每个区域的结束键值
//getScanner(byte[] family) 获取当前给定列族的scanner实例
//getTableDescriptor() 获取当前表的HTableDescriptor实例
//getTableName() 获取表名
//isTableEnabled(HBaseConfiguration conf, String tableName) 检查表是否有效
// 获取所有的列族
HColumnDescriptor[] columnFamilies = table.getTableDescriptor().getColumnFamilies();
//HColumnDescriptor的常用方法:
//getName() //获取列族的名字
//getValue(byte[] key) //获取对应的属性的值
//setValue(String key, String value) //设置对应属性的值
//插入器
Put put =
new
Put(Bytes.toBytes(strRowKey));
// 设置行号,RowKey
//add(byte[] family, byte[] qualifier, byte[] value) 将指定的列和对应的值添加到Put实例中
//add(byte[] family, byte[] qualifier, long ts, byte[] value) 将指定的列和对应的值及时间戳添加到Put实例中
//getRow() 获取Put实例的行
//getRowLock() 获取Put实例的行锁
//getTimeStamp() 获取Put实例的时间戳
//isEmpty() 检查familyMap是否为空
//setTimeStamp(long timeStamp) 设置Put实例的时间戳
for
(
int
i =
0
; i < columnFamilies.length; i++) {
String familyName = columnFamilies[i].getNameAsString();
// 获取列族名
//指定列族
if
(familyName.equals(strColFamily)) {
//插入
put.add(Bytes.toBytes(familyName), Bytes.toBytes(strColumn), Bytes.toBytes(strValue));
}
}
table.put(put);
//运行插入器
System.out.println(
"存入数据完毕"
);
}
|

3.读取指定行记录
|
1
2
3
4
5
6
7
8
9
10
11
12
13
14
15
16
17
18
19
20
21
22
23
24
25
26
27
28
29
30
31
32
|
//根据RowKey查询整行
@Test
public
void
getRow()
throws
IOException {
String strTBName =
"tb_test"
;
String strRowKey =
"row1"
;
Configuration conf = HBaseConfiguration.create();
conf.set(
"hbase.zookeeper.quorum"
,
"192.168.1.241,192.168.1.242,192.168.1.243"
);
HTable table =
new
HTable(conf, strTBName);
//获取表实例
//查询器
Get get =
new
Get(Bytes.toBytes(strRowKey));
//查询指定行
//addColumn(byte[] family, byte[] qualifier) 获取指定列族和列修饰符对应的列
//addFamily(byte[] family) 通过指定的列族获取其对应列的所有列
//setTimeRange(long minStamp,long maxStamp) 获取指定取件的列的版本号
//setFilter(Filter filter) 当执行Get操作时设置服务器端的过滤器
Result result = table.get(get);
//containsColumn(byte[] family, byte[] qualifier) 检查指定的列是否存在
//getFamilyMap(byte[] family) 获取对应列族所包含的修饰符与值的键值对
//getValue(byte[] family, byte[] qualifier) 获取对应列的最新值
List<Cell> listCells = result.listCells();
//指定行、全部列族的全部列
for
(Cell cell : listCells) {
System.out.println(
"列 族:"
+ Bytes.toString(CellUtil.cloneFamily(cell)));
System.out.println(
"列 名:"
+ Bytes.toString(CellUtil.cloneQualifier(cell)));
System.out.println(
"列 值:"
+ Bytes.toString(CellUtil.cloneValue(cell)));
System.out.println(
"时间戳:"
+ cell.getTimestamp());
}
}
|

4.显示所有数据
|
1
2
3
4
5
6
7
8
9
10
11
12
13
14
15
16
17
18
19
20
21
22
23
|
//遍历全部条目
@Test
public
void
getAllRows()
throws
IOException {
String strTBName =
"tb_test"
;
Configuration conf = HBaseConfiguration.create();
conf.set(
"hbase.zookeeper.quorum"
,
"192.168.1.241,192.168.1.242,192.168.1.243"
);
HTable table =
new
HTable(conf, strTBName);
//获取表实例
//扫描器
ResultScanner resultScanner = table.getScanner(
new
Scan());
//针对全表的查询器
Iterator<Result> results = resultScanner.iterator();
while
(results.hasNext()) {
Result result = results.next();
List<Cell> cells = result.listCells();
for
(Cell cell : cells) {
System.out.println(
"列 族:"
+ Bytes.toString(CellUtil.cloneFamily(cell)));
System.out.println(
"列 名:"
+ Bytes.toString(CellUtil.cloneQualifier(cell)));
System.out.println(
"列 值:"
+ Bytes.toString(CellUtil.cloneValue(cell)));
System.out.println(
"时间戳:"
+ cell.getTimestamp() +
"\n------------------"
);
}
}
}
|

5.更新条目
|
1
2
3
4
5
6
7
8
9
10
11
12
13
14
15
16
17
18
19
20
|
//更新表中某行的某一列
@Test
public
void
updateTable()
throws
IOException {
String strTBName =
"tb_test"
;
String strColFamily =
"cf"
;
String strColumn =
"col"
;
String strRowKey =
"row1"
;
String strNewValue =
"NewValues"
;
Configuration conf = HBaseConfiguration.create();
conf.set(
"hbase.zookeeper.quorum"
,
"192.168.1.241,192.168.1.242,192.168.1.243"
);
HTable table =
new
HTable(conf, strTBName);
//获取表实例
Put put =
new
Put(Bytes.toBytes(strRowKey));
//仍然是插入操作(已知列族,已知列,新值)
put.add(Bytes.toBytes(strColFamily), Bytes.toBytes(strColumn), Bytes.toBytes(strNewValue));
table.put(put);
System.out.println(
"更新结束"
);
}
|

6.删除单元格
|
1
2
3
4
5
6
7
8
9
10
11
12
13
14
15
16
17
18
19
|
//删除指定行的指定的列(删除单元格)
@Test
public
void
deleteColumn()
throws
IOException {
String strTBName =
"tb_test"
;
String strColFamily =
"cf"
;
String strColumn =
"col"
;
String strRowKey =
"row1"
;
Configuration conf = HBaseConfiguration.create();
conf.set(
"hbase.zookeeper.quorum"
,
"192.168.1.241,192.168.1.242,192.168.1.243"
);
HTable table =
new
HTable(conf, strTBName);
//获取表实例
//删除器
Delete del =
new
Delete(Bytes.toBytes(strRowKey));
del.deleteColumns(Bytes.toBytes(strColFamily), Bytes.toBytes(strColumn));
table.delete(del);
System.out.println(
"行:"
+ strRowKey +
",列族:"
+ strColFamily +
",列:"
+ strColumn +
",删除完毕"
);
}
|

7.删除整行
|
1
2
3
4
5
6
7
8
9
10
11
12
13
14
15
16
|
//删除整行
@Test
public
void
deleteAllColumn()
throws
IOException {
String strTBName =
"tb_test"
;
String strRowKey =
"row1"
;
Configuration conf = HBaseConfiguration.create();
conf.set(
"hbase.zookeeper.quorum"
,
"192.168.1.241,192.168.1.242,192.168.1.243"
);
HTable table =
new
HTable(conf, strTBName);
//获取表实例
Delete deleteAll =
new
Delete(Bytes.toBytes(strRowKey));
table.delete(deleteAll);
System.out.println(
"这一行全删除了"
);
}
|

8.删除表单
|
1
2
3
4
5
6
7
8
9
10
11
12
13
14
|
//删除表
@Test
public
void
deleteTable()
throws
IOException {
String strTBName =
"tb_test"
;
Configuration conf = HBaseConfiguration.create();
conf.set(
"hbase.zookeeper.quorum"
,
"192.168.1.241,192.168.1.242,192.168.1.243"
);
HBaseAdmin admin =
new
HBaseAdmin(conf);
admin.disableTable(strTBName);
admin.deleteTable(strTBName);
System.out.println(strTBName +
"表 删除了"
);
}
|

- end


 89
89

 被折叠的 条评论
为什么被折叠?
被折叠的 条评论
为什么被折叠?
 到【灌水乐园】发言


