


step1:
先安装node,去官网下载,不多提了。
step2:
创建项目根文件夹并创建如下目录:
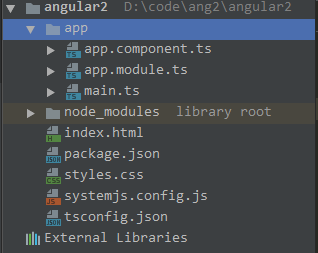
其中,node_modules可以先不创建,是由后续命令生成的;systemjs.config.js和tsconfig.json是angular2的配置文件;package.json是安装的依赖包。
各文件内容为:
/**
 * systemjs.config.js
 */
(function (global) {
    System.config({
        paths: {
            // paths serve as alias
            'npm:': 'node_modules/'
        },
        // map tells the System loader where to look for things
        map: {
            // our app is within the app folder
            app: 'app',

            // angular bundles
            '@angular/core': 'npm:@angular/core/bundles/core.umd.js',
            '@angular/common': 'npm:@angular/common/bundles/common.umd.js',
            '@angular/compiler': 'npm:@angular/compiler/bundles/compiler.umd.js',
            '@angular/platform-browser': 'npm:@angular/platform-browser/bundles/platform-browser.umd.js',
            '@angular/platform-browser-dynamic': 'npm:@angular/platform-browser-dynamic/bundles/platform-browser-dynamic.umd.js',
            '@angular/http': 'npm:@angular/http/bundles/http.umd.js',
            '@angular/router': 'npm:@angular/router/bundles/router.umd.js',
            '@angular/router/upgrade': 'npm:@angular/router/bundles/router-upgrade.umd.js',
            '@angular/forms': 'npm:@angular/forms/bundles/forms.umd.js',
            '@angular/upgrade': 'npm:@angular/upgrade/bundles/upgrade.umd.js',
            '@angular/upgrade/static': 'npm:@angular/upgrade/bundles/upgrade-static.umd.js',

            // other libraries
            'rxjs':                      'npm:rxjs',
            'angular-in-memory-web-api': 'npm:angular-in-memory-web-api/bundles/in-memory-web-api.umd.js'
        },
        // packages tells the System loader how to load when no filename and/or no extension
        packages: {
            app: {
                main: './main.js',
                defaultExtension: 'js'
            },
            rxjs: {
                defaultExtension: 'js'
            }
        }
    });
})(this);
/**
 * tsconfig.json
 */

{
  "compilerOptions": {
    "target": "es5",
    "module": "commonjs",
    "moduleResolution": "node",
    "sourceMap": true,
    "emitDecoratorMetadata": true,
    "experimentalDecorators": true,
    "lib": [ "es2015", "dom" ],
    "noImplicitAny": true,
    "suppressImplicitAnyIndexErrors": true
  },
  "exclude": [
    "node_modules/*",
    "**/*-aot.ts"
  ]
}
/**
 * package.json
 */

{
  "name": "angular2",
  "version": "1.0.0",
  "description": "QuickStart package.json from the documentation, supplemented with testing support",
  "scripts": {
    "start": "tsc && concurrently \"tsc -w\" \"lite-server\" ",
    "e2e": "tsc && concurrently \"http-server -s\" \"protractor protractor.config.js\" --kill-others --success first",
    "lint": "tslint ./app/**/*.ts -t verbose",
    "lite": "lite-server",
    "pree2e": "webdriver-manager update",
    "test": "tsc && concurrently \"tsc -w\" \"karma start karma.conf.js\"",
    "test-once": "tsc && karma start karma.conf.js --single-run",
    "tsc": "tsc",
    "tsc:w": "tsc -w"
  },
  "keywords": [],
  "author": "",
  "license": "MIT",
  "dependencies": {
    "@angular/common": "~2.2.0",
    "@angular/compiler": "~2.2.0",
    "@angular/core": "~2.2.0",
    "@angular/forms": "~2.2.0",
    "@angular/http": "~2.2.0",
    "@angular/platform-browser": "~2.2.0",
    "@angular/platform-browser-dynamic": "~2.2.0",
    "@angular/router": "~3.2.0",

    "angular-in-memory-web-api": "~0.1.15",
    "systemjs": "0.19.40",
    "core-js": "^2.4.1",
    "reflect-metadata": "^0.1.8",
    "rxjs": "5.0.0-beta.12",
    "zone.js": "^0.6.26"
  },
  "devDependencies": {
    "concurrently": "^3.1.0",
    "lite-server": "^2.2.2",
    "typescript": "^2.0.10",

    "canonical-path": "0.0.2",
    "http-server": "^0.9.0",
    "tslint": "^3.15.1",
    "lodash": "^4.16.4",
    "jasmine-core": "~2.4.1",
    "karma": "^1.3.0",
    "karma-chrome-launcher": "^2.0.0",
    "karma-cli": "^1.0.1",
    "karma-htmlfile-reporter": "^0.3.4",
    "karma-jasmine": "^1.0.2",
    "karma-jasmine-html-reporter": "^0.2.2",
    "protractor": "4.0.9",
    "webdriver-manager": "10.2.5",
    "rimraf": "^2.5.4",

    "@types/node": "^6.0.46",
    "@types/jasmine": "^2.5.36",
    "@types/selenium-webdriver": "^2.53.33"
  },
  "repository": {}
}
以下是实现 ‘hello world’ 相应代码
/**
 * index.html
 */

<!DOCTYPE html>
<html>
<head>
    <title>Angular QuickSt2</title>
    <meta charset="UTF-8">
    <meta name="viewport" content="width=device-width, initial-scale=1">
    <link rel="stylesheet" href="styles.css">

    <!-- Polyfill(s) for older browsers -->
    <script src="node_modules/core-js/client/shim.min.js"></script>

    <script src="node_modules/zone.js/dist/zone.js"></script>
    <script src="node_modules/reflect-metadata/Reflect.js"></script>
    <script src="node_modules/systemjs/dist/system.src.js"></script>

    <script src="systemjs.config.js"></script>
    <script>
        System.import('app').catch(function(err){ console.error(err); });
    </script>
</head>

<body>
<my-app>Loading AppComponent content here ...</my-app>
</body>
</html>
/**
 * styles.css(没啥用)
 */
 h1 {
    color: #369;
    font-family: Arial, Helvetica, sans-serif;
    font-size: 250%;
}
/**
* app.component.ts
*/
import { Component } from '@angular/core';
@Component({
selector: 'my-app',
template: `<h1>Hello {{name}}</h1>`,
})
export class AppComponent {
name = 'World';
}
/**
 * app.,module.ts
 */

import { NgModule }      from '@angular/core';
import { BrowserModule } from '@angular/platform-browser';

import { AppComponent }  from './app.component';

@NgModule({
    imports:      [ BrowserModule ],
    declarations: [ AppComponent ],
    bootstrap:    [ AppComponent ]
})
export class AppModule { }
/**
* main.ts
*/
import { platformBrowserDynamic } from '@angular/platform-browser-dynamic';
import { AppModule } from './app.module';
platformBrowserDynamic().bootstrapModule(AppModule);
step3:
执行命令,生成node_modules文件夹,安装依赖
npm install执行之后就跟开始的目录结构是一样的了。
step4:
运行下面命令,程序就跑起来了
npm start这个命令会在监视模式下运行编译器,启动开发服务器,在浏览器中启动我们的应用,并在我们构建代码的时候让应用得以持续运行
这个时候的目录结构是这样的,他会将ts文件编译成js文件:

运行效果如下:

到此,基本的程序已经可以运行了,接下来就可以编写代码完成更丰富的程序。
进阶
双向绑定需要导入FormsModule模块,添加在imports数组中(在app.module.ts中imports数组中是应用中用到的外部模块列表);
双向数据绑定:
<h2>{{hero.name}} details!</h2>
<div>
    <label>name: </label>
    <input [(ngModel)]="hero.name" placeholder="name">
</div>
*ngFor、事件绑定和添加selected样式
<li *ngFor="let hero of heroes"
  [class.selected]="hero === selectedHero"
  (click)="onSelect(hero)">
  <span class="badge">{{hero.id}}</span> {{hero.name}}
</li>
ngFor的*前缀表示< li>及其子元素组成了一个主控模板。
ngFor指令在AppComponent.heroes属性返回的heroes数组上迭代,并输出此模板的实例。
圆括号表示< li>元素上的click事件就是我们要绑定的目标。 等号右边的表达式调用AppComponent的onSelect()方法,并把模板输入变量hero作为参数传进去。
定义方法
onSelect(hero: Hero): void {
  this.selectedHero = hero;
}
创建组件基本格式
/**
  *hero-detail.component.ts
  */
import { Component, Input } from '@angular/core';

@Component({
  selector: 'my-hero-detail',
})
export class HeroDetailComponent {
}
自定义组件完成之后先在AppModule中用import导入,然后在添加到declarations数组中
declarations数组
添加HeroDetailComponent到NgModule装饰器中的declarations数组。这个数组包含了所有属于本应用模块的,由我们亲自创建的组件、管道和指令。
命名约定
你会注意到,在名叫app.component.ts的文件中有一个AppComponent组件,在名叫hero-detail.component.ts的文件中有一个HeroDetailComponent组件。
我们的所有组件名都以Component结尾。所有组件的文件名都以.component结尾。
这里我们使用小写中线命名法(也叫烤串命名法)拼写文件名, 所以不用担心它在服务器或者版本控制系统中出现大小写问题。
框架之间属性的绑定
<my-hero-detail [hero]="selectedHero"></my-hero-detail>注意,在等号(=)左边方括号中的这个hero是属性绑定的目标。
Angular希望我们把目标属性定义成组件的输入属性,否则,Angular会拒绝绑定,并且抛出一个错误。
@Input()装饰器
export class HeroDetailComponent {
    @Input()
    hero = Hero;
}
我们有几种方式把hero声明成输入属性。 这里我们采用首选的方式:使用我们前面导入的@Input装饰器,为hero属性加上注解。
可注入的服务
注意,我们引入了Angular的Injectable函数,并通过@Injectable()装饰器使用这个函数。
当TypeScript看到@Injectable()装饰器时,就会记下本服务的元数据。如果Angular需要往这个服务中注入其它依赖,就会使用这些元数据。
不要忘了写圆括号!如果忘了写,就会导致一个很难诊断的错误。
注入 HeroService
constructor(private heroService: HeroService) { }构造函数自己什么也不用做,它在参数中定义了一个私有的heroService属性,并把它标记为注入HeroService的靶点。
现在,Angular将会知道,当它创建AppComponent实例时,需要先提供一个HeroService的实例。
我们还得注册一个HeroService提供商,来告诉注入器如何创建HeroService。 要做到这一点,我们应该在@Component组件的元数据底部添加providers数组属性如下:
providers: [HeroService]
providers数组告诉Angular,当它创建新的AppComponent组件时,也要创建一个HeroService的新实例。 AppComponent会使用那个服务来获取英雄列表,在它组件树中的每一个子组件也同样如此。
OnInit接口的基本轮廓:
import { OnInit } from '@angular/core';

export class AppComponent implements OnInit {
  ngOnInit(): void {
  }
}
Angular路由器
是一个可选的外部Angular NgModule,名叫RouterModule。 路由器包含了多种服务(RouterModule)、多种指令(RouterOutlet, RouterLink, RouterLinkActive)、 和一套配置(Routes)。我们将先配置路由。
配置路由需要在 < head > 中添加< base href=”/”>标签
相应的template也可以换成templateUrl这样参数可以传html页面
@Component({
 moduleId: module.id,
 selector: 'my-dashboard',
 templateUrl: 'dashboard.component.html',
 })
使用路由,将下面代码放在app.module.ts的imports数组中
RouterModule.forRoot([
  {
    path: 'heroes',
    component: HeroesComponent
  }
])
路由定义包括几个部分:
path: 路由器会用它来匹配浏览器地址栏中的地址,如heroes。
component: 导航到此路由时,路由器需要创建的组件(HeroesComponent)。
重定向
{
  path: '',
  redirectTo: '/dashboard',
  pathMatch: 'full'
},
路由模块
典型路由模块值得注意的有:
将路由抽出到一个变量中。你将来可能会导出它。而且它让路由模块模式更加明确。
添加RouterModule.forRoot(routes)到imports。
添加RouterModule到exports,这样关联模块的组件可以访问路由的声明,比如RouterLink和RouterOutlet。
无Declarations!声明是关联模块的任务。
如果你有守卫服务,添加模块providers;本例子无守卫服务。
routerLinkActive指令
Angular路由器提供了routerLinkActive指令,我们可以用它来为匹配了活动路由的HTML导航元素自动添加一个CSS类。 我们唯一要做的就是为它定义样式。++++++++++++
服务Service
- 首先,创建一个服务,如hero.service.ts;
- 导入(import)想操作的数据和类, 在service中HeroService中写要操* * 作数据的代码逻辑;
- 然后在想使用这个服务的组件(component)中先导入这个service模块;
- 然后创建HeroService实例(constructor(private heroService: HeroService){ });
- 接着在@Component中注册一个HeroService的提供商(providers: [HeroService]);
- 可以使用生命周期钩子来进行操作。
路由参数相关
ngOnInit(): void {
  this.route.params
    .switchMap((params: Params) => this.heroService.getHero(+params['id']))
    .subscribe(hero => this.hero = hero);
}
- switchMap运算符如何将可观察的路由参数中的 id 映射到一个新的Observable, 即HeroService.getHero方法的结果。
- 如果用户在 getHero 请求执行的过程中再次导航这个组件,switchMap 再次调用HeroService.getHero之前, 会取消之前的请求。
- 英雄的id是数字,而路由参数的值总是字符串。 所以我们需要通过 JavaScript 的 (+) 操作符把路由参数的值转成数字。
获取路由参数方法
打开HeroService,并添加一个getHero方法,用来通过id从getHeros过滤英雄列表:
getHero(id: number): Promise<Hero> {
  return this.getHeroes()
             .then(heroes => heroes.find(hero => hero.id === id));
}
HTTP模块
使用http由于没有服务器要使用内存Web API服务,需要引入两个模块:
// Imports for loading & configuring the in-memory web api
import { InMemoryWebApiModule } from 'angular-in-memory-web-api';
import { InMemoryDataService }  from './in-memory-data.service';
同时要在imports数组中加入:
InMemoryWebApiModule.forRoot(InMemoryDataService)接着创建in-memory-data.service.ts文件:
import { InMemoryDbService } from 'angular-in-memory-web-api';
export class InMemoryDataService implements InMemoryDbService {
  createDb() {
    let heroes = [
      {id: 11, name: 'Mr. Nice'},
      {id: 12, name: 'Narco'},
      {id: 13, name: 'Bombasto'},
      {id: 14, name: 'Celeritas'},
      {id: 15, name: 'Magneta'},
      {id: 16, name: 'RubberMan'},
      {id: 17, name: 'Dynama'},
      {id: 18, name: 'Dr IQ'},
      {id: 19, name: 'Magma'},
      {id: 20, name: 'Tornado'}
    ];
    return {heroes};
  }
}
import导入相应模块,里面数据内容有具体需求决定。


 8470
8470


 被折叠的 条评论
为什么被折叠?
被折叠的 条评论
为什么被折叠?
 到【灌水乐园】发言


