


本次配置是为了搭建嵌入式开发板4412Linux开发环境。tftp是文件传输协议,方便电脑端文件传输到嵌入式开发板中(只能传输单个文件),具体的构成如图1所示;nfs是远程共享,方便多个文件的传输。

因为嵌入式开发板中有uboot,包含了tftp客户端,因此开发板中不需要安装了,废话不多说,下面开始安装tftp服务器。
- 安装 tftp-server
$apt-get install tftpd-hpa tftp-hpa
检查是否安装tftp server
$dpkg -s tftpd-hpa
- 修改文件,开启tftp服务,此处目录设置为根目录"/tftp"
#sudo vi /etc/default/tftpd-hpa
TFTP_USERNAME="tftp"
TFTP_DIRECTORY="/tftpboot"
TFTP_ADDRESS="0.0.0.0:69"
TFTP_OPTIONS="-c  -s  -l"
- 创建tftpboot目录(注意,这里创建的目录是在根文件目录下创建的),启动 tftp-server
$mkdir  /tftpboot
$sudo chmod  a+w  /tftpboot
$sudo service  tftpd-hpa  restart
- 准备带传输的文件(本地测试用的文件,随便找一个.c或者.bin之类文件就行,文件夹不可以)
$cp u-boot-fs4412.bin uImage exynos4412-fs4412.dtb /tftpboot
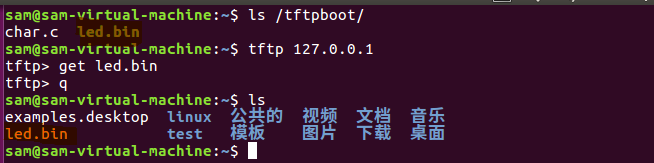
- 本机自环测试
#tftp   127.0.0.1
tftp>get  <download file>
tftp>put  <upload file>
tftp>q
ls
此处测试目的是观察tftpboot目录下的"led.bin"文件是否被传输到根目录下:
接下来安装nfs服务器

6. 安装nfs服务
$ sudo apt-get install nfs-kernel-server
检查nfs服务是否安装
$ service nfs-kernel-server
安装过程:
sam@sam-virtual-machine:/mnt/hgfs/Ubuntu_share/tftpboot$ sudo apt-get install nfs-kernel-server
[sudo] sam 的密码:
正在读取软件包列表... 完成
正在分析软件包的依赖关系树
正在读取状态信息... 完成
将会同时安装下列软件:
  nfs-common
建议安装:
  open-iscsi watchdog
下列软件包将被升级:
  nfs-common nfs-kernel-server
升级了 2 个软件包,新安装了 0 个软件包,要卸载 0 个软件包,有 238 个软件包未被升级。
需要下载 273 kB 的归档。
解压缩后会消耗 0 B 的额外空间。
您希望继续执行吗? [Y/n] y
获取:1 http://cn.archive.ubuntu.com/ubuntu xenial-updates/main amd64 nfs-common amd64 1:1.2.8-9ubuntu12.3 [185 kB]
获取:2 http://cn.archive.ubuntu.com/ubuntu xenial-updates/main amd64 nfs-kernel-server amd64 1:1.2.8-9ubuntu12.3 [87.8 kB]
已下载 273 kB,耗时 4秒 (67.5 kB/s)
(正在读取数据库 ... 系统当前共安装有 223243 个文件和目录。)
正准备解包 .../nfs-common_1%3a1.2.8-9ubuntu12.3_amd64.deb  ...
正在将 nfs-common (1:1.2.8-9ubuntu12.3) 解包到 (1:1.2.8-9ubuntu12.2) 上 ...
正准备解包 .../nfs-kernel-server_1%3a1.2.8-9ubuntu12.3_amd64.deb  ...
正在将 nfs-kernel-server (1:1.2.8-9ubuntu12.3) 解包到 (1:1.2.8-9ubuntu12.2) 上 ...
正在处理用于 ureadahead (0.100.0-19) 的触发器 ...
正在处理用于 systemd (229-4ubuntu21.27) 的触发器 ...
正在处理用于 man-db (2.7.5-1) 的触发器 ...
正在设置 nfs-common (1:1.2.8-9ubuntu12.3) ...
正在设置 nfs-kernel-server (1:1.2.8-9ubuntu12.3) ...
- 修改文件/etc/exports为(此处nfs目录为/nfs/rootfs,也可以设置为其他目录,不过我这边设置其他目录,后面解压根文件系统出错,把nfs目录设置为/nfs/rootfs就好了):
#/etc/exports: the access control list for filesystems which may be exported
/nfs/rootfs *(rw,sync,no_root_squash)
$ sudo vim /etc/exports
#/etc/exports: the access control list for filesystems which may be exported
#               to NFS clients.  See exports(5).
#
# Example for NFSv2 and NFSv3:
# /srv/homes       hostname1(rw,sync,no_subtree_check) hostname2(ro,sync,no_subtree_check)
#
# Example for NFSv4:
# /srv/nfs4        gss/krb5i(rw,sync,fsid=0,crossmnt,no_subtree_check)
# /srv/nfs4/homes  gss/krb5i(rw,sync,no_subtree_check)
#
/nfs/rootfs  *(rw,sync,no_root_squash)
- 准备内容,创建nfs目录,解压根文件系统,此处我用的是华清远见根文件系统,安装包链接:rootfs根文件系统
$ sudo mkdir /nfs
$ sudo chmod 777 /nfs
$ cd /nfs
$ cp rootfs.tar.xz  .          它已制作好的根文件系统
$ tar -xvf  rootfs.tar
$ sudo chmod 777 rootfs
- 重启 nfs 服务
$ sudo /etc/init.d/nfs-kernel-server restart
- 测试nfs服务是否安装成功
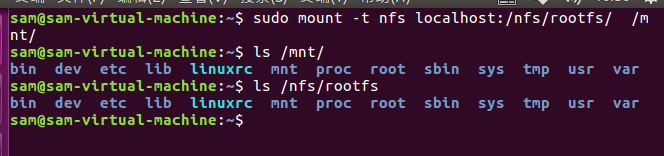
$ sudo mount -t nfs localhost:/nfs/rootfs/  /mnt/
$ ls /mnt/   如果其中的内容和/nfs/rootfs中一致。 表示有挂载成功
$ sudo umount /mnt   取消挂载
测试结果(观察挂载的"/mnt"目录下文件是否与"/nfs/rootfs"目录下的文件一致,一致代表挂在成功了):


 1622
1622


 被折叠的 条评论
为什么被折叠?
被折叠的 条评论
为什么被折叠?
 到【灌水乐园】发言


