


自己写了一套简单的App常用的框架样式,就是比较传统的NavigationController+TabBarController结合的这种
效果图:
大体介绍:
主要是两个容器来盛放子控制器,两个容器分别是UINavigationController 和 UITabBarController,在这两个控制器中,自行设置其子控制器.通过git图上可以看见我们自行简单对他们的更改,主要是两个比较好玩的地方,一个是比较常规的自定义UITabBarItem另一个是设置NavigationBar透明,并且随着TableView滑动改变透明度.这篇主要就是记录一下自定义TabBarItem和设置NavigationBar透明的实现
言归正传:
关于UITabBarController
首先自定义一个继承自UITabBar的类@interface LGJTabBar : UITabBar在.m文件中
- (instancetype)initWithFrame:(CGRect)frame {

    self = [super initWithFrame:frame];
    return  self;
}
//布局子控件
- (void)layoutSubviews {

    [super layoutSubviews];
    [self setUpAllTabBarButtonsFrame];
}
在复写layoutSubviews这个方法时,设置tabbar上tabbarButtonFrame将这个过程封装为两个函数:
1:设置每个tabbarButton的frame
/**
 *  设置每个tabbarButton的frame
 *
 *  @param tabBarButton 需要设置的tabbarButton
 *  @param index        tabbarButton的index
 */
- (void)setUpTabBarButtonFrame:(UIView *)tabBarButton atIndex:(int)index {
    CGFloat buttonW = self.width / (self.items.count);
    CGFloat buttonH = self.height;

    tabBarButton.width = buttonW;
    tabBarButton.height = buttonH;
    tabBarButton.x = buttonW * index;
    tabBarButton.y = 0;
}
2:设置所有的tabbarButtonFrame, 在函数中 设置index值为0,在tabbar上遍历其子视图,如果找不到UITabBarButton就跳过,在for循环中调用setUpTabBarButtonFrame:(UIView *)tabBarButton atIndex:(int)index方法,将view(也就是tabBarButton)和所在的索引值index传到这个函数中,设置每个tabBarButton的frame;
/**
 *  设置所有的tabbarButtonFrame
 */
- (void)setUpAllTabBarButtonsFrame {

    int index = 0;

    for (UIView *tabBarButton in self.subviews) {
        if (![tabBarButton isKindOfClass:NSClassFromString(@"UITabBarButton")]) {
            continue;
        }
        [self setUpTabBarButtonFrame:tabBarButton atIndex:index];
        index++;
    }
}
然后自定义一个继承自UITabBarController的类@interface LGJTabBarController : UITabBarController在这个控制器中,我们需要做的是创建自定义的tabbar和将子控制器加进来;
1:创建自定义的tabbar
/**
 *  创建自定义tabbar
 */
- (void)addCustomTabBar {

    //创建自定义tabbar
    LGJTabBar *customTabBar = [[LGJTabBar alloc] init];

    UIView *backView = [[UIView alloc] initWithFrame:CGRectMake(0, 0, [UIScreen mainScreen].bounds.size.width, 49)];
    backView.backgroundColor = [UIColor whiteColor];
    [customTabBar insertSubview:backView atIndex:0];
    customTabBar.opaque = YES;

    //更换系统自带的tabbar
    [self setValue:customTabBar forKeyPath:@"tabBar"];
}
在这个函数中,将backView插入到customTabBar的最底层,作为背景图;然后
//更换系统自带的tabbar
    [self setValue:customTabBar forKeyPath:@"tabBar"];
2:将子控制器加入tabbarController中
- (void)addOneChildViewController:(UIViewController *)childViewController title:(NSString *)title imageName:(NSString *)imageName selectedImageName:(NSString *)selectedImageName {

    childViewController.title = title;
    childViewController.tabBarItem.image = [UIImage imageNamed:imageName];

    //设置tabbarItem的普通文字颜色
    NSMutableDictionary *textAttrs = [NSMutableDictionary dictionary];
    textAttrs[NSForegroundColorAttributeName] = [UIColor colorWithRed:100/255.0 green:100/255.0 blue:100/255.0 alpha:1];
    textAttrs[NSFontAttributeName] = [UIFont systemFontOfSize:10];
    [childViewController.tabBarItem setTitleTextAttributes:textAttrs forState:UIControlStateNormal];

    //设置tabbarItem的选中文字颜色
    NSMutableDictionary *selectedTextAttrs = [NSMutableDictionary dictionary];
    selectedTextAttrs[NSForegroundColorAttributeName] = [UIColor colorWithRed:244/255.0 green:165/255.0 blue:27/255.0 alpha:1];
    [childViewController.tabBarItem setTitleTextAttributes:selectedTextAttrs forState:UIControlStateSelected];

    //设置选中的图标
    UIImage *selectedImage = [UIImage imageNamed:selectedImageName];
    //声明这张图用原图(不渲染)
    selectedImage = [selectedImage imageWithRenderingMode:UIImageRenderingModeAlwaysOriginal];

    childViewController.tabBarItem.selectedImage = selectedImage;

    //添加为tabbar控制器的子控制器
    LGJNavigationController *nav = [[LGJNavigationController alloc] initWithRootViewController:childViewController];
    [self addChildViewController:nav];
}
关于UINavigationController
自定义继承自UINavigationController的类
@interface LGJNavigationController : UINavigationController
在.m文件中:
//只初始化一次
+ (void)initialize {

    //设置项目中的item的主题样式
    UIBarButtonItem *item = [UIBarButtonItem appearance];

    //Normal
    NSMutableDictionary *textAttrs = [NSMutableDictionary dictionary];
    textAttrs[NSForegroundColorAttributeName] = [UIColor orangeColor];
    textAttrs[NSFontAttributeName] = [UIFont systemFontOfSize:13];
    [item setTitleTextAttributes:textAttrs forState:UIControlStateNormal];

    //不可以用状态
    NSMutableDictionary *disableTextAttrs = [NSMutableDictionary dictionary];
    disableTextAttrs[NSForegroundColorAttributeName] = [UIColor colorWithRed:123/255.0 green: 123/255.0 blue:123/255.0 alpha:1];
    disableTextAttrs[NSFontAttributeName] = [UIFont systemFontOfSize:13];
    [item setTitleTextAttributes:disableTextAttrs forState:UIControlStateDisabled];

}
/**
 *  重写这个方法目的:能够拦截所有push进来的控制器
 *
 *  @param viewController 即将push进来的控制器
 *  @param animated
 */
- (void)pushViewController:(UIViewController *)viewController animated:(BOOL)animated {

    if (self.viewControllers.count > 0) {
        //此时push进来的ViewController是第二个自控制器
        //自动隐藏tabbar
        viewController.hidesBottomBarWhenPushed = YES;

        //定义leftBarButtonItem
        viewController.navigationItem.leftBarButtonItem = [UIBarButtonItem itemWithTarget:self action:@selector(back) image:@"nav_back" highImage:@"nil"];

    }

    /**
     *  调用父类pushViewController, self.viewControllers数组添加对象viewController
     */
    [super pushViewController:viewController animated:animated];

}

- (void)back {

    /**
     *  这里要用self, 不能用self.navigationViewController 因为self本身就是导航控制器对象, self.navigationViewController是nil
     */
    [self popViewControllerAnimated:YES];
}
在MainViewController中
针对navigationBar透明度随着滑动改变的设置方法
//MARK:-ScrollViewDelegate
- (void)scrollViewDidScroll:(UIScrollView *)scrollView {

    if (self.tableView.contentOffset.y < 0.1) {
        NSMutableDictionary *textAttrs = [NSMutableDictionary dictionary];
        textAttrs[NSForegroundColorAttributeName] = [UIColor whiteColor];
        [self.navigationItem.leftBarButtonItem setTitleTextAttributes:textAttrs forState:UIControlStateNormal];

        [self.navigationController.navigationBar setBackgroundImage:[UIImage imageNamed:@"toumingbeijing"] forBarPosition:UIBarPositionAny barMetrics:UIBarMetricsDefault];

    } else {

        CGFloat alpha = self.tableView.contentOffset.y / 200.0f > 1.0f?1:self.tableView.contentOffset.y/200.0f;
        [self.navigationController.navigationBar setBackgroundImage:[self getImageWithAlpha:alpha] forBarMetrics:UIBarMetricsDefault];

        self.navigationItem.rightBarButtonItem = [UIBarButtonItem itemWithTarget:self action:@selector(next) image:@"scan_code_c" highImage:nil];

    }

}
这个方法是用来根据tableView滑动的contentOffSet.y来设置透明度,需要的参数是根据contentOffSet.y计算出来的alpha值[self getImageWithAlpha:alpha]在这个函数中注释已经写好了_
- (UIImage *)getImageWithAlpha:(CGFloat)alpha {

    UIColor *color = [UIColor colorWithRed:251/255.0 green:249/255.0 blue:248/255.0 alpha:alpha];
    //设置需要截取的color"画板"的size大小
    CGSize colorSize = CGSizeMake(1, 1);

    //UIGraphicsBeginImageContext()指定获取上下文的"画板"size大小
    UIGraphicsBeginImageContext(colorSize);
    //开始截取
    CGContextRef context = UIGraphicsGetCurrentContext();


    //用颜色填充当前"画板"
    CGContextSetFillColorWithColor(context, color.CGColor);
    //每个截取到上下文"画板"中填充的frame
    CGContextFillRect(context, CGRectMake(0, 0, 1, 1));
    //得到当前上下文获取到的图片
    UIImage *img = UIGraphicsGetImageFromCurrentImageContext();
    UIGraphicsEndImageContext();

    NSLog(@"imgHeight:%f, imgWidth:%f", img.size.height, img.size.width);
    return img;
}
可能大家对于里面两个用到size的地方比较蒙, 这样解释下,在代码注释中说的"画板"就是这个获取到最终的imgCGSize colorSize = CGSizeMake(1, 1);那CGContextFillRect(context, CGRectMake(0, 0, 1, 1));这句代码的意思是在这个"画板"上填充进去的颜色.为了更直观 我改变了这两句代码:
//设置需要截取的color"画板"的size大小
    CGSize colorSize = CGSizeMake(50, 50);
//每个截取到上下文模板中填充的frame
    CGContextFillRect(context, CGRectMake(0, 0, 20, 20));
得到的是这样的:
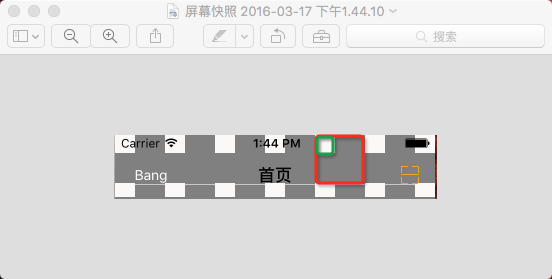
其中红色框就是colorSize,绿框就是代表CGContextFillRect的frame.
总结:
整个简单的小框架大概就这些内容,欢迎大家和我交流,一同进步
demo地址:https://github.com/irembeu/SimpleAppBasicDemo.git


 595
595

 被折叠的 条评论
为什么被折叠?
被折叠的 条评论
为什么被折叠?
 到【灌水乐园】发言


