


前言
我们经常在没有 UINavigationController的时候,这里我们先说这种情况。使用present和dismiss(present modally弹出模态控制器)的方式切换控制器视图,默认情况下,目标控制器视图从下向上弹出。系统有ViewController自带的modalTransitionStyle属性,可以修改ViewController弹出和消失时的动画。如:
func nextClick() -> Void {
        second.modalTransitionStyle = .partialCurl
        self.present(second, animated: true, completion: nil)
    }
系统自带的有四种动画:
public enum UIModalTransitionStyle : Int {

    case coverVertical // 默认 底部滑入

    case flipHorizontal //水平翻转

    case crossDissolve //渐隐

    @available(iOS 3.2, *)
    case partialCurl //翻页
}
但是有时候呢,系统自带的转场动画并不能满足我们的需求,因为我们需要自定义动画。
关于自定义TransitionAnimation
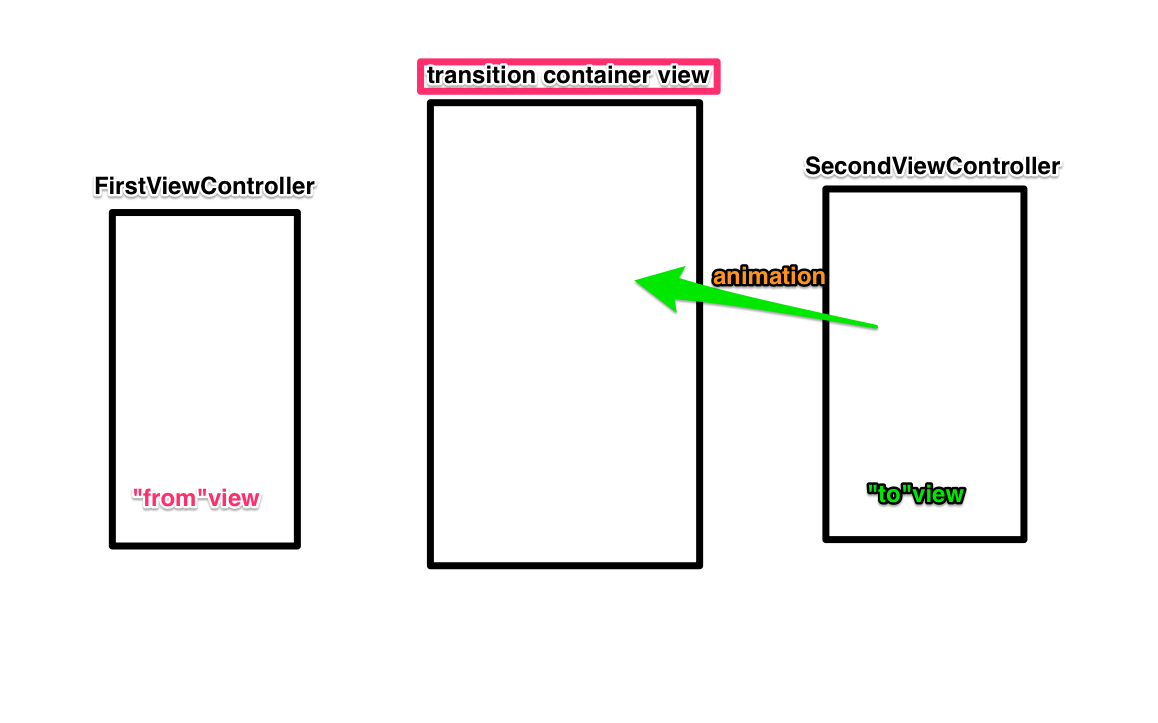
其实呢,在转场的过程中系统会提供一个视图容器用来盛装进行跳转控制器的视图,如下图所示,当前的FirstViewControllerpresent到SecondViewController的时候,此时,FirstViewController的view变成fromView,这个视图会自动加入到transtition container view中,然后在跳转过程中我们需要做的就是将SecondViewController的视图(此时是toView)加入到这个容器中,然后为这个toView的展现增加动画。
TransitionAnimation的实现
1、
首先, 我们先创建一个动画管理类,继承NSObject并遵循UIViewControllerAnimatedTransitioning还有CAAnimationDelegate协议(CAAnimationDelegate这个协议是因为用圆缩放动画时候需要用到),我是将present和dismiss的动画管理类分开写的,就以present动画为例,我创建了CustomPresentAnimation类。
在这个类中,我使用了两种动画,因而我创建了一个枚举用来标示:
enum AnimationType {
    case circle     //圆缩放
    case rectangle  //矩形偏移
}
2、
在UIViewControllerAnimatedTransitioning这个协议中有个方法:
public func transitionDuration(using transitionContext: UIViewControllerContextTransitioning?) -> TimeInterval
这个方法是用来控制转场动画执行时间的。
我们的主要操作是在这个方法中进行的:
public func animateTransition(using transitionContext: UIViewControllerContextTransitioning)
在这个方法中,我们开始进行自定义Animation:
(1)先说矩形偏移的方法,效果如图:
代码里面都有注释,比较容易理解。
// 修改过渡时的背景颜色
            transitionContext.containerView.backgroundColor = UIColor.white
            // 得到toViewController
            let toViewController = transitionContext.viewController(forKey: UITransitionContextViewControllerKey.to)!
            // 得到fromViewController
            let fromViewController = transitionContext.viewController(forKey: UITransitionContextViewControllerKey.from)!
            // 将toViewController.view 放到fromViewController.view之上
            transitionContext.containerView.insertSubview(toViewController.view, aboveSubview: fromViewController.view)
            // 对toViewController.view 进行动画操作
            toViewController.view.transform = CGAffineTransform(translationX: LGJWidth, y: LGJHeight)
            UIView.animate(withDuration: self.transitionDuration(using: transitionContext), animations: {
                toViewController.view.transform = CGAffineTransform.identity
                fromViewController.view.transform = CGAffineTransform(translationX: -LGJWidth, y: -LGJHeight)
                }, completion: { (completion) in
                    // 转场完成后 transitionWasCancelled
                    fromViewController.view.transform = CGAffineTransform.identity
                    transitionContext.completeTransition(!transitionContext.transitionWasCancelled)
            })
(2)这个圆缩放的效果就比较常见了,效果如图:
这个效果主要是用在登录界面的转场中,思路如下:
第一步:找到fromView和 toView并且将toView放到containerView中。
let toVC: UIViewController = transitionContext.viewController(forKey: UITransitionContextViewControllerKey.to)!
            let containerView: UIView = transitionContext.containerView
            containerView.addSubview(toVC.view)
第二步:绘制圆
这里用到贝塞尔曲线绘图,我有写过一篇关于贝塞尔曲线的简单使用方法的介绍,链接:http://www.jianshu.com/p/c883fbf52681。这里分为两步:
首先绘制起点,let startCircle: UIBezierPath = UIBezierPath(ovalIn: CGRect(x: LGJWidth/2, y: LGJHeight/2, width: 50, height: 50)) 这里用的是UIBezierPath的public convenience init(ovalIn rect: CGRect)这个方法,这个方法是用来在给定的rect中绘制内切圆的,这里给的rect以当前view的中点为圆心,并且width=height,所以可以绘制出圆。
第二个圆就是放大之后的圆,这里使用UIBezierPath的init(arcCenter center: CGPoint, radius: CGFloat, startAngle: CGFloat, endAngle: CGFloat, clockwise: Bool)这个方法,创建,使用这个方法我们要用到圆的radius半径、startAngle起始角度、endAngle终点角度,clockwise是否是顺时针画圆,这里我们需要的圆的半径通过勾股定理算出。利用CAShapeLayer将toView的mask蒙版设为endCircle.cgPath结束时的圆。
//画圆
            let startCircle: UIBezierPath = UIBezierPath(ovalIn: CGRect(x: LGJWidth/2, y: LGJHeight/2, width: 50, height: 50))
            let x: CGFloat = LGJWidth/2
            let y: CGFloat = LGJHeight/2
            //求出半径 pow a的x次方
            let radius: CGFloat = sqrt(pow(x, 2) + pow(y, 2))
            let endCircle: UIBezierPath = UIBezierPath(arcCenter: containerView.center, radius: radius, startAngle: 0, endAngle: CGFloat(2*M_PI), clockwise: true)
            let maskLayer: CAShapeLayer = CAShapeLayer()
            maskLayer.path = endCircle.cgPath
            toVC.view.layer.mask = maskLayer
第三步:添加动画
创建基础动画对象,设置动画的fromValue和toValue这里的这两个值也就是我们上一步用贝塞尔曲线画的两个路径。duration设置动画时间,timingFunction控制动画节奏,setValue添加动画的时候设置key,在代理方法中通过key获取animate(如果动画很多的话),为了观察动画什么时候结束,我们将animation的代理设为self这就是为什么我们将这个类继承CAAnimationDelegate了,最后将动画添加到maskLayer,动画执行过程就是我们看见的从小圆变大的过程了。
let maskLayerAnimation: CABasicAnimation = CABasicAnimation()
            maskLayerAnimation.fromValue = startCircle.cgPath
            maskLayerAnimation.toValue = endCircle.cgPath
            maskLayerAnimation.duration = transitionDuration(using: transitionContext)
            maskLayerAnimation.timingFunction = CAMediaTimingFunction(name: kCAMediaTimingFunctionEaseOut)
            maskLayerAnimation.setValue(transitionContext, forKey: "transitionContext")
            maskLayerAnimation.delegate = self
            maskLayer.add(maskLayerAnimation, forKey: "path")
第四步:结束跳转
根据animation的代理方法,观察到动画完成后,根据animation的key找到transitionContext,结束动画,将toView的mask设为nil。
func animationDidStop(_ anim: CAAnimation, finished flag: Bool) {
        if type == .circle {
            let transitionContext: UIViewControllerContextTransitioning = anim.value(forKey: "transitionContext") as! UIViewControllerContextTransitioning
            transitionContext.completeTransition(true)
            transitionContext.viewController(forKey: UITransitionContextViewControllerKey.to)?.view.layer.mask = nil
        }
    }
使用方法
在所谓的fromViewController中,遵循UIViewControllerTransitioningDelegate协议。将toViewController的transitioningDelegate设为自身。然后执行UIViewControllerTransitioningDelegate方法,presentA.type默认为circle
//MARK: -UIViewControllerTransitioningDelegate
    func animationController(forPresented presented: UIViewController, presenting: UIViewController, source: UIViewController) -> UIViewControllerAnimatedTransitioning? {
        let presentA = CustomPresentAnimation()
        presentA.type = .rectangle
        return presentA
    }
关于UINavigationController的转场动画
上面我们介绍了没有 UINavigationController的情况下模态跳转,接下来就简单说一下关于UINavigationController的转场动画的使用方法,其实管理动画的类都是一样的,唯一的不同就是在Controller里面的使用方法的不同,FirstViewController是第一个控制器,SecondViewController是第二个控制器,在第一个控制器中使用时,首先遵循UINavigationControllerDelegate控制器协议,将navigationController?.delegate = self,然后实现ControllerDelegate的代理方法:
func navigationController(_ navigationController: UINavigationController, animationControllerFor operation: UINavigationControllerOperation, from fromVC: UIViewController, to toVC: UIViewController) -> UIViewControllerAnimatedTransitioning? {
        print("\(navigationController) \(operation.rawValue)")

        if operation == .push {
            return CustomPresentAnimation()
        }

        if operation == .pop {
            return CustomDismissAnimation()
        }

        return nil
    }
小结:
以上就是关于present,dismiss的自定义转场动画比较详细的用法和navigationCotroller的push和pop的自定义转场动画的简单用法介绍。如果有不同见解,欢迎留言交流。


 8402
8402


 被折叠的 条评论
为什么被折叠?
被折叠的 条评论
为什么被折叠?
 到【灌水乐园】发言


