


目录
一、创作灵感
- 在工作生产中常遇到移植能力弱
- 使用命令时没那么方便
二、创作思路
- 移植能力强
- 登录服务器就可使用命令,不用切换到命令目录
- docker容器化方便维护
三、具体步骤
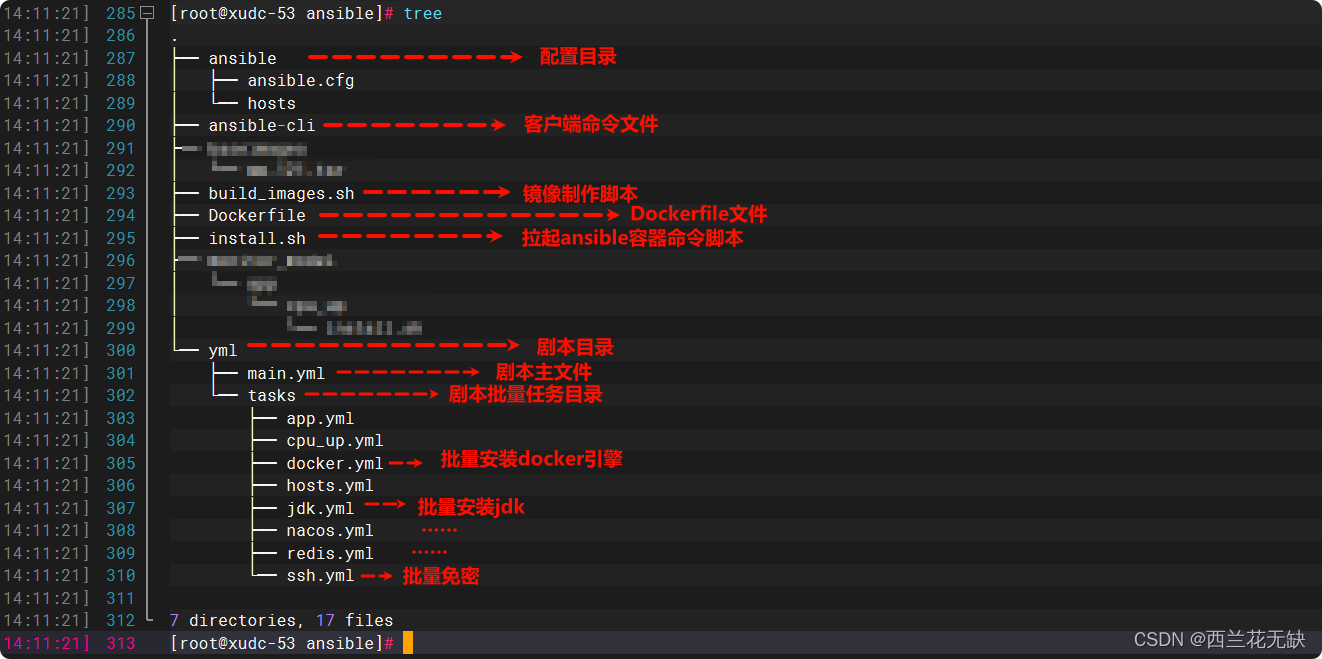
1、总目录结构
拉起容器时的目录,包含以下几点
- 拉起ansible容器命令脚本
- ansible配置目录
- 剧本目录
- 客户端脚本
2、制作镜像
- Dockerfile内容
#基于alpinelinux/ansible
FROM alpinelinux/ansible
# 安装sshpass工具
RUN apk add sshpass- 执行build_images.sh, build_images.sh内容
# 制作镜像命令
docker build -t myansible .- 查看制作的镜像

3、ansible配置
- 目录结构

- ansible.cfg文件内容
ansible.cfg配置文件随后拉起容器时挂载到容器中,可直接复制放在相对目录中即可
[defaults]
# hosts配置,不变即可,此处是容器中位置
inventory = /etc/ansible/hosts
forks = 5
poll_interval = 15
sudo_user = root
#ask_sudo_pass = True
#ask_pass = True
remote_port = 22
roles_path = /etc/ansible/roles
host_key_checking = False
timeout = 10
log_path = ~/.ansible/ansible.log
deprecation_warnings = Flase
nocows = 1
nocolor = 0
gathering = smart
fact_caching_timeout = 86400
fact_caching = jsonfile
fact_caching_connection = ~/.ansible/ansible_facts.d
[privilege_escalation]
#become = True
#become_method = sudo
#become_user = root
#beceme_ask_pass= False
[paramiko_connection]
record_host_keys=Flase
[ssh_connection]
ssh_args = -o ControlMaster=auto -o ControlPersist=1800
control_path_dir = ~/.ansible/cp
pipelining=true
[accelerate]
#accelerate_port = 5099
#accelerate_timeout = 30
#accelerate_connect_timeout = 5.0
#accelerate_daemon_timeout = 30
[selinux]
[colors]
highlight = white
verbose = blue
warn = bright purple
error = red
ok = green
changed = yellow
diff_add = green
diff_remove = red
diff_lines = cyan- hosts文件内容
hosts文件随后拉起容器时挂载到容器中,可直接复制放在相对目录中即可
ip修改为自己的ip
[all]
123.x.x.x
123.x.x.x
[all:vars]
# 工作目录
WorkPath="/data/monitor_model/"
# 原目录
SrcPath="/monitor_model/"
# 目标目录
DestPath="/data/software/monitor_model/"
# docker私有仓库地址
RegistryServer="123.x.x.x:5000"
4、剧本内容
- 目录结构
按目录结构存放文件,下面粘贴几个子任务文件内容
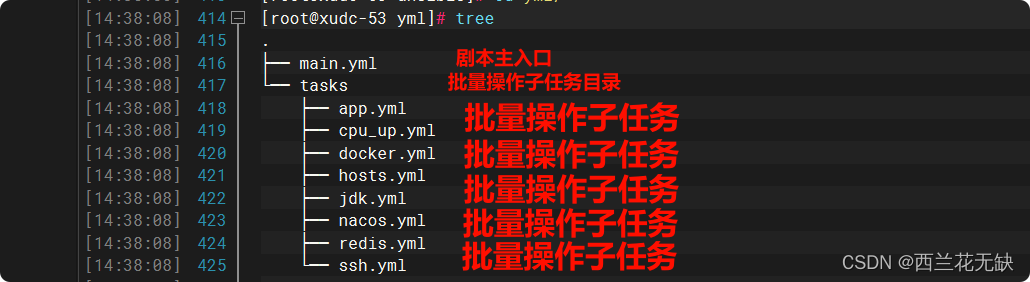
- 剧本主入口文件main.yml
---
- hosts: all
  tasks:
    - include: tasks/ssh.yml
  tags:
    - ssh
- hosts: all
  tasks:
    - include: tasks/docker.yml app=docker
  tags:
- docker- 批量免密文件ssh.yml
---
    - name: "delete ~/.ssh/"
      file: path=~/.ssh/ state=absent
    - name: "generating public/private rsa key pair"
      shell: ssh-keygen -t rsa -P '' -f ~/.ssh/id_rsa
    - name: "delete /tmp/ssh/"
      local_action: shell rm -rf ~/tmp/ssh/
      run_once: true
    - name: "fetch copy"
      fetch: src=~/.ssh/id_rsa.pub dest=~/tmp/ssh/
    - name: "append file authorized_keys.log"
      local_action: shell find ~/tmp/ssh/* -type f -exec sh -c 'cat {}>>~/tmp/ssh/authorized_keys.log' \;
      run_once: true
    - name: "copy authorized_keys"
copy: src=~/tmp/ssh/authorized_keys.log dest=~/.ssh/authorized_keys mode=0600- 批量安装docker引擎文件docker.yml
---
    - name: "Copy app"
      copy:
        src: '{{ item.src }}'
        dest: '{{ item.dest }}'
        mode: 0777
      with_items:
        - { src: '{{SrcPath}}baseapp/{{app}}/', dest: '{{DestPath}}{{app}}/' }
    - name: "initial app"
      replace:
        path: '{{item.path}}'
        regexp: '{{ item.reg }}'
        replace: '{{ item.rep }}'
      with_items:
        - { path: '{{ DestPath }}{{app}}/docker.service', reg: 'RegistryServer', rep: '{{RegistryServer}}' }
        - { path: '{{ DestPath }}{{app}}/docker.service', reg: 'WorkPath', rep: '{{WorkPath}}' }
    - name: "install app"
      shell: sh {{ DestPath }}{{app}}/install.sh > {{DestPath}}install.log
    - name: "delete pkg"
      file:
        path: '{{item.path}}'
        state: absent
      with_items:
- { path: '{{DestPath}}{{app}}/' }- 批量安装jdk文件jdk.yml
---
    - name: "Copy app"
      copy:
        src: '{{ item.src }}'
        dest: '{{ item.dest }}'
        mode: 0777
      with_items:
        - { src: '{{SrcPath}}baseapp/{{app}}/', dest: '{{DestPath}}{{app}}/' }
    - name: "install app"
      shell: sh {{ DestPath }}{{app}}/install.sh > {{DestPath}}install.log
    - name: "delete pkg"
      file:
        path: '{{item.path}}'
        state: absent
      with_items:
        - { path: '{{DestPath}}{{app}}/' }
5、拉起ansible容器
按总目录结构存放该脚本
server_name=myansible
docker rm -f $server_name
docker run -dit --net host --name $server_name \
  -v $(pwd)/monitor_model:/monitor_model \
  -v $(pwd)/yml:/yml \
  -v $(pwd)/ansible:/etc/ansible \
  --restart=always \
  --privileged=true \
myansible - 容器启动后的状态

6、客户端文件ansible-cli
- ansible-cli文件内容
# 不进入容器执行容器中的脚本
docker exec -it myansible sh -c "$1"- 在ansible-cli文件所在目录下执行
echo 'export PATH="'$(pwd)':$PATH"' >> ~/.bashrc
source ~/.bashrc
chmod +777 ansible-cli
四、ansible-cli使用命令及方式
1、批量免密
ansible-cli "ansible-playbook /yml/main.yml --tags ssh -k"
2、批量ping主机
ansible-cli "ansible all -m ping"
3、批量安装docker
ansible-cli "ansible-playbook --become /yml/main.yml --tags docker -K"4、批量安装其他
批量安装软件参考“批量安装docker”
五、总结
有任何疑问可以评论区留言互动哦~欢迎点赞收藏


 346
346


 被折叠的 条评论
为什么被折叠?
被折叠的 条评论
为什么被折叠?
 到【灌水乐园】发言


