


1、创建项目
创建窗体WPF项目WpfAppUc
2、创建用户控件
创建用户控件LimitInputUserControl
(1)、修改视图文件LimitInputUserControl.xaml
<UserControl x:Class="WpfAppUc.LimitInputUserControl"
             xmlns="http://schemas.microsoft.com/winfx/2006/xaml/presentation"
             xmlns:x="http://schemas.microsoft.com/winfx/2006/xaml"
             xmlns:mc="http://schemas.openxmlformats.org/markup-compatibility/2006"
             xmlns:d="http://schemas.microsoft.com/expression/blend/2008"
             xmlns:local="clr-namespace:WpfAppUc"
             mc:Ignorable="d"
             d:DesignHeight="450" d:DesignWidth="800">
    <Grid>
        <Grid.ColumnDefinitions>
            <ColumnDefinition Width="*"/>
            <ColumnDefinition Width="Auto"/>
        </Grid.ColumnDefinitions>
        <Grid.RowDefinitions>
            <RowDefinition Height="Auto"/>
            <RowDefinition Height="*"/>
        </Grid.RowDefinitions>
        <Label Content="{Binding Title}"/>
        <Label Grid.Column="1">
            <StackPanel Orientation="Horizontal">
                <TextBlock Text="{Binding ElementName=textLimitedInput}"/>
                <TextBlock Text="/"/>
                <TextBlock Text="{Binding MaxLength}"/>
            </StackPanel>
        </Label>
        <TextBox MaxLength="{Binding MaxLength}" Grid.Row="1" Grid.ColumnSpan="2" Name="textLimitedInput"
                 ScrollViewer.VerticalScrollBarVisibility="Auto" TextWrapping="Wrap"/>
    </Grid>
</UserControl>
(2)、修改逻辑文件LimitInputUserControl.xaml.cs
using System;
using System.Collections.Generic;
using System.Text;
using System.Windows;
using System.Windows.Controls;
using System.Windows.Data;
using System.Windows.Documents;
using System.Windows.Input;
using System.Windows.Media;
using System.Windows.Media.Imaging;
using System.Windows.Navigation;
using System.Windows.Shapes;

namespace WpfAppUc
{
    /// <summary>
    /// LimitInputUserControl.xaml 的交互逻辑
    /// </summary>
    public partial class LimitInputUserControl : UserControl
    {
        public LimitInputUserControl()
        {
            InitializeComponent();
            this.DataContext = this;
        }
        public string Title { get; set; }
        public int MaxLength { get; set; }
    }
}
3、在项目中引用控件
(1)、主窗体文件MainWindow.xaml
<Window x:Class="WpfAppUc.MainWindow"
xmlns="http://schemas.microsoft.com/winfx/2006/xaml/presentation"
xmlns:x="http://schemas.microsoft.com/winfx/2006/xaml"
xmlns:d="http://schemas.microsoft.com/expression/blend/2008"
xmlns:mc="http://schemas.openxmlformats.org/markup-compatibility/2006"
xmlns:local="clr-namespace:WpfAppUc"
mc:Ignorable="d"
Title="MainWindow" Height="450" Width="800">
<Grid Margin="10">
<Grid.RowDefinitions>
<RowDefinition Height="Auto"/>
<RowDefinition Height="*"/>
</Grid.RowDefinitions>
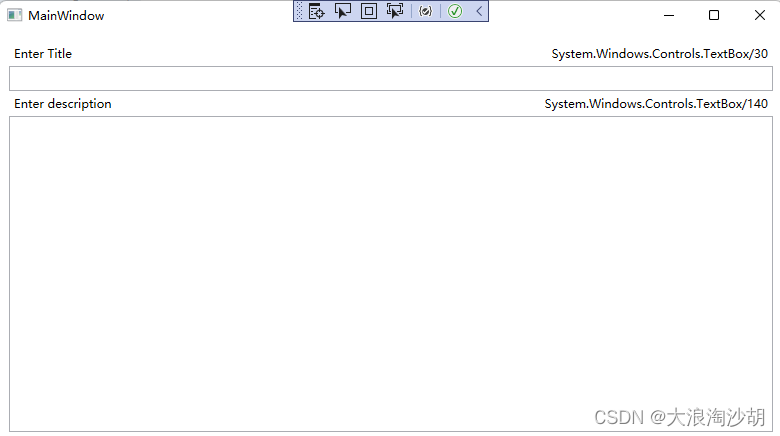
<local:LimitInputUserControl Title="Enter Title" MaxLength="30" Height="50"/>
<local:LimitInputUserControl Title="Enter description" MaxLength="140" Grid.Row="1"/>
</Grid>
</Window>
(2)、主窗体逻辑MainWindow.xaml.cs
using System;
using System.Collections.Generic;
using System.Linq;
using System.Text;
using System.Threading.Tasks;
using System.Windows;
using System.Windows.Controls;
using System.Windows.Data;
using System.Windows.Documents;
using System.Windows.Input;
using System.Windows.Media;
using System.Windows.Media.Imaging;
using System.Windows.Navigation;
using System.Windows.Shapes;

namespace WpfAppUc
{
    /// <summary>
    /// Interaction logic for MainWindow.xaml
    /// </summary>
    public partial class MainWindow : Window
    {
        public MainWindow()
        {
            InitializeComponent();
        }
    }
}
4、实现效果


 4562
4562


 被折叠的 条评论
为什么被折叠?
被折叠的 条评论
为什么被折叠?
 到【灌水乐园】发言


