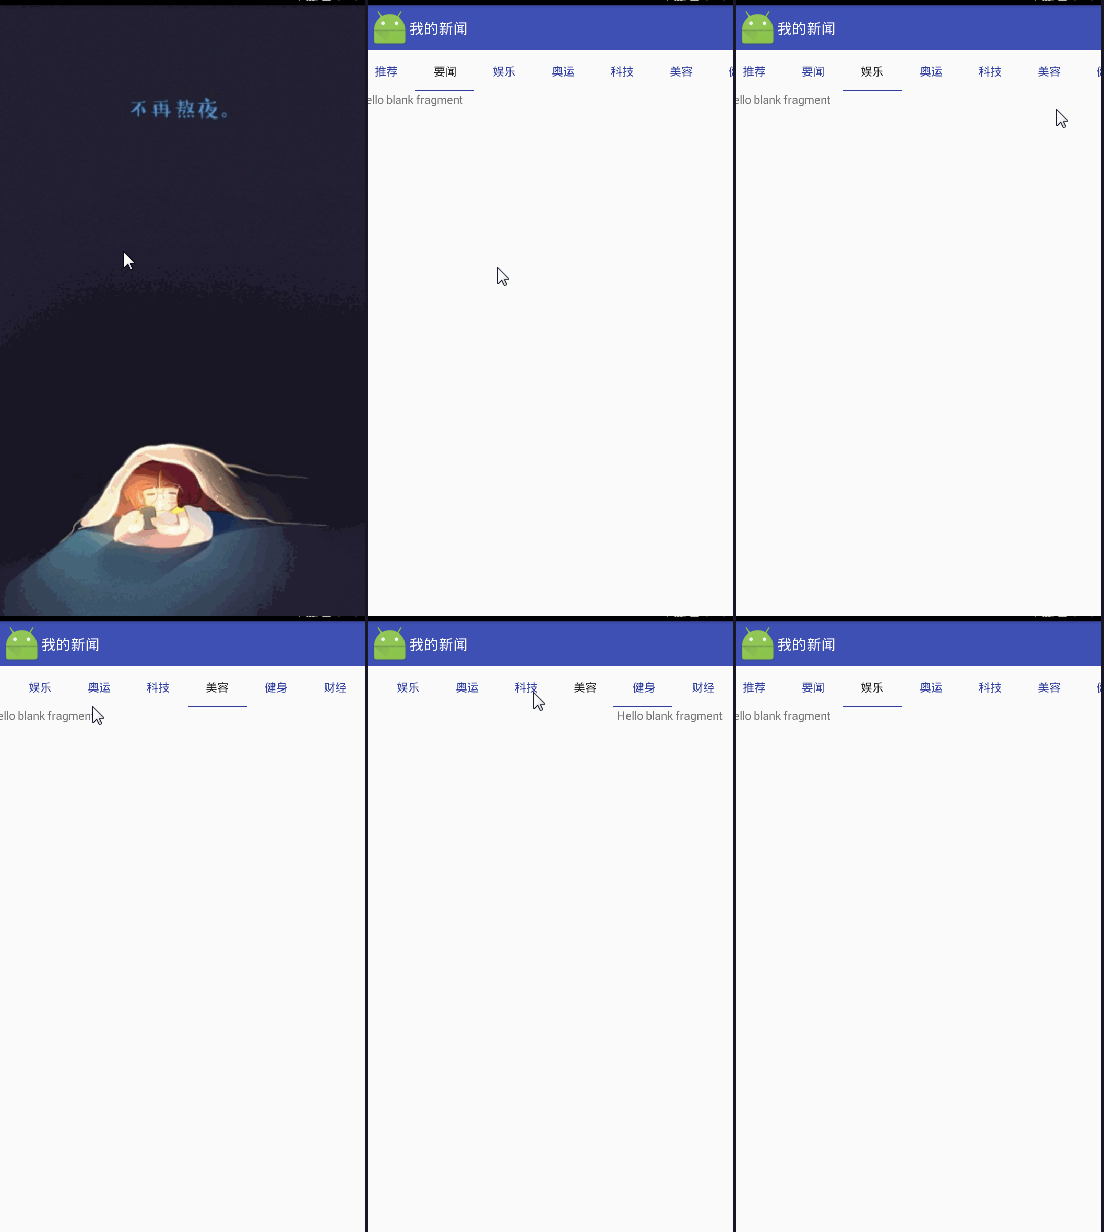
看一下实现的效果
闪屏页:
public class Main2Activity extends AppCompatActivity {
    //闪屏页,两秒之后条状到主页面

    @Override
    protected void onCreate(Bundle savedInstanceState) {
        super.onCreate(savedInstanceState);
        setContentView(R.layout.activity_main2);
        new Handler().postDelayed(new Runnable() {
            @Override
            public void run() {
                Intent intent = new Intent(Main2Activity.this, MainActivity.class);
                startActivity(intent);
            }
        }, 1000 * 3);
    }
}
其中的xml文件:
<?xml version="1.0" encoding="utf-8"?>
<RelativeLayout xmlns:android="http://schemas.android.com/apk/res/android"
    xmlns:tools="http://schemas.android.com/tools"
    android:layout_width="match_parent"
    android:layout_height="match_parent"
    tools:context="com.example.administrator.test02.Main2Activity">

    <ImageView
        android:layout_width="match_parent"
        android:layout_height="match_parent"
        android:scaleType="fitXY"
        android:src="@mipmap/image" />
</RelativeLayout>
因为刚刚的闪屏页把最上面的一部分标题改成了NoActionBar,这里再次用ToolBar实现主页面的最上面一栏。
这里用了自定义的xmlns如下:
xmlns:app="http://schemas.android.com/apk/res-auto"xml文件:
<?xml version="1.0" encoding="utf-8"?>
<LinearLayout xmlns:android="http://schemas.android.com/apk/res/android"
    xmlns:app="http://schemas.android.com/apk/res-auto"
    xmlns:tools="http://schemas.android.com/tools"
    android:layout_width="match_parent"
    android:layout_height="match_parent"
    android:orientation="vertical"
    tools:context="com.example.administrator.test02.MainActivity">

    <android.support.v7.widget.Toolbar
        android:layout_width="match_parent"
        android:layout_height="55dp"
        android:background="@color/colorPrimary"
        android:title="@string/app_name"
        app:logo="@mipmap/ic_launcher">

        <TextView
            android:layout_width="match_parent"
            android:layout_height="wrap_content"
            android:text="@string/app_name"
            android:textColor="#ffffff"
            android:textSize="18sp" />
    </android.support.v7.widget.Toolbar>

    <android.support.design.widget.TabLayout
        android:id="@+id/tablayout"
        android:layout_width="match_parent"
        android:layout_height="50dp"
        app:tabIndicatorColor="@color/colorPrimaryDark"
        app:tabMode="scrollable"
        app:tabTextColor="@color/colorPrimaryDark"
      >

    </android.support.design.widget.TabLayout>

    <android.support.v4.view.ViewPager
        android:id="@+id/myViewPager"
        android:layout_width="match_parent"
        android:layout_height="wrap_content"></android.support.v4.view.ViewPager>

</LinearLayout>
MainActivity.java
public class MainActivity extends AppCompatActivity {
    private ViewPager mViewPager;
    private TabLayout mTablayout;
    private String[] mtitle;
    private MyAdapter myAdapter;
    private List<Fragment> fragments;

    @Override
    protected void onCreate(Bundle savedInstanceState) {
        super.onCreate(savedInstanceState);
        setContentView(R.layout.activity_main);
        initView();
        initData();

    }

    private void initData() {
        //获得标题
        mtitle = getResources().getStringArray(R.array.title);
        //创建容器来装Fragment
        fragments = new ArrayList<>();
        for (int i = 0; i < mtitle.length; i++) {
            Firstfragment first = new Firstfragment();
            fragments.add(first);
        }
        myAdapter = new MyAdapter(getSupportFragmentManager(), MainActivity.this, fragments, mtitle);
        mViewPager.setAdapter(myAdapter);
        mTablayout.setupWithViewPager(mViewPager);
    }

    private void initView() {
        mTablayout = (TabLayout) findViewById(R.id.tablayout);
        mViewPager = (ViewPager) findViewById(R.id.myViewPager);

    }
}
其中标题是放在数组中的:
如下:
   <array name="title">

        <item>推荐</item>
        <item>要闻</item>
        <item>娱乐</item>
        <item>奥运</item>
        <item>科技</item>
        <item>美容</item>
        <item>健身</item>
        <item>财经</item>
    </array>
当然还需要适配器了
/**
 * Created by Administrator on 2016/9/2.
 */
public class MyAdapter extends FragmentPagerAdapter {
    private Context context;
    private List<Fragment> fragments;
    private String[] titles;

    public MyAdapter(FragmentManager fm, Context context, List<Fragment> fragments, String[] titles) {
        super(fm);
        this.context = context;
        this.fragments = fragments;
        this.titles = titles;
    }


    @Override
    public CharSequence getPageTitle(int position) {
        return titles[position];
    }

    @Override
    public Fragment getItem(int position) {
        return fragments.get(position);
    }

    @Override
    public int getCount() {
        return fragments.size();
    }
}
其中用一个Fragment来放这些内容,待到后面的实践中会把其中的界面实现,下面是Fragment的简单内容:
<FrameLayout xmlns:android="http://schemas.android.com/apk/res/android"
    xmlns:tools="http://schemas.android.com/tools"
    android:layout_width="match_parent"
    android:layout_height="match_parent"
    tools:context="com.example.administrator.test02.Firstfragment">

    <TextView
        android:layout_width="match_parent"
        android:layout_height="match_parent"
        android:text="@string/hello_blank_fragment" />

</FrameLayout>
Fragment中的代码:
package com.example.administrator.test02;


import android.os.Bundle;
import android.support.v4.app.Fragment;
import android.view.LayoutInflater;
import android.view.View;
import android.view.ViewGroup;

public class Firstfragment extends Fragment {
    @Override
    public View onCreateView(LayoutInflater inflater, ViewGroup container, Bundle savedInstanceState) {
        return inflater.inflate(R.layout.fragment_firstfragment2, container, false);
    }
}


 本文介绍了一个简单的Android应用程序启动流程与主界面设计。通过使用Handler和postDelayed方法实现闪屏效果,自动跳转至主界面。主界面采用Toolbar和TabLayout组件,结合ViewPager展示多个标签页内容。


 818
818

 被折叠的 条评论
为什么被折叠?


