


前言
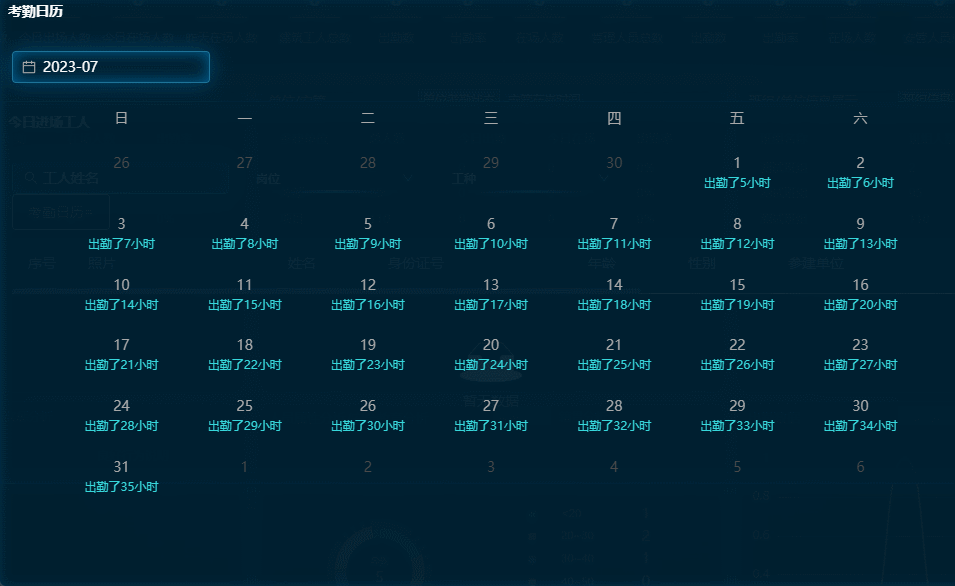
在后台管理系统中,封装vue的日历组件是很常见的一个功能,有时候antdvue里面的组件跟我们业务需求差异比较大时,去改antdui的官方组件比较麻烦,这个时候,我们就得自己去封装这样一个日历组件,效果如下图所示:
两种实现方式之vue2.x的实现
<template>
  <div>
    <a-month-picker
      placeholder="选择年月"
      allowClear
      @change="changeMonth"
      :defaultValue="defaultValue"
    />
    <div class="date_box">
      <!-- 星期 -->
      <div class="week">
        <span class="w-item" v-for="(item, index) in week" :key="index">{{
          item
        }}</span>
      </div>
      <!-- 日期 -->
      <div class="day">
        <div class="day_time" v-for="(item, index) in calendar" :key="index">
          <div v-for="(subItem, idx) in item" :key="idx" class="num">
            <p class="c-date" :class="{ 'is-current-month': !subItem.isShow }">
              {{ subItem.date }}
            </p>
            <p class="c-text" v-if="subItem.isShow">{{ subItem.content }}</p>
          </div>
        </div>
      </div>
    </div>
  </div>
</template>
js代码逻辑
<script>
import { Component, Vue } from 'vue-property-decorator';
import dayjs from 'dayjs';
import { chunk } from 'lodash';

@Component({})
export default class WorkTimeCalendar extends Vue {
  created() {
    this.init();
  }
  calendar = [];
  week = ['日', '一', '二', '三', '四', '五', '六'];
  init() {
    //处理日期
    this.calendar = chunk(this.getMonth(this.defaultValue), 7);
  }
  getMonth(e) {
    const startDay = dayjs(e).startOf('month');
    const endDay = dayjs(e).endOf('month');
    let currentDay = startDay;
    let list = [];
    while (currentDay.isBefore(endDay)) {
      list.push({ day: currentDay, isShow: true });
      currentDay = currentDay.add(1, 'day');
    }
    // console.log(list,'list')
    let week = list[0].day.day();
    if (week === 0) {
      week = 7;
    }

    for (let i = 1; i < week; i++) {
      // ishow:区分是否是本月日期
      list.unshift({ day: startDay.add(-i, 'day'), isShow: false });
    }
    //下个月补充   42:日历中的六周 * 一周七天
    const nextWeek = 42 - (dayjs(e).daysInMonth() + week - 1);
    for (let i = 1; i <= nextWeek; i++) {
      // ishow:区分是否是本月日期
      list.push({ day: endDay.add(i, 'day'), isMonth: false });
    }
    list = list.map((item, index) => {
      const str = item.day.$d.toLocaleDateString().replaceAll('/', '-');
      item.time = dayjs(str).format('YYYY-MM-DD');
      item.date = dayjs(str).date();
      item.content = `出勤了${index}小时`;
      return item;
    });
    // console.log("本月天数",list)
    return list;
  }
  get defaultValue() {
    return this.dayjs().format('YYYY-MM-DD');
  }
  curentValue = '';
  changeMonth(value) {
    // window.console.log('month', this.dayjs(value).month());
    // window.console.log('year', this.dayjs(value).year());
    const year = this.dayjs(value).year();
    const month = this.dayjs(value).month();
    this.calendar = chunk(this.getMonth(`${year}-${month + 1}`), 7);
  }
}
</script>
样式美化
<style lang="less" scoped>
.date_box {
  padding: 0.32rem 0;
  .week {
    display: flex;
    align-items: center;
    text-align: center;
    width: 90%;
    margin: 0 auto;
    span {
      flex: 1;
      // border: 1px solid #ccc;
      // border-bottom: none;
      height: 0.6rem;
    }
  }
  .day {
    width: 90%;
    margin: 0 auto 24px;
    // background: green;
    .day_time {
      display: flex;
      align-items: center;
      justify-content: space-around;
      text-align: center;
      box-sizing: border-box;
      .num {
        // border: 1px solid #ccc;
        // width: 0.98rem;
        flex: 1;
        height: 0.8rem;
        .is-current-month {
          color: #4a4a4a;
        }
        .c-date,
        .c-text {
          padding: 0;
          margin: 0;
        }
        .c-text {
          font-size: 0.14rem;
          font-family: Microsoft YaHei UI-Regular;
          font-weight: 400;
          color: #37d7db;
        }
      }
    }
  }
}
</style>
这样就实现了我们的日历组件,里面可以根据自己的需求定制props,日历里面的content,非常方便了
两种实现方式之vue3.x的实现
<template>
  <div>
    <!-- {{ data.calendar }} -->
     <div class="date_box">
      <!-- 星期 -->
      <div class="week">
          <span class="w-item" v-for="(item, index) in week" :key="index">{{ item }}</span>
      </div>
      <!-- 日期 -->
      <div class="day">
         <div class="day_time" v-for="(item, index) in data.calendar"
            :key="index">
            <div v-for="(subItem, idx) in item" :key="idx" class="num">
                <p :class="{'is-current-month':!subItem.isShow}">{{subItem.date}}</p>
                <p v-if="subItem.isShow">{{ subItem.content}}</p>
            </div>
      </div>
     </div>
     </div>
  </div>
</template>
js逻辑
<script setup>
import { onMounted,reactive } from 'vue';
import dayjs from 'dayjs'
import {chunk} from 'lodash'
onMounted(() => {
  init()
})
const data =reactive({
  calendar:[]
})
function init(){
  //处理日期
  data.calendar = chunk(getMonth('2023-6'),7)
}
function getMonth(e) {
  const startDay = dayjs(e).startOf('month');
  const endDay = dayjs(e).endOf('month');
  let currentDay = startDay;
  let list = [];
  while(currentDay.isBefore(endDay)){
    list.push({day:currentDay,isShow:true})
    currentDay = currentDay.add(1,'day')
  }
  // console.log(list,'list')

  let week = list[0].day.day();
    if (week == 0) {
      week = 7;
    }

    for (let i = 1; i < week; i++) {
       // ishow:区分是否是本月日期
      list.unshift({ day: startDay.add(-i, 'day'),isShow:false });
    }
    //下个月补充   42:日历中的六周 * 一周七天
    let nextWeek = 42 - (dayjs(e).daysInMonth() + week - 1);
    for (let i = 1; i <= nextWeek; i++) {
       // ishow:区分是否是本月日期
      list.push({ day: endDay.add(i, 'day'), isMonth: false })
    }
    list = list.map((item,index) => {
      let str = item.day.$d.toLocaleDateString().replaceAll('/', '-');
      item.time = dayjs(str).format("YYYY-MM-DD")
      item.date = dayjs(str).date()
      item.content=`出勤了${index}天`
        return item
    });
    // console.log("本月天数",list)
    return list
}
const week = ["日", "一", "二", "三", "四", "五", "六"];


</script>
css美化
<style lang="less" scoped>
.date_box {
      padding: 32px 0;
      .week {
        display: flex;
        align-items: center;
        text-align: center;
        width: 90%;
        margin:0 auto 6px;
        border: 1px solid #ccc;
        span {
          width: 98px;
          border: 1px solid #ccc;

        }

      }
      .day{
        width: 90%;
        margin:0 auto 24px;
        // background: green;
          .day_time{
            display: flex;
            align-items: center;
            justify-content: space-around;
            text-align: center;

           box-sizing: border-box;
            .num{
              border: 1px solid #ccc;
              width: 98px;
              height: 49px;
              .is-current-month{
                color: #4a4a4a;
              }
            }
          }

        }
}
</style>
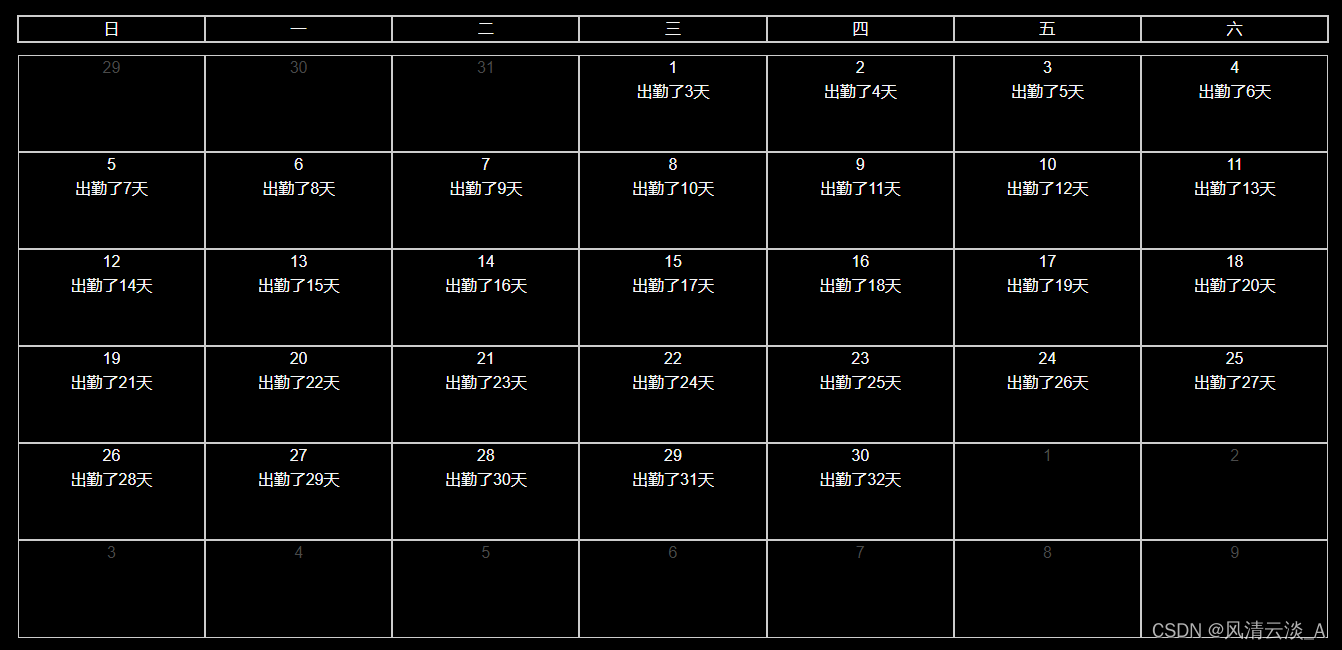
也可以像vue2那样实现切换年月,展示不同的月份的日期,自己动手试试拓展这个功能吧~~~
关注我的个人公众号,获取更多前后端开发经验知识


 4122
4122


 被折叠的 条评论
为什么被折叠?
被折叠的 条评论
为什么被折叠?
 到【灌水乐园】发言


