


我们围绕实例讲解、性能高阶深入使用、locust的扩展使用(接口自动化)、在本地定时自动运行。

一:实例讲解
locust介绍:
据官网介绍,Locust是作为基于Python语言的性能测试框架。 其优点在于他的并发量可以实现单机10倍于LoadRunner和Jmeter工具。他的工作原理为协程并发,也就是gevent库。 Locust的缺点也显而易见,他没有友好的性能监控页面,没有任何关联,参数化,检查点之类的定义。他仅仅就是一个轻量级的框架,但是正因为如此,我们可以通过python成千上万的库支持,定制自己任何想要的东西!

可直接在终端命令行窗口中通过pip安装,亦可通过pycharm中file--settings--project:xx--python lnterpreter中添加locust。
1、安装命令:pip3 install locust 或 pip install locust
安装locust, 终端中输入 locust --help 显示帮助信息表示安装成功
2、创建python文件:locustfile.py
'''
encoding: utf-8
作者:zveren
说明:此文件用于locust的基本脚本,终端命令窗口执行该文件
'''

class testapi():#被测方法

    def startSetp(self):
        self.client.post('/login', data={"token": 'xxx'})

    def stopSetp(self):
        self.client.post('/unlogin', data={"token": 'xxx'})

    def weightA(self):
        self.client.post('/proxpert', data={"token": 'xxx'})

    def weightB(self):
        req = self.client.post('/progpert', data=json.dumps(body))
        print('/progpert' + ' - ' + str(req.json()))

class UserBehavior(TaskSet): #方法调度
    #@task装饰器和tasks属性进行权重分配,下列用的是tasks属性方式
    tasks = {testapi.weightA: 1, testapi.weightB: 2}

    def on_start(self):
        testapi.startSetp(self)

    def on_stop(self):
        testapi.stopSetp(self)

class WebsiteUser(FastHttpUser): #执行层
    # task_set = UserBehavior
    tasks = [UserBehavior]
    wait_time = between(1.0, 3.0)
3、在终端命令行窗口执行:locust -f c:/user/.../locustfile.py
正常启动显示:
Starting web interface at http://0.0.0.0:8089
Starting Locust x.x.x
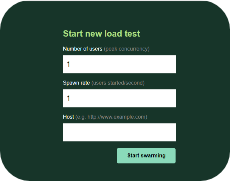
4、在浏览器中通过http://0.0.0.0:8089进入可视化页面:
到此,locust已可正常使用。
二:深入使用
1、FastHttpUser发起并发请求
△、调用taskset的方法
△、设置请求需等待时间: wait_time = between(1.0, 3.0)
△、调用FastHttpUsers或HttpUsers
引用自官网:
使用FastHttpUsers的测试将能够在每个核心每秒执行近5000个请求,而HttpUsers(在2018年MacBook Pro i7 2.6GHz上测试)的约850个请求
2、TaskSet 请求调度处理(代码上面以贴出)
△、on_start 与 on_stop
△、权重分配:装饰器或者tasks属性
装饰器:@task 1
tasks属性:tasks = {testapi.weightA: 1, testapi.weightB: 2}
* on_start在开始执行时执行一次(用户数多少就执行多少,不会持续执行) * on_stop在结束执行时执行一次(用户数多少就执行多少,不会持续执行) * 权重分配 可针对不同的接口来设置,达到不同接口并发数的差异(场景:小程序与APP用户数差异可借助此权重来分配APP的接口并发大与小程序的接口)
3、client.get或client.post 发起请求
△ client.get(“/propup/********”)
△client.post('/progty/*****, body=body, header = header)
4、可视化页面说明:
Start new load test说明:
Number of users:用户数
Spawn rate:每秒请求数
Host:接口域名(会和代码中路径拼接成完整接口地址)
页面菜单及包含内容说明:
Statistics:当前运行的接口及集合数据,包括请求数、(断言)失败数、每秒请求数
charts:图形实时显示(每秒请求数、请求用时、每秒的用户数)
Failures:过程级(请求失败日志、断言失败数据)
Exceptions:脚本级错误日志
Tasks:脚本文件中 脚本类及权重的执行占比
Download Data:
Download request statistics CSV
Download failures CSV
Download exceptions CSV
Download Report
5、高级进阶:
locust可通过有界面和无界面运行、可实现分布式运行、可设置集合点运行。
△ 、无界面运行:
locust -f ***.py --host=*** --headless -u 10 -r 1 -t 1m -s 120 --csv=example
说明:无web界面,定时运行,数据存储在csv中;--host:指定接口运行的域名;--headless 表示不使用web界面运行 测试;u:用户数;r:线程数;t:运行时间;--csv=example:结果存放当前位置example-*****.csv;
locust -f ***.py --host=*** --autostart -u 1 -r 1 -t 1m -s 120 --csv=example --autoquit 10 --html locust_report.html
说明:有web界面,定时运行,数据存储在csv及html中;--autoquit:自动退出
成功执行完提示:
--run-time limit reached, stopping test
--autoquit time reached, shutting down
运行结束后终端窗口会显示运行的结构,并保存csv文件至同一目录中


△ 、 locust分布式执行:
locust -f ***.py --master 说明:主机
locust -f ***.py --worker 说明:执行机
locust -f ***.py --worker --master-host=*.*.*.* 说明:在不同的电脑上 需要指定主机IP
更多参数:
-H HOST,-host=HOST 指定被测试的主机
–web-host=WEB_HOST 指定运行 Locust Web 页面的主机
-P PORT, –port=PORT, –web-port=PORT 指定 –web-host 的端口
-f locustfile, –locustfile=locustfile 指定运行 Locust 性能测试文件,默认为: locustfile.py
–csv=filename, –csv-base-name=filename 以CSV格式存储当前请求测试数据
–master Locust 分布式模式使用,当前节点为 master 节点
–worker Locust 分布式模式使用,当前节点为 slave 节点 –master-host=MASTER_HOST 设置 master 节点的地址,只在与 –slave一起使用
–expect-slaves=EXPECT_SLAVES 满足节点数才能开始,与无web页面一起使用
--headless 无界面运行配合 -u -r使用(以前是:–no-web命令)
...
△ 、locust设置集合点:
通过locust得基于gevent并发得机制,引入gevent的锁的概念,代入到locust的钩子函数中。
semaphore是一个内置的计数器:
每当调用acquire()时,内置计数器-1
每当调用release()时,内置计数器+1
计数器不能小于0,当计数器为0时,acquire()将阻塞线程直到其他线程调用release()
实现代码:
在调度方法中写入 all_locusts_spawned.wait() //创建钩子方法
all_locusts_spawned = Semaphore(0)
all_locusts_spawned.acquire()
def on_hatch_complete(**kwargs):
    all_locusts_spawned.release()
events.hatch_complete += on_hatch_complete //挂载到locust钩子函数(所有的Locust实例产生完成时触发)
高阶附加福利
△ 、断言:
class publicmethod(): #断言返回结果
    def Assert(self, response, path, code, asse): #通用断言,特殊化断言可在testapi方法中单独写
        with response:
            res = response.json()
            code = jsonpath.jsonpath(res, code)[0]
            if str(code) == asse:  # 保证正常返回的情况下统计正确数
                response.success()
            else:
                response.failure(response.json())
                content = path + ' - ' + str(response.json())
                print(content)
△ 、执行结果发送至企业微信(或钉钉、或飞书),可使用文本类型、图文类型、卡片类型
class sendmessage(): #结果发送
    def sendenterprisewechat(self, content = "失败"):
        url = 'https://qyapi.weixin.qq.com/cgi-bin/webhook/send?key=*********'
        # 文本类型*************************************************
        body = '{"msgtype": "text",' \
               '"text": {"content": "失败记录:' + content + ',请及时查看。","mentioned_mobile_list":["18311111111"]}}'
        urllib3.disable_warnings()  # 禁用urllib3
        Response = requests.post(url, data=body.encode(), verify=False)
        print(Response.text)
        return Response.text
一:locust拓展使用(不会代码的同学福利),既可以值维护一个文档就能完成locust性能测试,又可以只维护一个文档就能完成接口自动化测试:
超轻量级接口自动化框架,只需维护文档。(python解析xlsx文件)
文档解析代码:
data1 = xlrd.open_workbook(r'D:\Users\zveren\...\locust/Interfacedocument.xlsx')
table = data1.sheets()[0]
for rown in range(table.nrows - 1):
     rown = rown + 1
    weight= table.cell_value(rown, 0)
    path = table.cell_value(rown, 1)
    body = table.cell_value(rown, 2)
    code = table.cell_value(rown, 3)
    asse = table.cell_value(rown, 4)
    if weight== 'start':
        # path = '/progrdNum'
        body = eval(body)
        body['token'] = token
        response = self.client.post(path, data=json.dumps(body), catch_response=True)
    else:
        continue
文档字段示例:
文档说明:权重用户调度执行、path接口路径 需要带/、body为json格式(代码中单独插入了身份校验字段,在执行locustfile.py文件时录入身份校验值)、断言取值返回json中的字段(取值方式:**.**.**,以点连接多级)
关联接口的参数传递相对此差异化很大,不建议使用此文档

一:本地定时自动运行
1、引入批处理脚本启动locustfile.py文件,批处理脚本文件为:locustfile.bat
@echo off
echo ------本文件为启动locust------
echo ------有疑问可联系zveren------
locust -f d:/Users\zveren\...\locust\locustfile.py
2、定时执行批处理脚本
windows schtasks定时任务
* create 创建任务、
query查看任务、
end结束任务、
delete删除任务 * tn任务名称、tr任务执行的文件、
sc任务执行的方式/st任务执行的时间...
eq:
schtasks /create /tn taskname /tr D:\locustfile.bat /sc DAILY /st 08:00:00 创建一个每天8点执行的一个定时任务
schtasks /query /tn taskname 查看任务
· 更多常用命令:
schtasks /end /tn taskname 结束任务
schtasks /delete /tn taskname /f 删除任务
完结!
zveren 2022.3.10 成都


 301
301


 被折叠的 条评论
为什么被折叠?
被折叠的 条评论
为什么被折叠?
 到【灌水乐园】发言


