


Spring securty<四> 认证的源码解析
本地项目的基础环境
| 环境 | 版本 |
|---|---|
| jdk | 1.8.0_201 |
| maven | 3.6.0 |
| Spring-boot | 2.3.3.RELEASE |
1、简介
spring security是一个提供身份验证、授权和防止常见攻击的框架,它对命令式和反应式应用程序都有一流的支持,是保护基于Spring的应用程序的事实上的标准。
详细可以参看《spring security官网》
2、认证(登录)
通过之前的两篇文章的介绍,应该也比较清楚了基本的概念了安全框架里的核心的概念了,从这篇开始,主要开始细化讲代码层面上的开发了;在权限框架中,认证这个部分,也算是最难的了,之后的几篇,也是主要讲述认证相关的。
3、认证的源码解析
这篇文章使用的案例,为《Spring securty<三> 认证案例代码》
整个认证的流程,都是基于拦截器链的,这句话也是反复说明的,请求的过程,大概是如下过程:

可以看到,http请求,其实在图中第二步,就已经被拦截器处理了,没有进入SpringMvc的前置派发器中;
spring Security安全框架,最主要的认证部分,就是org.springframework.security.web.authentication.UsernamePasswordAuthenticationFilter这个拦截器了,一般拦截器执行方法doFilter方法;这个拦截器,是继承AbstractAuthenticationProcessingFilter`的doFilter方法:
org.springframework.security.web.authentication.AbstractAuthenticationProcessingFilter.doFilter()
	public void doFilter(ServletRequest req, ServletResponse res, FilterChain chain)
			throws IOException, ServletException {
		HttpServletRequest request = (HttpServletRequest) req;
		HttpServletResponse response = (HttpServletResponse) res;
        // 1、是否是指定的url的请求
		if (!requiresAuthentication(request, response)) {
			chain.doFilter(request, response);
			return;
		}
		if (logger.isDebugEnabled()) {
			logger.debug("Request is to process authentication");
		}
		Authentication authResult;
		try {
            //2、验证帐号密码信息
			authResult = attemptAuthentication(request, response);
			if (authResult == null) {
				// return immediately as subclass has indicated that it hasn't completed
				// authentication
				return;
			}
            //3、验证成功后,存储会话信息
			sessionStrategy.onAuthentication(authResult, request, response);
		}
		catch (InternalAuthenticationServiceException failed) {
			logger.error(
					"An internal error occurred while trying to authenticate the user.",
					failed);
            //4、失败之后,走失败的异常处理
			unsuccessfulAuthentication(request, response, failed);
			return;
		}
		catch (AuthenticationException failed) {
			// Authentication failed  4.1、失败之后,走失败的异常处理
			unsuccessfulAuthentication(request, response, failed);
			return;
		}
		// Authentication success  5、是否继续链路
		if (continueChainBeforeSuccessfulAuthentication) {
			chain.doFilter(request, response);
		}
        // 6、登录成功后,成功处理器
		successfulAuthentication(request, response, chain, authResult);
	}
上述的代码中,我分别按照整个认证的步骤,写了注释,大概是6个步骤;下面,我们每个步骤,进行拆解,详解:
1、是否是指定的url的请求
 		// 1、是否是指定的url的请求
		if (!requiresAuthentication(request, response)) {
			chain.doFilter(request, response);
			return;
		}
注释也在下面看到了,拿到当前 request 对象的中的请求路径,跟构造方法(初始化)里的url做对比,如果是,就继续执行第二步;
	protected boolean requiresAuthentication(HttpServletRequest request,
			HttpServletResponse response) {
		return requiresAuthenticationRequestMatcher.matches(request);
	}

	/**
	  构造方法
	 * @param defaultFilterProcessesUrl the default value for <tt>filterProcessesUrl</tt>.
	 */
	protected AbstractAuthenticationProcessingFilter(String defaultFilterProcessesUrl) {
		setFilterProcessesUrl(defaultFilterProcessesUrl);
	}

	/**
		构造方法
	 * Creates a new instance
	 *
	 * @param requiresAuthenticationRequestMatcher the {@link RequestMatcher} used to
	 * determine if authentication is required. Cannot be null.
	 */
	protected AbstractAuthenticationProcessingFilter(
			RequestMatcher requiresAuthenticationRequestMatcher) {
		Assert.notNull(requiresAuthenticationRequestMatcher,
				"requiresAuthenticationRequestMatcher cannot be null");
		this.requiresAuthenticationRequestMatcher = requiresAuthenticationRequestMatcher;
	}
不知道,大家注意了没有,我在上述的案例代码中,表单提交的url设置的/auth/login,我请求的地址,也是同一个;

2、验证帐号密码信息
authResult = attemptAuthentication(request, response);
方法进去之后,可以看到,调用org.springframework.security.web.authentication.UsernamePasswordAuthenticationFilter实现的方法
public Authentication attemptAuthentication(HttpServletRequest request,
			HttpServletResponse response) throws AuthenticationException {
		if (postOnly && !request.getMethod().equals("POST")) {
			throw new AuthenticationServiceException(
					"Authentication method not supported: " + request.getMethod());
		}
    	//1、从请求参数中,获取username、password
		String username = obtainUsername(request);
		String password = obtainPassword(request);
		if (username == null) {
			username = "";
		}
		if (password == null) {
			password = "";
		}
		username = username.trim();
    	//2、 帐号密码构建一个 UsernamePasswordAuthenticationToken 对象
		UsernamePasswordAuthenticationToken authRequest = new UsernamePasswordAuthenticationToken(
				username, password);
		// Allow subclasses to set the "details" property
		setDetails(request, authRequest); //3、 设置一些属性
    	//4、获取权限管理器,认证权限
		return this.getAuthenticationManager().authenticate(authRequest);
	}
步骤1和步骤3,代码比较简单,也就不在解释了;重点说下步骤2和步骤4,认证的过程
2.1、帐号密码构建一个 UsernamePasswordAuthenticationToken 对象
UsernamePasswordAuthenticationToken authRequest = new UsernamePasswordAuthenticationToken( username, password);
	/**
	 * This constructor can be safely used by any code that wishes to create a
	 * <code>UsernamePasswordAuthenticationToken</code>, as the {@link #isAuthenticated()}
	 * will return <code>false</code>.
	 *
	 */
	public UsernamePasswordAuthenticationToken(Object principal, Object credentials) {
		super(null);
		this.principal = principal;
		this.credentials = credentials;
		setAuthenticated(false);
	}

	/**
	 * This constructor should only be used by <code>AuthenticationManager</code> or
	 * <code>AuthenticationProvider</code> implementations that are satisfied with
	 * producing a trusted (i.e. {@link #isAuthenticated()} = <code>true</code>)
	 * authentication token.
	 *
	 * @param principal
	 * @param credentials
	 * @param authorities
	 */
	public UsernamePasswordAuthenticationToken(Object principal, Object credentials,
			Collection<? extends GrantedAuthority> authorities) {
		super(authorities);
		this.principal = principal;
		this.credentials = credentials;
		super.setAuthenticated(true); // must use super, as we override
	}
从代码中,可以看到,创建对象的时候,使用了第一个构造方法,主要注意setAuthenticated(false);这个验证信息,设置成了false,表示没有认证,只是构建了对象;
2.2、获取权限管理器,认证权限(重点,要掌握、通透理解)
这节是重点,一定要通透,关系到后面,能不能自定义开发,整合其他的各种登录
this.getAuthenticationManager().authenticate(authRequest)
找到认证管理器AuthenticationManager的实现类org.springframework.security.authentication.ProviderManager,查看认证方法authenticate
public Authentication authenticate(Authentication authentication)
			throws AuthenticationException {
		Class<? extends Authentication> toTest = authentication.getClass();
		AuthenticationException lastException = null;
		AuthenticationException parentException = null;
		Authentication result = null;
		Authentication parentResult = null;
		boolean debug = logger.isDebugEnabled();
    	// 1、主要业务,获取所有的认证提供者,遍历去认证权限
		for (AuthenticationProvider provider : getProviders()) {
            // 2、判断是否是指定的Authentication类型,不是就跳过
			if (!provider.supports(toTest)) {
				continue;
			}
			if (debug) {
				logger.debug("Authentication attempt using "
						+ provider.getClass().getName());
			}
			try {
                // 3、认证操作
				result = provider.authenticate(authentication);

				if (result != null) {
					copyDetails(authentication, result);
					break;
				}
			}
			catch (AccountStatusException | InternalAuthenticationServiceException e) {
				prepareException(e, authentication);
				// SEC-546: Avoid polling additional providers if auth failure is due to
				// invalid account status
				throw e;
			} catch (AuthenticationException e) {
				lastException = e;
			}
		}
		if (result == null && parent != null) {
			// Allow the parent to try.
			try {
                //4、上述认证失败后,用父级的认证器做认证
				result = parentResult = parent.authenticate(authentication);
			}
			catch (ProviderNotFoundException e) {
				// ignore as we will throw below if no other exception occurred prior to
				// calling parent and the parent
				// may throw ProviderNotFound even though a provider in the child already
				// handled the request
			}
			catch (AuthenticationException e) {
				lastException = parentException = e;
			}
		}
    	//5、认证成功后返回
		if (result != null) {
			if (eraseCredentialsAfterAuthentication
					&& (result instanceof CredentialsContainer)) {
				// Authentication is complete. Remove credentials and other secret data
				// from authentication
				((CredentialsContainer) result).eraseCredentials();
			}
			// If the parent AuthenticationManager was attempted and successful then it will publish an AuthenticationSuccessEvent
			// This check prevents a duplicate AuthenticationSuccessEvent if the parent AuthenticationManager already published it
			if (parentResult == null) {
				eventPublisher.publishAuthenticationSuccess(result);
			}
			return result;
		}
    	//6、认证失败后,返回异常信息
		// Parent was null, or didn't authenticate (or throw an exception).
		if (lastException == null) {
			lastException = new ProviderNotFoundException(messages.getMessage(
					"ProviderManager.providerNotFound",
					new Object[] { toTest.getName() },
					"No AuthenticationProvider found for {0}"));
		}
		// If the parent AuthenticationManager was attempted and failed then it will publish an AbstractAuthenticationFailureEvent
		// This check prevents a duplicate AbstractAuthenticationFailureEvent if the parent AuthenticationManager already published it
		if (parentException == null) {
			prepareException(lastException, authentication);
		}
		throw lastException;
	}
这里主要说下1、2、3个步骤,认证成功后,认证就通过了,认证失败了,后面的父级验证,基本上也会成功;
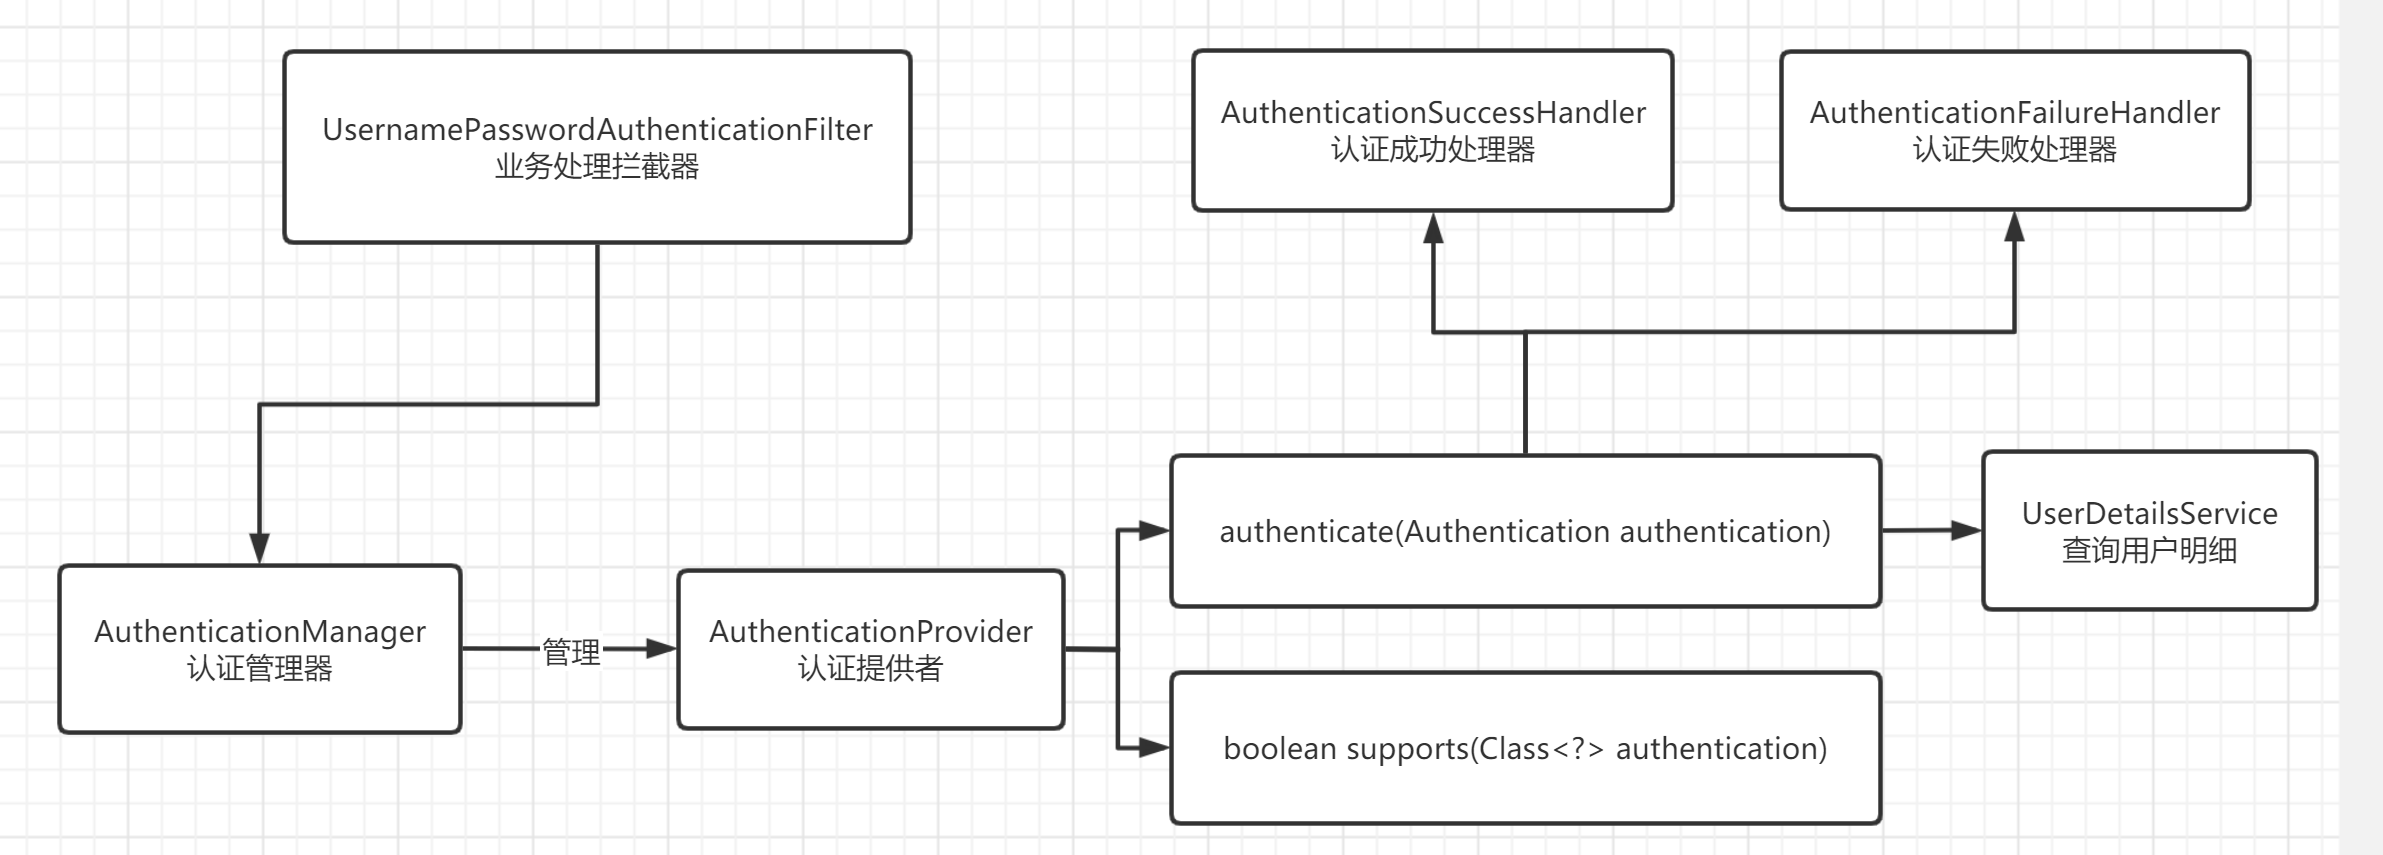
首先是认证管理器,负责管理多个认证的提供者,认证的提供者,主要认证两个地方
public interface AuthenticationProvider {
	//3、拿到需要认证的信息`Authentication authentication`后,进行认证操作;
	Authentication authenticate(Authentication authentication)
			throws AuthenticationException;
	//2、认证的类型是不是匹配的,例如:帐号密码登录、手机号+验证码登录、扫码登录等
	boolean supports(Class<?> authentication);
}
如图所示:

我们使用的是默认的认证提供者是org.springframework.security.authentication.dao.DaoAuthenticationProvider,我就主要看这个默认的提供者;两个步骤的实现 方法,其实都是在抽象类中实现org.springframework.security.authentication.dao.AbstractUserDetailsAuthenticationProvider,下面,我们就直接看这个抽象类的两个接口实现:
2.2.1、先看第二个步骤:认证的类型是不是匹配的,例如:帐号密码登录、手机号+验证码登录、扫码登录等
	public boolean supports(Class<?> authentication) {
		return (UsernamePasswordAuthenticationToken.class
				.isAssignableFrom(authentication));
	}
可以看到,判断的类型是UsernamePasswordAuthenticationToken.class,在上一个小节,2.1节中
UsernamePasswordAuthenticationToken authRequest = new UsernamePasswordAuthenticationToken( username, password);确实是同一个类型;
2.2.2、第三个步骤:拿到需要认证的信息Authentication authentication后,进行认证操作;
public Authentication authenticate(Authentication authentication)
			throws AuthenticationException {
		Assert.isInstanceOf(UsernamePasswordAuthenticationToken.class, authentication,
				() -> messages.getMessage(
						"AbstractUserDetailsAuthenticationProvider.onlySupports",
						"Only UsernamePasswordAuthenticationToken is supported"));

		// Determine username 1、拿到当前登录的用户名
		String username = (authentication.getPrincipal() == null) ? "NONE_PROVIDED"
				: authentication.getName();

		boolean cacheWasUsed = true;
    	// 2、从缓存中,拿到用户明细信息,很明显,拿不到,略过
		UserDetails user = this.userCache.getUserFromCache(username);

		if (user == null) {
			cacheWasUsed = false;

			try {
                // 3、拿到用户的信息
				user = retrieveUser(username,
						(UsernamePasswordAuthenticationToken) authentication);
			}
			catch (UsernameNotFoundException notFound) {
				logger.debug("User '" + username + "' not found");

				if (hideUserNotFoundExceptions) {
					throw new BadCredentialsException(messages.getMessage(
							"AbstractUserDetailsAuthenticationProvider.badCredentials",
							"Bad credentials"));
				}
				else {
					throw notFound;
				}
			}

			Assert.notNull(user,
					"retrieveUser returned null - a violation of the interface contract");
		}

		try {
			preAuthenticationChecks.check(user);
			additionalAuthenticationChecks(user,
					(UsernamePasswordAuthenticationToken) authentication);
		}
		catch (AuthenticationException exception) {
			if (cacheWasUsed) {
				// There was a problem, so try again after checking
				// we're using latest data (i.e. not from the cache)
				cacheWasUsed = false;
				user = retrieveUser(username,
						(UsernamePasswordAuthenticationToken) authentication);
				preAuthenticationChecks.check(user);
				additionalAuthenticationChecks(user,
						(UsernamePasswordAuthenticationToken) authentication);
			}
			else {
				throw exception;
			}
		}

		postAuthenticationChecks.check(user);

		if (!cacheWasUsed) {
			this.userCache.putUserInCache(user);
		}

		Object principalToReturn = user;

		if (forcePrincipalAsString) {
			principalToReturn = user.getUsername();
		}
		//4、中间步骤略过,最后一步,认证成功后,返回认证成功对象
		return createSuccessAuthentication(principalToReturn, authentication, user);
	}
源代码,确实是篇幅过大,过多,1、2步骤,就不说了~就挑重点讲
步骤三,调用子类的org.springframework.security.authentication.dao.DaoAuthenticationProvider的retrieveUser方法
	protected final UserDetails retrieveUser(String username,
			UsernamePasswordAuthenticationToken authentication)
			throws AuthenticationException {
		prepareTimingAttackProtection();
		try {
			UserDetails loadedUser = this.getUserDetailsService().loadUserByUsername(username);
			if (loadedUser == null) {
				throw new InternalAuthenticationServiceException(
						"UserDetailsService returned null, which is an interface contract violation");
			}
			return loadedUser;
		}
		catch (UsernameNotFoundException ex) {
			mitigateAgainstTimingAttack(authentication);
			throw ex;
		}
		catch (InternalAuthenticationServiceException ex) {
			throw ex;
		}
		catch (Exception ex) {
			throw new InternalAuthenticationServiceException(ex.getMessage(), ex);
		}
	}
只看关键的一步
UserDetails loadedUser = this.getUserDetailsService().loadUserByUsername(username);
在刚刚的验证流程中,有个接口,查询用户的明细信息
public interface UserDetailsService {

	UserDetails loadUserByUsername(String username) throws UsernameNotFoundException;
}
我们用的默认接口是org.springframework.security.provisioning.InMemoryUserDetailsManager;为什么是这个?
上述案例代码中,有这个的配置,不知道各位有没有映像
    @Override
    protected void configure(AuthenticationManagerBuilder auth) throws Exception {
        auth.inMemoryAuthentication().withUser("test").password(passwordEncoder().encode("123456"))
                .authorities("admin");
    }
这个地方,拿到用户存储的帐号、密码,跟当前登录用户的帐号密码,做认证,就可以认证成功了;整个步骤,又多了一环

步骤四:认证成功后,返回认证成功对象
	protected Authentication createSuccessAuthentication(Object principal,
			Authentication authentication, UserDetails user) {
		UsernamePasswordAuthenticationToken result = new UsernamePasswordAuthenticationToken(
				principal, authentication.getCredentials(),
				authoritiesMapper.mapAuthorities(user.getAuthorities()));
		result.setDetails(authentication.getDetails());

		return result;
	}
帐号密码,验证成功之后,又再次创建了UsernamePasswordAuthenticationToken对象,这次调用的是另外的一个构造方法(在上面2.1节中,有说明),这次是把验证信息,设置成了true
	public UsernamePasswordAuthenticationToken(Object principal, Object credentials,
			Collection<? extends GrantedAuthority> authorities) {
		super(authorities);
		this.principal = principal;
		this.credentials = credentials;
		super.setAuthenticated(true); //把验证信息,设置成了`true`
	}
至此,登录认证的源码,就已经看完了,后续还有几个步骤,虽然重要,但是也没有什么难度了;
3、验证成功后,存储会话信息
sessionStrategy.onAuthentication(authResult, request, response);
存储会话这个,就不详细解释了,现在一般都是分布式系统,会话需要进行统一处理,在这里处理,也可以,在最终登录回调的处理器中处理,也是可以的,比较简单;
4、失败之后,走失败的异常处理
unsuccessfulAuthentication(request, response, failed);
失败处理,也就不解释,最终会调用失败的处理器;在案例的代码中,也实际指定了处理器
5、是否继续链路
		// Authentication success
		if (continueChainBeforeSuccessfulAuthentication) {
			chain.doFilter(request, response);
		}
一般默认是不在继续链路下去的,也就是后续的拦截器,不在执行,直接返回(都登录成功了,还链路个啥?);
6、登录成功后,成功处理器
successfulAuthentication(request, response, chain, authResult);
登录成功后,执行的登录成功处理器,暂时不详细解释了;
4、总结-最终认证流程
最终认证流程如图:
详细的代码,可以查看《码云》


 4970
4970


 被折叠的 条评论
为什么被折叠?
被折叠的 条评论
为什么被折叠?
 到【灌水乐园】发言


