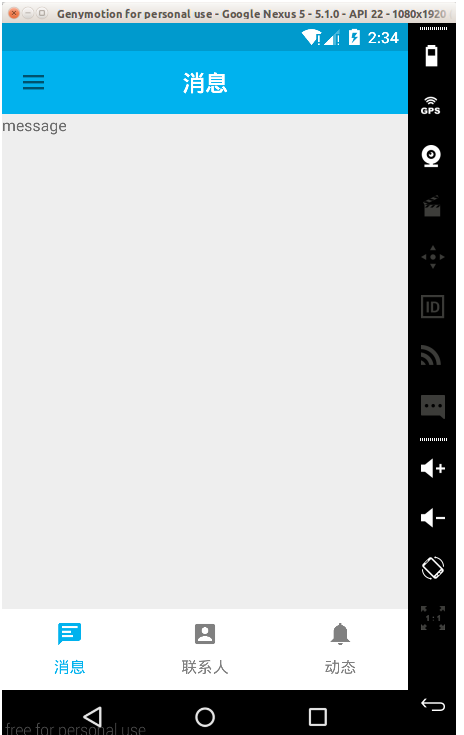
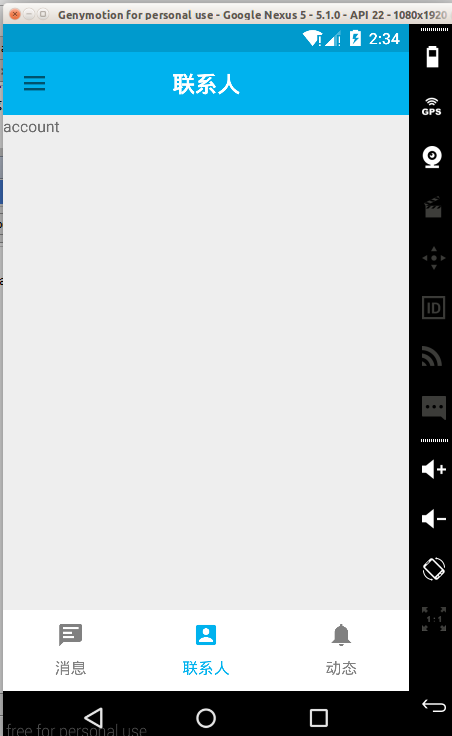
tablelayout在新的开发者文档中给出了具体的定义,可以通过tablelayot实现一个导航,一般情况下会和viewpager配合起来使用,达到通过导航切换页面的效果。
实现效果:

实现环境
- linux下Android Studio
- Android 5.1 API 21
代码部分
我的布局是一层一层嵌套的,最外面是一个DrawerLayout,然后
<?xml version="1.0" encoding="utf-8"?>
<android.support.v4.widget.DrawerLayout xmlns:android="http://schemas.android.com/apk/res/android"
    xmlns:app="http://schemas.android.com/apk/res-auto"
    xmlns:tools="http://schemas.android.com/tools"
    android:layout_width="match_parent"
    android:layout_height="match_parent"
    android:fitsSystemWindows="true"
    android:id="@+id/container"
    tools:context="com.example.steam.app_mydemon_qq.MainActivity">

    <!-- 页面内容-->
    <include layout="@layout/toolbar_layout"
        android:layout_width="match_parent"
        android:layout_height="match_parent"
        />
    <!-- 侧拉栏-->
    <android.support.design.widget.NavigationView
        android:id="@+id/navigationview"
        android:layout_gravity="start"
        android:layout_width="match_parent"
        app:headerLayout="@layout/navi_header"
        android:layout_height="match_parent"
        app:background="@mipmap/qq"
        app:menu="@menu/navi_menu"
        />
</android.support.v4.widget.DrawerLayout>
里面还有一个NavigationView用于实现抽屉菜单,使用方法见
http://blog.csdn.net/qq_28452311/article/details/50200475。
toolbar_layout.xml:
<?xml version="1.0" encoding="utf-8"?>
<LinearLayout xmlns:android="http://schemas.android.com/apk/res/android"
    xmlns:app="http://schemas.android.com/apk/res-auto"
    android:layout_width="match_parent"
    android:layout_height="match_parent"
    android:orientation="vertical">

    <android.support.v7.widget.Toolbar
        android:id="@+id/toolbar"
        android:layout_width="match_parent"
        android:layout_height="wrap_content"
        android:background="?attr/colorPrimary"
        android:minHeight="?attr/actionBarSize"
        app:title=" "
        app:titleTextColor="@color/colorwhite">

        <TextView
            android:id="@+id/toobat_centertv"
            android:layout_width="wrap_content"
            android:layout_height="wrap_content"
            android:layout_gravity="center"
            android:text="消息"
            android:textColor="@color/colorwhite"
            android:textSize="20dp"
            android:textStyle="bold" />
    </android.support.v7.widget.Toolbar>

    <include layout="@layout/content_layout" />

</LinearLayout>
这个没什么好说的,放入一个TextView显示导航选中对应的文字。
content_layout.xml:
<?xml version="1.0" encoding="utf-8"?>
<LinearLayout xmlns:android="http://schemas.android.com/apk/res/android"
    xmlns:app="http://schemas.android.com/apk/res-auto"
    android:layout_width="match_parent"
    android:layout_height="match_parent"
    android:orientation="vertical">

    <com.example.steam.app_mydemon_qq.MyViewPager
        android:id="@+id/myviewpager"
        android:layout_width="match_parent"
        android:layout_height="0dp"
        android:layout_weight="1" />

    <com.example.steam.app_mydemon_qq.BottomMentTab
        android:id="@+id/mytab"
        android:layout_width="match_parent"
        android:layout_height="wrap_content"
        android:background="@color/colorwhite"
        app:tabIndicatorColor="@color/colorwhite"
        app:tabSelectedTextColor="@color/colorPrimary"
        app:tabTextAppearance="@style/tablayoutIcon"
        app:tabTextColor="@color/colorgray">

    </com.example.steam.app_mydemon_qq.BottomMentTab>

</LinearLayout>
上面是一个主布局,里面myviewpager是一个自定义的viewpager,BottomMentTab是自定义的Tablayout,下面是自定义class文件
BottomMentTab.class:
package com.example.steam.app_mydemon_qq;

import android.content.Context;
import android.support.design.widget.TabLayout;
import android.util.AttributeSet;

/**
 * Created by steam on 15-12-7.
 */
public class BottomMentTab extends TabLayout {

    public static final int[] tabIcon_gray = new int[]{
            R.drawable.message_icon,
            R.drawable.account_icon,
            R.drawable.moment_icon};

    public static final int[] tabIcon_bule = new int[]{
            R.drawable.message_icon_blue,
            R.drawable.account_icon_blue,
            R.drawable.moment_icon_blue};

    public static final String[] tabTitle = new String[]{"消息", "联系人", "动态"};
    private static final int NUM_TAD = 3;

    public BottomMentTab(Context context, AttributeSet attrs, int defStyleAttr) {
        super(context, attrs, defStyleAttr);
        init();
    }


    public BottomMentTab(Context context, AttributeSet attrs) {
        super(context, attrs);
        init();
    }


    public BottomMentTab(Context context) {
        super(context);
        init();
    }

    @Override
    public void setOnTabSelectedListener(OnTabSelectedListener onTabSelectedListener) {
        super.setOnTabSelectedListener(onTabSelectedListener);
    }

    private void init() {

        for (int i = 0; i < NUM_TAD; i++) {
            if (i == 0) {
                addTab(newTab().setText(tabTitle[i]).setIcon(tabIcon_bule[i]));
            } else {
                addTab(newTab().setText(tabTitle[i]).setIcon(tabIcon_gray[i]));
            }
        }
    }
}
里面没有实现监听的功能,之后再MainActivity中实现。
MyViewPager.class:
package com.example.steam.app_mydemon_qq;


import android.content.Context;
import android.support.v4.app.Fragment;
import android.support.v4.view.ViewPager;
import android.util.AttributeSet;
import android.view.MotionEvent;

import java.util.ArrayList;
import java.util.List;

/**
 * Created by steam on 15-12-8.
 */
public class MyViewPager extends ViewPager {

    public List<Fragment> fragmentList = new ArrayList<Fragment>();
    private boolean noScroll = true;

    public MyViewPager(Context context, AttributeSet attrs) {
        super(context, attrs);
        init();
    }


    public MyViewPager(Context context) {
        super(context);
        init();
    }

    @Override
    public boolean onInterceptTouchEvent(MotionEvent ev) {
        if (noScroll)
            return false;
        else
            return super.onInterceptTouchEvent(ev);
    }

    @Override
    public boolean onTouchEvent(MotionEvent ev) {
        if (noScroll)
            return false;
        else
            return super.onTouchEvent(ev);
    }

    public List<Fragment> getFragmentList() {
        return fragmentList;
    }


    public void setNoScroll(boolean noScroll) {
        this.noScroll = noScroll;
    }

    private void init() {
        fragmentList.add(new MessageFragment());
        fragmentList.add(new AccountFragment());
        fragmentList.add(new MomentFragment());
    }
}
自定义的viewpager中加入了三个Fragment分别实现三个界面,之后会和自定义的TableLayout(BottomMentRab)绑定,达到切换界面的效果。当然和viewpager一样,我们需要自己去实现一个继承自FragmentPagerAdapter的适配器,将fragment加载进viewpager中。
MyFragAdapter.class:
package com.example.steam.app_mydemon_qq;

import android.support.v4.app.Fragment;
import android.support.v4.app.FragmentManager;
import android.support.v4.app.FragmentPagerAdapter;

import java.util.List;

/**
 * Created by steam on 15-12-8.
 */
public class MyfragAdapter extends FragmentPagerAdapter {

    private List<Fragment> fragmentList;

    public MyfragAdapter(FragmentManager fm,List<Fragment> fragmentList) {
        super(fm);
        this.fragmentList=fragmentList;
    }

    @Override
    public Fragment getItem(int position) {
        return fragmentList.get(position);
    }

    @Override
    public int getCount() {
        return fragmentList.size();
    }
}
之后还需要准备三个Fragment,这里就只列出一个:
<FrameLayout xmlns:android="http://schemas.android.com/apk/res/android"
    xmlns:tools="http://schemas.android.com/tools"
    android:layout_width="match_parent"
    android:layout_height="match_parent"
    tools:context="com.example.steam.app_mydemon_qq.MessageFragment">

    <!-- TODO: Update blank fragment layout -->
    <TextView
        android:layout_width="match_parent"
        android:layout_height="match_parent"
        android:text="message" />

</FrameLayout>
以及每个Fragment对应一个class
package com.example.steam.app_mydemon_qq;


import android.os.Bundle;
import android.support.v4.app.Fragment;
import android.view.LayoutInflater;
import android.view.View;
import android.view.ViewGroup;


/**
 * A simple {@link Fragment} subclass.
 */
public class MessageFragment extends Fragment {


    public MessageFragment() {
        // Required empty public constructor
    }


    @Override
    public View onCreateView(LayoutInflater inflater, ViewGroup container,
                             Bundle savedInstanceState) {
        // Inflate the layout for this fragment
        return inflater.inflate(R.layout.fragment_message, container, false);
    }

}
最后就只剩MainActivity了
package com.example.steam.app_mydemon_qq;

import android.os.Bundle;
import android.support.design.widget.NavigationView;
import android.support.design.widget.TabLayout;
import android.support.v4.view.GravityCompat;
import android.support.v4.widget.DrawerLayout;
import android.support.v7.app.ActionBarDrawerToggle;
import android.support.v7.app.AppCompatActivity;
import android.support.v7.widget.Toolbar;
import android.util.Log;
import android.widget.TextView;

public class MainActivity extends AppCompatActivity implements TabLayout.OnTabSelectedListener {

    private Toolbar toolbar;
    private BottomMentTab Mytable;
    private TextView toobat_centertv;
    private NavigationView navigationView;
    private DrawerLayout drawerLayout;
    private MyViewPager myViewPager;


    @Override
    protected void onCreate(Bundle savedInstanceState) {
        super.onCreate(savedInstanceState);
        setContentView(R.layout.activity_main);

        //初始化

        myViewPager = (MyViewPager) findViewById(R.id.myviewpager);
        toobat_centertv = (TextView) findViewById(R.id.toobat_centertv);
        toolbar = (Toolbar) findViewById(R.id.toolbar);
        setSupportActionBar(toolbar);//加载toolbar
        toolbar.setNavigationIcon(R.mipmap.ic_launcher);
        navigationView = (NavigationView) findViewById(R.id.navigationview);
        drawerLayout = (DrawerLayout) findViewById(R.id.container);
        Mytable = (BottomMentTab) findViewById(R.id.mytab);


        //初始化myviewpager的适配器

       MyfragAdapter myfragAdapter = new MyfragAdapter(getSupportFragmentManager(),
               myViewPager.getFragmentList());

        myViewPager.setAdapter(myfragAdapter);
        myViewPager.setOffscreenPageLimit(2);

        Mytable.setOnTabSelectedListener(this);


        ActionBarDrawerToggle toggle = new ActionBarDrawerToggle(
                this, drawerLayout, toolbar, R.string.navigation_drawer_open, R.string.navigation_drawer_close);
        drawerLayout.setDrawerListener(toggle);
        toggle.syncState();
    }

    @Override
    public void onBackPressed() {

        if (drawerLayout.isDrawerOpen(GravityCompat.START)) {
            drawerLayout.closeDrawer(GravityCompat.START);
        } else {
            super.onBackPressed();
        }

    }

    @Override
    public void onTabSelected(TabLayout.Tab tab) {
        Log.i("TAB", "selected" + tab.getPosition());
        tab.setIcon(BottomMentTab.tabIcon_bule[tab.getPosition()]);
        toobat_centertv.setText(BottomMentTab.tabTitle[tab.getPosition()]);
        myViewPager.setCurrentItem(tab.getPosition());
    }

    @Override
    public void onTabUnselected(TabLayout.Tab tab) {        tab.setIcon(BottomMentTab.tabIcon_gray[tab.getPosition()]);
    }

    @Override
    public void onTabReselected(TabLayout.Tab tab) {
    }
}
这里我是利用监听TableLayout实现切换,可以试试直接用setupwithviewpager()将TableLayout和viewpager绑定。
=。=如果上面有哪里说得不对的,欢迎指出。


 2309
2309

 被折叠的 条评论
为什么被折叠?


