


Android系统中提供了如下5种存储数据的方式
1、文件存储
2、SQLite数据库方式
3、内容提供器(Content Provider)
4、SharedPreferences
5、网络
一、SharedPreferences存储
SharedPreferences存储方式是Android提供的一种用来存储简单设置信息的机制,经常用于存储常见的欢迎语、登录用户名和密码等信息。SharedPreferences使用“键-值”对的方式进行存储,这样开发人员可以很方便的实现数据的读取和存入。
通过使用SharedPreferences存储方式,可以保存Android平台中的Long长整型,Int整型、String字符串型的数据。也可以将SharedPreferences中的数据分为多种权限,最常用的是设置全局共享访问。最终会以XML的方式来保存数据,在处理这些XML数据时,Dalvik会通过自带的底层的本地XML Parser进行解析,比如XMLpull方式,这种方式会节约内存资源。在两个Activity之间,除了可以通过Intent来进行数据传递外,还可以用SharedPreferences共享数据的方式实现数据的传递。
先在A中设置如下代码:
editor sharedata = getSharedPreferences("date",0).edit();
shareddata.putString("item","getSharedPreferences");
sharedata.commit();
然后在B中编写如下获取设置信息的代码:
SharedPreferences sharedata = getSharedPreferences("data",0);
String data = sharedata.getString("item",null);
Log.v("cola","data="+data);
最后通过以下Java代码将获取的储存数据显示出来
<SPAN class = hilitel>SharedPreferences
</SPAN>sharedata = getSharedPreferences("data",0);
String data = sharedata.getString("item",null);
Log.v("cola","data="+data);
获取SharedPreferences的两种方式:
1 调用Context对象的getSharedPreferences()方法
2 调用Activity对象的getPreferences()方法
两种方式的区别:
调用Context对象的getSharedPreferences()方法获得的SharedPreferences对象可以被同一应用程序下的其他组件共享.
调用Activity对象的getPreferences()方法获得的SharedPreferences对象只能在该Activity中使用.
SharedPreferences的四种操作模式:
Context.MODE_PRIVATE
Context.MODE_APPEND
Context.MODE_WORLD_READABLE
Context.MODE_WORLD_WRITEABLE
Context.MODE_PRIVATE:为默认操作模式,代表该文件是私有数据,只能被应用本身访问,在该模式下,写入的内容会覆盖原文件的内容
Context.MODE_APPEND:模式会检查文件是否存在,存在就往文件追加内容,否则就创建新文件.
Context.MODE_WORLD_READABLE和Context.MODE_WORLD_WRITEABLE用来控制其他应用是否有权限读写该文件.
MODE_WORLD_READABLE:表示当前文件可以被其他应用读取.
MODE_WORLD_WRITEABLE:表示当前文件可以被其他应用写入.
将数据保存至SharedPreferences:
SharedPreferences preferences=getSharedPreferences(“user”,Context.MODE_PRIVATE);
Editor editor=preferences.edit();
String name=”xixi”;
String age=”22”;
editor.putString(“name”, name);
editor.putString(“age”, age);
editor.commit();
从SharedPreferences获取数据:
SharedPreferences preferences=getSharedPreferences(“user”, Context.MODE_PRIVATE);
String name=preferences.getString(“name”, “defaultname”);
String age=preferences.getString(“age”, “0”);
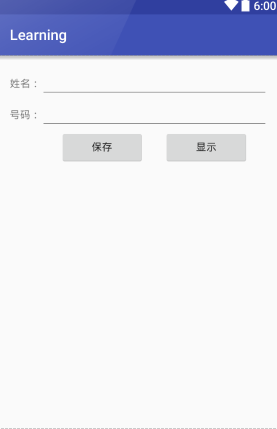
具体实现
功能介绍:通过两个按钮(一个保存数据,另外一个显示数据),两个输入框完成基本的SharedPreferences存储方式的练习。
先写一个SharedPreferences外部类,进行处理、封装
import android.content.Context;
import android.content.SharedPreferences;

/**
 * Created by yuanlifu on 2016/10/23.
 */
public class SharedPreferencesHelper {
    SharedPreferences sp;
    SharedPreferences.Editor editor;
    Context context;

    public SharedPreferencesHelper(Context c,String name){
        context = c;
        sp = context.getSharedPreferences(name,0);
        editor = sp.edit();
    }

    public void putValue(String key,String value){
        editor = sp.edit();
        editor.putString(key,value);
        editor.commit();
    }

    public String getValue(String key){
        return sp.getString(key,null);
    }
}
再在主函数里面进行具体的功能实现操作
import android.support.v7.app.AppCompatActivity;
import android.os.Bundle;
import android.view.View;
import android.widget.Button;
import android.widget.EditText;
import android.widget.TextView;
import android.widget.Toast;

public class MainActivity extends AppCompatActivity implements View.OnClickListener{

    public final static String COLUMN_NAME = "name";
    public final static String COLUMN_MOBILE = "mobile";
    SharedPreferencesHelper sp;

    private EditText nameEt;
    private EditText numEt;
    private EditText visiable;
    private Button savaBtn;
    private Button visiBtn;

    @Override
    protected void onCreate(Bundle savedInstanceState) {
        super.onCreate(savedInstanceState);
        setContentView(R.layout.activity_main);

        nameEt = (EditText) findViewById(R.id.name);
        numEt = (EditText) findViewById(R.id.num);
        savaBtn = (Button) findViewById(R.id.save);
        visiBtn = (Button) findViewById(R.id.visi);
        visiable = (EditText) findViewById(R.id.visiable);

        savaBtn.setOnClickListener(this);
        visiBtn.setOnClickListener(this);

    }

    @Override
    public void onClick(View v) {
        if(v == savaBtn){
            String name = nameEt.getText().toString();
            String num = numEt.getText().toString();

            sp = new SharedPreferencesHelper(this,"contacts");
            sp.putValue(COLUMN_NAME,name);
            sp.putValue(COLUMN_MOBILE,num);

            Toast.makeText(this,"保存成功",Toast.LENGTH_SHORT).show();

        }else if(v == visiBtn){
                String name = sp.getValue(COLUMN_NAME);
                String mobile = sp.getValue(COLUMN_MOBILE);

                visiable.setText("NAME:" + name + "\n" + "MOBILE:" + mobile);

        }
    }
}
界面设计如下
<?xml version="1.0" encoding="utf-8"?>
<TableLayout xmlns:android="http://schemas.android.com/apk/res/android"
    xmlns:tools="http://schemas.android.com/tools"
    android:orientation="vertical"
    android:layout_width="match_parent"
    android:layout_height="match_parent"
    android:paddingBottom="@dimen/activity_vertical_margin"
    android:paddingLeft="@dimen/activity_horizontal_margin"
    android:paddingRight="@dimen/activity_horizontal_margin"
    android:paddingTop="@dimen/activity_vertical_margin"
    tools:context="com.example.wo.learning.MainActivity">

    <TableRow>
        <TextView
            android:layout_width="wrap_content"
            android:layout_height="wrap_content"
            android:text="姓名:"/>
        <EditText
            android:layout_weight="1"
            android:id="@+id/name"
            android:layout_width="wrap_content"
            android:layout_height="wrap_content" />
    </TableRow>

    <TableRow>
        <TextView
            android:layout_width="wrap_content"
            android:layout_height="wrap_content"
            android:text="号码:"/>
        <EditText
            android:layout_weight="1"
            android:id="@+id/num"
            android:layout_width="wrap_content"
            android:layout_height="wrap_content" />
    </TableRow>

    <TableRow>
        <TextView
            android:layout_weight="1"
            android:layout_width="wrap_content"
            android:layout_height="wrap_content"/>
        <Button
            android:layout_weight="1"
            android:id="@+id/save"
            android:text="保存"
            android:layout_width="wrap_content"
            android:layout_height="wrap_content"/>
        <TextView
            android:layout_weight="1"
            android:layout_width="wrap_content"
            android:layout_height="wrap_content"/>
        <Button
            android:layout_weight="1"
            android:id="@+id/visi"
            android:text="显示"
            android:layout_width="wrap_content"
            android:layout_height="wrap_content"/>
        <TextView
            android:layout_weight="1"
            android:layout_width="wrap_content"
            android:layout_height="wrap_content"/>
    </TableRow>
    <EditText
        android:id="@+id/visiable"
        android:layout_width="match_parent"
        android:layout_height="wrap_content"/>
</TableLayout>


 1万+
1万+

 被折叠的 条评论
为什么被折叠?
被折叠的 条评论
为什么被折叠?
 到【灌水乐园】发言


