


功能
之前的文章中由解析过@PostConstruct/@PreDestroy,他们也是initMethod的一种形式,注解方式是后来才加入的,在源码中他们的命名都是一样的名字,都叫initMethod,不过他们却是有着很大的差别,并且他们的执行顺序也不相同,@PostConstruct > afterPropertiesSet >initMethod。
xml配置方式,例如:
<bean id="xx" class="xxxxx" init-method="" destroy-method="">
注解配置
@Component
public class CustomConfig7 {

    @PostConstruct
    public void t() {
        System.out.println("customConfig7 init");
    }

    @PostConstruct
    public void t2() {
        System.out.println("customConfig7 init2");
    }

    @PreDestroy
    public void d() {
		System.out.println("customConfig7 destroy");
    }

    @PreDestroy
    public void d2() {
		System.out.println("customConfig7 destroy2");
    }
}
或者是
@Configuration
public class CustomConfig8 {

    @Bean(initMethod = "initTest", destroyMethod = "destroyTest")
    public CustomTest4 get() {
        return new CustomTest4();
    }
    public static class CustomTest4{

        public void initTest() {
            System.out.println("init 初始化。");
        }

        public void destroyTest() {
            System.out.println("destroy exec");
        }
    }
}
而在之前的文章中,还有一种方式,就是手动构建beanDefinition对象,然后手动设置到定义里面,如:
@Component
public class CustomBeanFactoryPostProcessor implements BeanFactoryPostProcessor {
    @Override
    public void postProcessBeanFactory(ConfigurableListableBeanFactory beanFactory) throws BeansException {
        GenericBeanDefinition customBean = new GenericBeanDefinition();
        customBean.setBeanClassName(CustomTest4.class.getName());
        // 设置初始化方法
        customBean.setInitMethodName("initTest");
        // 设置销毁方法
        customBean.setInitMethodName("destroyTest");
        // 设置自定义bean的class
        customBean.setBeanClass(CustomTest4.class);
        // 设置自动注入
        customBean.setAutowireMode(AbstractBeanDefinition.AUTOWIRE_BY_TYPE);
        ((BeanDefinitionRegistry)beanFactory).registerBeanDefinition("customTestBean4", customBean);
        // 提前实例化
        Object customTestBean = beanFactory.getBean("customTestBean4");
        System.out.println("自定义bean:" + customTestBean);
    }
}
这最后这一种方法虽然用不到,但是可以作为了解,可以尝试不一样的方法去完成也是不错的。
源码
同样还是bean初始化方法,位置:
org.springframework.beans.factory.support.AbstractAutowireCapableBeanFactory#initializeBean(java.lang.String, java.lang.Object, org.springframework.beans.factory.support.RootBeanDefinition)
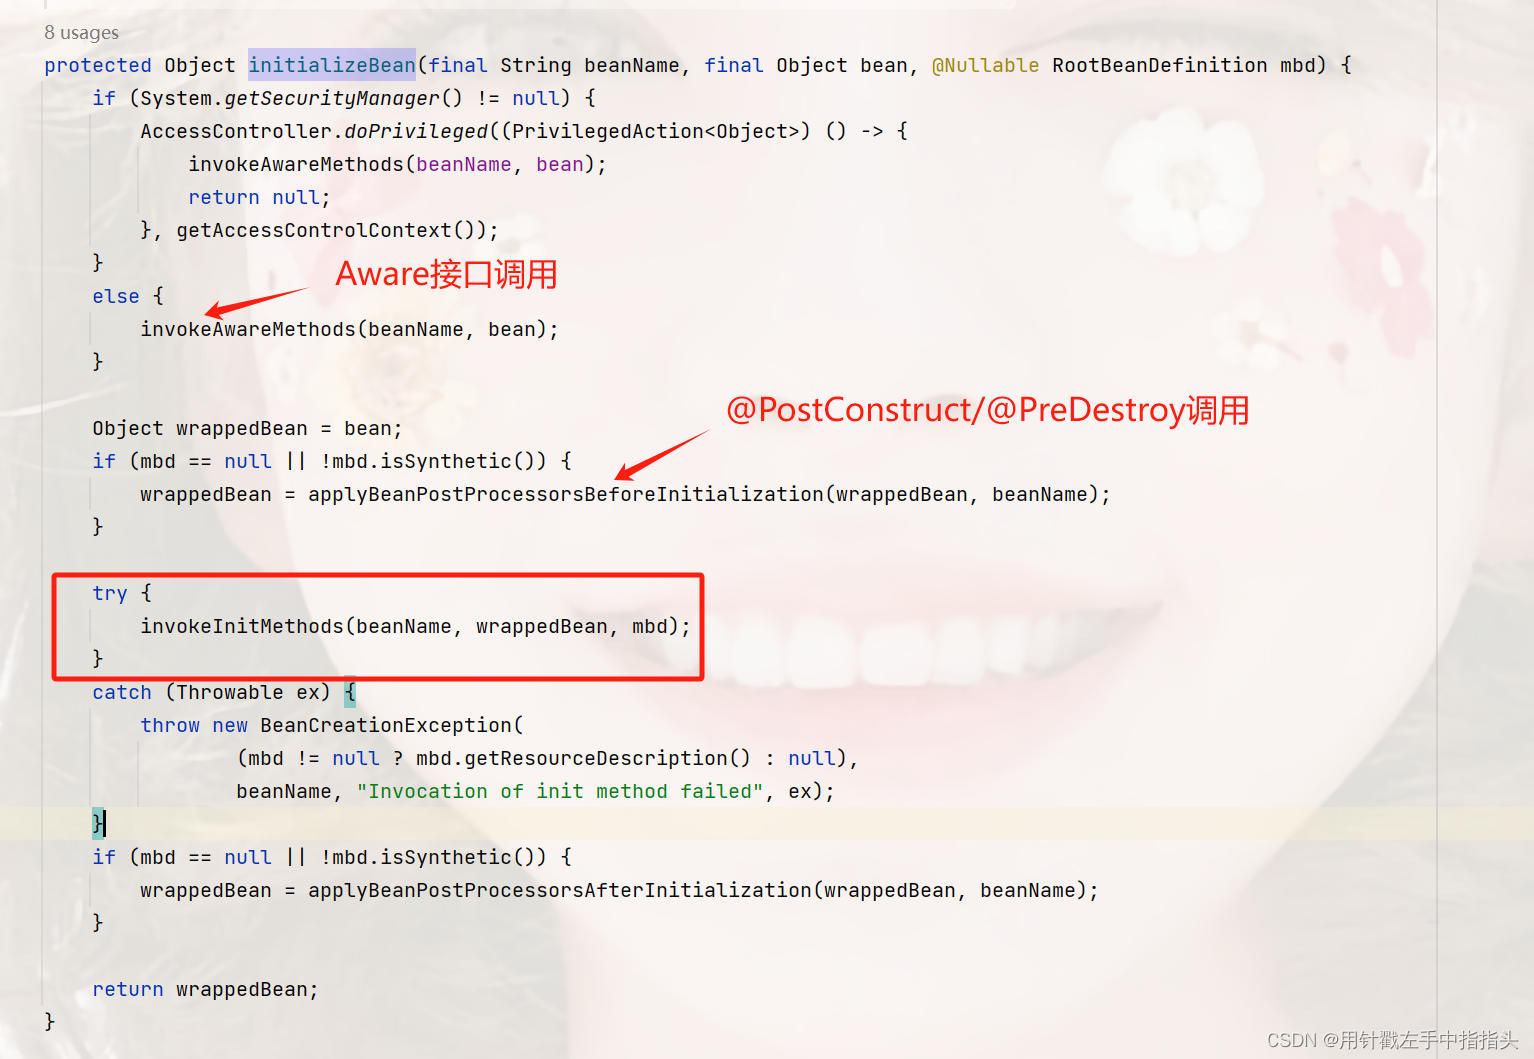

initMethod方法调用和@PostConstruct是并不是同一个入口,它是在afterPropertiesSet方法调用之后执行的。
if (mbd != null && bean.getClass() != NullBean.class) {
    // 获取initMethod,
    // 就是:customBean.setInitMethodName("initTest");
    // 或者:@Bean(initMethod = "initTest", destroyMethod = "destroyTest")
			String initMethodName = mbd.getInitMethodName();
			if (StringUtils.hasLength(initMethodName) &&
                // 这里排除 InitializingBean.afterPropertiesSet 方法

					!(isInitializingBean && "afterPropertiesSet".equals(initMethodName)) &&
                 // 和 @PostConstruct 方法
					!mbd.isExternallyManagedInitMethod(initMethodName)) {
				invokeCustomInitMethod(beanName, bean, mbd);
			}
		}
这里的逻辑含义是:
这些初始化回调方法只能执行一次,多次初始化能力赋予,也只能执行一次,且生效的是第一次。
下面进入真正执行的地方:
protected void invokeCustomInitMethod(String beanName, final Object bean, RootBeanDefinition mbd)
			throws Throwable {
// 获取设置的initMethod
		String initMethodName = mbd.getInitMethodName();
		Assert.state(initMethodName != null, "No init method set");
    // 获取initMethod的方法对象,因为后面要进行反射操作
    // 这里不管它怎么校验,它都能获取私有方法(private)
    // 总感觉这有点多此一举,可能我没理解到
		Method initMethod = (mbd.isNonPublicAccessAllowed() ?
				BeanUtils.findMethod(bean.getClass(), initMethodName) :
				ClassUtils.getMethodIfAvailable(bean.getClass(), initMethodName));

		if (initMethod == null) {
			if (mbd.isEnforceInitMethod()) {
				throw new BeanDefinitionValidationException("Could not find an init method named '" +
						initMethodName + "' on bean with name '" + beanName + "'");
			}
			else {
				if (logger.isTraceEnabled()) {
					logger.trace("No default init method named '" + initMethodName +
							"' found on bean with name '" + beanName + "'");
				}
				// Ignore non-existent default lifecycle methods.
				return;
			}
		}

		if (logger.isTraceEnabled()) {
			logger.trace("Invoking init method  '" + initMethodName + "' on bean with name '" + beanName + "'");
		}
    // 这个反射工具是获取更加详细的方法信息,
    // 如果你的这个初始化方法是一个接口方法,那么他会找到你的接口类,这在后面接口判断中可能会有用
		Method methodToInvoke = ClassUtils.getInterfaceMethodIfPossible(initMethod);

    // 又是AccessController.doPrivileged ,用于访问特权
		if (System.getSecurityManager() != null) {
			AccessController.doPrivileged((PrivilegedAction<Object>) () -> {
				ReflectionUtils.makeAccessible(methodToInvoke);
				return null;
			});
			try {
				AccessController.doPrivileged((PrivilegedExceptionAction<Object>) () ->
						methodToInvoke.invoke(bean), getAccessControlContext());
			}
			catch (PrivilegedActionException pae) {
				InvocationTargetException ex = (InvocationTargetException) pae.getException();
				throw ex.getTargetException();
			}
		}
		else {
			try {
                // 一般是走这里的,两边都一样
                // makeAccessible 等效于 initMethod.setAccessible(true)
				ReflectionUtils.makeAccessible(methodToInvoke);
                // 直接反射调用
				methodToInvoke.invoke(bean);
			}
			catch (InvocationTargetException ex) {
				throw ex.getTargetException();
			}
		}
	}


 342
342


 被折叠的 条评论
为什么被折叠?
被折叠的 条评论
为什么被折叠?
 到【灌水乐园】发言


