


为了提高性能,减少数据库的压力,使用缓存是非常好的手段之一。
声明式缓存
Spring 定义 CacheManager 和 Cache 接口用来统一不同的缓存技术。例如 JCache、 EhCache、 Hazelcast、 Guava、 Redis 等。在使用 Spring 集成 Cache 的时候,我们需要注册实现的 CacheManager 的 Bean。
如果想更深入理解 Spring 的 Cache 机制,这边推荐两篇不错的文章。
Spring Boot默认集成CacheManager
Spring Boot 为我们自动配置了多个 CacheManager 的实现。
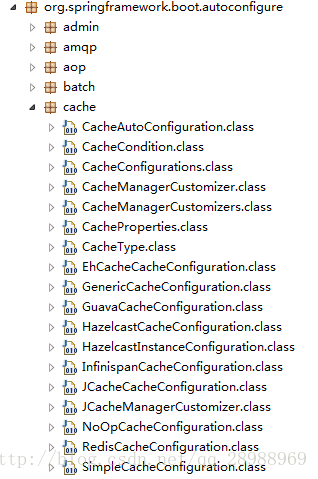
Spring Boot 为我们自动配置了 JcacheCacheConfiguration、 EhCacheCacheConfiguration、HazelcastCacheConfiguration、GuavaCacheConfiguration、RedisCacheConfiguration、SimpleCacheConfiguration 等。
默认的 ConcurrenMapCacheManager
Spring 从 Spring3.1 开始基于 java.util.concurrent.ConcurrentHashMap 实现的缓存管理器。所以, Spring Boot 默认使用 ConcurrentMapCacheManager 作为缓存技术。
以下是我们不引入其他缓存依赖情况下,控制台打印的日志信息。
Bean 'cacheManager' of type [class org.springframework.cache.concurrent.ConcurrentMapCacheManager]SpringBoot 缓存
在 Spring Boot中,通过@EnableCaching注解自动化配置合适的缓存管理器(CacheManager),Spring Boot根据下面的顺序去侦测缓存提供者:
- Generic
- JCache (JSR-107)
- EhCache 2.x
- Hazelcast
- Infinispan
- Redis
- Guava
- Simple
关于 Spring Boot 的缓存机制:
高速缓存抽象不提供实际存储,并且依赖于由org.springframework.cache.Cache和org.springframework.cache.CacheManager接口实现的抽象。 Spring Boot根据实现自动配置合适的CacheManager,只要缓存支持通过@EnableCaching注释启用即可。
EhCache
JAVA缓存实现方案有很多,最基本的自己使用Map去构建缓存,或者使用memcached或Redis,但是上述两种缓存框架都要搭建服务器,而Map自行构建的缓存可能没有很高的使用效率,那么我们可以尝试一下使用Ehcache缓存框架。
Ehcache主要基于内存缓存,磁盘缓存为辅的,使用起来方便。
Springboot整合EhCache
整合步骤:
- 添加pom文件maven依赖
- 配置ehcache.xml
- 开启缓存支持
- 项目中使用
添加pom文件maven依赖
<!--开启 cache 缓存 -->
<dependency>
    <groupId>org.springframework.boot</groupId>
    <artifactId>spring-boot-starter-cache</artifactId>
</dependency>

<!-- ehcache缓存 -->
<dependency>
    <groupId>net.sf.ehcache</groupId>
    <artifactId>ehcache</artifactId>
    <version>2.9.1</version><!--$NO-MVN-MAN-VER$ -->
</dependency>
配置ehcache.xml
默认自动加载resources目录下的ehcache.xml文件
<?xml version="1.0" encoding="UTF-8"?>
<ehcache xmlns:xsi="http://www.w3.org/2001/XMLSchema-instance"
    xsi:noNamespaceSchemaLocation="ehcache.xsd">
    <!--timeToIdleSeconds 当缓存闲置n秒后销毁 -->
    <!--timeToLiveSeconds 当缓存存活n秒后销毁 -->
    <!-- 缓存配置
        name:缓存名称。
        maxElementsInMemory:缓存最大个数。
        eternal:对象是否永久有效,一但设置了,timeout将不起作用。
        timeToIdleSeconds:设置对象在失效前的允许闲置时间(单位:秒)。仅当eternal=false对象不是永久有效时使用,可选属性,默认值是0,也就是可闲置时间无穷大。
        timeToLiveSeconds:设置对象在失效前允许存活时间(单位:秒)。最大时间介于创建时间和失效时间之间。仅当eternal=false对象不是永久有效时使用,默认是0.,也就是对象存活时间无穷大。
        overflowToDisk:当内存中对象数量达到maxElementsInMemory时,Ehcache将会对象写到磁盘中。 diskSpoolBufferSizeMB:这个参数设置DiskStore(磁盘缓存)的缓存区大小。默认是30MB。每个Cache都应该有自己的一个缓冲区。
        maxElementsOnDisk:硬盘最大缓存个数。
        diskPersistent:是否缓存虚拟机重启期数据 Whether the disk
        store persists between restarts of the Virtual Machine. The default value
        is false.
        diskExpiryThreadIntervalSeconds:磁盘失效线程运行时间间隔,默认是120秒。  memoryStoreEvictionPolicy:当达到maxElementsInMemory限制时,Ehcache将会根据指定的策略去清理内存。默认策略是
LRU(最近最少使用)。你可以设置为FIFO(先进先出)或是LFU(较少使用)。
        clearOnFlush:内存数量最大时是否清除。 -->
    <!-- 磁盘缓存位置 -->
    <diskStore path="java.io.tmpdir" />
    <!-- 默认缓存 -->
    <defaultCache
        maxElementsInMemory="10000"
        eternal="false"
        timeToIdleSeconds="120"
        timeToLiveSeconds="120"
        maxElementsOnDisk="10000000"
        diskExpiryThreadIntervalSeconds="120"
        memoryStoreEvictionPolicy="LRU">

        <persistence strategy="localTempSwap" />
    </defaultCache>

    <!-- 测试 -->
    <cache name="GoodsType"
        eternal="false"
        timeToIdleSeconds="2400"
        timeToLiveSeconds="2400"
        maxEntriesLocalHeap="10000"
        maxEntriesLocalDisk="10000000"
        diskExpiryThreadIntervalSeconds="120"
        overflowToDisk="false"
        memoryStoreEvictionPolicy="LRU">
    </cache>
</ehcache>
对于EhCache的配置文件也可以通过application.yml文件中使用spring.cache.ehcache.config属性来指定,比如:
spring:
  cache:
    ehcache:
      config: classpath:ehcache.xml
ehcache.xml配置文件详解
- diskStore:为缓存路径,ehcache分为内存和磁盘两级,此属性定义磁盘的缓存位置。
- defaultCache:默认缓存策略,当ehcache找不到定义的缓存时,则使用这个缓存策略。只能定义一个。
- name:缓存名称。
- maxElementsInMemory:缓存最大数目
- maxElementsOnDisk:硬盘最大缓存个数。
- eternal:对象是否永久有效,一但设置了,timeout将不起作用。
- overflowToDisk:是否保存到磁盘,当系统宕机时
- timeToIdleSeconds:设置对象在失效前的允许闲置时间(单位:秒)。仅当eternal=false对象不是永久有效时使用,可选属性,默认值是0,也就是可闲置时间无穷大。
- timeToLiveSeconds:设置对象在失效前允许存活时间(单位:秒)。最大时间介于创建时间和失效时间之间。仅当eternal=false对象不是永久有效时使用,默认是0.,也就是对象存活时间无穷大。
- diskPersistent:是否缓存虚拟机重启期数据 Whether the disk store persists between restarts of the Virtual Machine. The default value is false.
- diskSpoolBufferSizeMB:这个参数设置DiskStore(磁盘缓存)的缓存区大小。默认是30MB。每个Cache都应该有自己的一个缓冲区。
- diskExpiryThreadIntervalSeconds:磁盘失效线程运行时间间隔,默认是120秒。
- memoryStoreEvictionPolicy:当达到maxElementsInMemory限制时,Ehcache将会根据指定的策略去清理内存。默认策略是LRU(最近最少使用)。你可以设置为FIFO(先进先出)或是LFU(较少使用)。
- clearOnFlush:内存数量最大时是否清除。
FIFO,first in first out,先进先出。
LFU, Less Frequently Used,一直以来最少被使用的。如上面所讲,缓存的元素有一个hit属性,hit值最小的将会被清出缓存。
LRU,Least Recently Used,最近最少使用的,缓存的元素有一个时间戳,当缓存容量满了,而又需要腾出地方来缓存新的元素的时候,那么现有缓存元素中时间戳离当前时间最远的元素将被清出缓存。
开启缓存支持
package com.ahut.config;

import org.springframework.cache.annotation.EnableCaching;
import org.springframework.context.annotation.Configuration;

/**
 *
 * @ClassName: EhCacheConfig
 * @Description:配置缓存
 * @author cheng
 * @date 2017年10月11日 下午1:00:34
 */
@Configuration
@EnableCaching
public class EhCacheConfig {

}
项目中使用
一般情况下,我们在Sercive层进行对缓存的操作。
先介绍 Ehcache 在 Spring 中的注解:在支持 Spring Cache 的环境下。
@CacheConfig

String[] cacheNames() default {};
指定使用那个缓存,如下:
@CacheConfig(cacheNames = "GoodsType")
@CacheConfig(cacheNames = {"cache1","cache2"})
配置在类上面,指定使用哪个缓存
@Cacheable

@AliasFor("cacheNames")
String[] value() default {};
缓存的名称,在 spring 配置文件中定义,必须指定至少一个 例如:
@Cacheable(value = "mycache") 或者
@Cacheable(value = {"cache1","cache2"}

String key() default "";
缓存的 key,可以为空,如果指定要按照 SpEL 表达式编写,如果不指定,则缺省按照方法的所有参数进行组合  例如:
@Cacheable(value = "testcache",key = "#userName")

String condition() default "";
缓存的条件,可以为空,使用 SpEL 编写,返回 true 或者 false,只有为 true 才进行缓存   例如:
@Cacheable(value = "testcache",condition = "#userName.length()>2")
Spring在每次执行前都会检查Cache中是否存在相同key的缓存元素,如果存在就不再执行该方法,而是直接从缓存中获取结果进行返回,否则才会执行并将返回结果存入指定的缓存中。
@CachePut

和@Cacheable注解相类似
使用@CachePut标注的方法在执行前不会去检查缓存中是否存在之前执行过的结果,而是每次都会执行该方法,并将执行结果以键值对的形式存入指定的缓存中。
@CacheEvict

@AliasFor("cacheNames")
String[] value() default {};
缓存的名称,在 spring 配置文件中定义,必须指定至少一个 例如:
@CachEvict(value= "mycach") 或者
@CachEvict(value = {"cache1","cache2"}

String key() default "";
缓存的 key,可以为空,如果指定要按照 SpEL 表达式编写,如果不指定,则缺省按照方法的所有参数进行组合  例如:
@CachEvict(value=”testcache”,key=”#userName”)

String condition() default "";
缓存的条件,可以为空,使用 SpEL 编写,返回 true 或者 false,只有为 true 才清空缓存   例如:
@CachEvict(value=”testcache”,
condition=”#userName.length()>2”)

boolean allEntries() default false;
是否清空所有缓存内容,缺省为 false,如果指定为 true,则方法调用后将立即清空所有缓存 例如:
@CachEvict(value=”testcache”,allEntries=true)

boolean beforeInvocation() default false;
是否在方法执行前就清空,缺省为 false,如果指定为 true,则在方法还没有执行的时候就清空缓存,缺省情况下,如果方法执行抛出异常,则不会清空缓存 例如:
@CachEvict(value=”testcache”,beforeInvocation=true)
清除缓存
@Caching分组注解,能够同时应用多个其他的缓存注解
注解说明:
- @cache这个相当于save()操作
- @cachePut相当于update()操作,只要他标示的方法被调用,那么都会缓存起来,而@cache则是先看下有没已经缓存了,然后再选择是否执行方法。
- @CacheEvict相当于delete()操作。用来清除缓存用的。
package com.ahut.cache;

import org.springframework.cache.annotation.CacheConfig;
import org.springframework.cache.annotation.CacheEvict;
import org.springframework.cache.annotation.CachePut;
import org.springframework.cache.annotation.Cacheable;
import org.springframework.stereotype.Repository;

/**
 *
 * @ClassName: GoodsTypeDaoImpl
 * @Description: 模拟数据访问实现类
 * @author cheng
 * @date 2017年10月13日 上午10:54:32
 */
@Repository
@CacheConfig(cacheNames = "GoodsType")
public class GoodsTypeDaoImpl {

    @Cacheable
    public String save(String typeId) {
        System.out.println("save()执行了=============");
        return "模拟数据库保存";
    }

    @CachePut
    public String update(String typeId) {
        System.out.println("update()执行了=============");
        return "模拟数据库更新";
    }

    @CacheEvict
    public String delete(String typeId) {
        System.out.println("delete()执行了=============");
        return "模拟数据库删除";
    }

    @Cacheable
    public String select(String typeId) {
        System.out.println("select()执行了=============");
        return "模拟数据库查询";
    }
}
测试:
package com.ahut.cache;

import org.junit.Test;
import org.junit.runner.RunWith;
import org.springframework.beans.factory.annotation.Autowired;
import org.springframework.boot.test.context.SpringBootTest;
import org.springframework.test.context.junit4.SpringRunner;

@RunWith(SpringRunner.class)
@SpringBootTest
public class GoodsTypeDaoImplTest {

    @Autowired
    private GoodsTypeDaoImpl typeDao;

    @Test
    public void testSave() {
        String typeId = "type111";
        // 模拟第一次保存
        String returnStr1 = typeDao.save(typeId);
        System.out.println(returnStr1);
        // 模拟第二次保存
        String returnStr2 = typeDao.save(typeId);
        System.out.println(returnStr2);
    }

    @Test
    public void testUpdate() {
        String typeId = "type111";
        // 模拟第一次查询
        String returnStr1 = typeDao.select(typeId);
        System.out.println(returnStr1);
        // 模拟第二次查询
        String returnStr2 = typeDao.select(typeId);
        System.out.println(returnStr2);
        // 模拟更新
        String returnStr3 = typeDao.update(typeId);
        System.out.println(returnStr3);
        // 模拟查询
        String returnStr4 = typeDao.select(typeId);
        System.out.println(returnStr4);
    }

    @Test
    public void testDelete() {
        String typeId = "type111";
        // 模拟第一次查询
        String returnStr1 = typeDao.select(typeId);
        System.out.println(returnStr1);
        // 模拟第二次查询
        String returnStr2 = typeDao.select(typeId);
        System.out.println(returnStr2);
        // 模拟删除
        String returnStr3 = typeDao.delete(typeId);
        System.out.println(returnStr3);
        // 模拟查询
        String returnStr4 = typeDao.select(typeId);
        System.out.println(returnStr4);
    }

    @Test
    public void testSelect() {
        String typeId = "type111";
        // 模拟第一次查询
        String returnStr1 = typeDao.select(typeId);
        System.out.println(returnStr1);
        // 模拟第二次查询
        String returnStr2 = typeDao.select(typeId);
        System.out.println(returnStr2);
    }

}
执行
    @Test
    public void testSave() {
        String typeId = "type111";
        // 模拟第一次保存
        String returnStr1 = typeDao.save(typeId);
        System.out.println(returnStr1);
        // 模拟第二次保存
        String returnStr2 = typeDao.save(typeId);
        System.out.println(returnStr2);
    }
结果
save()执行了=============
模拟数据库保存
模拟数据库保存
执行
    @Test
    public void testUpdate() {
        String typeId = "type111";
        // 模拟第一次查询
        String returnStr1 = typeDao.select(typeId);
        System.out.println(returnStr1);
        // 模拟第二次查询
        String returnStr2 = typeDao.select(typeId);
        System.out.println(returnStr2);
        // 模拟更新
        String returnStr3 = typeDao.update(typeId);
        System.out.println(returnStr3);
        // 模拟查询
        String returnStr4 = typeDao.select(typeId);
        System.out.println(returnStr4);
    }
结果
select()执行了=============
模拟数据库查询
模拟数据库查询
update()执行了=============
模拟数据库更新
模拟数据库更新
执行
    @Test
    public void testDelete() {
        String typeId = "type111";
        // 模拟第一次查询
        String returnStr1 = typeDao.select(typeId);
        System.out.println(returnStr1);
        // 模拟第二次查询
        String returnStr2 = typeDao.select(typeId);
        System.out.println(returnStr2);
        // 模拟删除
        String returnStr3 = typeDao.delete(typeId);
        System.out.println(returnStr3);
        // 模拟查询
        String returnStr4 = typeDao.select(typeId);
        System.out.println(returnStr4);
    }
结果
select()执行了=============
模拟数据库查询
模拟数据库查询
delete()执行了=============
模拟数据库删除
select()执行了=============
模拟数据库查询
执行
    @Test
    public void testSelect() {
        String typeId = "type111";
        // 模拟第一次查询
        String returnStr1 = typeDao.select(typeId);
        System.out.println(returnStr1);
        // 模拟第二次查询
        String returnStr2 = typeDao.select(typeId);
        System.out.println(returnStr2);
    }
结果
select()执行了=============
模拟数据库查询
模拟数据库查询


 21万+
21万+

 被折叠的 条评论
为什么被折叠?
被折叠的 条评论
为什么被折叠?
 到【灌水乐园】发言


