


 本文详细介绍了如何在Springboot项目中集成SpringSecurity,从基础概念到实际操作,包括配置登录页面、自定义用户名和密码、登录成功和失败处理、权限控制以及实现"记住我"功能。通过实例代码展示了Spring Security的配置和使用方法,帮助开发者深入理解Spring Security的运作机制。
之前做过公司的SSO接入,也网上找了很多博客,结合自己的理解 梳理了一些,文章有点长,希望可以有耐心的看下去。
一、Spring security 是什么?
Spring Security是一个能够为基于Spring的企业应用系统提供声明式的安全访问控制解决方案的安全框架。
它提供了一组可以在Spring应用上下文中配置的Bean,充分利用了Spring IoC,DI(控制反转Inversion of Control ,DI:Dependency Injection 依赖注入)和AOP(面向切面编程)功能,为应用系统提供声明式的安全访问控制功能,减少了为企业系统安全控制编写大量重复代码的工作。
二、Spring security 怎么使用?
使用Spring Security很简单,只要在pom.xml文件中,引入spring security的依赖就可以了。
<!-- spring security依赖 -->
<dependency>
    <groupId>org.springframework.boot</groupId>
    <artifactId>spring-boot-starter-security</artifactId>
</dependency>
什么都不做,直接运行程序,这时你访问任何一个URL,都会弹出一个“需要授权”的验证框,如图:
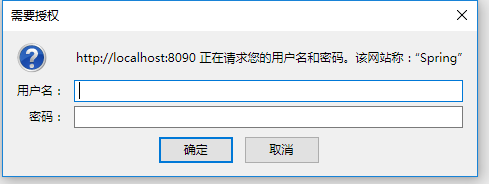
,spring security 会默认使用一个用户名为:user 的用户,密码就是 启动的时候生成的(通过控制台console中查看),如图

然后在用户名中输入:user 密码框中输入 上面的密码 ,之后就可以正常访问之前URL了。很显然这根本不是我们想要的,接下来我们需要一步一步的改造。
改造1 使用页面表单登录
通过修改Security的配置来实现 参考:https://docs.spring.io/spring-security/site/docs/current/guides/html5//helloworld-boot.html#creating-your-spring-security-configuration
首先 添加一个类 SecurityConfig 继承 WebSecurityConfigurerAdapter ,
重写configure方法。
并加上@Configuration 和@EnableWebSecurity 2个注解。
@Configuration
@EnableWebSecurity
public class SecurityConfig extends WebSecurityConfigurerAdapter {

      @Override
      protected void configure(HttpSecurity http) throws Exception {
            // TODO Auto-generated method stub
            //super.configure(http);
            http
                  .formLogin().loginPage("/login").loginProcessingUrl("/login/form").failureUrl("/login-error").permitAll()  //表单登录,permitAll()表示这个不需要验证 登录页面,登录失败页面
                  .and()
                  .authorizeRequests().anyRequest().authenticated()
                  .and()
                  .csrf().disable();
      }
}
View Code
loginPage("/login")表示登录时跳转的页面,因为登录页面我们不需要登录认证,所以我们需要添加 permitAll() 方法。
添加一个控制器,对应/login 返回一个登录页面。
  @RequestMapping("/login")
  public String userLogin(){

        return "demo-sign";
  }
html页面是使用 thymeleaf 模板引擎的,这里就不详细讲解了。
demo_sign.html 的 html部分代码如下:
<form  class="form-signin" action="/login/form" method="post">
              <h2 class="form-signin-heading">用户登录</h2>
            <table>
                  <tr>
                        <td>用户名:</td>
                        <td><input type="text" name="username"  class="form-control"  placeholder="请输入用户名"/></td>
                  </tr>
                        <tr>
                        <td>密码:</td>
                        <td><input type="password" name="password"  class="form-control" placeholder="请输入密码" /></td>
                  </tr>
                  <tr>

                        <td colspan="2">
                              <button type="submit"  class="btn btn-lg btn-primary btn-block" >登录</button>
                        </td>
                  </tr>
            </table>
      </form>
  class="form-signin" action="/login/form" method="post">
              <h2 class="form-signin-heading">用户登录</h2>
            <table>
                  <tr>
                        <td>用户名:</td>
                        <td><input type="text" name="username"  class="form-control"  placeholder="请输入用户名"/></td>
                  </tr>
                        <tr>
                        <td>密码:</td>
                        <td><input type="password" name="password"  class="form-control" placeholder="请输入密码" /></td>
                  </tr>
                  <tr>

                        <td colspan="2">
                              <button type="submit"  class="btn btn-lg btn-primary btn-block" >登录</button>
                        </td>
                  </tr>
            </table>
      </form>
需要注意下:form提交的url要和配置文件中的 loginProcessingUrl("")中的一致。
failureUrl=表示登录出错的页面,我们可以简单写个提示:如 用户名或密码错误。
@RequestMappin 最低0.47元/天 解锁文章


 3369
3369

 被折叠的 条评论
为什么被折叠?
被折叠的 条评论
为什么被折叠?
 到【灌水乐园】发言


