


1、DPDK环境搭建
1.1、环境搭建
工具准备:VMware、ubuntu16.04。
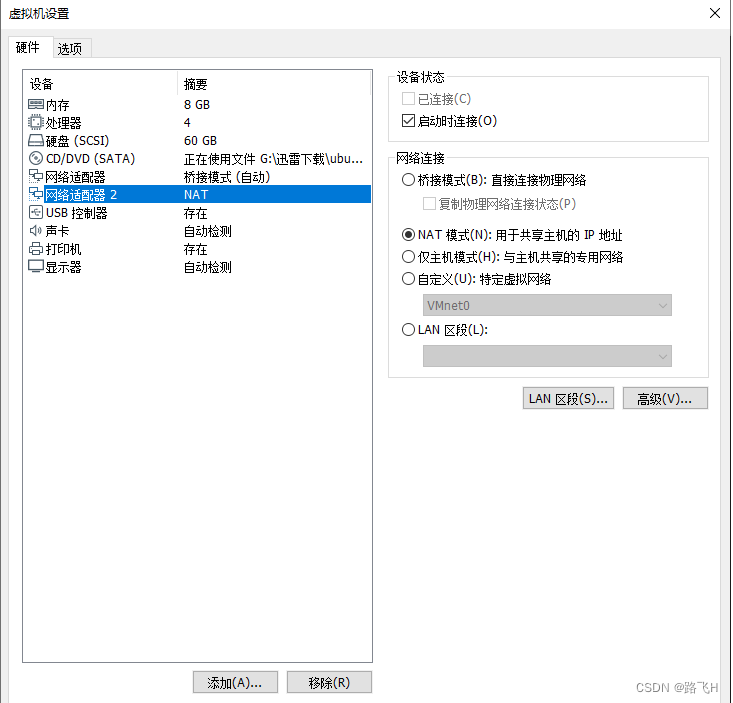
(1)VMware添加两个网卡。桥接网卡作为 DPDK 运行的网卡,NAT 网卡作为 ssh 连接的网卡。
(2)修改网卡配置信息。找到虚拟机安装目录下的.vmx文件,内容如下:
.encoding = "GBK"
config.version = "8"
virtualHW.version = "16"
mks.enable3d = "TRUE"
pciBridge0.present = "TRUE"
pciBridge4.present = "TRUE"
pciBridge4.virtualDev = "pcieRootPort"
pciBridge4.functions = "8"
pciBridge5.present = "TRUE"
pciBridge5.virtualDev = "pcieRootPort"
pciBridge5.functions = "8"
pciBridge6.present = "TRUE"
pciBridge6.virtualDev = "pcieRootPort"
pciBridge6.functions = "8"
pciBridge7.present = "TRUE"
pciBridge7.virtualDev = "pcieRootPort"
pciBridge7.functions = "8"
vmci0.present = "TRUE"
hpet0.present = "TRUE"
nvram = "Ubuntu64bit1604.nvram"
virtualHW.productCompatibility = "hosted"
powerType.powerOff = "soft"
powerType.powerOn = "soft"
powerType.suspend = "soft"
powerType.reset = "soft"
displayName = "Ubuntu64bit1604"
usb.vbluetooth.startConnected = "TRUE"
guestOS = "ubuntu-64"
tools.syncTime = "FALSE"
sound.autoDetect = "TRUE"
sound.fileName = "-1"
sound.present = "TRUE"
numvcpus = "4"
cpuid.coresPerSocket = "2"
vcpu.hotadd = "TRUE"
memsize = "8192"
mem.hotadd = "TRUE"
scsi0.virtualDev = "lsilogic"
scsi0.present = "TRUE"
sata0.present = "TRUE"
scsi0:0.fileName = "Ubuntu64bit1604.vmdk"
scsi0:0.present = "TRUE"
sata0:1.deviceType = "cdrom-image"
sata0:1.fileName = "G:\迅雷下载\ubuntu-16.04.7-desktop-amd64.iso"
sata0:1.present = "TRUE"
usb.present = "TRUE"
ehci.present = "TRUE"
svga.graphicsMemoryKB = "786432"
ethernet0.addressType = "generated"
ethernet0.virtualDev = "e1000"
serial0.fileType = "thinprint"
serial0.fileName = "thinprint"
ethernet0.present = "TRUE"
serial0.present = "TRUE"
extendedConfigFile = "Ubuntu64bit1604.vmxf"
floppy0.present = "FALSE"
uuid.bios = "56 4d fd 84 0c 40 c1 bb-af 47 c0 00 9f b9 71 74"
uuid.location = "56 4d fd 84 0c 40 c1 bb-af 47 c0 00 9f b9 71 74"
scsi0:0.redo = ""
pciBridge0.pciSlotNumber = "17"
pciBridge4.pciSlotNumber = "21"
pciBridge5.pciSlotNumber = "22"
pciBridge6.pciSlotNumber = "23"
pciBridge7.pciSlotNumber = "24"
scsi0.pciSlotNumber = "16"
usb.pciSlotNumber = "32"
ethernet0.pciSlotNumber = "33"
sound.pciSlotNumber = "34"
ehci.pciSlotNumber = "35"
vmci0.pciSlotNumber = "36"
sata0.pciSlotNumber = "37"
svga.vramSize = "268435456"
vmotion.checkpointFBSize = "4194304"
vmotion.checkpointSVGAPrimarySize = "268435456"
ethernet0.generatedAddress = "00:0C:29:B9:71:74"
ethernet0.generatedAddressOffset = "0"
vmci0.id = "-1615236748"
monitor.phys_bits_used = "43"
cleanShutdown = "TRUE"
softPowerOff = "FALSE"
usb:1.speed = "2"
usb:1.present = "TRUE"
usb:1.deviceType = "hub"
usb:1.port = "1"
usb:1.parent = "-1"
svga.guestBackedPrimaryAware = "TRUE"
tools.remindInstall = "FALSE"
gui.lastPoweredViewMode = "fullscreen"
toolsInstallManager.updateCounter = "2"
toolsInstallManager.lastInstallError = "0"
sata0:1.startConnected = "TRUE"
isolation.tools.hgfs.disable = "FALSE"
sharedFolder0.present = "TRUE"
sharedFolder0.enabled = "TRUE"
sharedFolder0.readAccess = "TRUE"
sharedFolder0.writeAccess = "TRUE"
sharedFolder0.hostPath = "G:\share"
sharedFolder0.guestName = "share"
sharedFolder0.expiration = "never"
sharedFolder.maxNum = "1"
usb:0.present = "TRUE"
usb:0.deviceType = "hid"
usb:0.port = "0"
usb:0.parent = "-1"
ethernet1.connectionType = "nat"
ethernet1.addressType = "generated"
ethernet1.virtualDev = "e1000"
ethernet1.present = "TRUE"
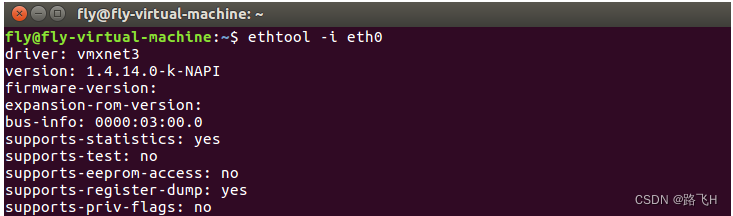
将 ethernet0.virtualDev 由 e1000 修改 vmxnet3,因为 vmware 的 vmxnet3 支持多队列网卡,同时添加一行ethernet0.wakeOnPcktRcv = “TRUE”:
ethernet0.virtualDev = "vmxnet3"
ethernet0.wakeOnPcktRcv = "TRUE"
重启虚拟机, 查看网卡ethtool -i eth0, 成功被被配置为vmxnet3:
(3)查看是否支持多队列网卡:
cat /proc/interrupts | grep eth0
  56:       1181          0          0      12784   PCI-MSI 1572864-edge      eth0-rxtx-0
  57:          0        193          0         22   PCI-MSI 1572865-edge      eth0-rxtx-1
  58:         41         36          0          0   PCI-MSI 1572866-edge      eth0-rxtx-2
  59:          0          5         13          0   PCI-MSI 1572867-edge      eth0-rxtx-3
  60:          0          0          0          0   PCI-MSI 1572868-edge      eth0-event-4
这里虚拟机有多少个CPU就有多少个队列。
关于多队列网卡请查看文章:多队列网卡
(4)修改 ubuntu 系统的启动参数。
sudo vim /etc/default/grub
主要是在GRUB_CMDLINE_LINUX添加如下内容:
default_hugepages=1G hugepagesz=2M hugepages=1024
如果是物理主机则添加的是如下内容:
default_hugepages=1G hugepagesz=1G hugepages=20 isolcpus=0-7
示例:
# If you change this file, run 'update-grub' afterwards to update
# /boot/grub/grub.cfg.
# For full documentation of the options in this file, see:
#   info -f grub -n 'Simple configuration'

GRUB_DEFAULT=0
GRUB_HIDDEN_TIMEOUT=0
GRUB_HIDDEN_TIMEOUT_QUIET=true
GRUB_TIMEOUT=10
GRUB_DISTRIBUTOR=`lsb_release -i -s 2> /dev/null || echo Debian`
GRUB_CMDLINE_LINUX_DEFAULT="quiet splash"
GRUB_CMDLINE_LINUX="net.ifnames=0 biosdevname=0 default_hugepages=1G hugepagesz=2M hugepages=1024"

# Uncomment to enable BadRAM filtering, modify to suit your needs
# This works with Linux (no patch required) and with any kernel that obtains
# the memory map information from GRUB (GNU Mach, kernel of FreeBSD ...)
#GRUB_BADRAM="0x01234567,0xfefefefe,0x89abcdef,0xefefefef"

# Uncomment to disable graphical terminal (grub-pc only)
#GRUB_TERMINAL=console

# The resolution used on graphical terminal
# note that you can use only modes which your graphic card supports via VBE
# you can see them in real GRUB with the command `vbeinfo'
#GRUB_GFXMODE=640x480

# Uncomment if you don't want GRUB to pass "root=UUID=xxx" parameter to Linux
#GRUB_DISABLE_LINUX_UUID=true

# Uncomment to disable generation of recovery mode menu entries
#GRUB_DISABLE_RECOVERY="true"

# Uncomment to get a beep at grub start
#GRUB_INIT_TUNE="480 440 1"
修改完之后需要重启。
1.2、编译DPDK
(1)下载 dpdk,随便一个版本,不同版本直接子系统接口会有差异,这里下载的是19.08.2版本:
wget https://fast.dpdk.org/rel/dpdk-19.08.2.tar.xz
(2)解压源码:
tar -xvf dpdk-19.08.2.tar.xz
cd dpdk-19.08.2
ls
app  buildtools  config  devtools  doc  drivers  examples  GNUmakefile  kernel  lib  license
MAINTAINERS  Makefile  meson.build  meson_options.txt  mk  README  usertools  VERSION
(3)安装依赖库:
sudo apt-get install numactl
sudo apt-get install libnuma-dev
sudo apt-get install net-tools
(4)通过 usertools/dpdk-setup.sh,64 位系统选择 39,编译完会在当前目录多出 x86_64-native-linux-gcc 的文件夹。
----------------------------------------------------------
 Step 1: Select the DPDK environment to build
----------------------------------------------------------
[1] arm64-armada-linuxapp-gcc
[2] arm64-armada-linux-gcc
[3] arm64-armv8a-linuxapp-clang
[4] arm64-armv8a-linuxapp-gcc
[5] arm64-armv8a-linux-clang
[6] arm64-armv8a-linux-gcc
[7] arm64-bluefield-linuxapp-gcc
[8] arm64-bluefield-linux-gcc
[9] arm64-dpaa2-linuxapp-gcc
[10] arm64-dpaa2-linux-gcc
[11] arm64-dpaa-linuxapp-gcc
[12] arm64-dpaa-linux-gcc
[13] arm64-octeontx2-linuxapp-gcc
[14] arm64-octeontx2-linux-gcc
[15] arm64-stingray-linuxapp-gcc
[16] arm64-stingray-linux-gcc
[17] arm64-thunderx2-linuxapp-gcc
[18] arm64-thunderx2-linux-gcc
[19] arm64-thunderx-linuxapp-gcc
[20] arm64-thunderx-linux-gcc
[21] arm64-xgene1-linuxapp-gcc
[22] arm64-xgene1-linux-gcc
[23] arm-armv7a-linuxapp-gcc
[24] arm-armv7a-linux-gcc
[25] i686-native-linuxapp-gcc
[26] i686-native-linuxapp-icc
[27] i686-native-linux-gcc
[28] i686-native-linux-icc
[29] ppc_64-power8-linuxapp-gcc
[30] ppc_64-power8-linux-gcc
[31] x86_64-native-bsdapp-clang
[32] x86_64-native-bsdapp-gcc
[33] x86_64-native-freebsd-clang
[34] x86_64-native-freebsd-gcc
[35] x86_64-native-linuxapp-clang
[36] x86_64-native-linuxapp-gcc
[37] x86_64-native-linuxapp-icc
[38] x86_64-native-linux-clang
[39] x86_64-native-linux-gcc
[40] x86_64-native-linux-icc
[41] x86_x32-native-linuxapp-gcc
[42] x86_x32-native-linux-gcc

----------------------------------------------------------
 Step 2: Setup linux environment
----------------------------------------------------------
[43] Insert IGB UIO module
[44] Insert VFIO module
[45] Insert KNI module
[46] Setup hugepage mappings for non-NUMA systems
[47] Setup hugepage mappings for NUMA systems
[48] Display current Ethernet/Baseband/Crypto device settings
[49] Bind Ethernet/Baseband/Crypto device to IGB UIO module
[50] Bind Ethernet/Baseband/Crypto device to VFIO module
[51] Setup VFIO permissions

----------------------------------------------------------
 Step 3: Run test application for linux environment
----------------------------------------------------------
[52] Run test application ($RTE_TARGET/app/test)
[53] Run testpmd application in interactive mode ($RTE_TARGET/app/testpmd)

----------------------------------------------------------
 Step 4: Other tools
----------------------------------------------------------
[54] List hugepage info from /proc/meminfo

----------------------------------------------------------
 Step 5: Uninstall and system cleanup
----------------------------------------------------------
[55] Unbind devices from IGB UIO or VFIO driver
[56] Remove IGB UIO module
[57] Remove VFIO module
[58] Remove KNI module
[59] Remove hugepage mappings

[60] Exit Script
(5)导出dpdk环境变量。
cd dpdk路径
# 如 dpdk/dpdk-stable-19.08.2/
# 切换root权限
sudo su
export RTE_SDK=dpdk路径
export RTE_TARGET=x86_64-native-linux-gcc
(6)配置dpdk。
./usertools/dpdk-setup.sh
依次执行:
43(加载DPDK UIO 模块,即插入driver)
44(加载VFIO模块,也是一种driver)
45(加载KNI模块,将一些数据写回内核)
46(设置巨页,可以不需要频繁页交换,512)
47(设置巨页,可512)
49(执行之前需要eth0 down掉,执行sudo ifconfig eth0 down,使绑定dpdk)pci地址=对应eth0的(如0000:03:00.0)
60(退出)
2、DPDK工作原理
网络上所有的数据传输都要经过网卡,网卡将模拟信号转换为数字信号,也就是将物理层信号转换为数据链路层信号。
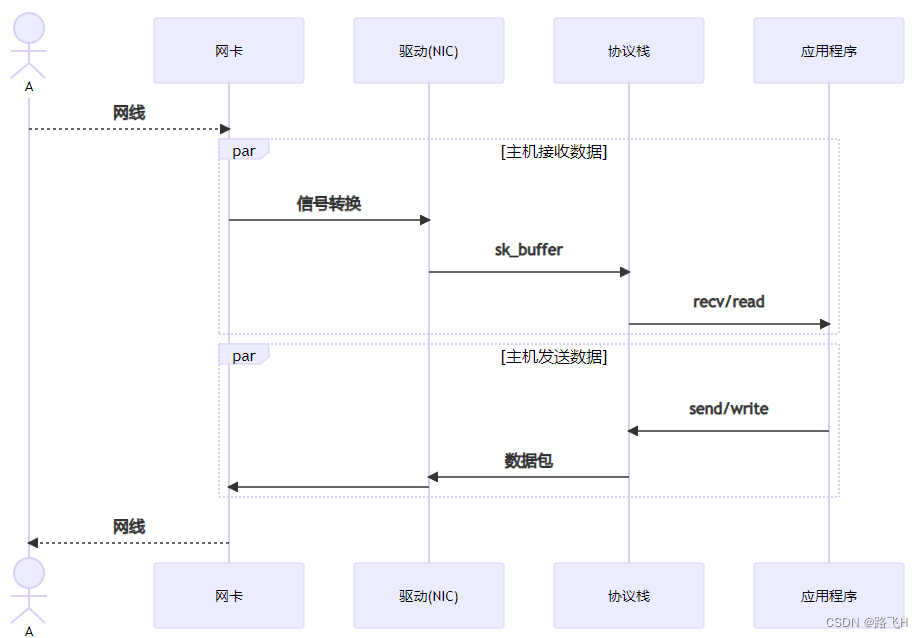
这个过程会进行两次拷贝,第一次是从网卡拷贝到NIC,用于组织sk_buffer;第二次是从内核空间拷贝到用户空间,应用程序处理数据。这些拷贝需要CPU的参与,会占用CPU资源。
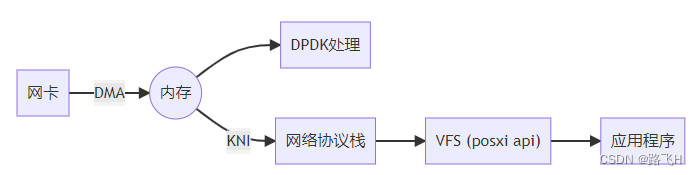
DPDK的作用:
- 是把网卡是数据映射到内存。
- 而且DPDK提供巨页机制,将原来的4K每页提升到2M、1G的巨页。
- 控制多队列网卡,提高性能;在启动线程时做了CPU亲缘性。
- DPDK提高一种KNI(Kernel Network Interface)方式,将不关注的数据写回内核让内核处理。
DPDK能用来做一下应用:
- 路由器。
- 网络协议栈的基石部分。
- 防火墙。
- VPN。
DPDK的优势:
- 有专门的公司维护,有保障。
- 问题能有快速解决,迭代出新的版本。
- 文档齐全。


 4245
4245


 被折叠的 条评论
为什么被折叠?
被折叠的 条评论
为什么被折叠?
 到【灌水乐园】发言


