经过朋友指导,终于成功在windows7上成功编译了caffe,这里将编译过程记录
1. 安装文件准备
1.1 visual studio 2013安装包下载
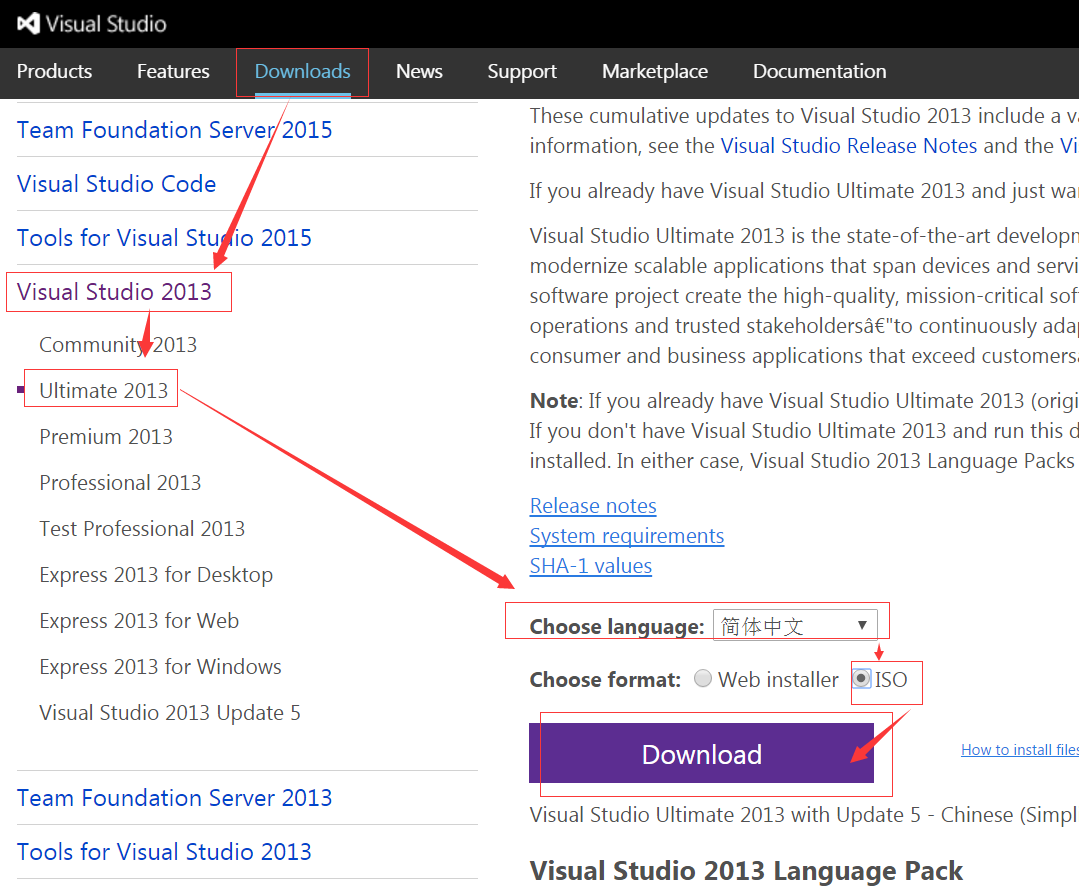
- 进入visual studio下载页
- 选择Visual Studio 2013–>Ultimate 2013版–>简体中文iso文件–>下载
1.2 CUDA7.5 (optional)
如果不需要cuda版本的caffe,本步跳过
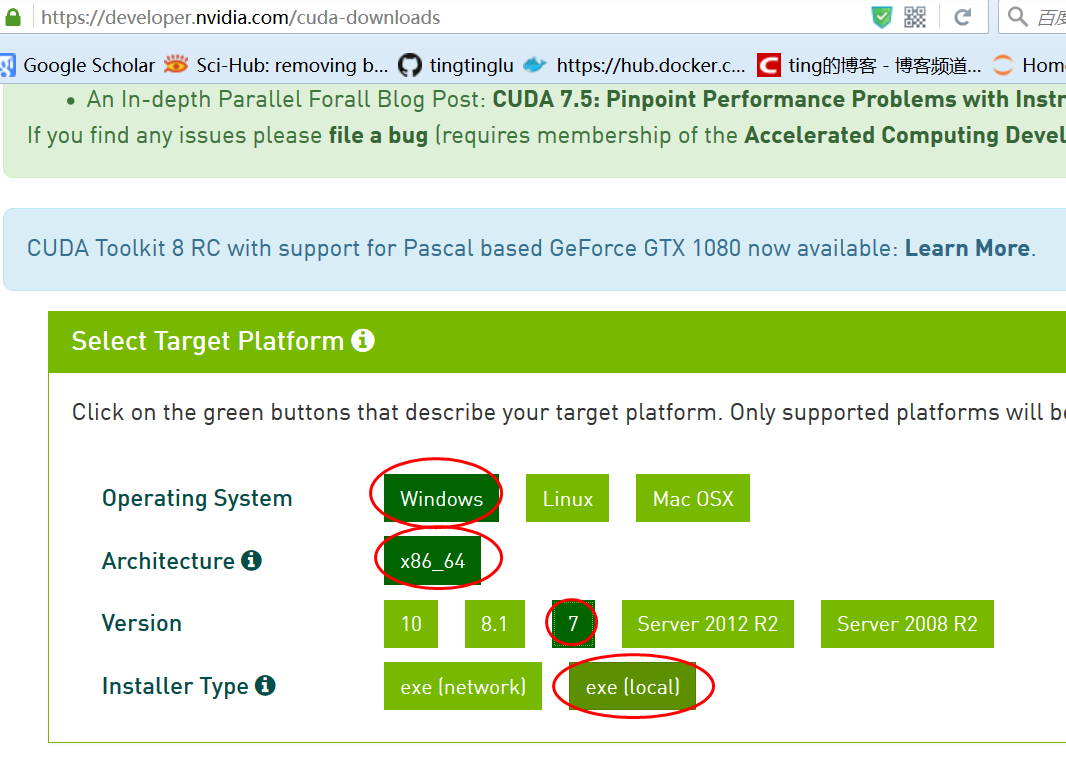
- 下载地址:
nvidia官网的cuda-toolkit-archive
…
1.3 windows版本caffe
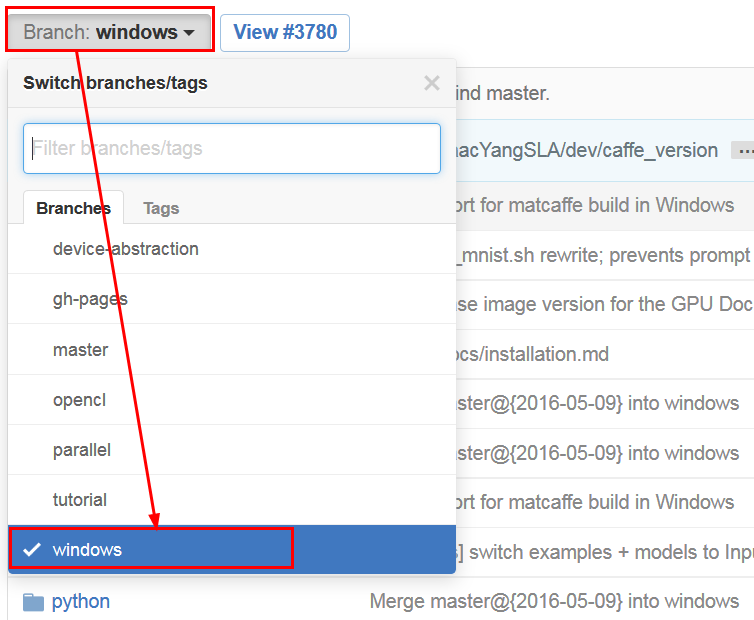
- 下载地址为GitHub的caffe windows版本
- 一定要注意,brand那里选择windows
1.4 下载cuDNN (optional)
- 如果不需要配置cuDNN,该步请跳过
- 从nVidia官网下载cuDNN v3或者是cuDNN v4,注意,需要注册才能下载
下载后解压缩,如下图所示
1.5 下载Anaconda安装包 (optional)
- 该安装包是用来安装python的,从而可以配置pycaffe
- 这里选择的是利用Anaconda的方法按照python,所以才需要下载Anaconda安装包,当然,也可以按照其他的方法安装
- 如果不需要配置pycaffe,该步请跳过
- 一般情况下,可能大家的机器上都已经安装了python,那么,也请跳过该步
- Anaconda安装包下载地址:https://www.continuum.io/downloads
1.6 下载Matlab安装包 (optional)
- 该安装包是用来安装matlab的,从而可以配置matcaffe
- 如果不需要配置matcaffe ,该步请跳过
- 一般情况下,可能大家的机器上都已经安装了matlab,那么,也请跳过该步
- matlab下载地址这里就不列出了,请自行寻找
2.安装visual studio 2013
具体安装方法见: 安装visual studio 2013
3.安装cuda7.5 (optional)
-
如果不需要cuda版本的caffe,本部分可以跳过
-
安装方法与theano安装(二)windows安装visual studio 2010及cuda中的cuda安装方法一致,只不过是版本号不同而已
4. 利用Anaconda安装python (optional)
如果你的本机没有安装Python,并且你需要配置pycaffe,那么,请按照win7系统安装python,并按照Pycharm集成开发环境安装python
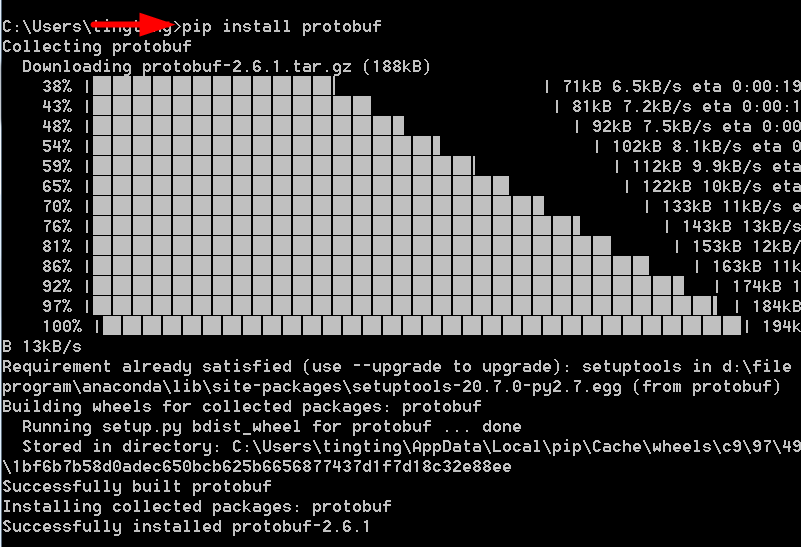
安装完python后,再安装一下protobuf,因为后面编译pycaffe时有需要:
- 利用pip工具安装protobuf:
pip install protobuf
5. 安装matlab (optional)
如果你的本机没有安装matlab ,并且你需要配置matcaffe,那么,请安装matlab,具体安装方法请自行查阅
6.修改配置文件
在github上下载的window caffe把呢你自带一个配置文件的例子,在进行编译之前,需要先更改该文件内容
6.1 解压缩下载的caffe-windows文件
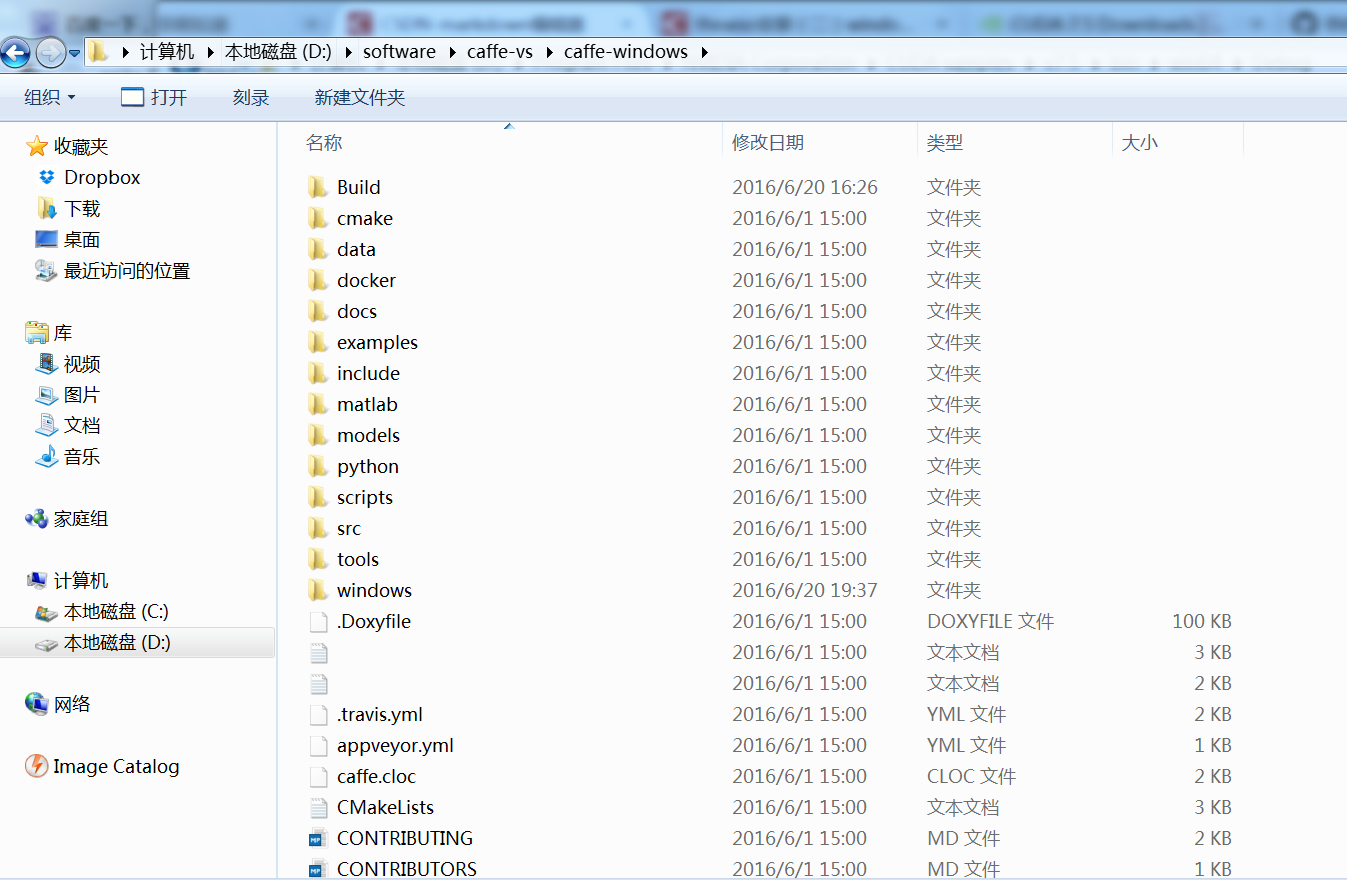
这里假设caffe-windows被解压到了如下的文件夹中
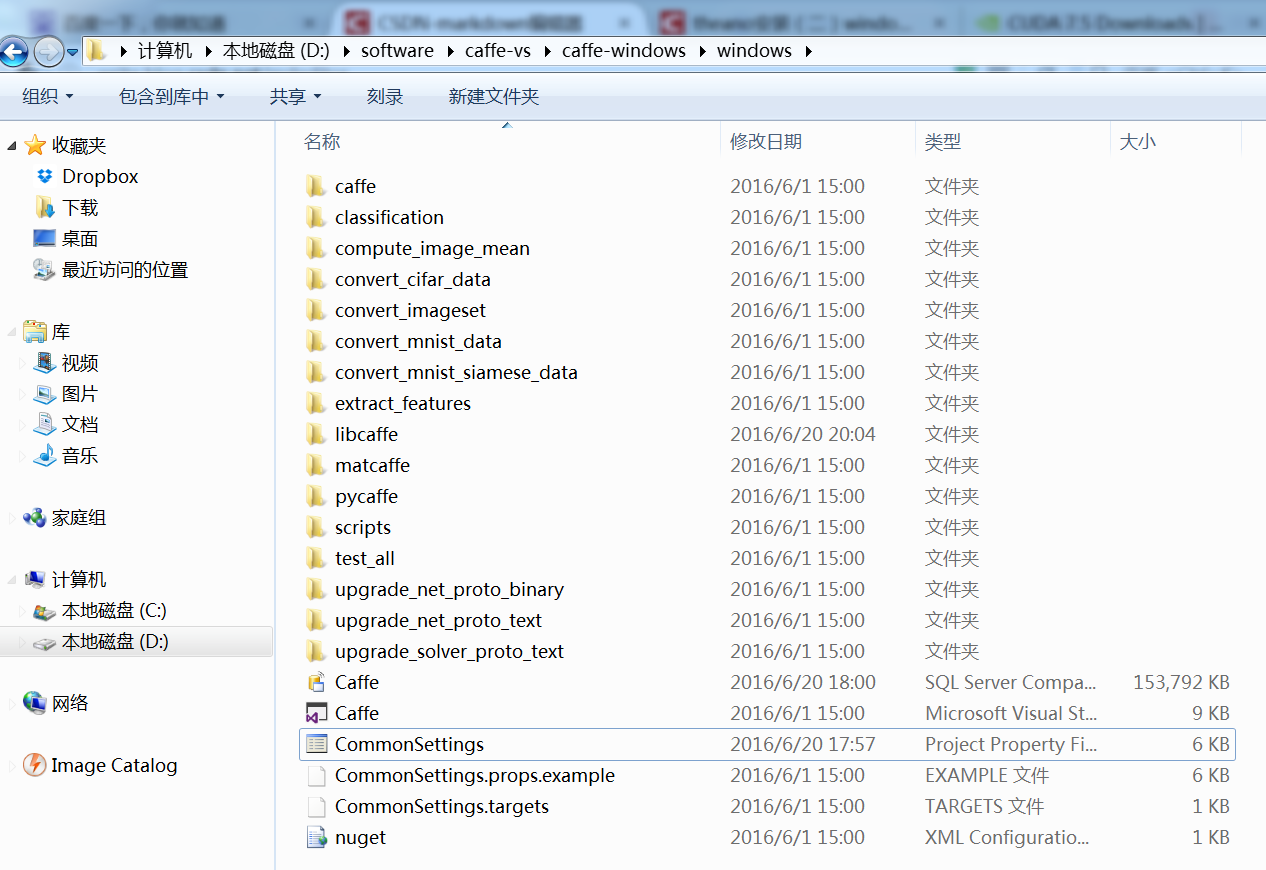
6.2 进入到windows文件夹
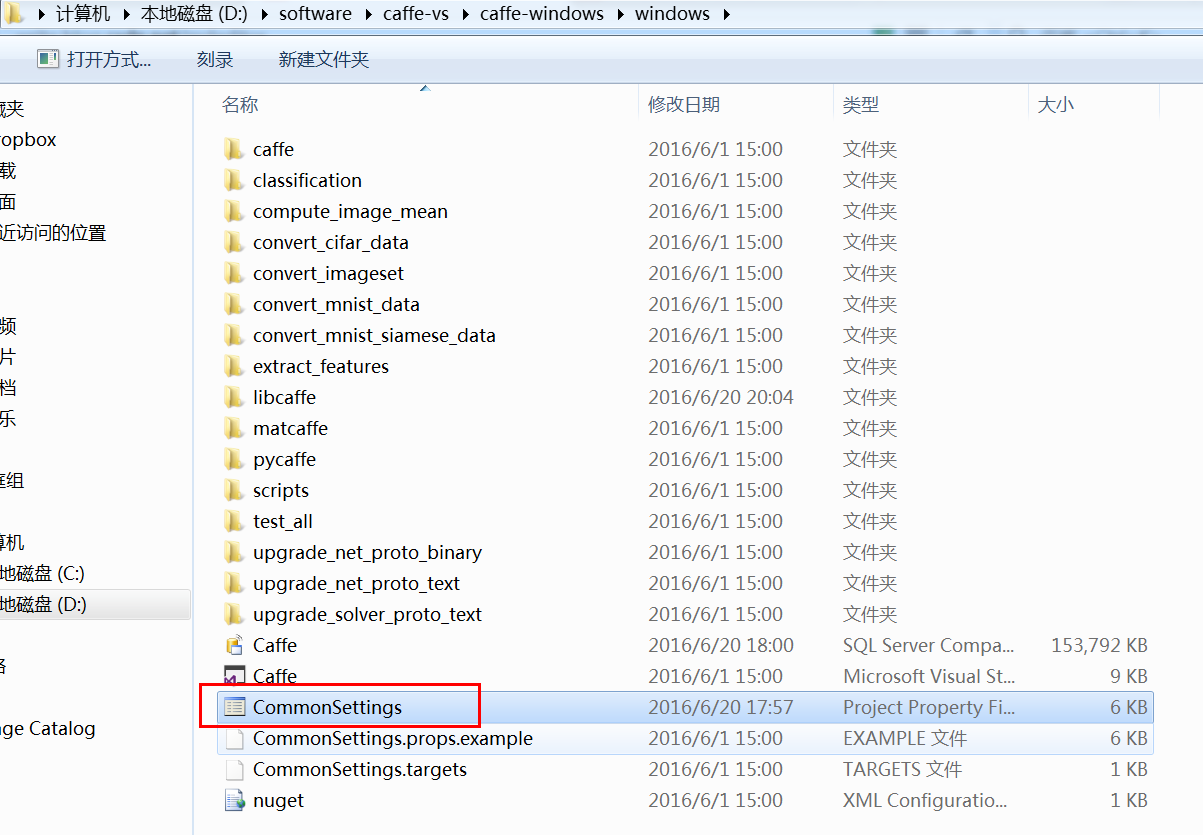
6.3 复制配置文件,并重命名
将该文件夹(即.\windows)下的CommonSettings.props.example文件复制一份儿,并将复制的文件命名为CommonSettings.props
-
6.4 修改配置文件(修改工程的属性文件)
6.4.1 配置文件说明
-
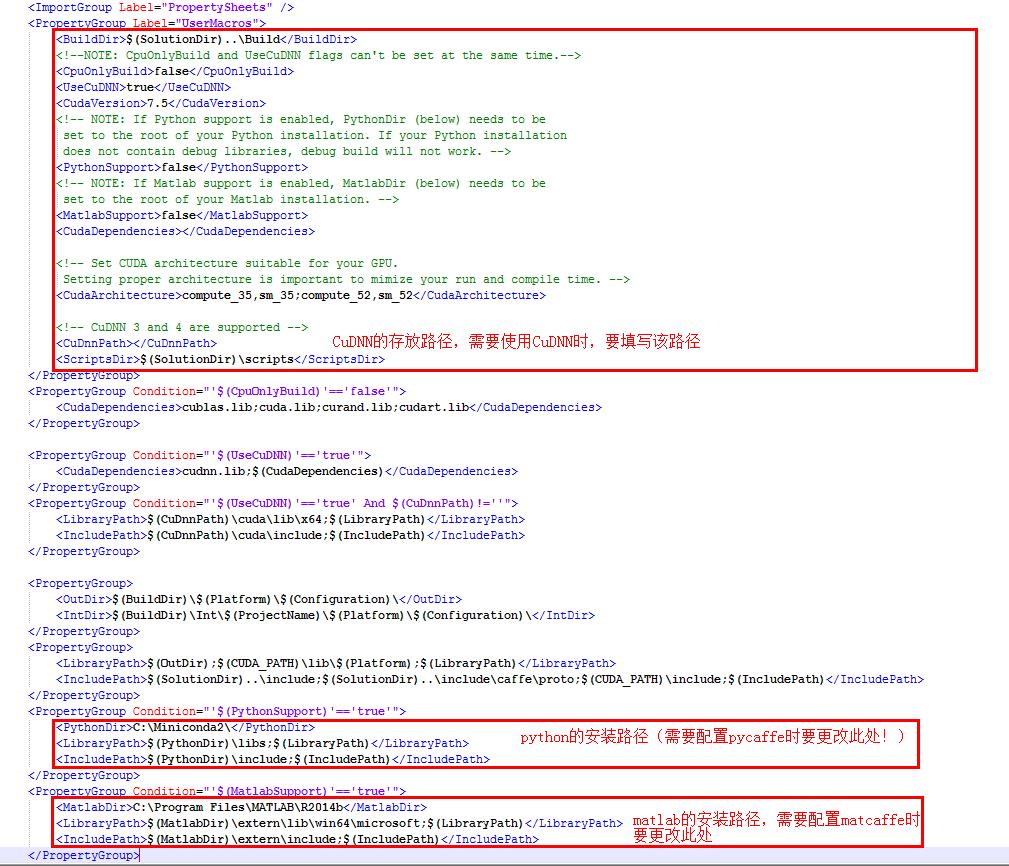
caffe-windows自带的配置文件CommonSettings.props.example中与我们后面要进行的编译密切相关的就是如下部分
-
例子中所有配置参数都是默认值
-
CpuOnlyBuild:是否使用CPU- 默认值为False(即使用GPU编译)
- 如果本机没有配置好CUDA,那么,该值应该赋值为True;
- 如果本机已经配置好CUDA,并且需要编译CUDA版本的caffe,那么,该值应该赋值为True、
-
UseCuDNN:是否使用CuDNN- 默认值为True;
- 如果本机没有配置好CUDA,那么,该值应该赋值为False;
- 注意:CpuOnlyBuild和CuDNN不能同时为True;
- 如果这里设置为True,那么还需要对
<CuDnnPath></CuDnnPath>赋值,即下载的CuDNN的路径
-
CudaVersion:CUDA的版本 -
PythonSupport:是否支持python- 默认值为False,即后续不编译pycaffe;
- 如果需要编译pycaffe,那么该值设置为True
- 如果这里设置为true,那么还需要对
<PythonDir>C:\Miniconda2\</PythonDir>赋值
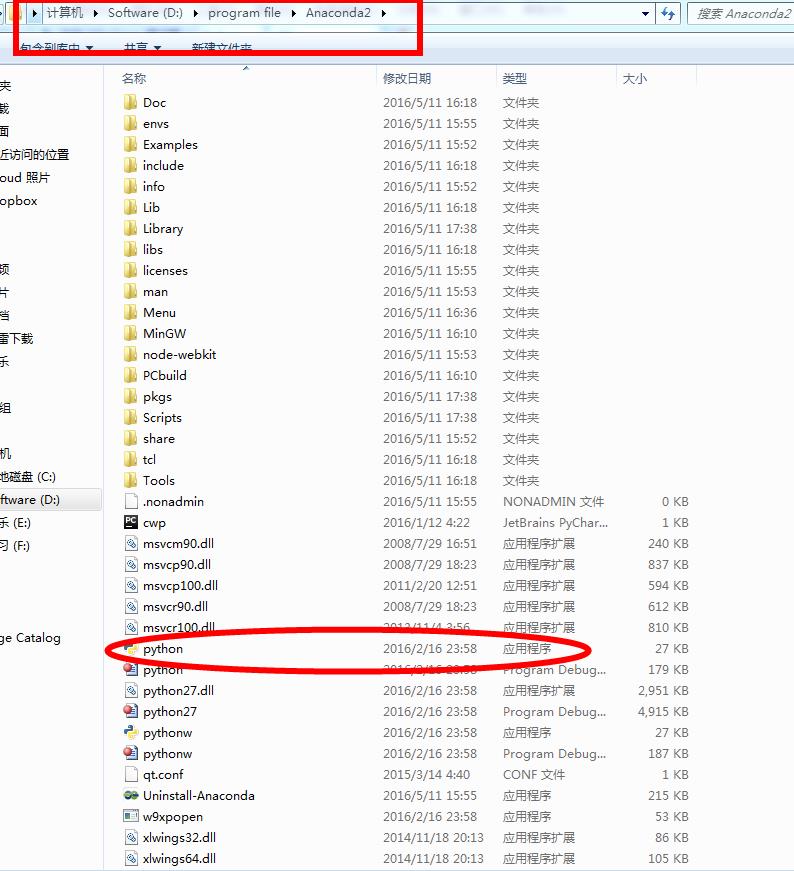
- 上面的值是默认的,应该修改为本机的python安装路径,也就是python.exe所在路径,例如,本机是利用Anaconda安装的python,路径如下:
D:\program file\Anaconda2,那么,应该令<PythonDir>D:\program file\Anaconda2</PythonDir>
- 上面的值是默认的,应该修改为本机的python安装路径,也就是python.exe所在路径,例如,本机是利用Anaconda安装的python,路径如下:
-
MatlabSupport:是否支持matlab- 默认值为False;
- 如果需要编译matcaffe,那么该值设置为True
- 如果该值设置为true,那么还需要对
<MatlabDir>C:\Program Files\MATLAB\R2014b</MatlabDir>进行赋值:
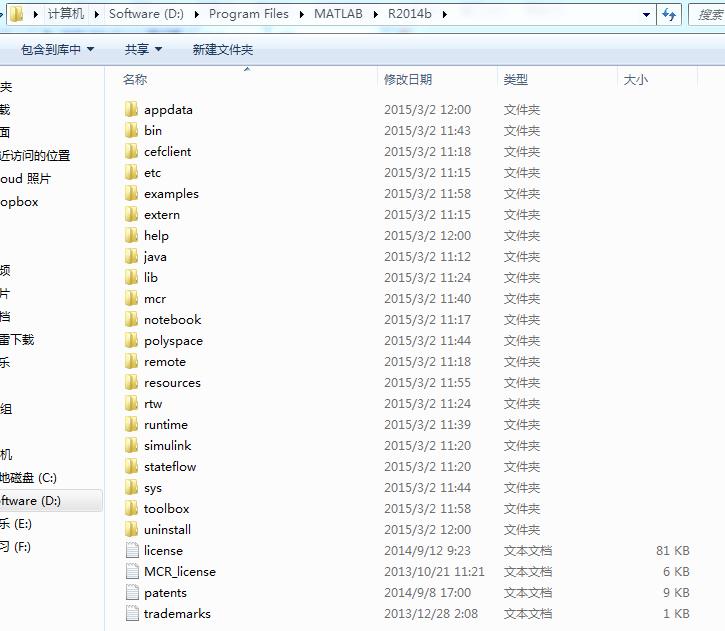
- 上面的路径是默认的,需要更改为本机的matlab安装目录,例如,本机的matlab安装路径如下:
D:\Program Files\MATLAB\R2014b,那么,<MatlabDir>D:\Program Files\MATLAB\R2014b</MatlabDir>
- 上面的路径是默认的,需要更改为本机的matlab安装目录,例如,本机的matlab安装路径如下:
6.4.2 非CUDA版本的caffe
配置文件部分设置如下:
    <PropertyGroup Label="UserMacros">
        <BuildDir>$(SolutionDir)..\Build</BuildDir>
        <!--NOTE: CpuOnlyBuild and UseCuDNN flags can't be set at the same time.-->
        <CpuOnlyBuild>true</CpuOnlyBuild>
        <UseCuDNN>false</UseCuDNN>
        <CudaVersion>7.5</CudaVersion>
        <!-- NOTE: If Python support is enabled, PythonDir (below) needs to be
         set to the root of your Python installation. If your Python installation
         does not contain debug libraries, debug build will not work. -->
        <PythonSupport>false</PythonSupport>
        <!-- NOTE: If Matlab support is enabled, MatlabDir (below) needs to be
         set to the root of your Matlab installation. -->
        <MatlabSupport>false</MatlabSupport>
        <CudaDependencies></CudaDependencies>

        <!-- Set CUDA architecture suitable for your GPU.
         Setting proper architecture is important to mimize your run and compile time. -->
        <CudaArchitecture>compute_35,sm_35;compute_52,sm_52</CudaArchitecture>

        <!-- CuDNN 3 and 4 are supported -->
        <CuDnnPath></CuDnnPath>
        <ScriptsDir>$(SolutionDir)\scripts</ScriptsDir>
    </PropertyGroup>
    <PropertyGroup Condition="'$(CpuOnlyBuild)'=='false'">
        <CudaDependencies>cublas.lib;cuda.lib;curand.lib;cudart.lib</CudaDependencies>
    </PropertyGroup>

    <PropertyGroup Condition="'$(UseCuDNN)'=='true'">
        <CudaDependencies>cudnn.lib;$(CudaDependencies)</CudaDependencies>
    </PropertyGroup>
    <PropertyGroup Condition="'$(UseCuDNN)'=='true' And $(CuDnnPath)!=''">
        <LibraryPath>$(CuDnnPath)\cuda\lib\x64;$(LibraryPath)</LibraryPath>
        <IncludePath>$(CuDnnPath)\cuda\include;$(IncludePath)</IncludePath>
    </PropertyGroup>

    <PropertyGroup>
        <OutDir>$(BuildDir)\$(Platform)\$(Configuration)\</OutDir>
        <IntDir>$(BuildDir)\Int\$(ProjectName)\$(Platform)\$(Configuration)\</IntDir>
    </PropertyGroup>
    <PropertyGroup>
        <LibraryPath>$(OutDir);$(CUDA_PATH)\lib\$(Platform);$(LibraryPath)</LibraryPath>
        <IncludePath>$(SolutionDir)..\include;$(SolutionDir)..\include\caffe\proto;$(CUDA_PATH)\include;$(IncludePath)</IncludePath>
    </PropertyGroup>
    <PropertyGroup Condition="'$(PythonSupport)'=='true'">
        <PythonDir>C:\Miniconda2\</PythonDir>
        <LibraryPath>$(PythonDir)\libs;$(LibraryPath)</LibraryPath>
        <IncludePath>$(PythonDir)\include;$(IncludePath)</IncludePath>
    </PropertyGroup>
    <PropertyGroup Condition="'$(MatlabSupport)'=='true'">
        <MatlabDir>C:\Program Files\MATLAB\R2014b</MatlabDir>
        <LibraryPath>$(MatlabDir)\extern\lib\win64\microsoft;$(LibraryPath)</LibraryPath>
        <IncludePath>$(MatlabDir)\extern\include;$(IncludePath)</IncludePath>
    </PropertyGroup>
- 1
- 2
- 3
- 4
- 5
- 6
- 7
- 8
- 9
- 10
- 11
- 12
- 13
- 14
- 15
- 16
- 17
- 18
- 19
- 20
- 21
- 22
- 23
- 24
- 25
- 26
- 27
- 28
- 29
- 30
- 31
- 32
- 33
- 34
- 35
- 36
- 37
- 38
- 39
- 40
- 41
- 42
- 43
- 44
- 45
- 46
- 47
- 48
- 49
- 50
- 51
- 52
- 53
- 1
- 2
- 3
- 4
- 5
- 6
- 7
- 8
- 9
- 10
- 11
- 12
- 13
- 14
- 15
- 16
- 17
- 18
- 19
- 20
- 21
- 22
- 23
- 24
- 25
- 26
- 27
- 28
- 29
- 30
- 31
- 32
- 33
- 34
- 35
- 36
- 37
- 38
- 39
- 40
- 41
- 42
- 43
- 44
- 45
- 46
- 47
- 48
- 49
- 50
- 51
- 52
- 53
6.4.3 CUDA版本的caffe
配置文件部分设置如下:
    <PropertyGroup Label="UserMacros">
        <BuildDir>$(SolutionDir)..\Build</BuildDir>
        <!--NOTE: CpuOnlyBuild and UseCuDNN flags can't be set at the same time.-->
        <CpuOnlyBuild>false</CpuOnlyBuild>
        <UseCuDNN>ture</UseCuDNN>
        <CudaVersion>7.5</CudaVersion>
        <!-- NOTE: If Python support is enabled, PythonDir (below) needs to be
         set to the root of your Python installation. If your Python installation
         does not contain debug libraries, debug build will not work. -->
        <PythonSupport>true</PythonSupport>
        <!-- NOTE: If Matlab support is enabled, MatlabDir (below) needs to be
         set to the root of your Matlab installation. -->
        <MatlabSupport>true</MatlabSupport>
        <CudaDependencies></CudaDependencies>

        <!-- Set CUDA architecture suitable for your GPU.
         Setting proper architecture is important to mimize your run and compile time. -->
        <CudaArchitecture>compute_35,sm_35;compute_52,sm_52</CudaArchitecture>

        <!-- CuDNN 3 and 4 are supported -->
        <CuDnnPath>D:\software\caffe-vs\cuda-cuDNN</CuDnnPath>
        <ScriptsDir>$(SolutionDir)\scripts</ScriptsDir>
    </PropertyGroup>
    <PropertyGroup Condition="'$(CpuOnlyBuild)'=='false'">
        <CudaDependencies>cublas.lib;cuda.lib;curand.lib;cudart.lib</CudaDependencies>
    </PropertyGroup>

    <PropertyGroup Condition="'$(UseCuDNN)'=='true'">
        <CudaDependencies>cudnn.lib;$(CudaDependencies)</CudaDependencies>
    </PropertyGroup>
    <PropertyGroup Condition="'$(UseCuDNN)'=='true' And $(CuDnnPath)!=''">
        <LibraryPath>$(CuDnnPath)\cuda\lib\x64;$(LibraryPath)</LibraryPath>
        <IncludePath>$(CuDnnPath)\cuda\include;$(IncludePath)</IncludePath>
    </PropertyGroup>

    <PropertyGroup>
        <OutDir>$(BuildDir)\$(Platform)\$(Configuration)\</OutDir>
        <IntDir>$(BuildDir)\Int\$(ProjectName)\$(Platform)\$(Configuration)\</IntDir>
    </PropertyGroup>
    <PropertyGroup>
        <LibraryPath>$(OutDir);$(CUDA_PATH)\lib\$(Platform);$(LibraryPath)</LibraryPath>
        <IncludePath>$(SolutionDir)..\include;$(SolutionDir)..\include\caffe\proto;$(CUDA_PATH)\include;$(IncludePath)</IncludePath>
    </PropertyGroup>
    <PropertyGroup Condition="'$(PythonSupport)'=='true'">
        <PythonDir>D:\File Program\Anaconda\</PythonDir>
        <LibraryPath>$(PythonDir)\libs;$(LibraryPath)</LibraryPath>
        <IncludePath>$(PythonDir)\include;$(IncludePath)</IncludePath>
    </PropertyGroup>
    <PropertyGroup Condition="'$(MatlabSupport)'=='true'">
        <MatlabDir>D:\File Program\Matlab\</MatlabDir>
        <LibraryPath>$(MatlabDir)\extern\lib\win64\microsoft;$(LibraryPath)</LibraryPath>
        <IncludePath>$(MatlabDir)\extern\include;$(IncludePath)</IncludePath>
    </PropertyGroup>
- 1
- 2
- 3
- 4
- 5
- 6
- 7
- 8
- 9
- 10
- 11
- 12
- 13
- 14
- 15
- 16
- 17
- 18
- 19
- 20
- 21
- 22
- 23
- 24
- 25
- 26
- 27
- 28
- 29
- 30
- 31
- 32
- 33
- 34
- 35
- 36
- 37
- 38
- 39
- 40
- 41
- 42
- 43
- 44
- 45
- 46
- 47
- 48
- 49
- 50
- 51
- 52
- 53
- 1
- 2
- 3
- 4
- 5
- 6
- 7
- 8
- 9
- 10
- 11
- 12
- 13
- 14
- 15
- 16
- 17
- 18
- 19
- 20
- 21
- 22
- 23
- 24
- 25
- 26
- 27
- 28
- 29
- 30
- 31
- 32
- 33
- 34
- 35
- 36
- 37
- 38
- 39
- 40
- 41
- 42
- 43
- 44
- 45
- 46
- 47
- 48
- 49
- 50
- 51
- 52
- 53
注:事实上,对cuDNN路径的配置有两种方案:
- 方案1:将cuDNN v4的压缩包内的bin、include、lib中的文件分别放置在%CUDA_PATH% (即cuda的安装路径)的相应目录中
- 方案2:将 .\windows\CommonSettings.props文件中的CuDnnPath设置为该解压缩路径,例如,将cuDNN解压后文件放置在D:\software\caffe-vs\cuda-cuDNN中,那么,在CommonSettings.props中,令<CuDnnPath>D:\software\caffe-vs\cuda-cuDNN\</CuDnnPath>,即上面提到的方法
7 编译caffe
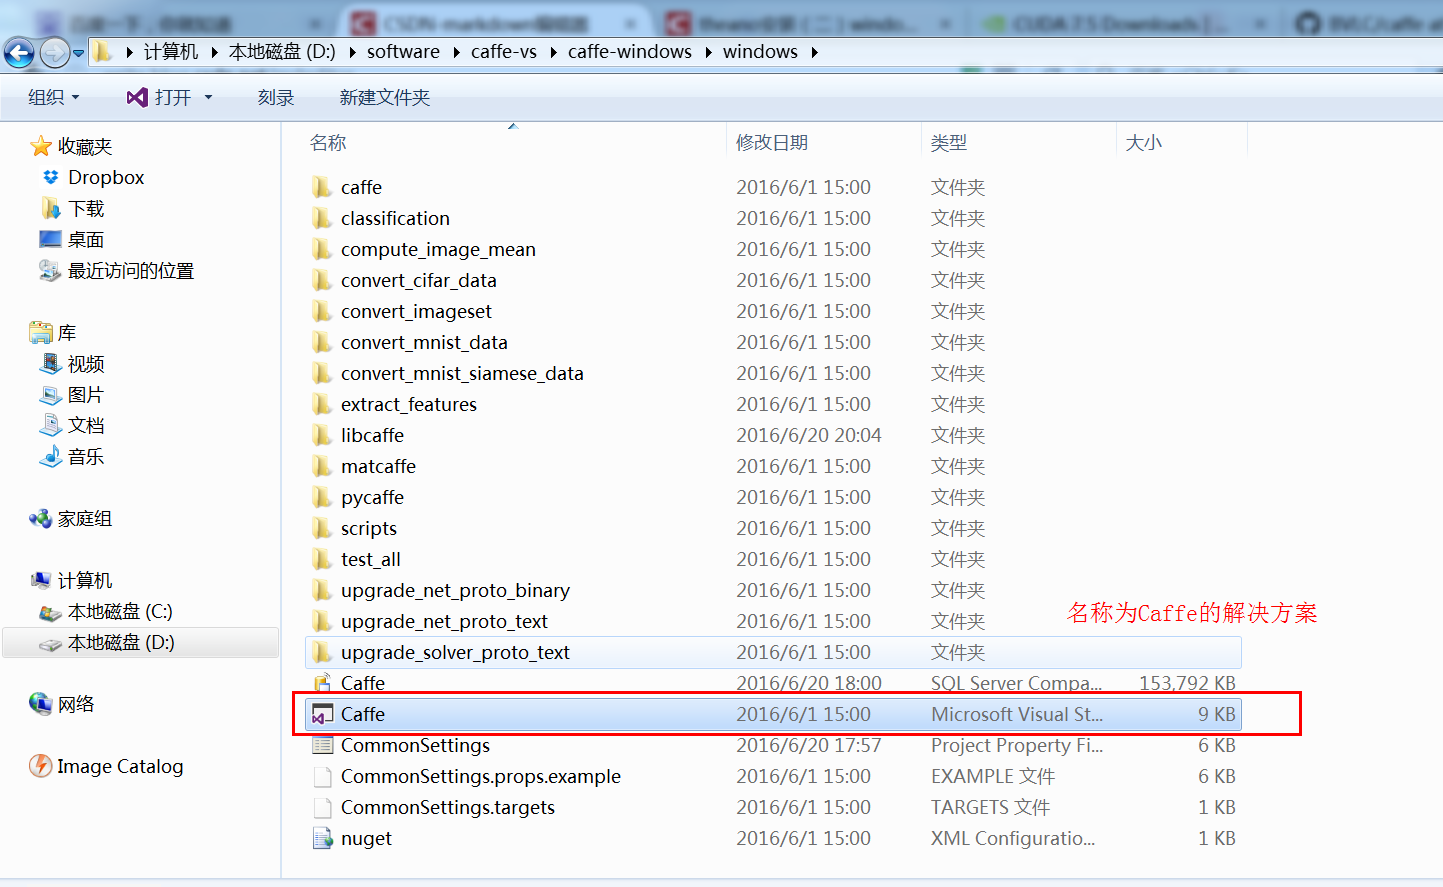
7.1 打开名称为Caffe的解决方案
利用VS2013打开名称为Caffe的解决方案
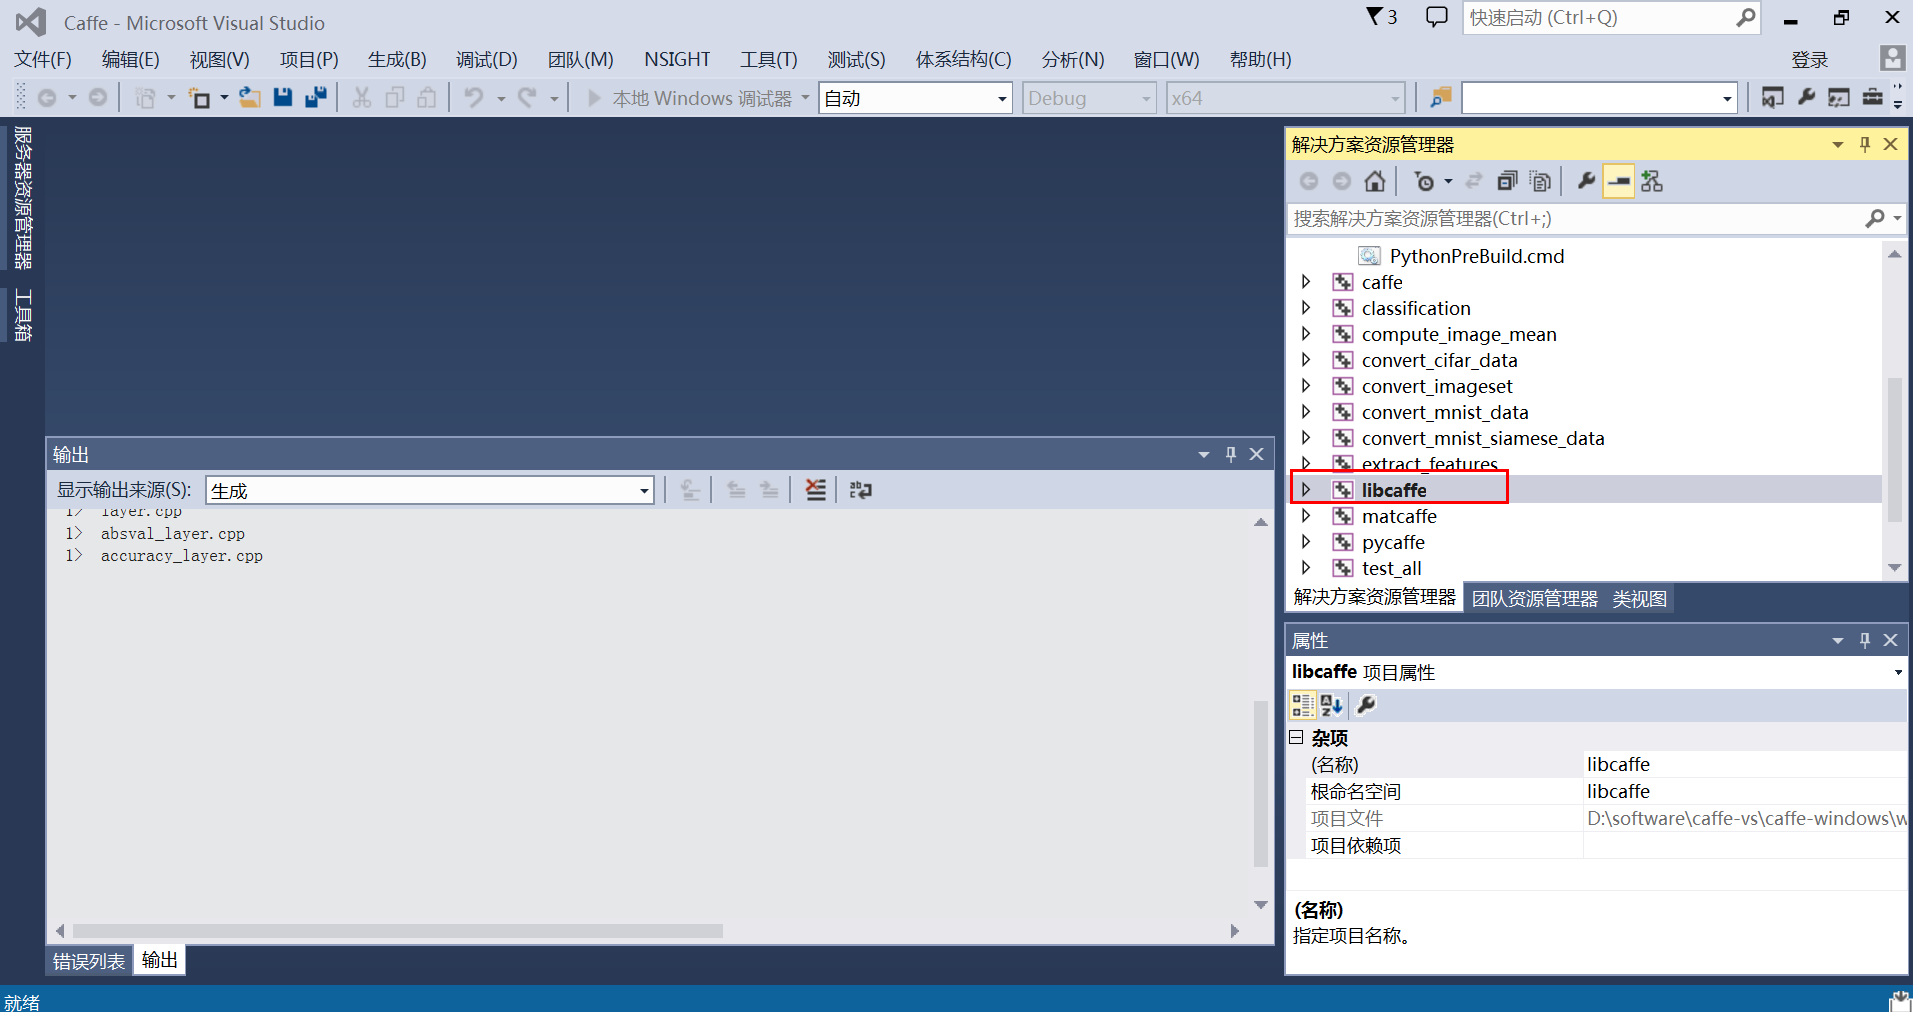
7.2 编译libcaffe项目
-
首先编译libcaffe项目(其他的项目依赖于libcaffe项目)
-
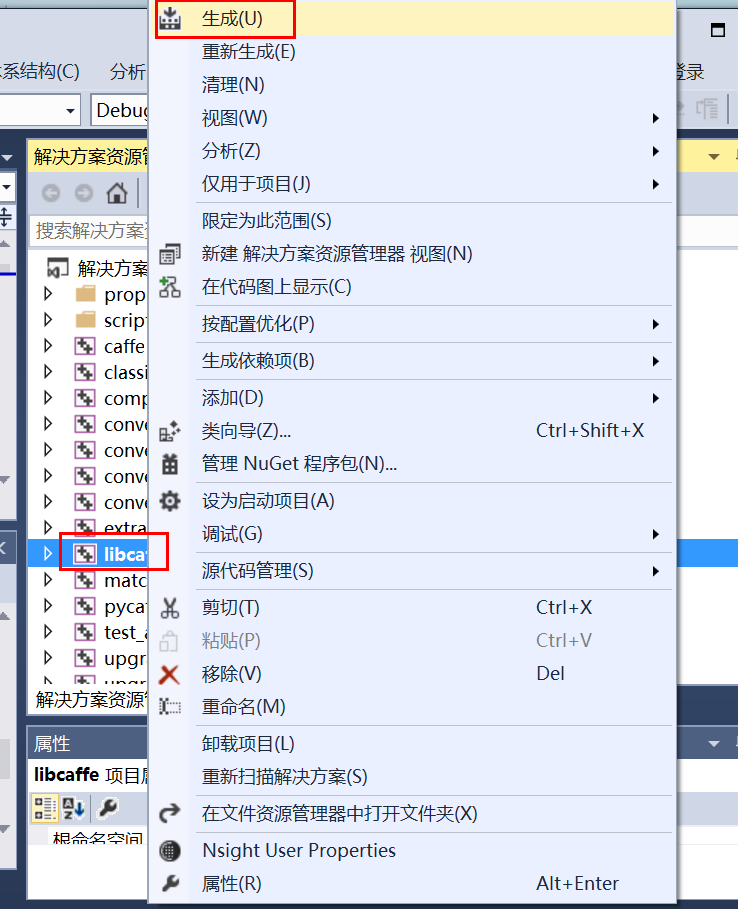
右键libcaffe,选择生成,开始编译libcaffe
…
… -
还原NuGet包,即从网络下载编译需要的各种依赖包
-
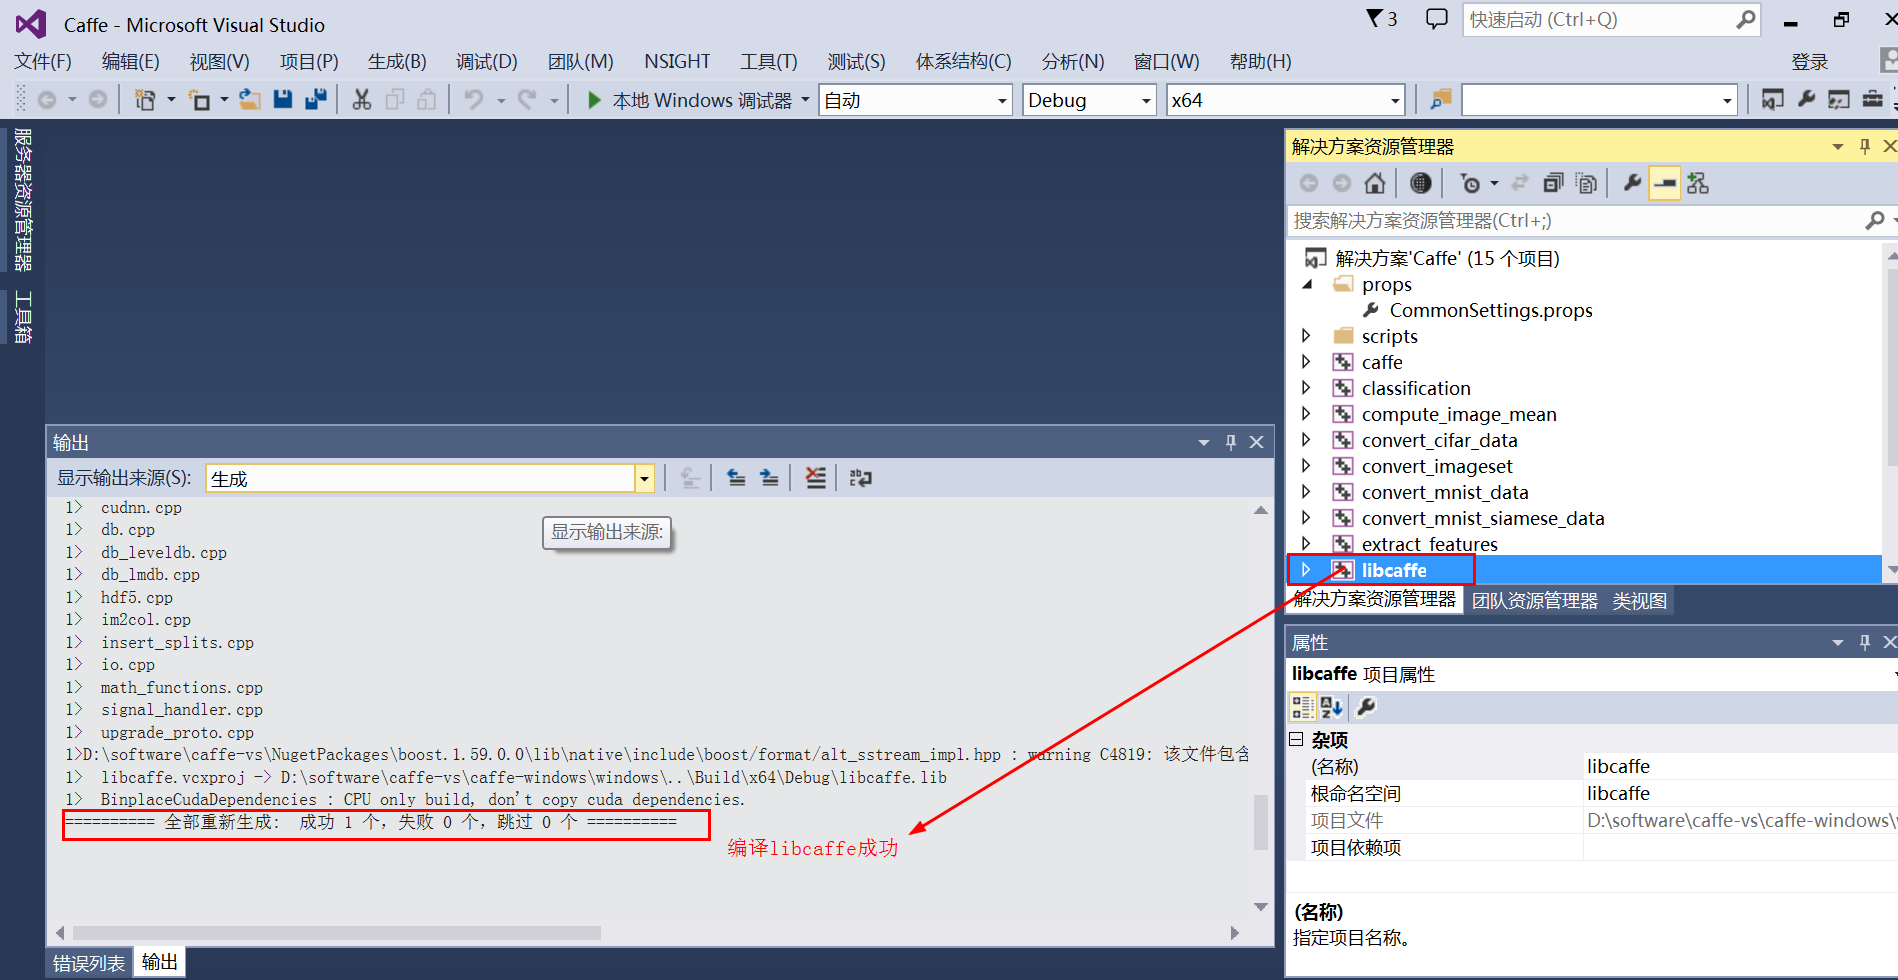
经过一段时间等待后,编译成功
-
这里有两个需要注意的地方:
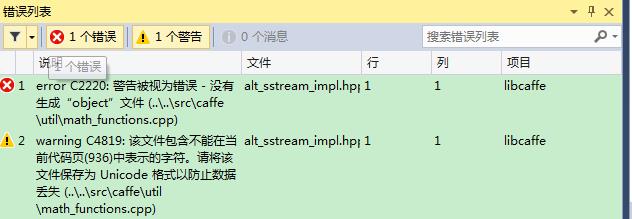
(1)编译过程中,可能会出现错误
error C2220: 警告被视为错误 - 没有生成“object”文件
错误的原因是编译过程中出现了警告,而导致编译无法进行,此时,需要进行如下修改:
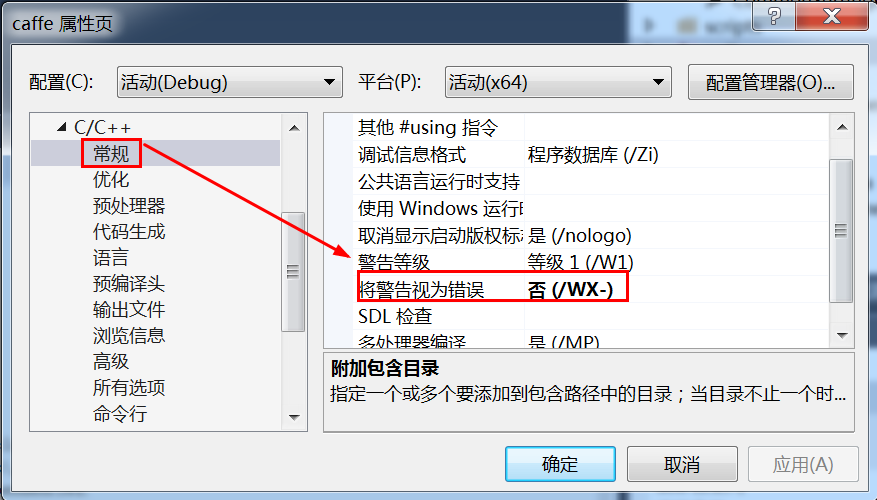
即:设置项目属性,不要将警告视为错误
右键->项目属性->C/C++->常规->将警告视为错误 设为否
另外,有一次在另外一个机器上出现了同样的问题,但按照上述方法却未解决,是因为文件的代码页为英文,而我的系统中的代码页为中文,解决方案:利用VS打开出错的文件->重新保存->重启vs->重新编译libcaffe->问题解决。
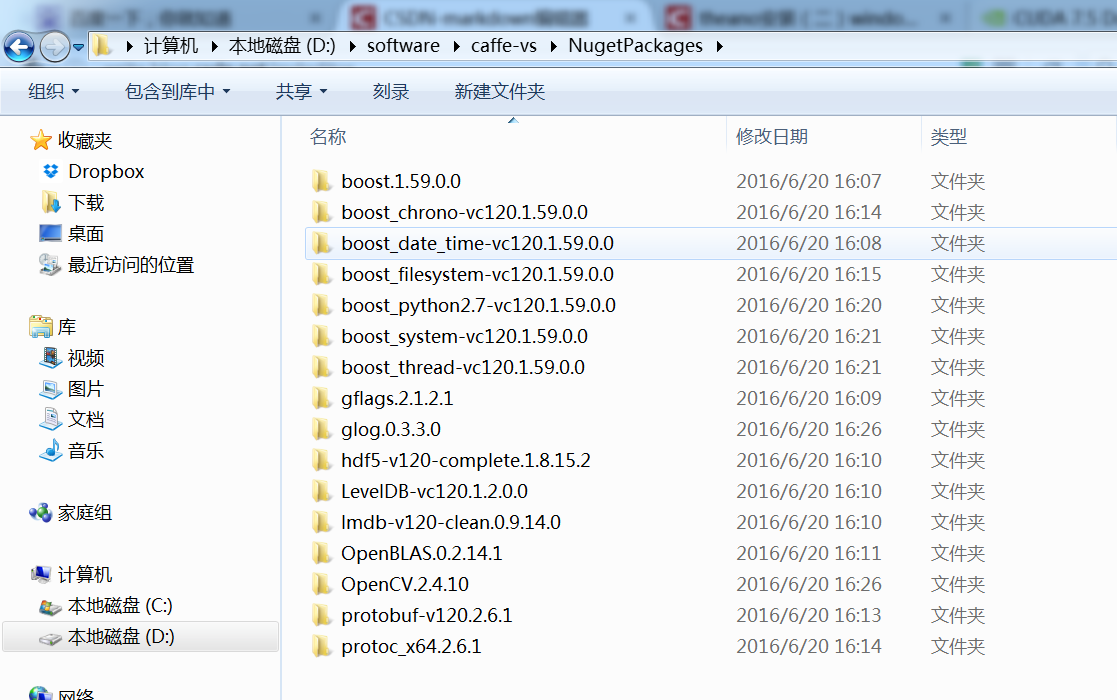
(2)caffe编译过程中,需要一些依赖包,在有网络的情况下,当编译第一个项目libcaffe时,程序会自动从网路下载这些依赖包,下载到与caffe-windows文件夹同级的NugetPackages文件夹中,下图所示即为程序自动下载的依赖包
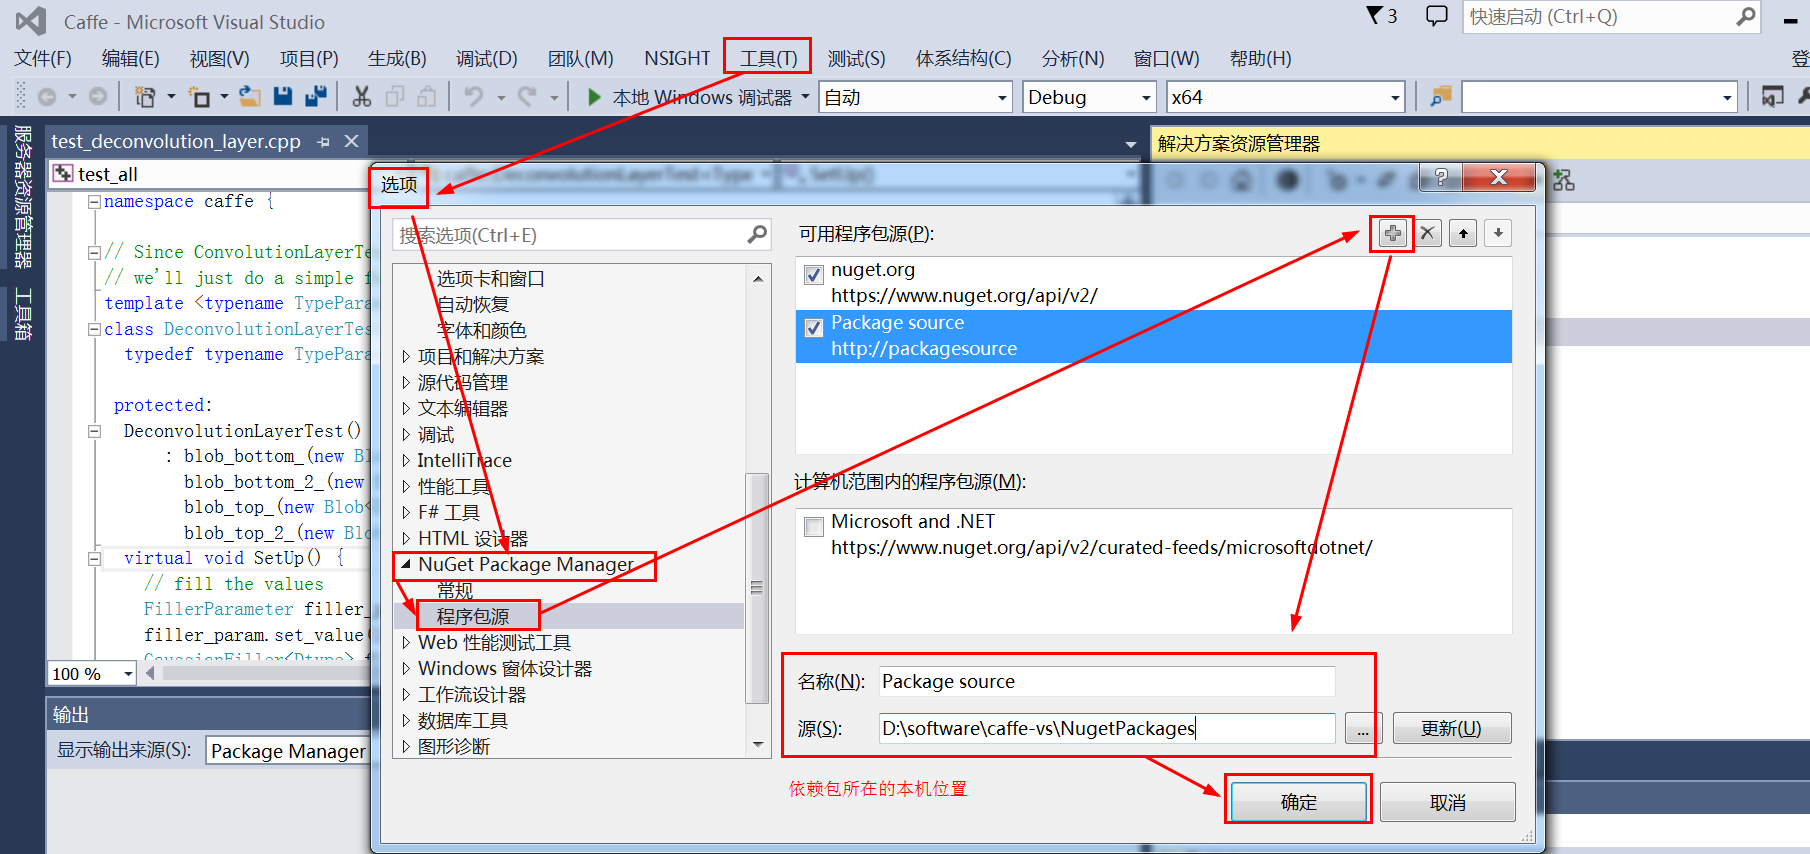
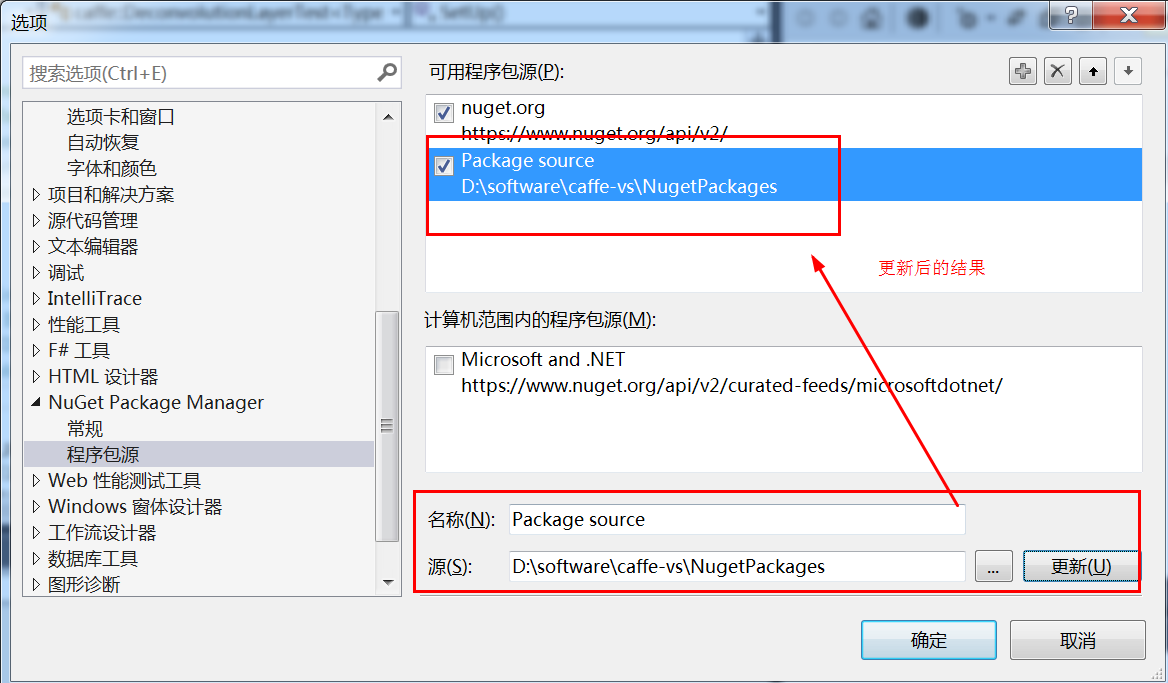
但在没有网络情况下,需要事先将这些依赖包下载好,并将它们的路径在vs的管理NuGet程序包中进行设置:工具->选项->NuGet Package Manager->程序包源->利用右侧的加号添加本地的package
…
手动添加这些package地址后,还需要手动对这些NuGet Package进行安装
(3)另外,第二次编译过程出现如下错误
发现是下载的NegetPackages\glog.0.3.3.0下载缺少两个文件:glog.overlay-x64_v120_Release_dynamic.0.3.3.0glog.overlay-x64_v120_Debug_dynamic.0.3.3.0
将第一次下载得到的这两个文件放入该文件夹,问题解决
注:这里的“第一次下载得到的这两个文件”是指NugetPackages中的glog.0.3.3.0文件夹下的两个文件,见下图
7.3 编译caffe项目
同样,在caffe项目处右键生成
F:\GenderRecognition\caffe-master\caffe-master\include\caffe工程记得包含该目录
7.4 编译pycaffe
直接在项目pycaffe右键,点击生成即可
7.5 编译matcaffe
直接在项目matcaffe右键,点击生成即可
-
第二次在编译matcaffe时,出现如下错误:
- 即编译matcaffe提示说找不到mex.h
- 将matlab_root/extend/include目录添加到matcaffe项目的include目录中,问题解决
-
上面这个问题解决后,又出现了另外一个错误
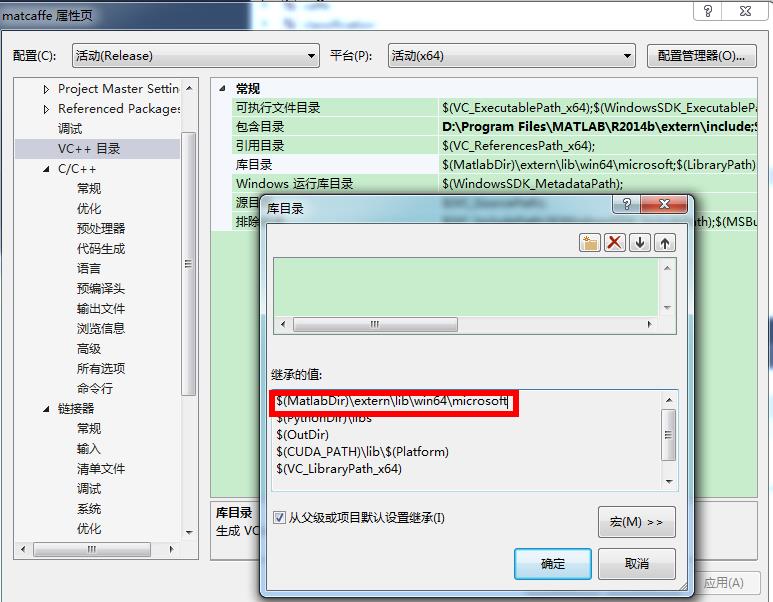
- 即链接器找不到libmx.lib(matlab的静态链接库),查看VC++库目录,没有发现设置问题
- 不知道为什么会这样, 想了一个临时的解决方便,将matlab安装路径下的
\extern\lib\win64\microsoft添加到matcaffe项目->链接器->常规->附加目录中,然后再次编译,成功;这是因为编译程序无法找到matlab的相关静态链接库的原因;
- 即链接器找不到libmx.lib(matlab的静态链接库),查看VC++库目录,没有发现设置问题
-
后来经过仔细查询,发现,原来是因为配置文件CommonSettings中的matlabDir不小心填写错误了,才会导致上面两个问题!将此处改正,上面2个问题成功解决,matcaffe编译成功
    <PropertyGroup Condition="'$(MatlabSupport)'=='true'">
        <MatlabDir>D:\Program Files\MATLAB\R2014b</MatlabDir>
        <LibraryPath>$(MatlabDir)\extern\lib\win64\microsoft;$(LibraryPath)</LibraryPath>
        <IncludePath>$(MatlabDir)\extern\include;$(IncludePath)</IncludePath>
    </PropertyGroup>
- 1
- 2
- 3
- 4
- 5
- 1
- 2
- 3
- 4
- 5
7.6 编译其他项目
接下来,再依次编译其他项目,同样的方法
classification:用来分类compute_image_mean:计算均值convert_cifar_dat:对cifat数据集进行转换convert_mnist_data:对mnist数据集进行转换
8.运行第一个caffe测试程序
为了测试编译好的caffe能否正常使用,需要进行测试,主要利用mnist数据集进行分类问题的测试
(1)下载测试数据集
(2)修改配置文件
进入文件夹D:\software\caffe-vs\caffe-windows\examples\mnist,即examples路径下的mnist文件夹
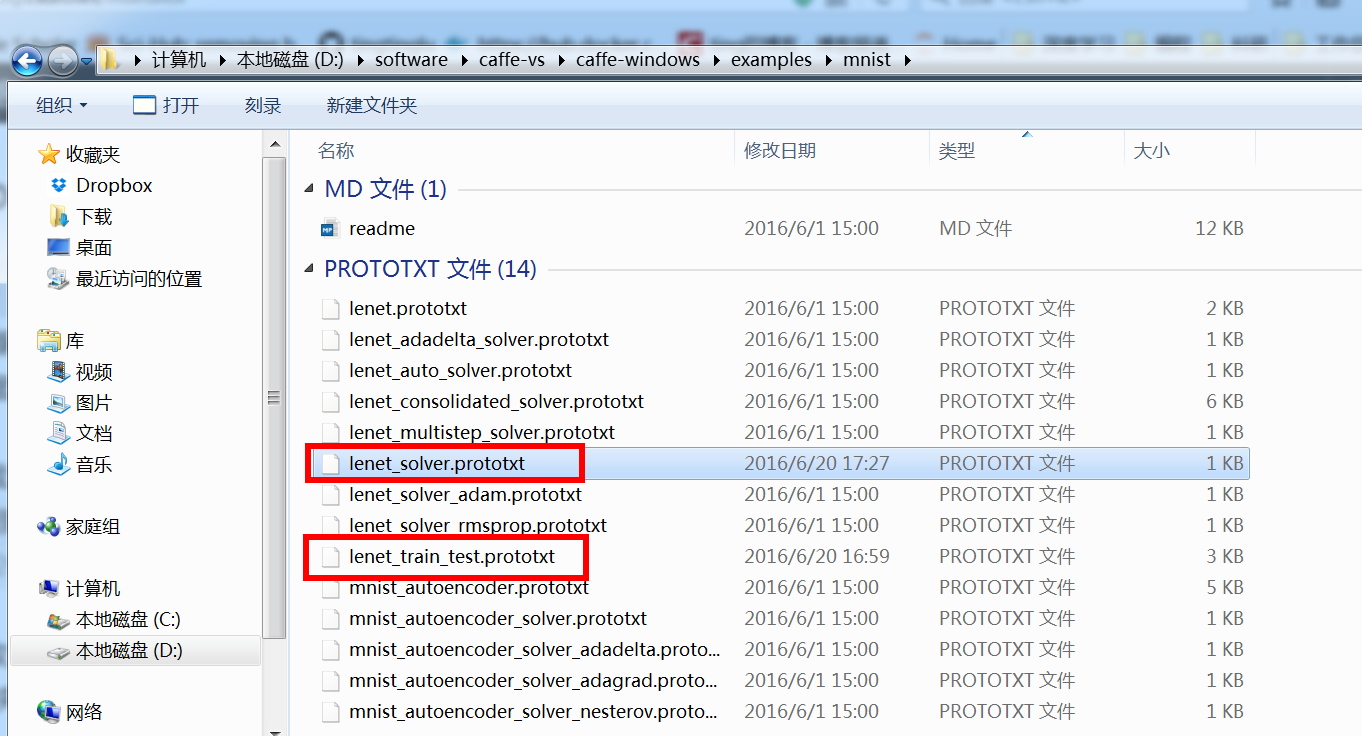
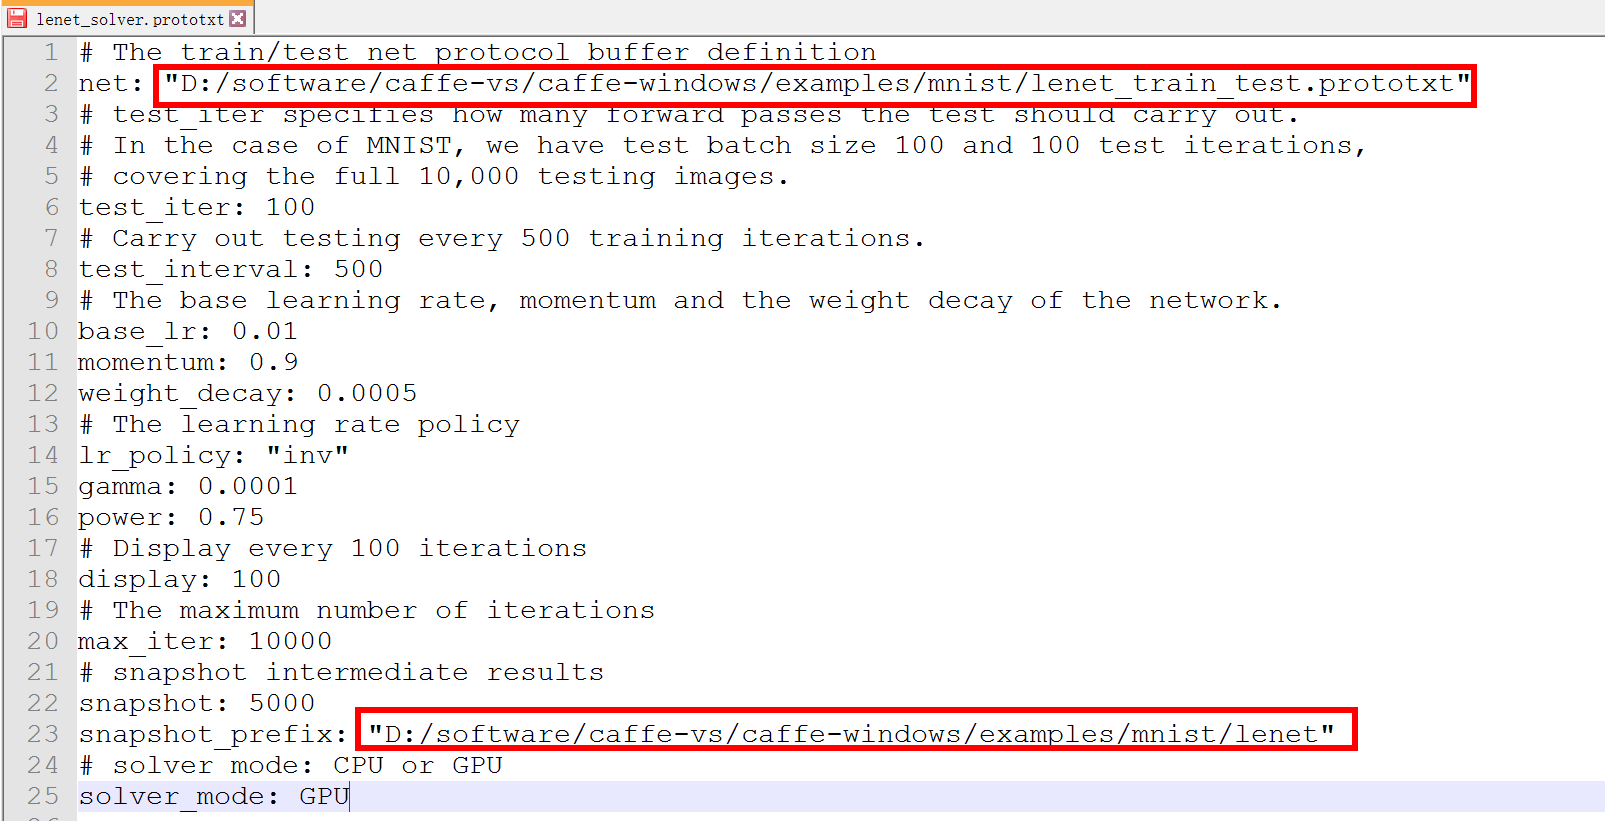
① 打开lenet_solver.prototxt
设置网络配置文件路径,这里使用了绝对路径,相对路径还没有尝试
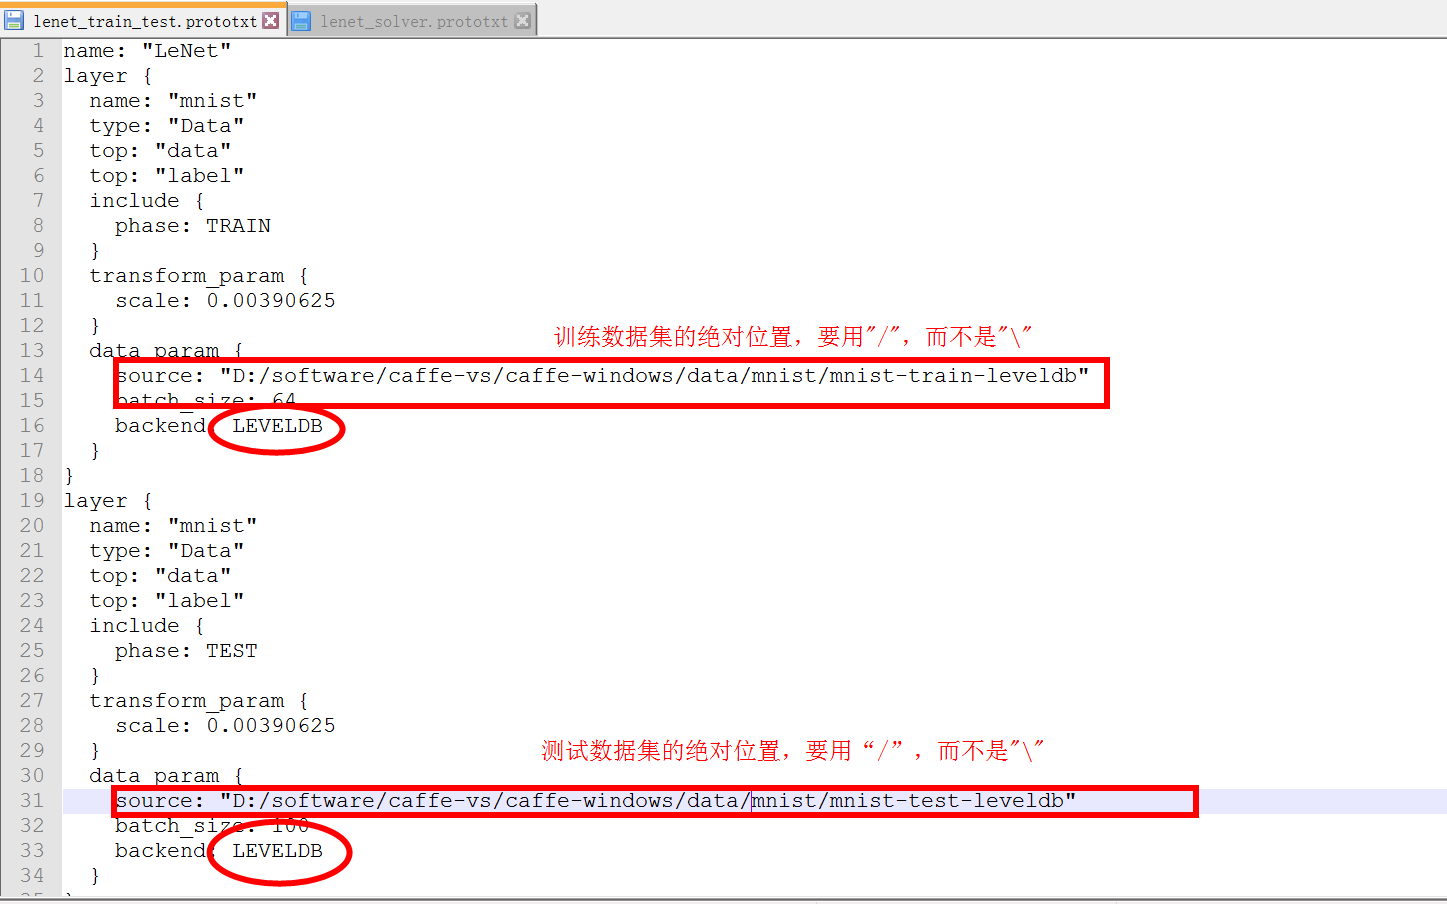
② 打开lenet_train_test.prototxt
(3)运行caffe程序,具体地
① 打开cmd命令行,cd到caffe-windows的.\Build\x64\Debug路径下,在该路径下,可以直接执行caffe.exe
D:\software\caffe-vs\caffe-windows\Build\x64\Debug
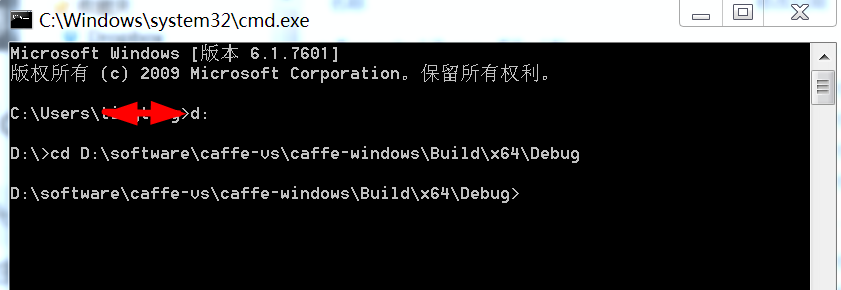
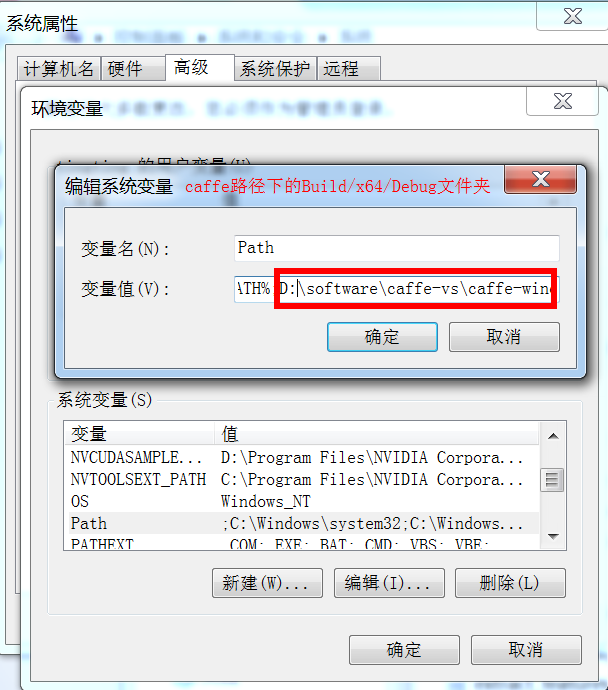
或者,为了方便,可以将caffe的路径添加到环境变量Path中,这样,cmd就可以直接识别caffe命令了
② 运行caffe
caffe train -solver lenet_solver.prototxt
- 1
- 1
注意,因为上一步已经将D:\software\caffe-vs\caffe-windows\Build\x64\Debug路径添加到环境变量PATH中了,所以,这里可以直接使用caffe.exe
下面两步主要配置cuDnn、python和matlab,具体配置时,应该在4.5之前进行
9. 配置python (optional)
如果已经编译好pycaffe,那么,为了能够在python使用caffe,还需要在python中进行一些相关配置
- 添加环境变量
- 在环境变量的用户变量中,新建用户变量,变量名“PythonPath”,变量值“caffe_root\Build\x64\Release\pycaffe”
- 或者将文件夹\Build\x64\Release\pycaffe\caffe 复制到\lib\site-packages.
10.配置matlab (optional)
如果已经编译好matcaffe,那么,为了能够在matlab使用caffe,还需要在matlab中进行一些相关配置
-
添加环境变量
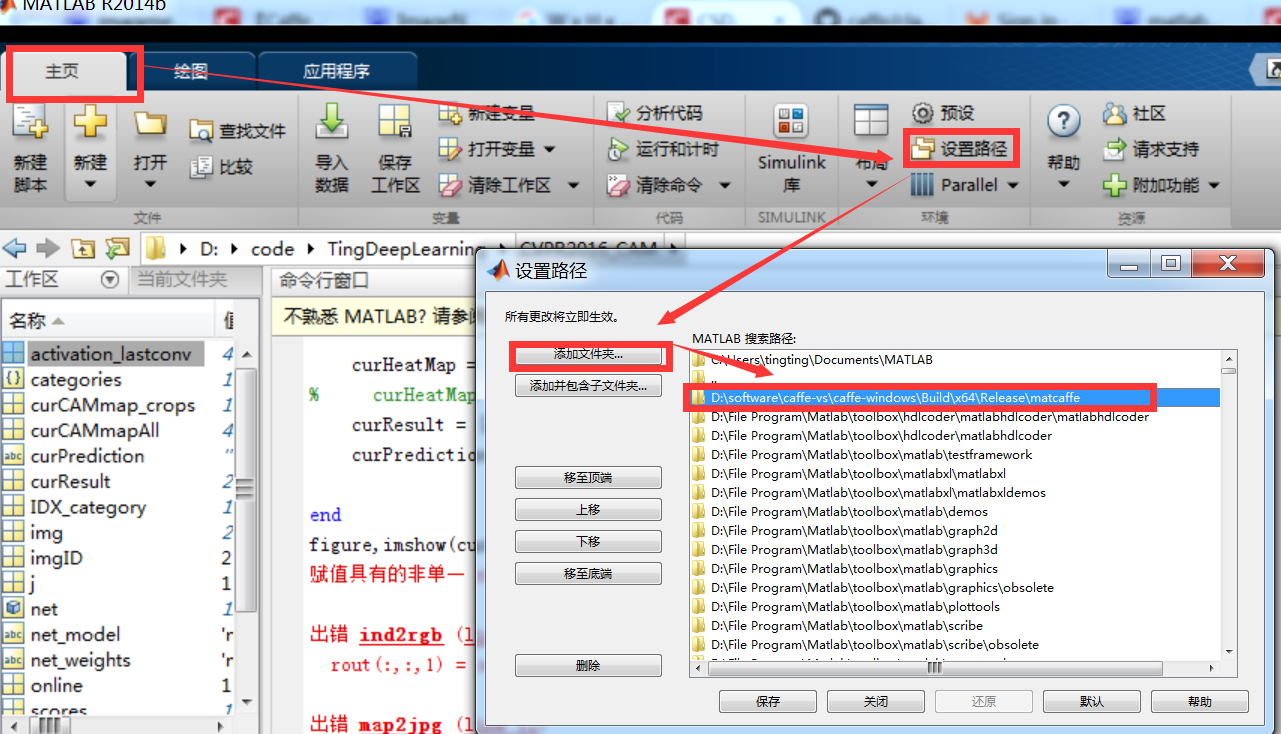
- 将
<caffe_root>\Build\x64\Release\matcaffe路径添加到matlab的搜索路径中 - 将
<caffe_root>\Build\x64\Release路径添加到环境变量PATH中
After you have built solution with Matlab support, in order to use it you have to:
add the generated matcaffe folder to Matlab search path, and
add \Build\x64\Release to your system path. - 将
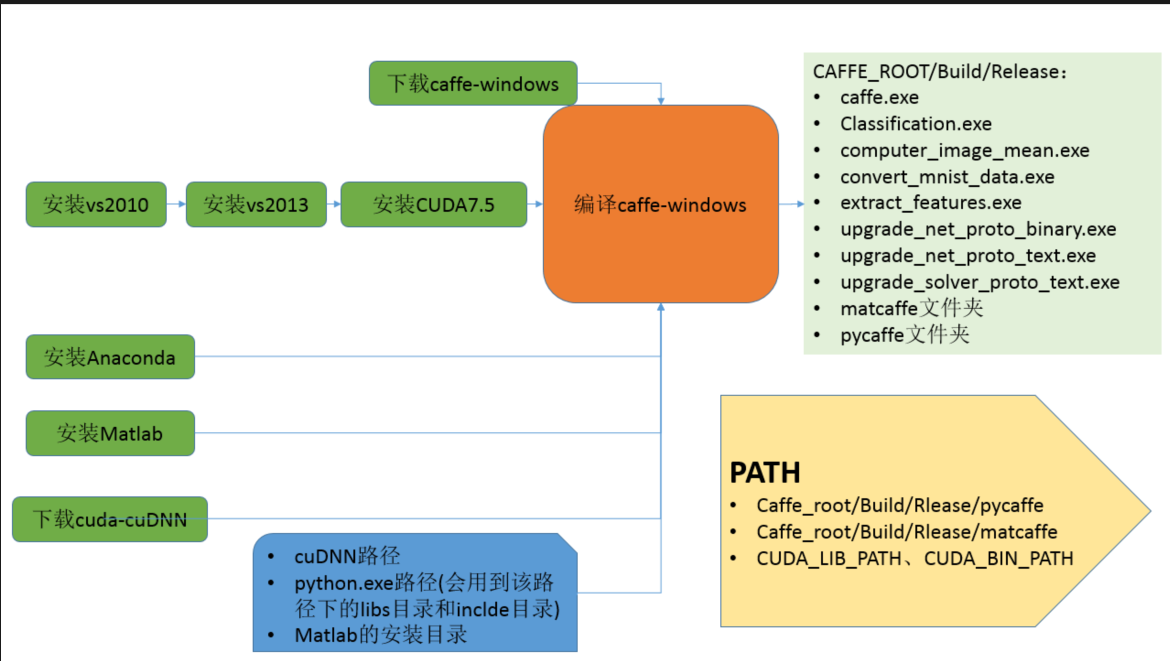
最后来张图
注:发现一篇写的比较好的博客
http://m.blog.csdn.net/article/details?id=50819464













 261
261

 被折叠的 条评论
为什么被折叠?


