在学习Fragment时,看到了有两种方法替换视图
FragmentManager.beginTransaction().replace().commit();
FragmentManager.beginTransaction().add().commit();
所以就手贱贱的敲了一些代码来看看这两个方法有什么不同….
先是activity_main的代码
<?xml version="1.0" encoding="utf-8"?>
<RelativeLayout xmlns:android="http://schemas.android.com/apk/res/android"
    xmlns:tools="http://schemas.android.com/tools"
    android:layout_width="match_parent"
    android:layout_height="match_parent"
    android:paddingBottom="@dimen/activity_vertical_margin"
    android:paddingLeft="@dimen/activity_horizontal_margin"
    android:paddingRight="@dimen/activity_horizontal_margin"
    android:paddingTop="@dimen/activity_vertical_margin"
    tools:context="com.hurui.myboketest.MainActivity">

  <FrameLayout
      android:layout_width="wrap_content"
      android:layout_height="wrap_content"
      android:id="@+id/my_Frame">
  </FrameLayout>
 <Button
     android:layout_width="wrap_content"
     android:layout_height="wrap_content"
     android:id="@+id/button1"
     android:text="添加一个fragment"
     android:layout_alignParentBottom="true"
     android:layout_alignParentStart="true"
/>
 <Button
     android:layout_width="wrap_content"
     android:layout_height="wrap_content"
     android:id="@+id/button2"
     android:text="再添加一个fragment"
     android:layout_alignParentBottom="true"
     android:layout_alignParentEnd="true"
  />
</RelativeLayout>
直接用图形界面拖得不要介意呀(^o^)/~…
这是 my_frame_one
<?xml version="1.0" encoding="utf-8"?>
<LinearLayout xmlns:android="http://schemas.android.com/apk/res/android"
    android:layout_width="match_parent"
    android:layout_height="match_parent">
    <TextView
        android:layout_width="wrap_content"
        android:layout_height="wrap_content"
        android:textSize="30sp"
        android:text="我是big big big!!!!!"/>
</LinearLayout>
在来个my_frame_two
<?xml version="1.0" encoding="utf-8"?>
<LinearLayout xmlns:android="http://schemas.android.com/apk/res/android"
    android:layout_width="match_parent"
    android:layout_height="match_parent"
    android:gravity="center_horizontal|center_vertical">
    <Button
        android:layout_width="wrap_content"
        android:layout_height="wrap_content"
        android:text="屠龙宝刀点击就送!!!!"/>
</LinearLayout>
这个是MainActivity的代码
package com.hurui.myboketest;

import android.app.Activity;
import android.app.FragmentManager;
import android.os.Bundle;
import android.view.View;
import android.widget.Button;

public class MainActivity extends Activity implements View.OnClickListener{
    private Button btn1;
    private Button btn2;
    @Override
    protected void onCreate(Bundle savedInstanceState) {
        super.onCreate(savedInstanceState);
        setContentView(R.layout.activity_main);
        btn1=(Button)findViewById(R.id.button1);
        btn2=(Button)findViewById(R.id.button2);
        btn1.setOnClickListener(this);
        btn2.setOnClickListener(this);
    }

    @Override
    public void onClick(View v) {
        FragmentManager fm=getFragmentManager();
        switch (v.getId()){
            case R.id.button1:
                MyFrament myFrament=new MyFrament();
                fm.beginTransaction().replace(R.id.my_Frame,myFrament).commit();
                break;
            case R.id.button2:
                MyFrament1 myFrament1=new MyFrament1();
                fm.beginTransaction().replace(R.id.my_Frame,myFrament1).commit();
                break;
        }
    }
}
用的两个类 MyFrament和 MyFrament1的代码为:
public class MyFrament1 extends Fragment {
    @Override
    public View onCreateView(LayoutInflater inflater, ViewGroup container, Bundle savedInstanceState) {
        View view =inflater.inflate(R.layout.my_frame_two,container,false);
        return view;
    }
}
public class MyFrament extends Fragment {
    @Override
    public View onCreateView(LayoutInflater inflater, ViewGroup container, Bundle savedInstanceState) {
        View view =inflater.inflate(R.layout.my_frame_one,container,false);
        return view;
    }
}
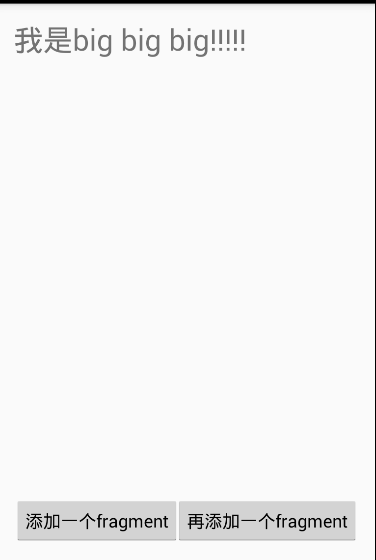
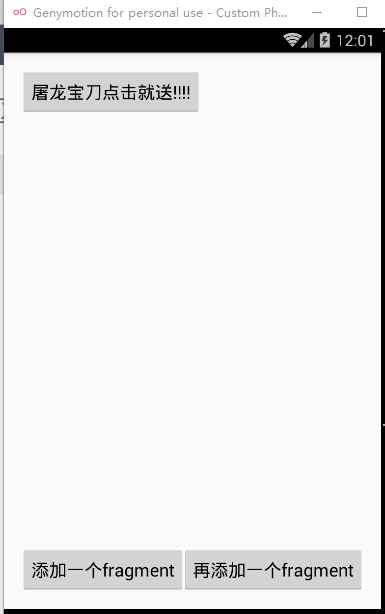
上面是使用replace方法写的…效果如下:
先点击第一个按钮

在点击第二个按钮
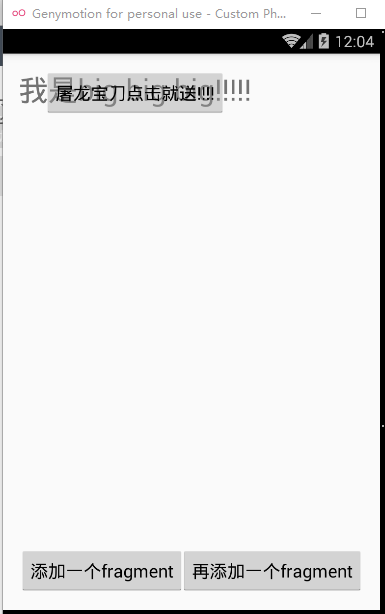
然后我们修改一下代码把监听事件里面的replace改为add则效果如下

这是点击了两个按钮以后的效果,,,他们尽然叠加在一起了….
所以我认为replace是替换Fragment而add则是将所有的Fragment添加进去了…
好了这就是我的理解了^_^


 418
418

 被折叠的 条评论
为什么被折叠?


