


 本文详细介绍了如何在Windows环境中安装和配置Elasticsearch,包括版本选择、SSL与密码认证设置,以及如何将其与Laravel框架结合使用,包括Scout包的安装和配置,以实现全文检索功能。
Elasticsearch
Elasticsearch 是一个分布式、高扩展、高实时的搜索与数据分析引擎。它提供了一个分布式多用户能力的全文搜索引擎,基于RESTful web接口。Elasticsearch是用Java语言开发的,并作为Apache许可条款下的开放源码发布,是一种流行的企业级搜索引擎。Elasticsearch用于云计算中,能够达到实时搜索,稳定,可靠,快速,安装使用方便。官方客户端在Java、.NET(C#)、PHP、Python、Apache Groovy、Ruby和许多其他语言中都是可用的。
安装
本文只介绍windows环境的使用及安装。
- 进入官网:
https://www.elastic.co/cn/downloads/elasticsearch - 下载对应版本:
注意:下载对应的版本,版本号要跟php composer 里面的elasticsearch/elasticsearch 的版本号一致。

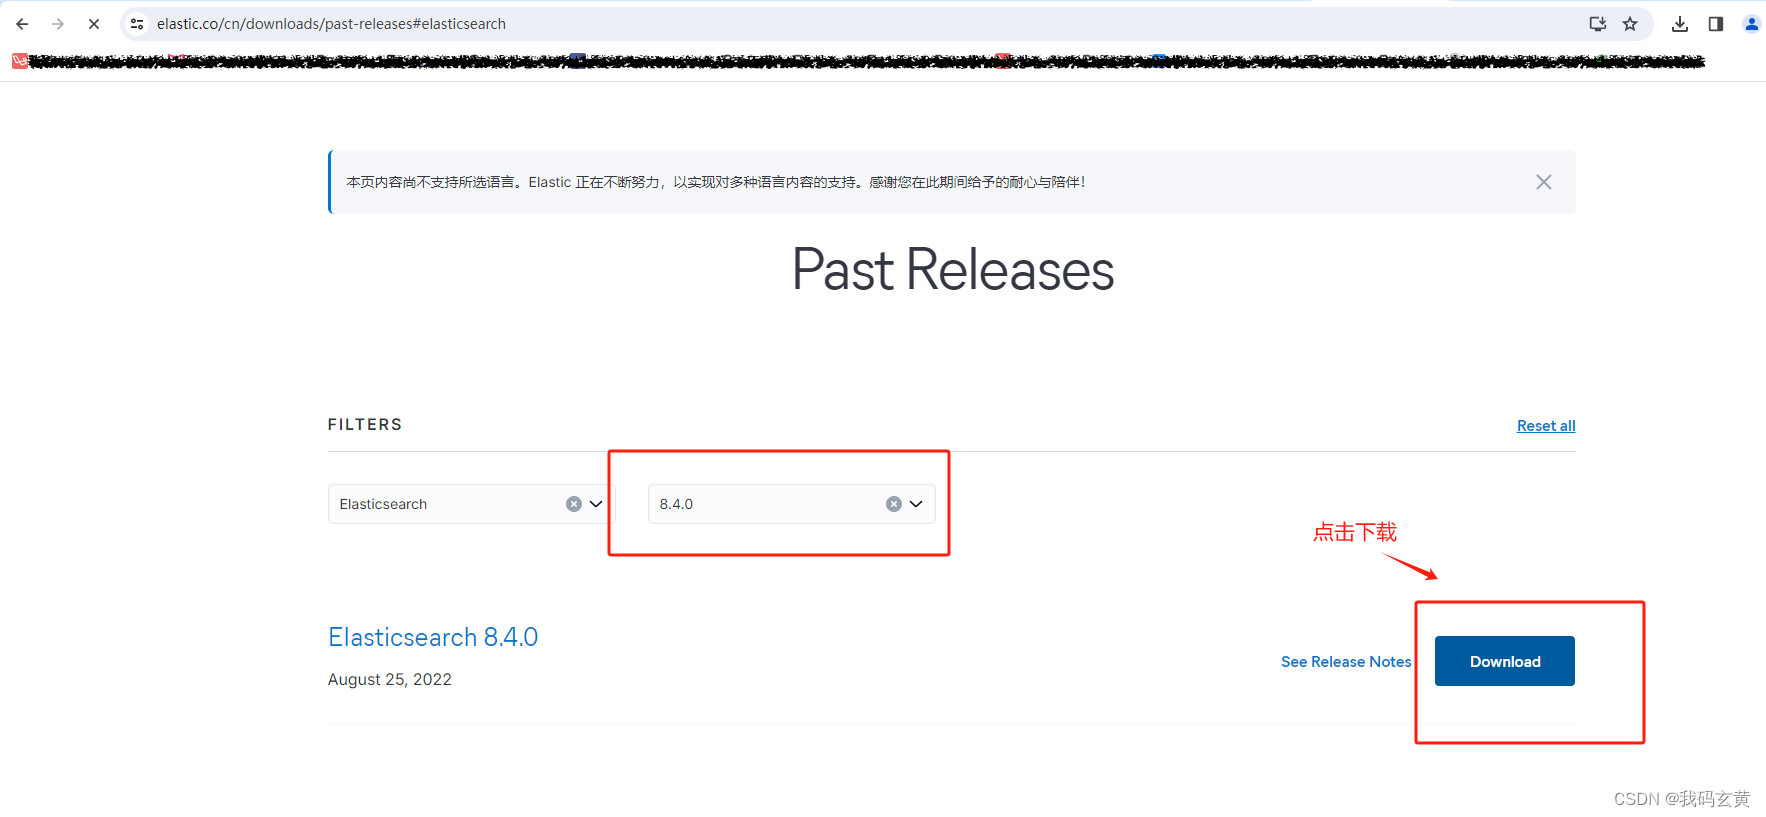
比如本次下载的 elasticsearch 为8.4版本,composer 包elasticsearch/elasticsearch也要8.4版本。否则在使用php客户端的时候会出错。
- 解压安装包:
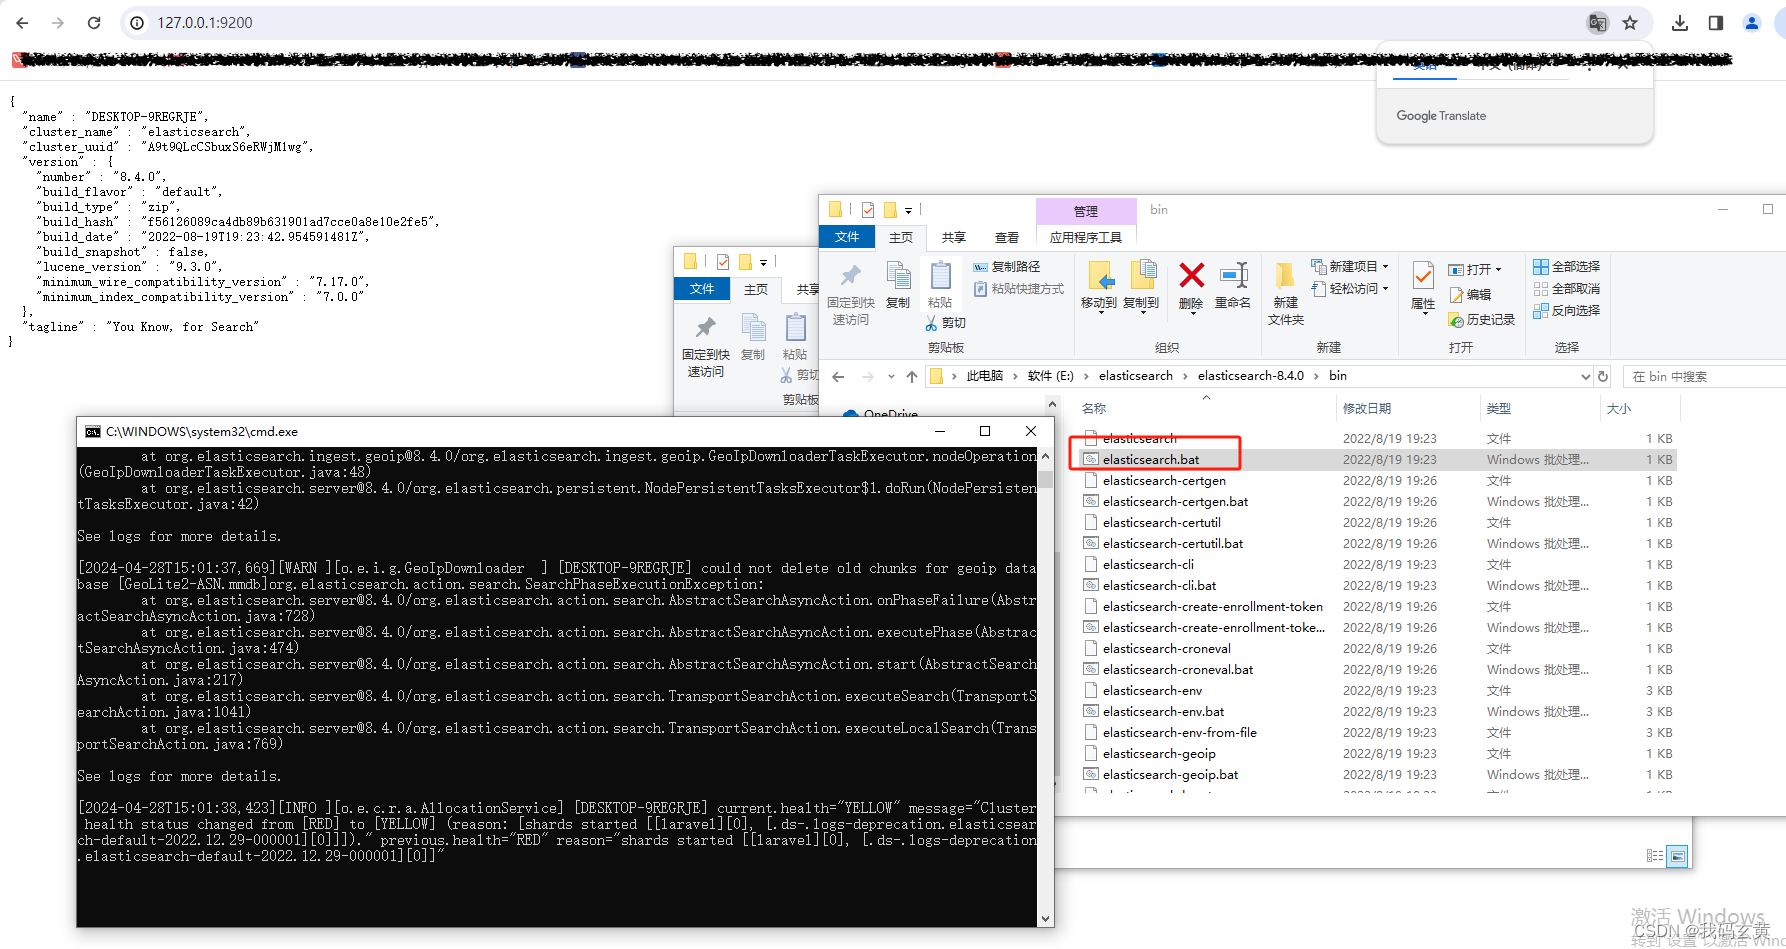
进入解压的文件,找到bin 目录,执行elasticsearch.bat
第一次执行应该会报错,因为默认是开启ssl认证和密码认证这些的。
需要进入config 目录,找到elasticsearch.yml 配置文件:

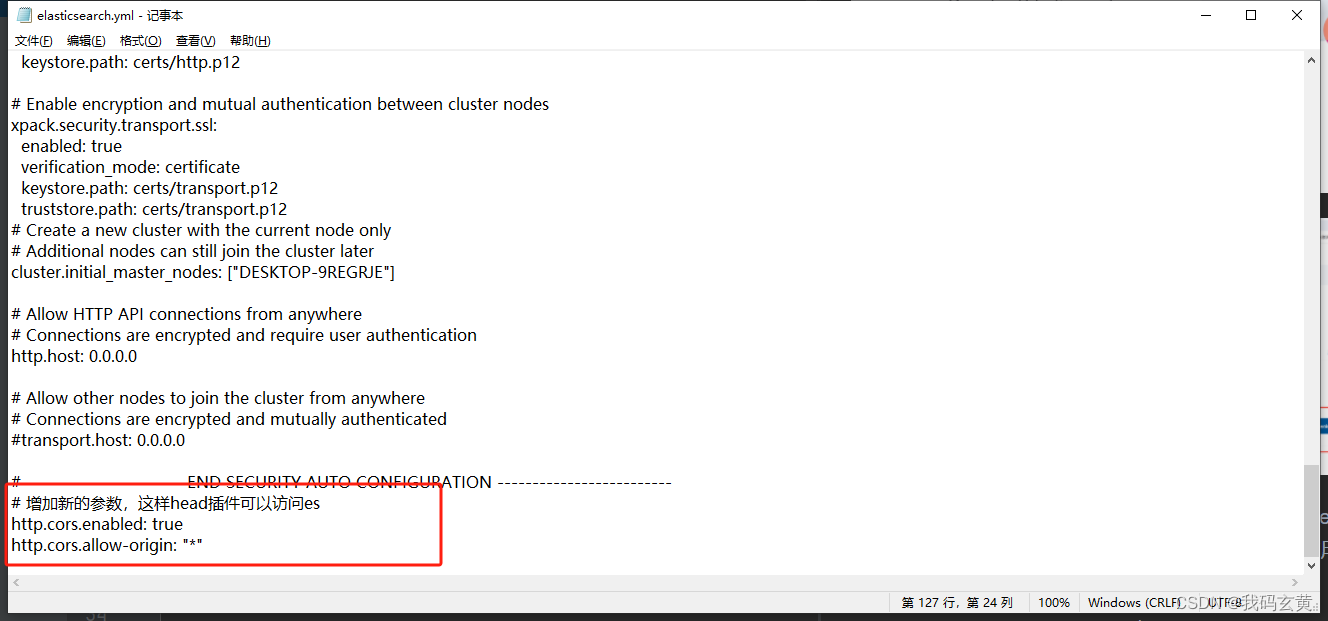
修改:xpack.security.enabled: true 为false
      xpack.security.http.ssl:
            enabled: true 为false


# 增加新的参数,这样head插件可以访问es
http.cors.enabled: true
http.cors.allow-origin: "*"
保存,再次执行elasticsearch.bat,在浏览器中访问127.0.0.1:9200,有返回json表示成功
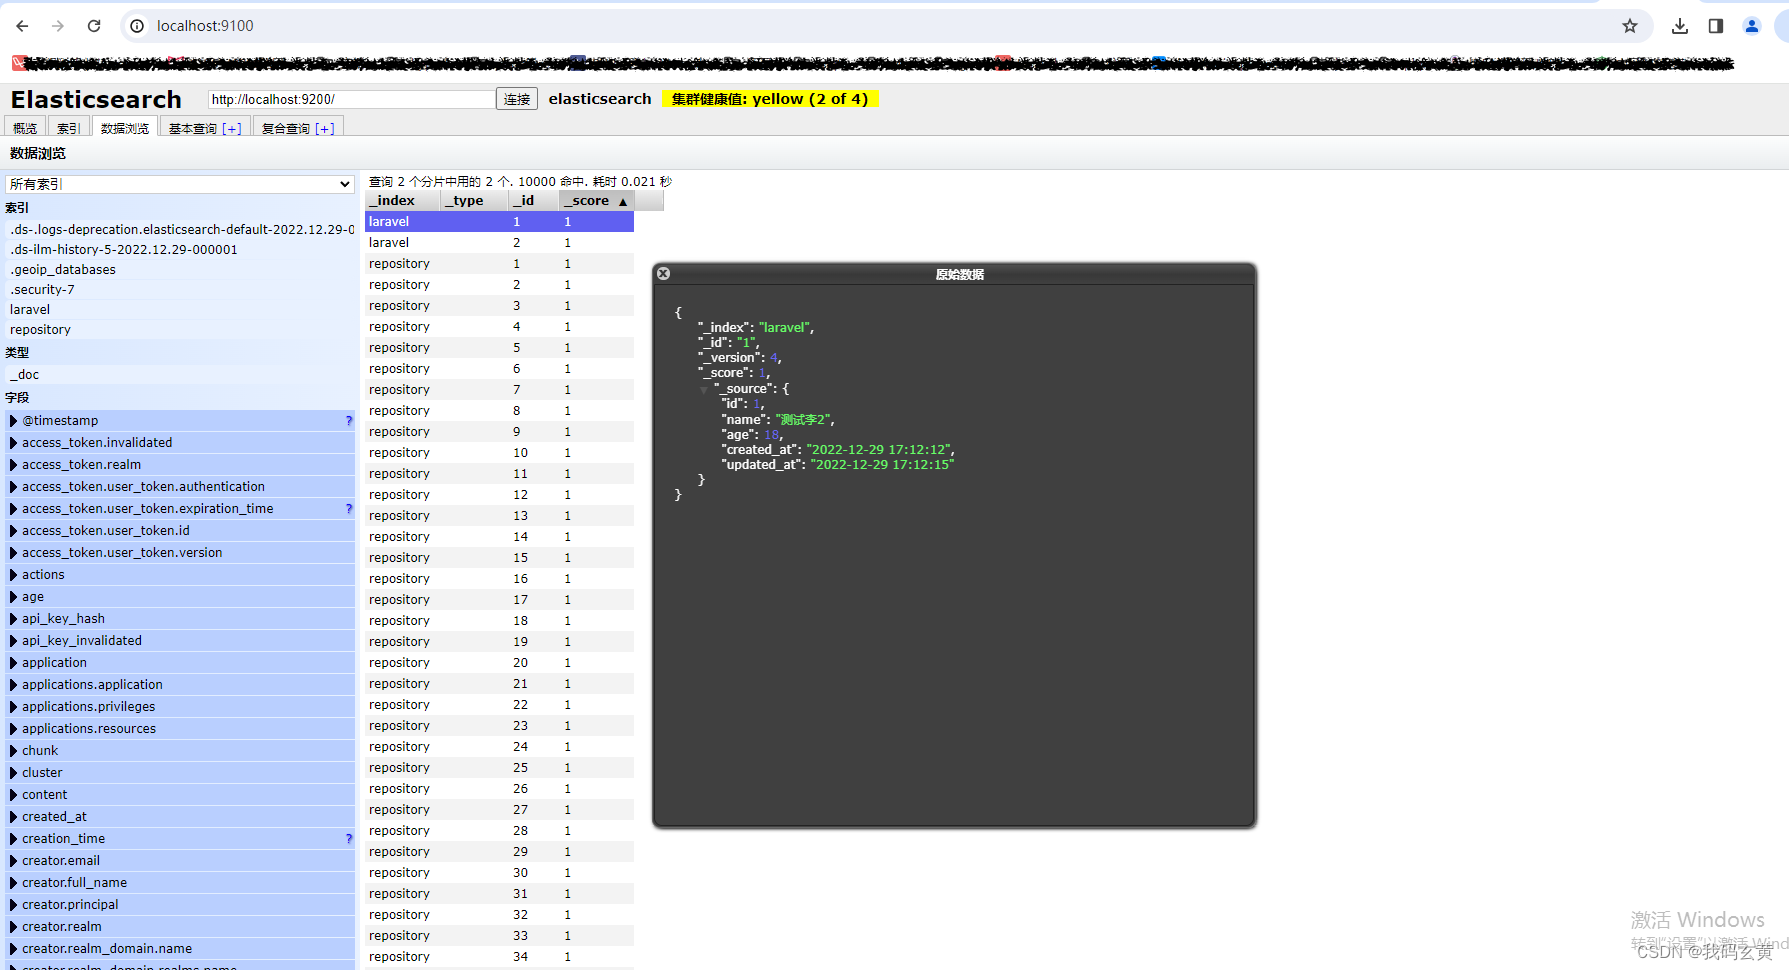
安装es可视化插件 elasticsearch-head
该插件需要node支持。
源代码下载:https://github.com/mobz/elasticsearch-head
- 进入目录:
打开cmd控制窗口,或者用编辑器打开项目然后打开命令窗口。 - 执行安装命令:npm install
- 运行命令: npm run start
运行后,打开浏览器http://localhost:9100,查看界面。可以在数据浏览里面查看数据
laravel 对接使用
本文以laravel9为测试用例。使用scout包 作为laravel的全文检索。
- 下载composer scout
composer require laravel/scout
- 下载scout 可用的elasticsearch 驱动支持
目前支持的驱动有:
composer require babenkoivan/elastic-scout-driver

composer require babenkoivan/elastic-scout-driver-plus
本文用的是 composer require babenkoivan/elastic-scout-driver
- 安装完后:执行发布命令
php artisan vendor:publish --provider="Laravel\Scout\ScoutServiceProvider"
此命令将会在你的 config 目录下 生成一个 scout.php 配置文件
你需要把scout驱动更改为es驱动:
'driver' => env('SCOUT_DRIVER', 'elastic'),
生成es配置命令:
php artisan vendor:publish --provider="Elastic\Client\ServiceProvider"
此命令会生成es驱动配置文件config/elastic.client.php 更改对应的配置:
<?php declare(strict_types=1);

return [
    'default' => env('ELASTIC_CONNECTION', 'default'),
    'connections' => [
        'default' => [
            'hosts' => [
                env('ELASTIC_HOST', 'localhost:9200'),
            ],
        ],
    ],
];
laravel 模型中使用搜索引擎
用laravel 模型操作es,数据源其实是有两份的。数据库里面一份,es里面一份。es里面的数据跟数据库里面的数据其实是一样的。模型检索数据的时候,用到全文检索,就是去es里面查询,如果没有用到就在数据库里面查询。
同时模型在curd的时候,会自动同步到es里面。
- 创建一个模型:
<?php

namespace App\Models;


use DateTimeInterface;
use App\Models\BaseModel as Model;
use Laravel\Scout\Searchable;


class Test extends Model
{
    use Searchable;

    protected $table='sys_test';

    protected function serializeDate(DateTimeInterface $date)
    {
        return $date->format('Y-m-d H:i:s');
    }

    /**
     * 获取与模型关联的索引的名称。
     *
     * @return string
     */
    public function searchableAs()
    {
        return 'laravel';
    }


}
- 导入已有项目数据:
如果,你的项目中已经有数据在表中,需要把数据导入到es里面,就需要执行下面命令:
php artisan scout:import "App\Models\Test"
- 使用:
使用跟正常laravel模型大致操作一样,搜索的时候用search
 //查询
 $data= Test::search('李')->get();
 dd($data->toArray());
官方包正常使用es
下载官方扩展
composer require elasticsearch/elasticsearch
注意:composer require elasticsearch/elasticsearch 版本需要跟 你下载的es安装包保持一致
# 我下载的8.4 版本,8.4版本需要 elastic/transport 8.4
composer require elasticsearch/elasticsearch ^8.4
本测试环境: php8.0 laravel9 composer2.2.8
添加配置文件:
添加配置文件:
config/database.php 里面加上如下配置:
 //es 配置
    'elastic'=>[
        'hosts' => explode(',',env('ELASTIC_HOST')),
    ]
env 添加配置:ELASTIC_HOST=http://127.0.0.1:9200
创建服务提供者:EsServiceProvider.php
<?php

namespace App\Providers;

use Elastic\Elasticsearch\ClientBuilder;
use Illuminate\Support\ServiceProvider;

class EsServiceProvider extends ServiceProvider
{
    /**
     * Register any application services.
     *
     * @return void
     */
    public function register()
    {
        $this->app->singleton('Es',function (){
            // 从配置文件读取 Elasticsearch 服务器列表
            $builder = ClientBuilder::create()->setHosts(config('database.elastic.hosts'));
            // 如果是开发环境
            if (app()->environment()==='local'){
                // 配置日志,Elasticsearch 的请求和返回数据将打印到日志文件中,方便我们调试
                $builder->setLogger(app('log')->driver());
            }

            return $builder->build();
        });
    }

    /**
     * Bootstrap any application services.
     *
     * @return void
     */
    public function boot()
    {
        //
    }
}
注册服务提供者:
config/app.php 里面加上刚才的服务提供者:
App\Providers\EsServiceProvider::class, //es 搜索
使用:
   //查询
  $params = [
    'index' => 'laravel',
    'type' => 'sys_test',
    'id' => 2
];

$response = app('Es')->get($params);
dd($response->asArray());
  //更新
  $params = [
    'index' => 'laravel',
    'type' => 'sys_test',
    'id' => 2,
    'body' => [
        'doc' => [
            'name' => 'liceshi'
        ]
    ]
];
$response = app('Es')->update($params);
dd($response->getContents());


 6886
6886

 被折叠的 条评论
为什么被折叠?
被折叠的 条评论
为什么被折叠?
 到【灌水乐园】发言


